Enable SSO with OneLogin
OneLogin is a cloud-based Identity and Access Management (IAM) provider that designs and develops enterprise-level identity management solutions. It is an Identity Provider (IdP) tool designed to secure, manage, and facilitate user access across multiple networks, applications, and devices. OneLogin's platform offers a variety of features, including Single Sign-On (SSO), Multi-Factor Authentication (MFA), user provisioning, compliance reporting, and end-user self-service.
You can integrate OneLogin with Palette to enable SSO for your users. This integration allows you to use OneLogin as a third-party IdP to authenticate users in Palette. This integration also allows you to use the same OneLogin application for OIDC-based SSO in your Kubernetes cluster.
Prerequisites
-
An active OneLogin subscription and administrator-level permissions. If you are using this for testing purposes, OneLogin provides a developer subscription.
-
For OIDC-based SSO in your Kubernetes cluster, you will need to install kubelogin on your local workstation to retrieve access tokens for your cluster.
Setup
Use the following steps to configure OneLogin as a third-party IdP in Palette.
Create a OneLogin Application
-
Log in to your OneLogin account with administrative credentials.
-
Navigate to the Applications section of your OneLogin admin dashboard and click on the Add App button to create a new application.
-
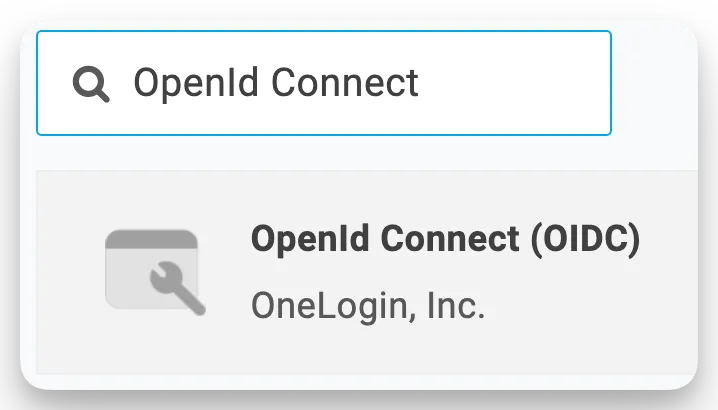
In the search bar, type "OpenID Connect" to find the generic OIDC app connector.
-
Select the OpenID Connect app connector to add it to your account.
-
Next, you will be taken to the application configuration page, where you can provide a Display Name. Use the display name Spectro Cloud Palette OIDC and click Save. OpenLog displays the configuration screen for your new application.

- Select the Configuration tab and fill out the following input values.
| Field | Description |
|---|---|
| Login URL | The URL where users are sent to log in. |
| Redirect URIs | The Uniform Resource Identifiers (URIs) to which OneLogin will redirect the user after successful authentication. |
| Post Logout Redirect URIs | The URIs where you will be redirected after successfully logging out of the current session. |
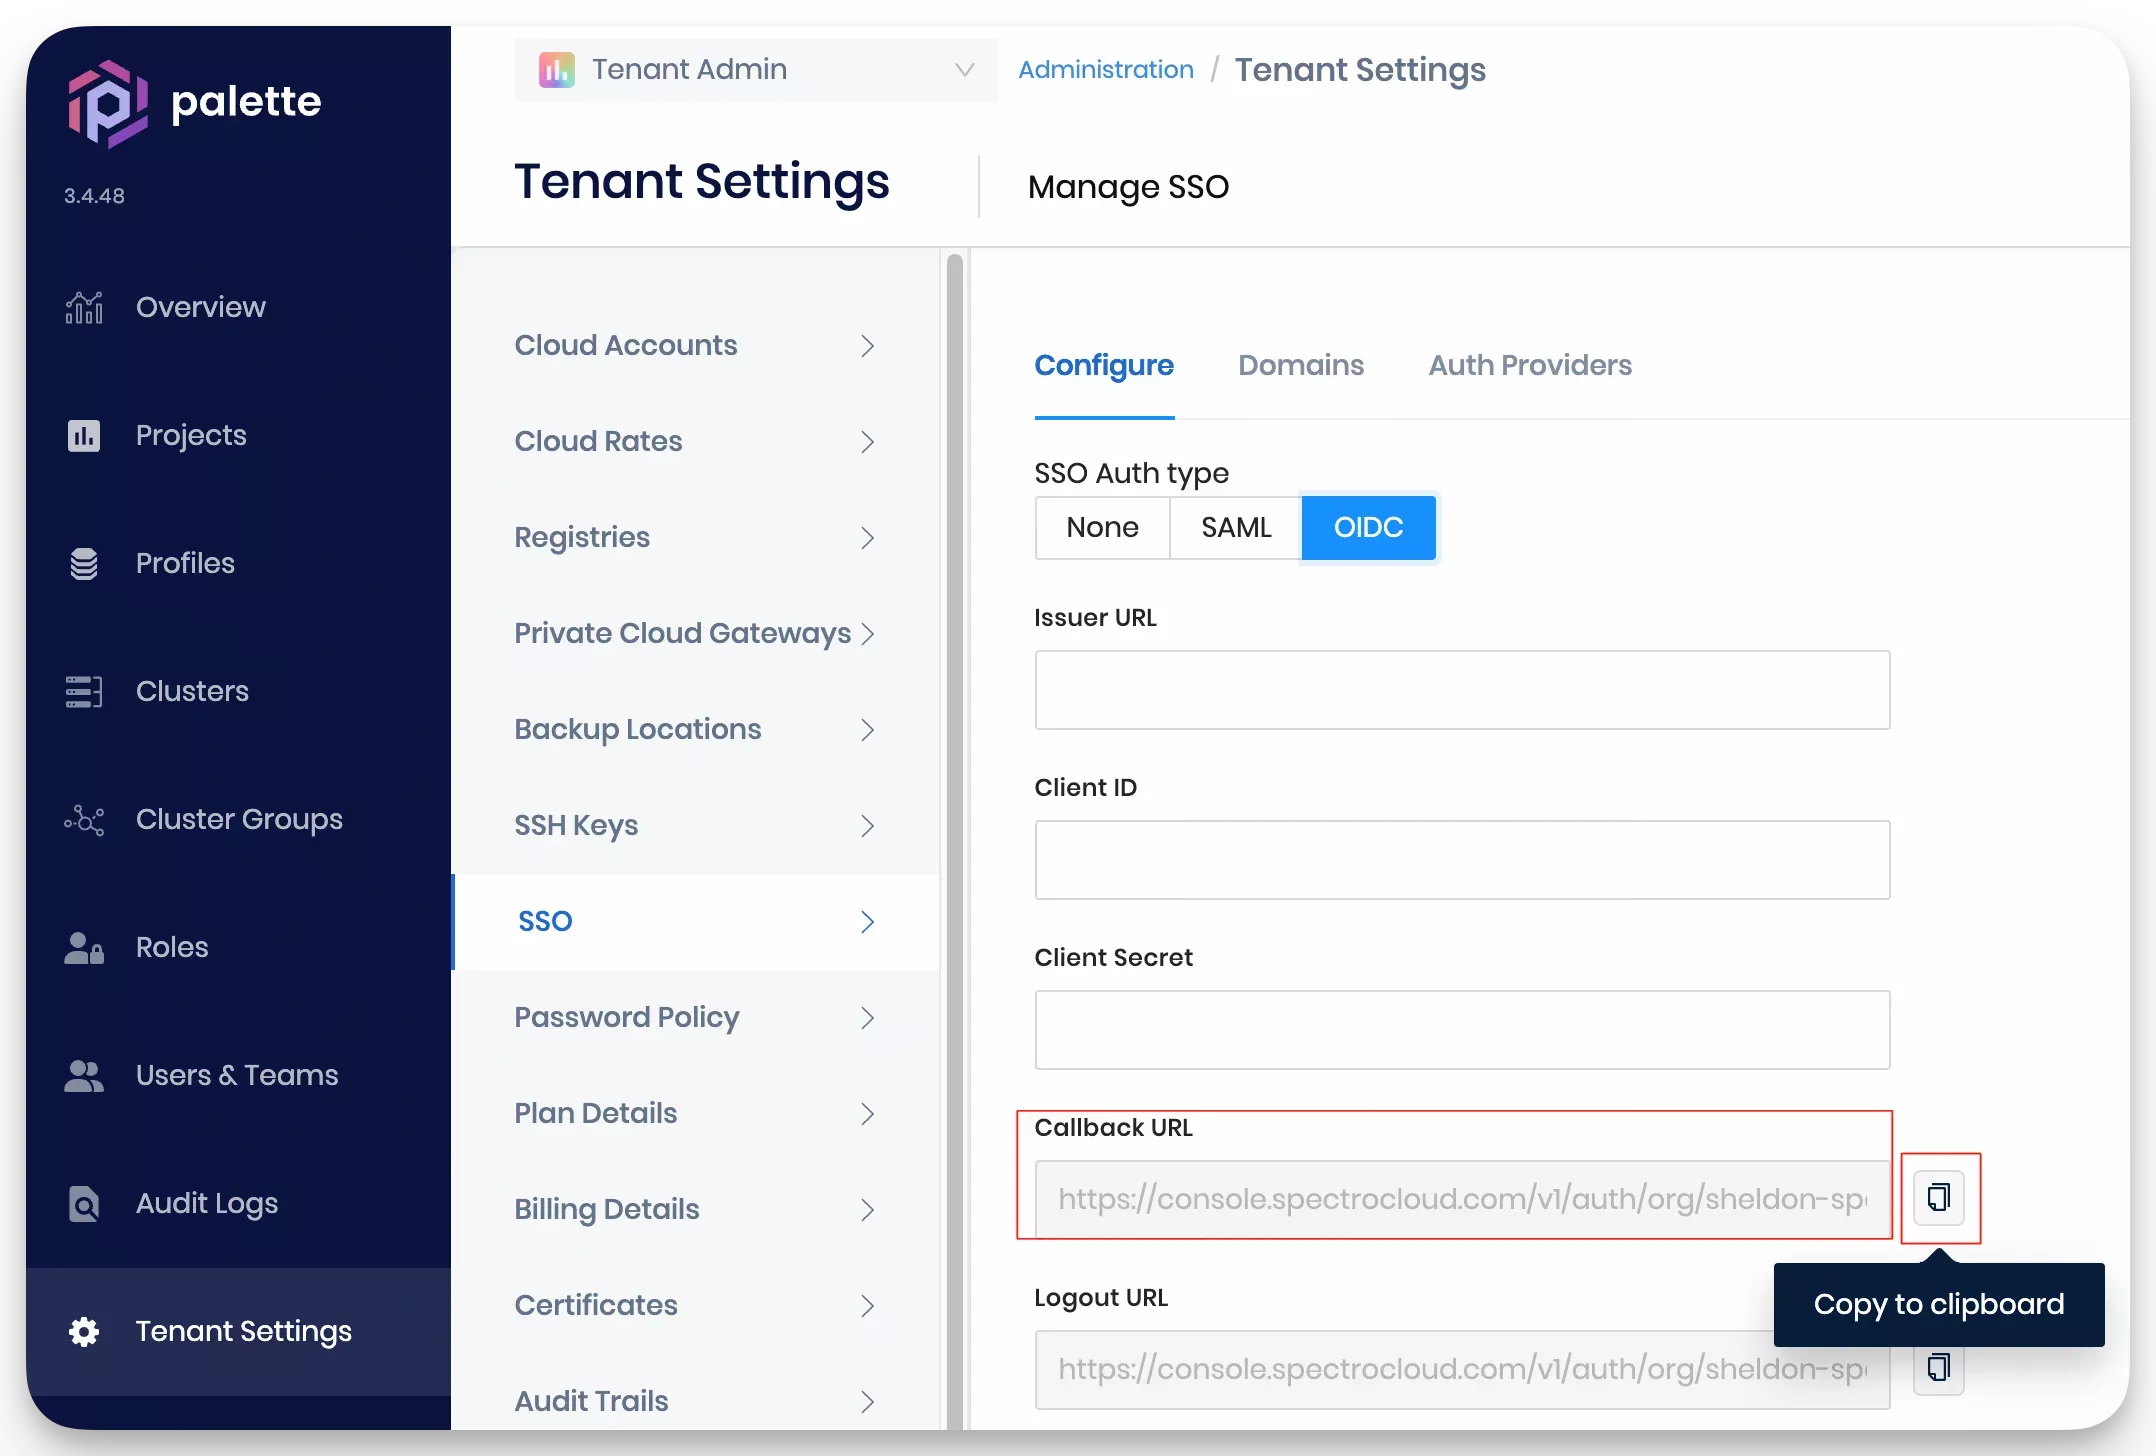
- The URLs needed to configure OneLogin can be found in your Palette account. From the left Main Menu click on Tenant Admin. Next, select Tenant Settings to access the settings page. From the settings page, select SSO and click on the OIDC tab. Copy the Callback URL value to your clipboard.
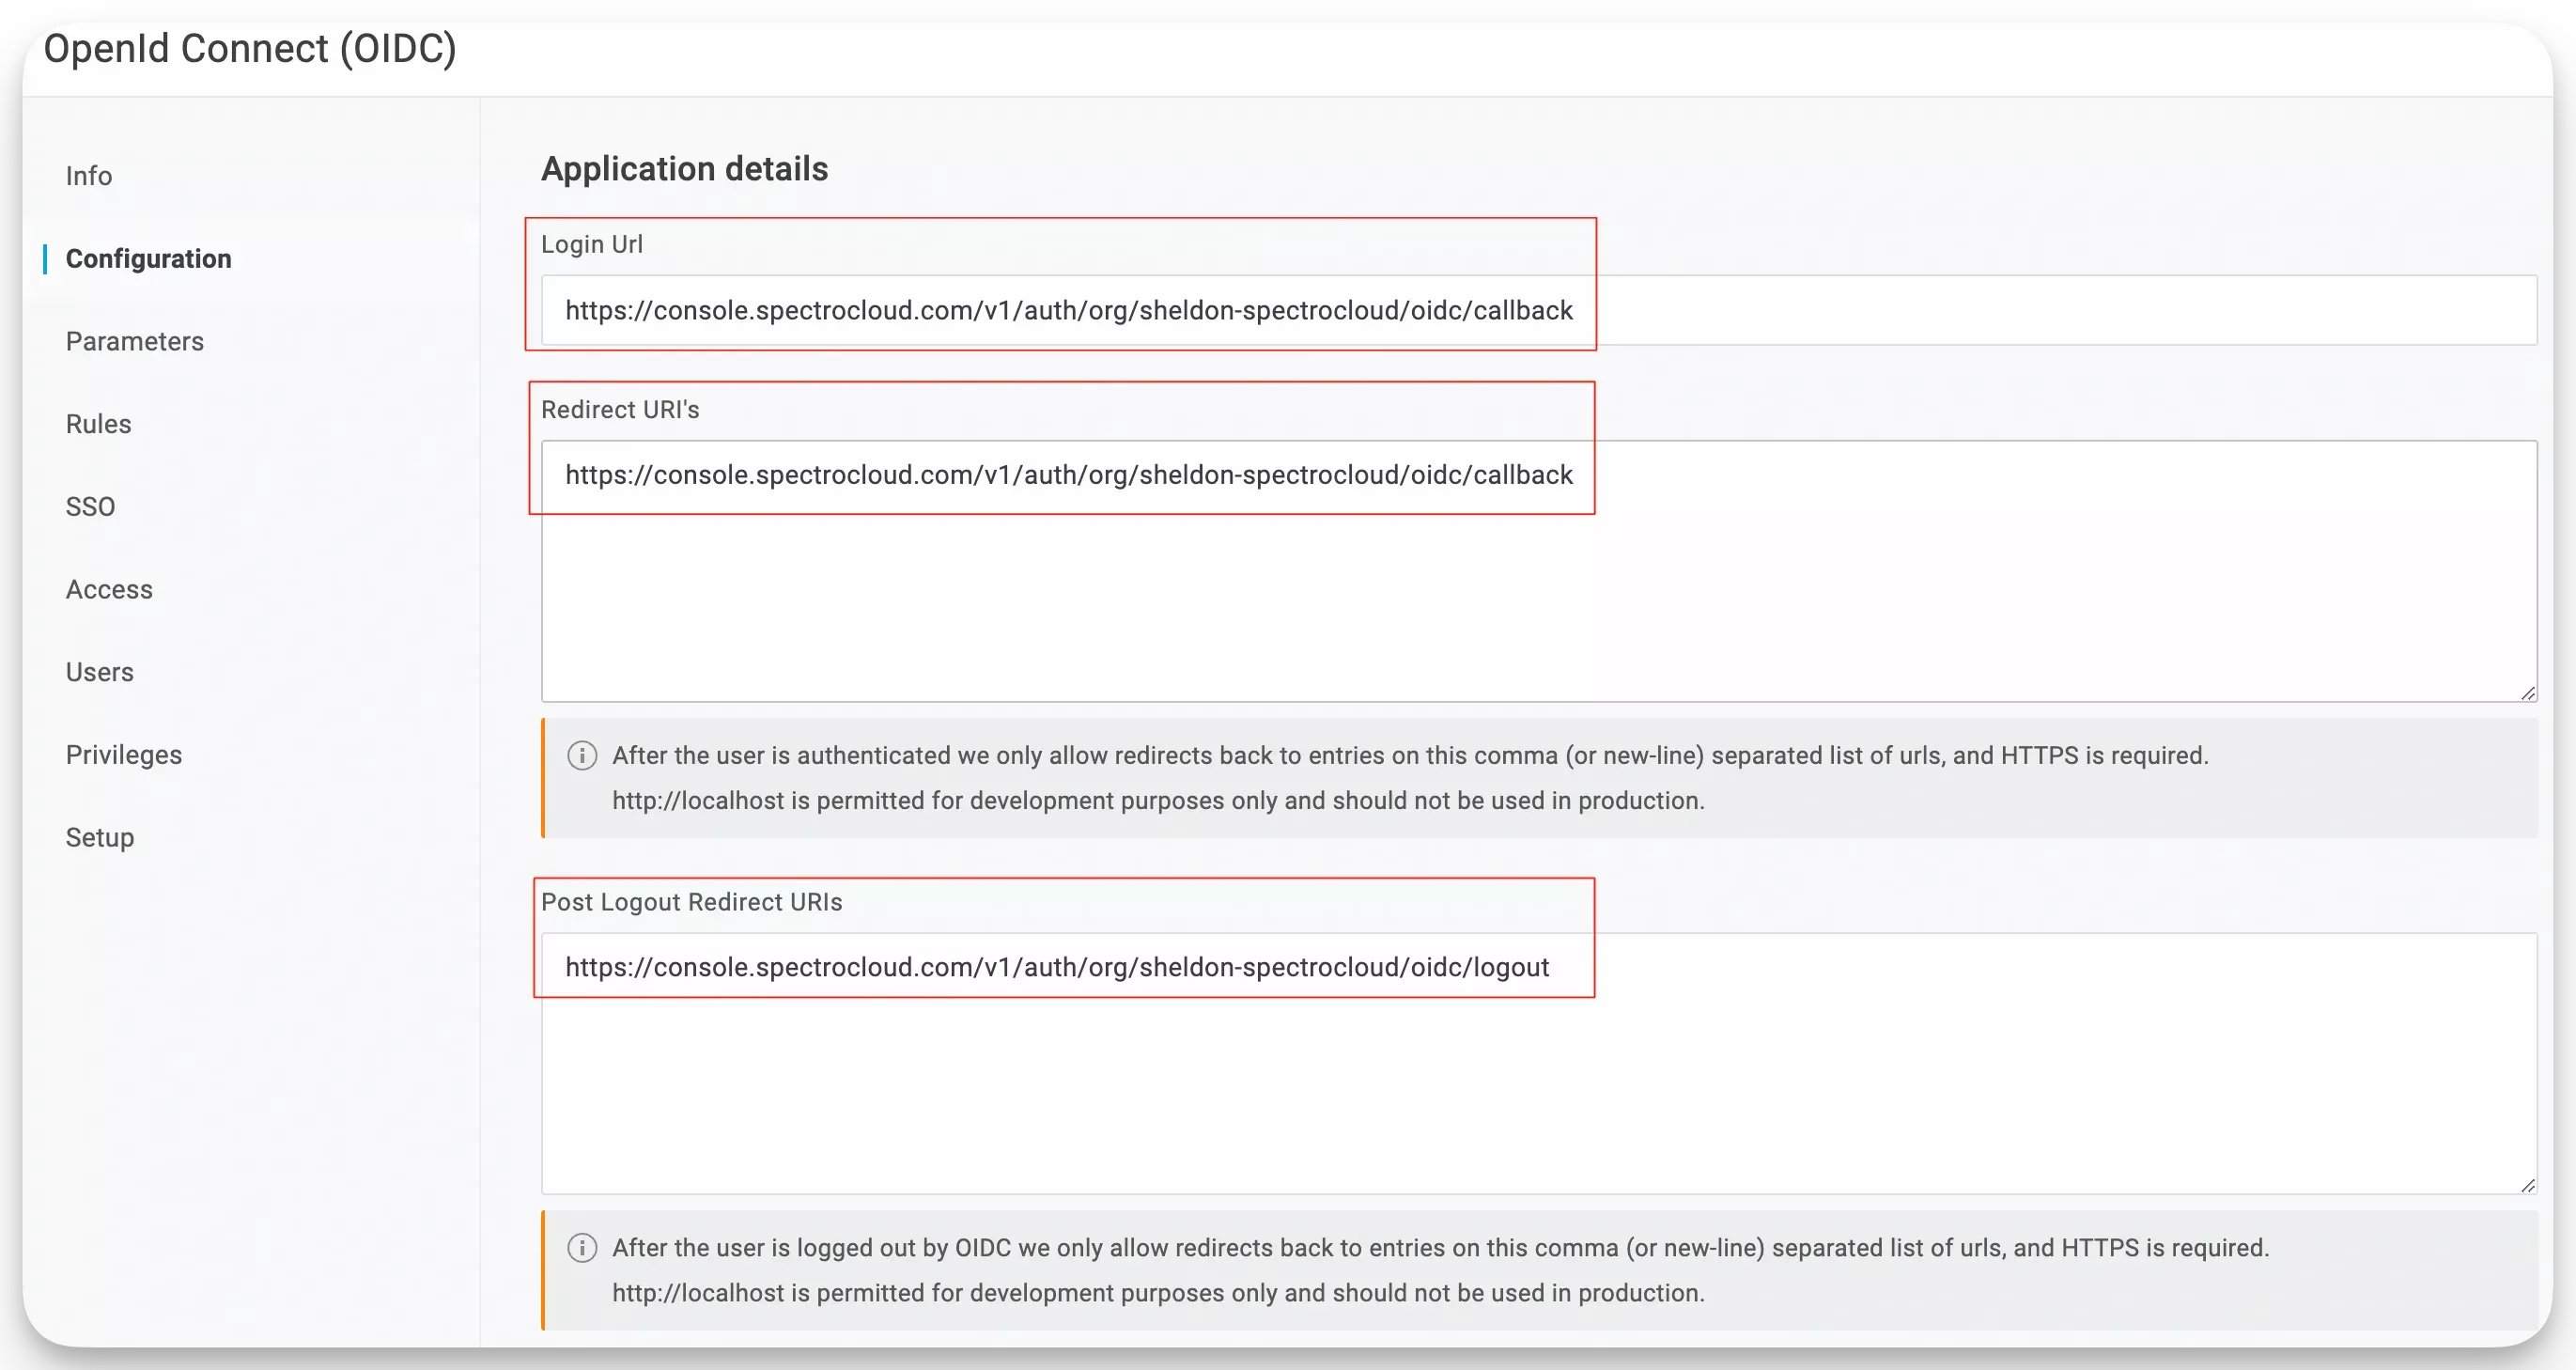
- Paste the Palette Callback URL value in the Login Url and Redirect URI's sections.
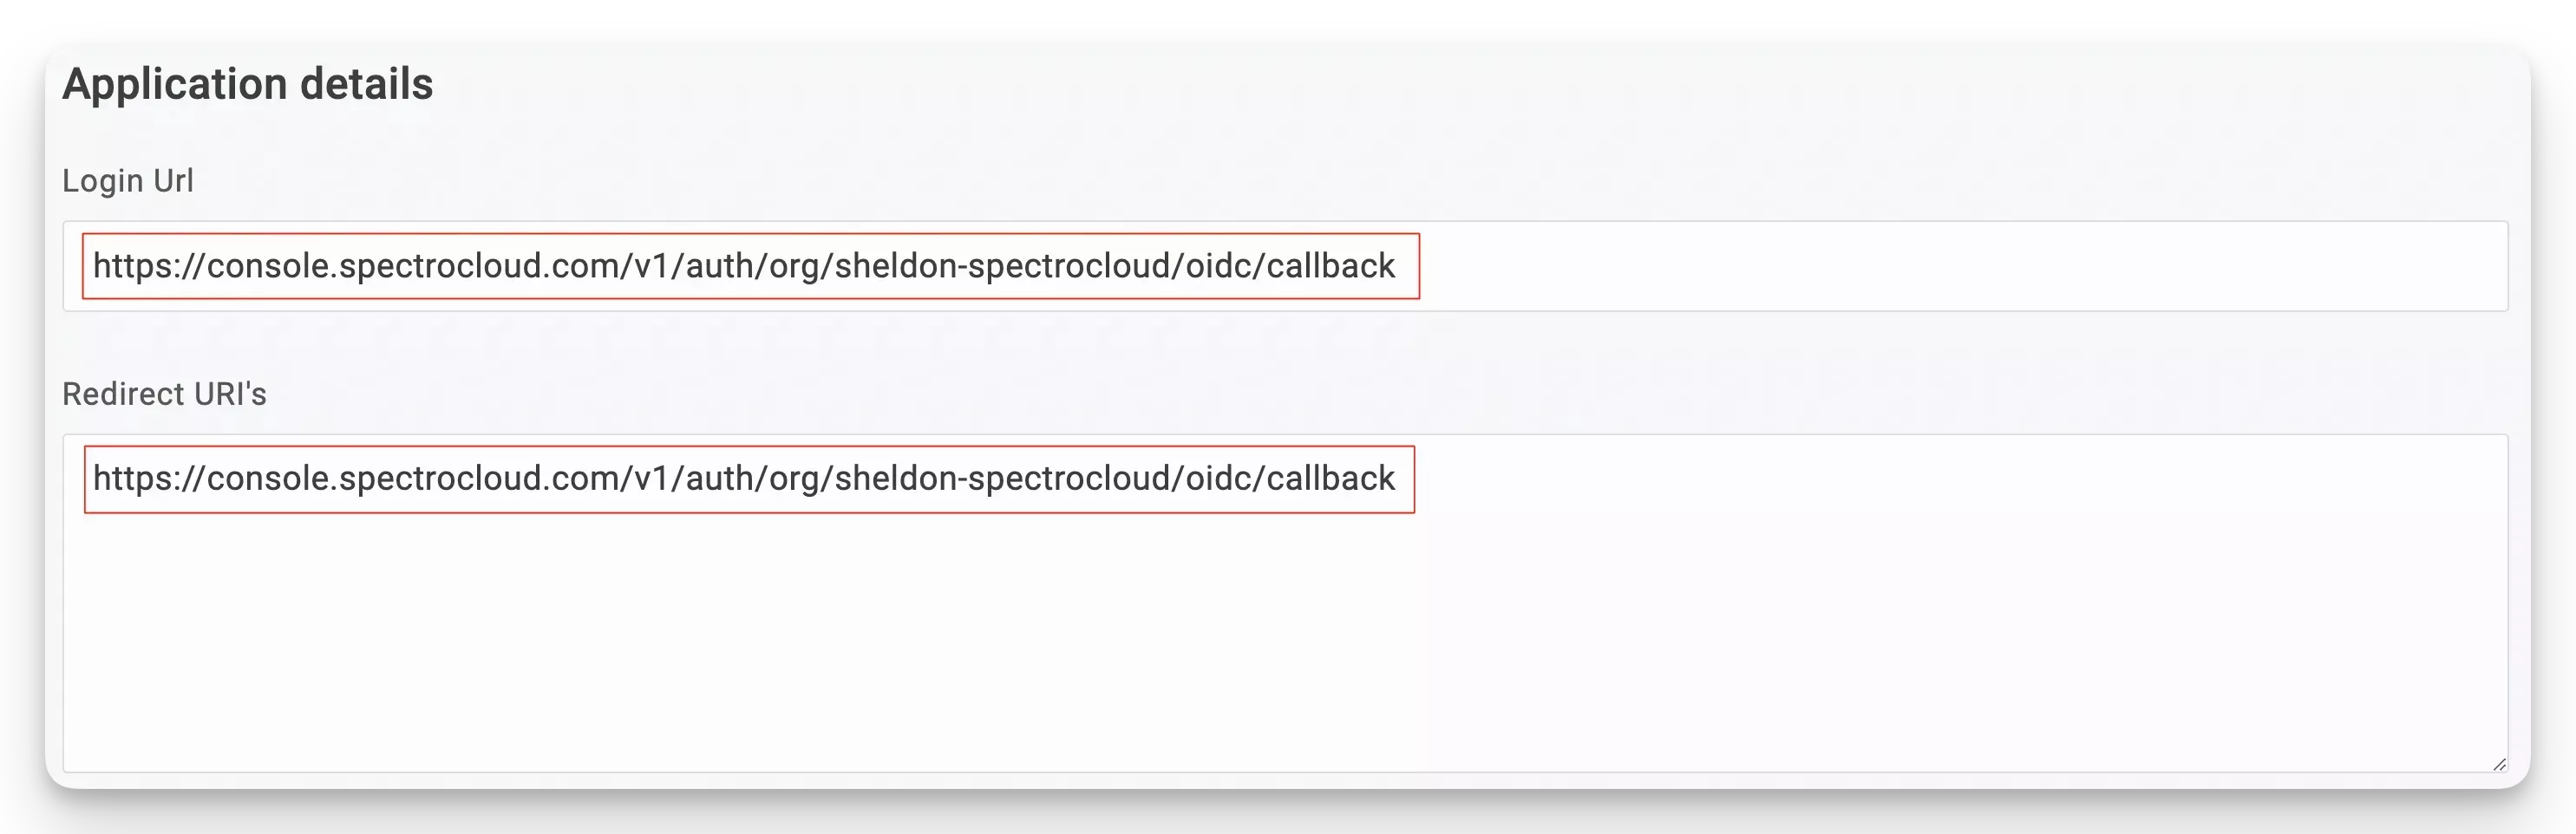
- Next, do the same for the Logout Redirect URIs and copy the Logout URL value located below the Callback URL from Palette.

- Your configuration should look similar to the following screenshot.
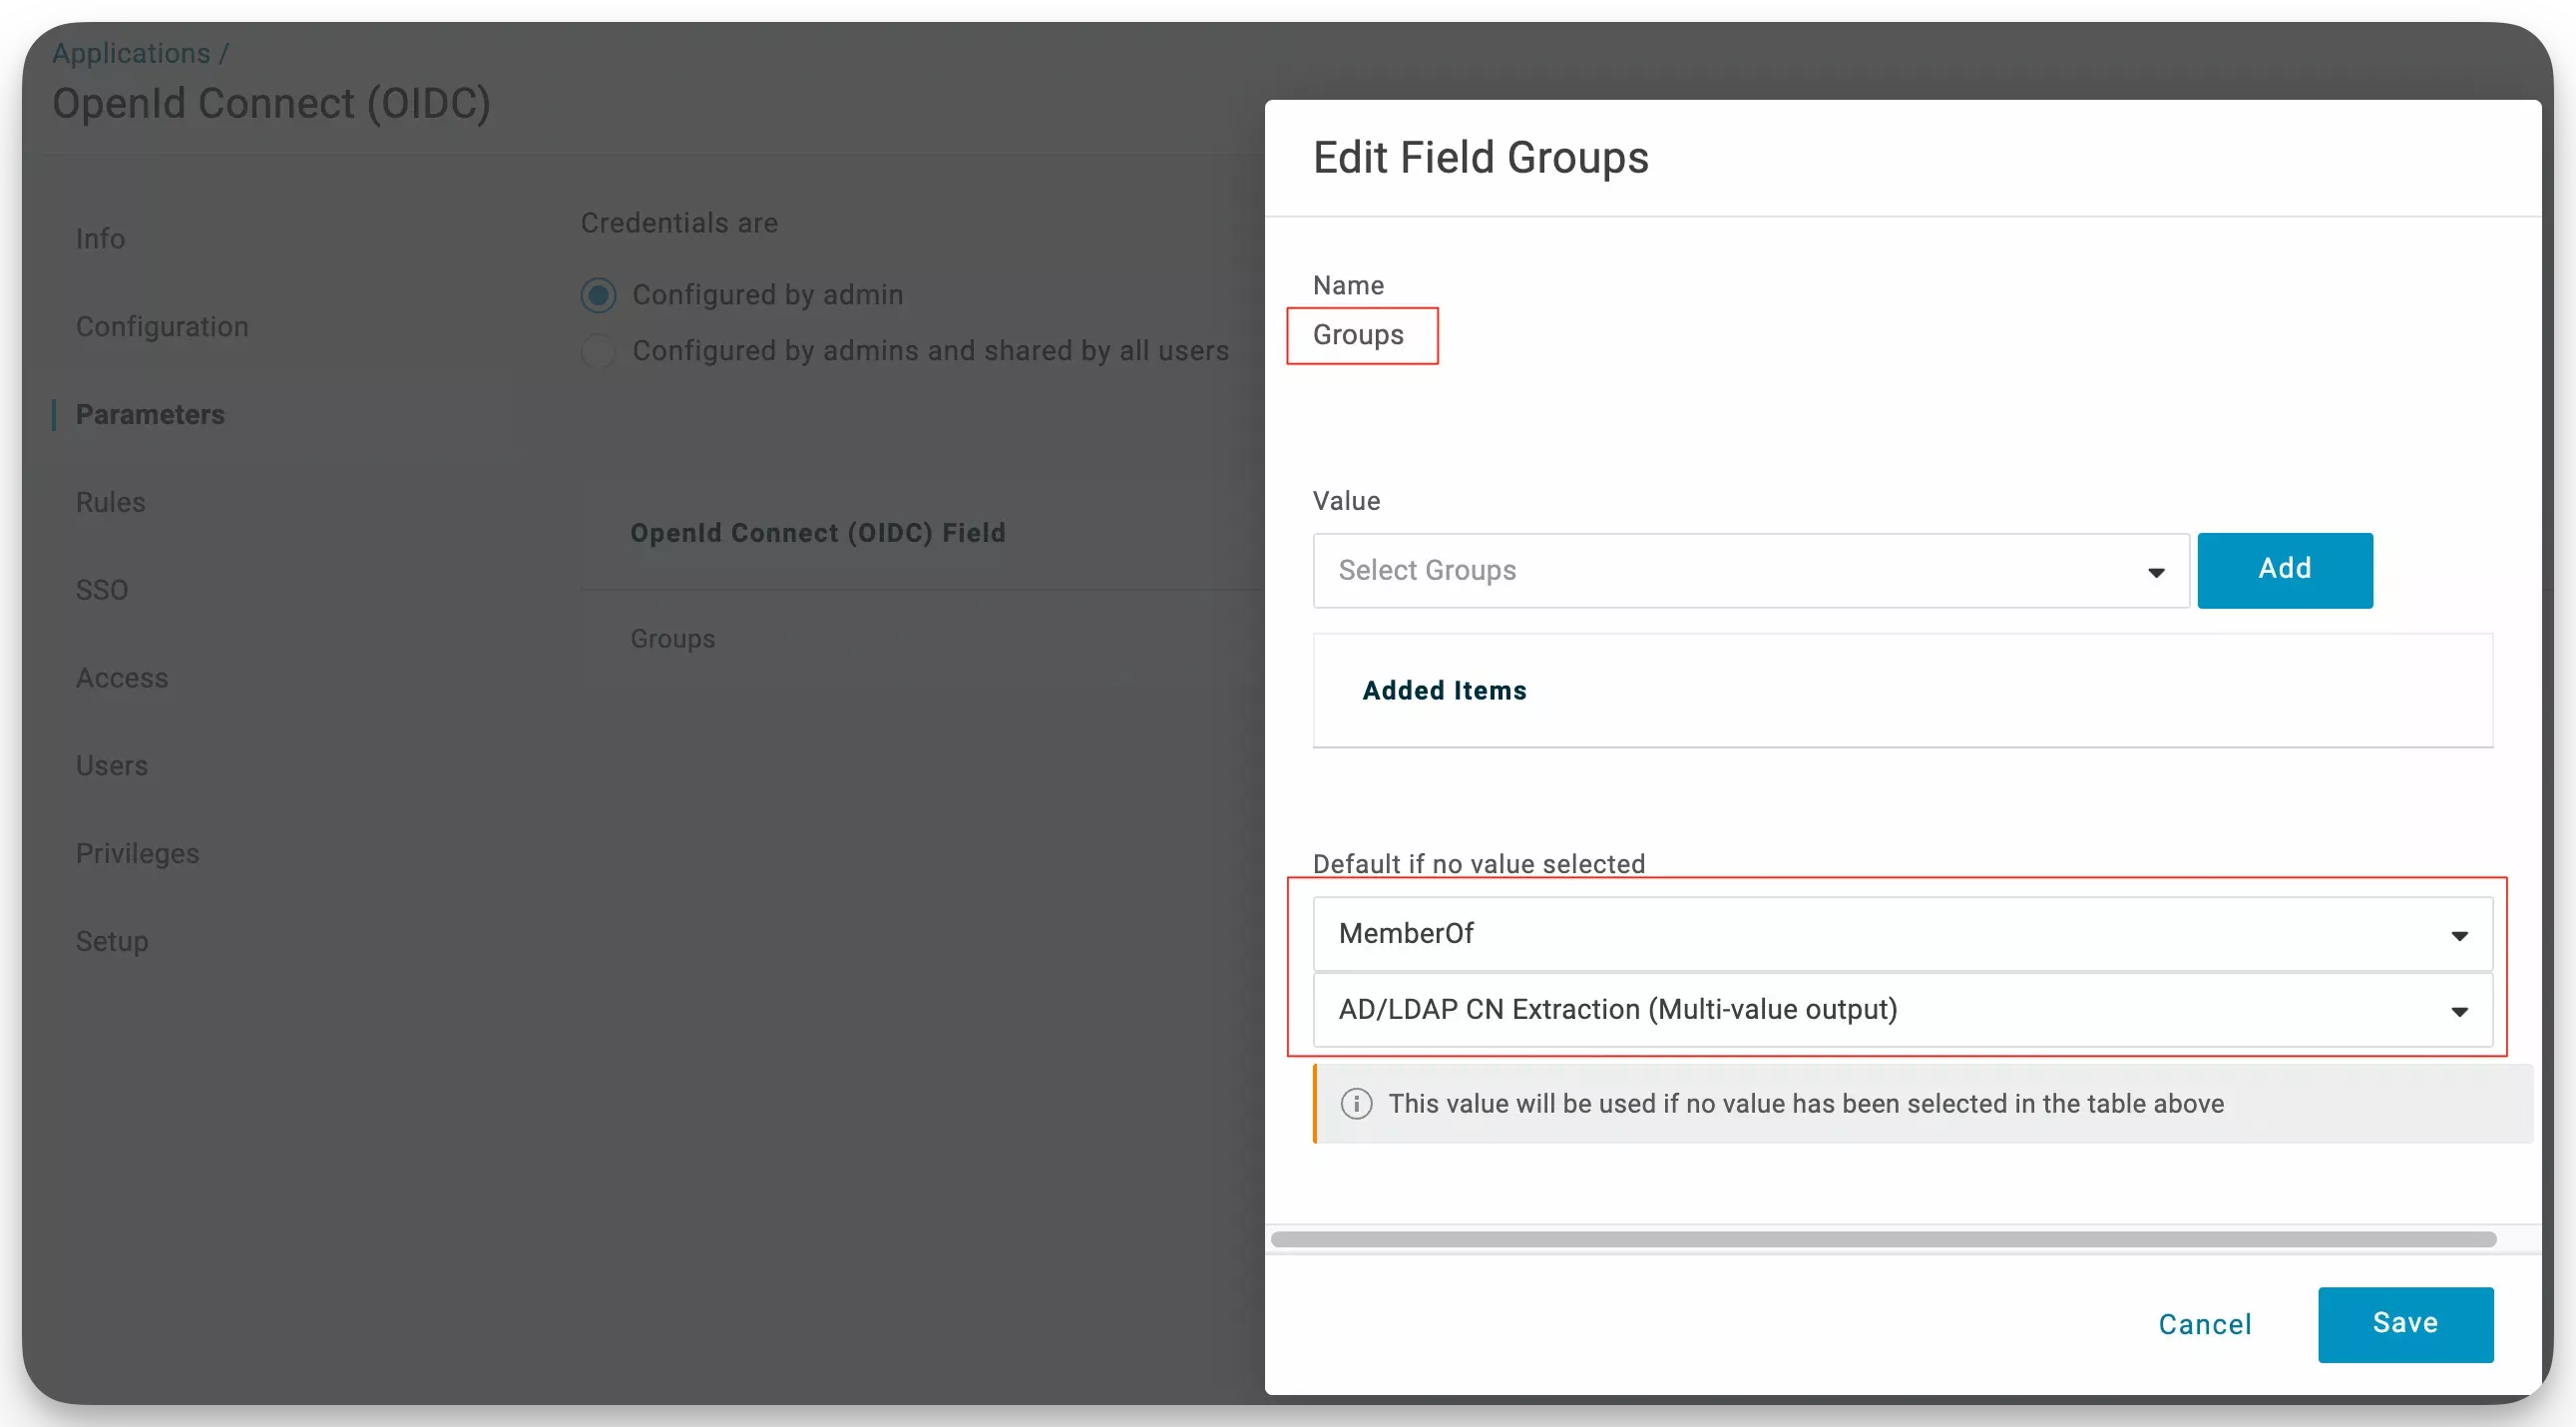
- Select the Parameters tab and click on the Groups field. Ensure the bottom configuration contains the MemberOf value so that the correct group value is passed.
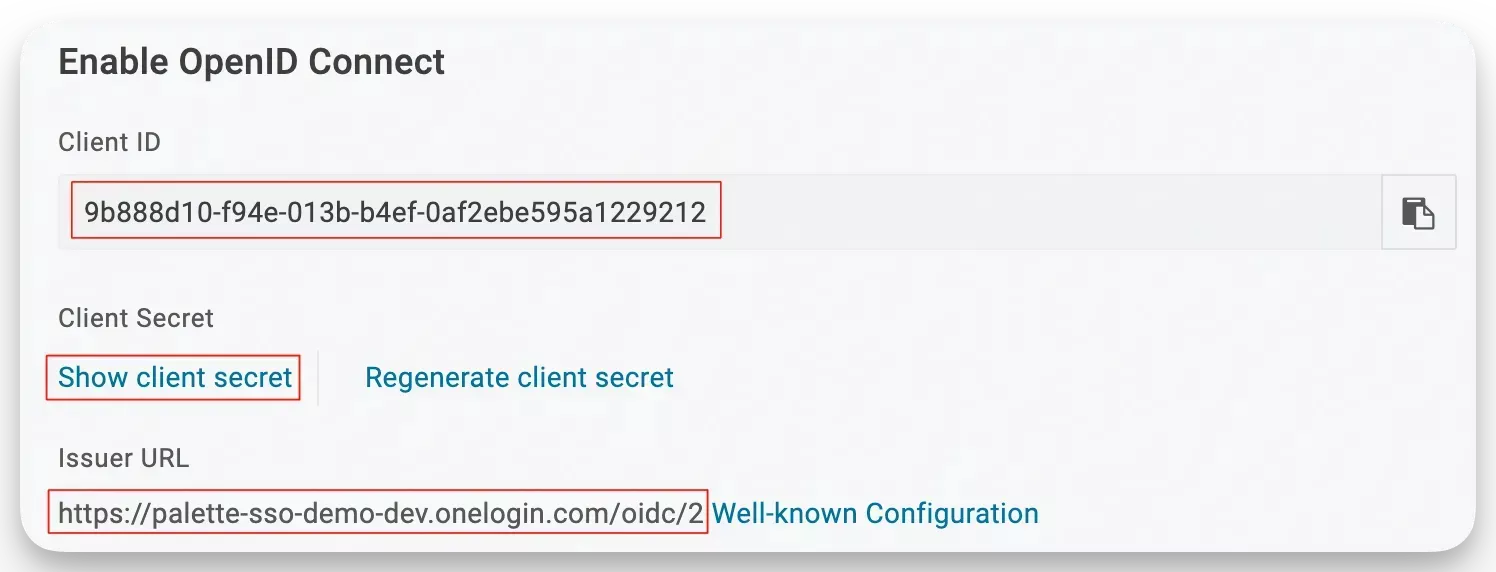
- Navigate to the left Main Menu and select SSO. From the SSO settings page, copy the Client ID, Client Secret, and Issuer URL values. These values are important credentials that Palette will use to authenticate with OneLogin. Make sure to save them securely. Click Save to save all changes.
Create Role, Security Policy, and Group
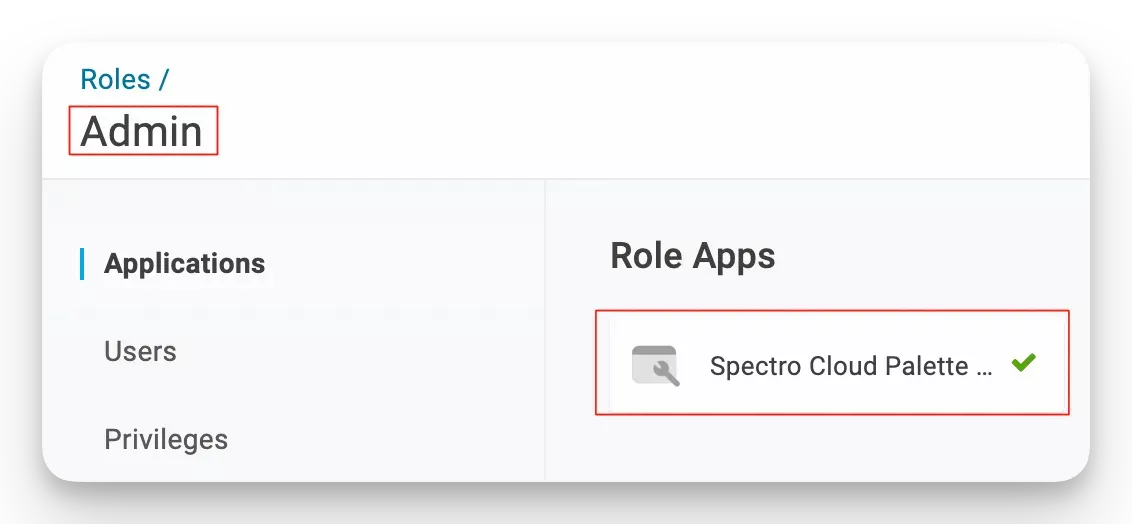
- Go to your OneLogin dashboard and select Users. Next, click on Roles to access the Role page and select New Role. Create an Admin role and select your Role App. The Spectro Cloud Palette OIDC app is used in this example. When selecting the app, a green check will appear next to the name. Click Save.
-
You can create an optional security policy. To create a security policy, navigate to Security and select Policies.
-
Click New User Policy. Provide a policy name, such as "Admin policy", and configure the policy to meet your requirements. Click Save to continue.
-
Apply the policy to a user group that you create. To create a user group, navigate to the left Main Menu, select Users, and then select Groups.
-
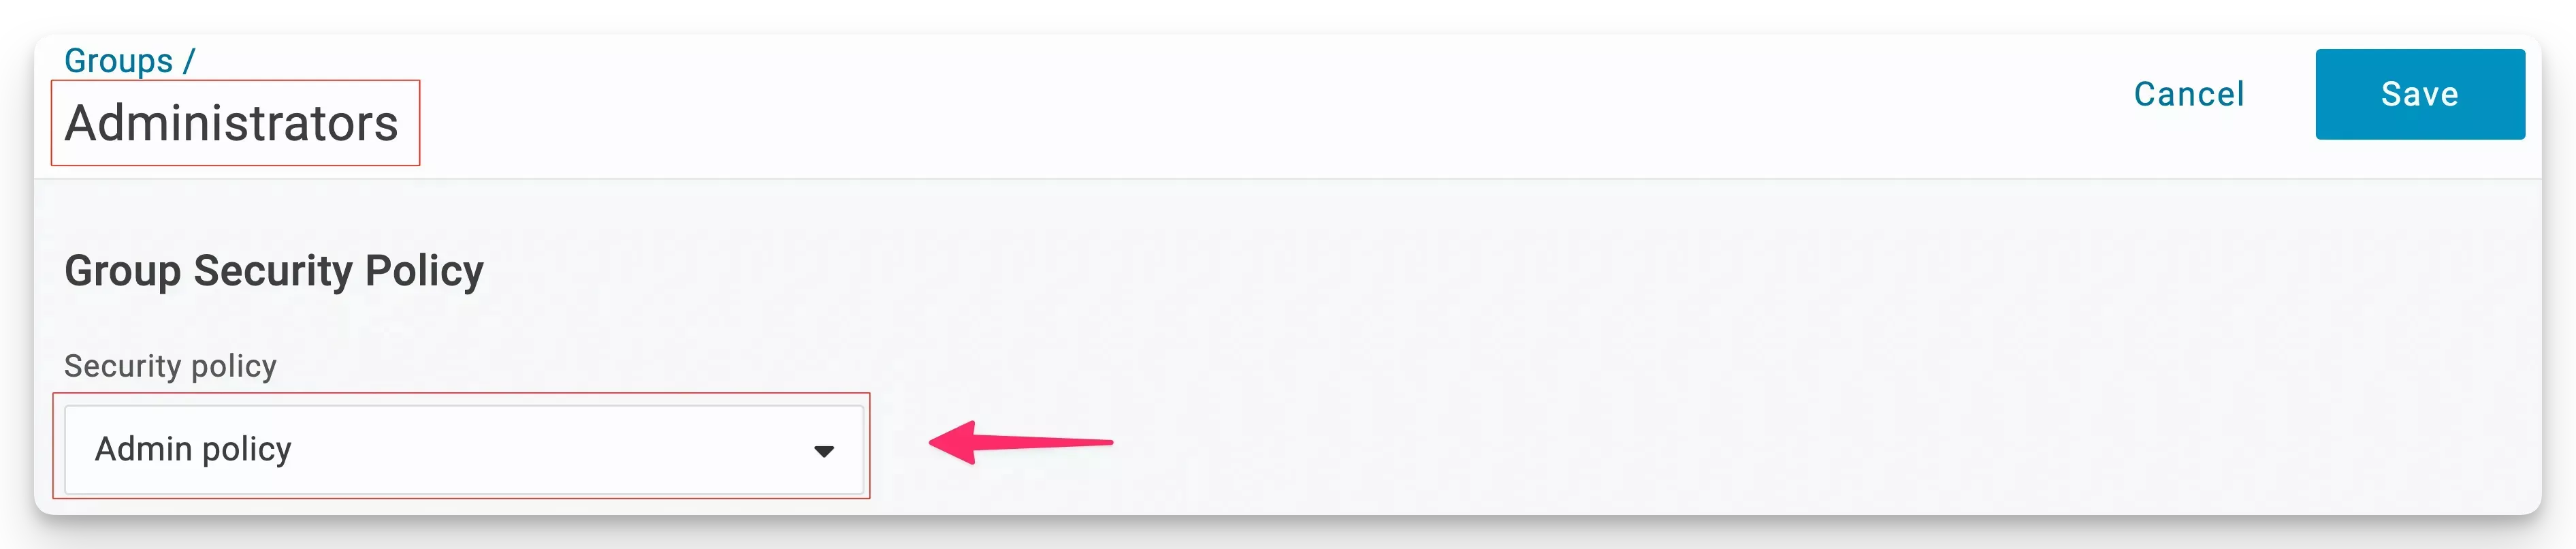
Click New Group and assign a group name.
-
Select your security policy and click Save.
-
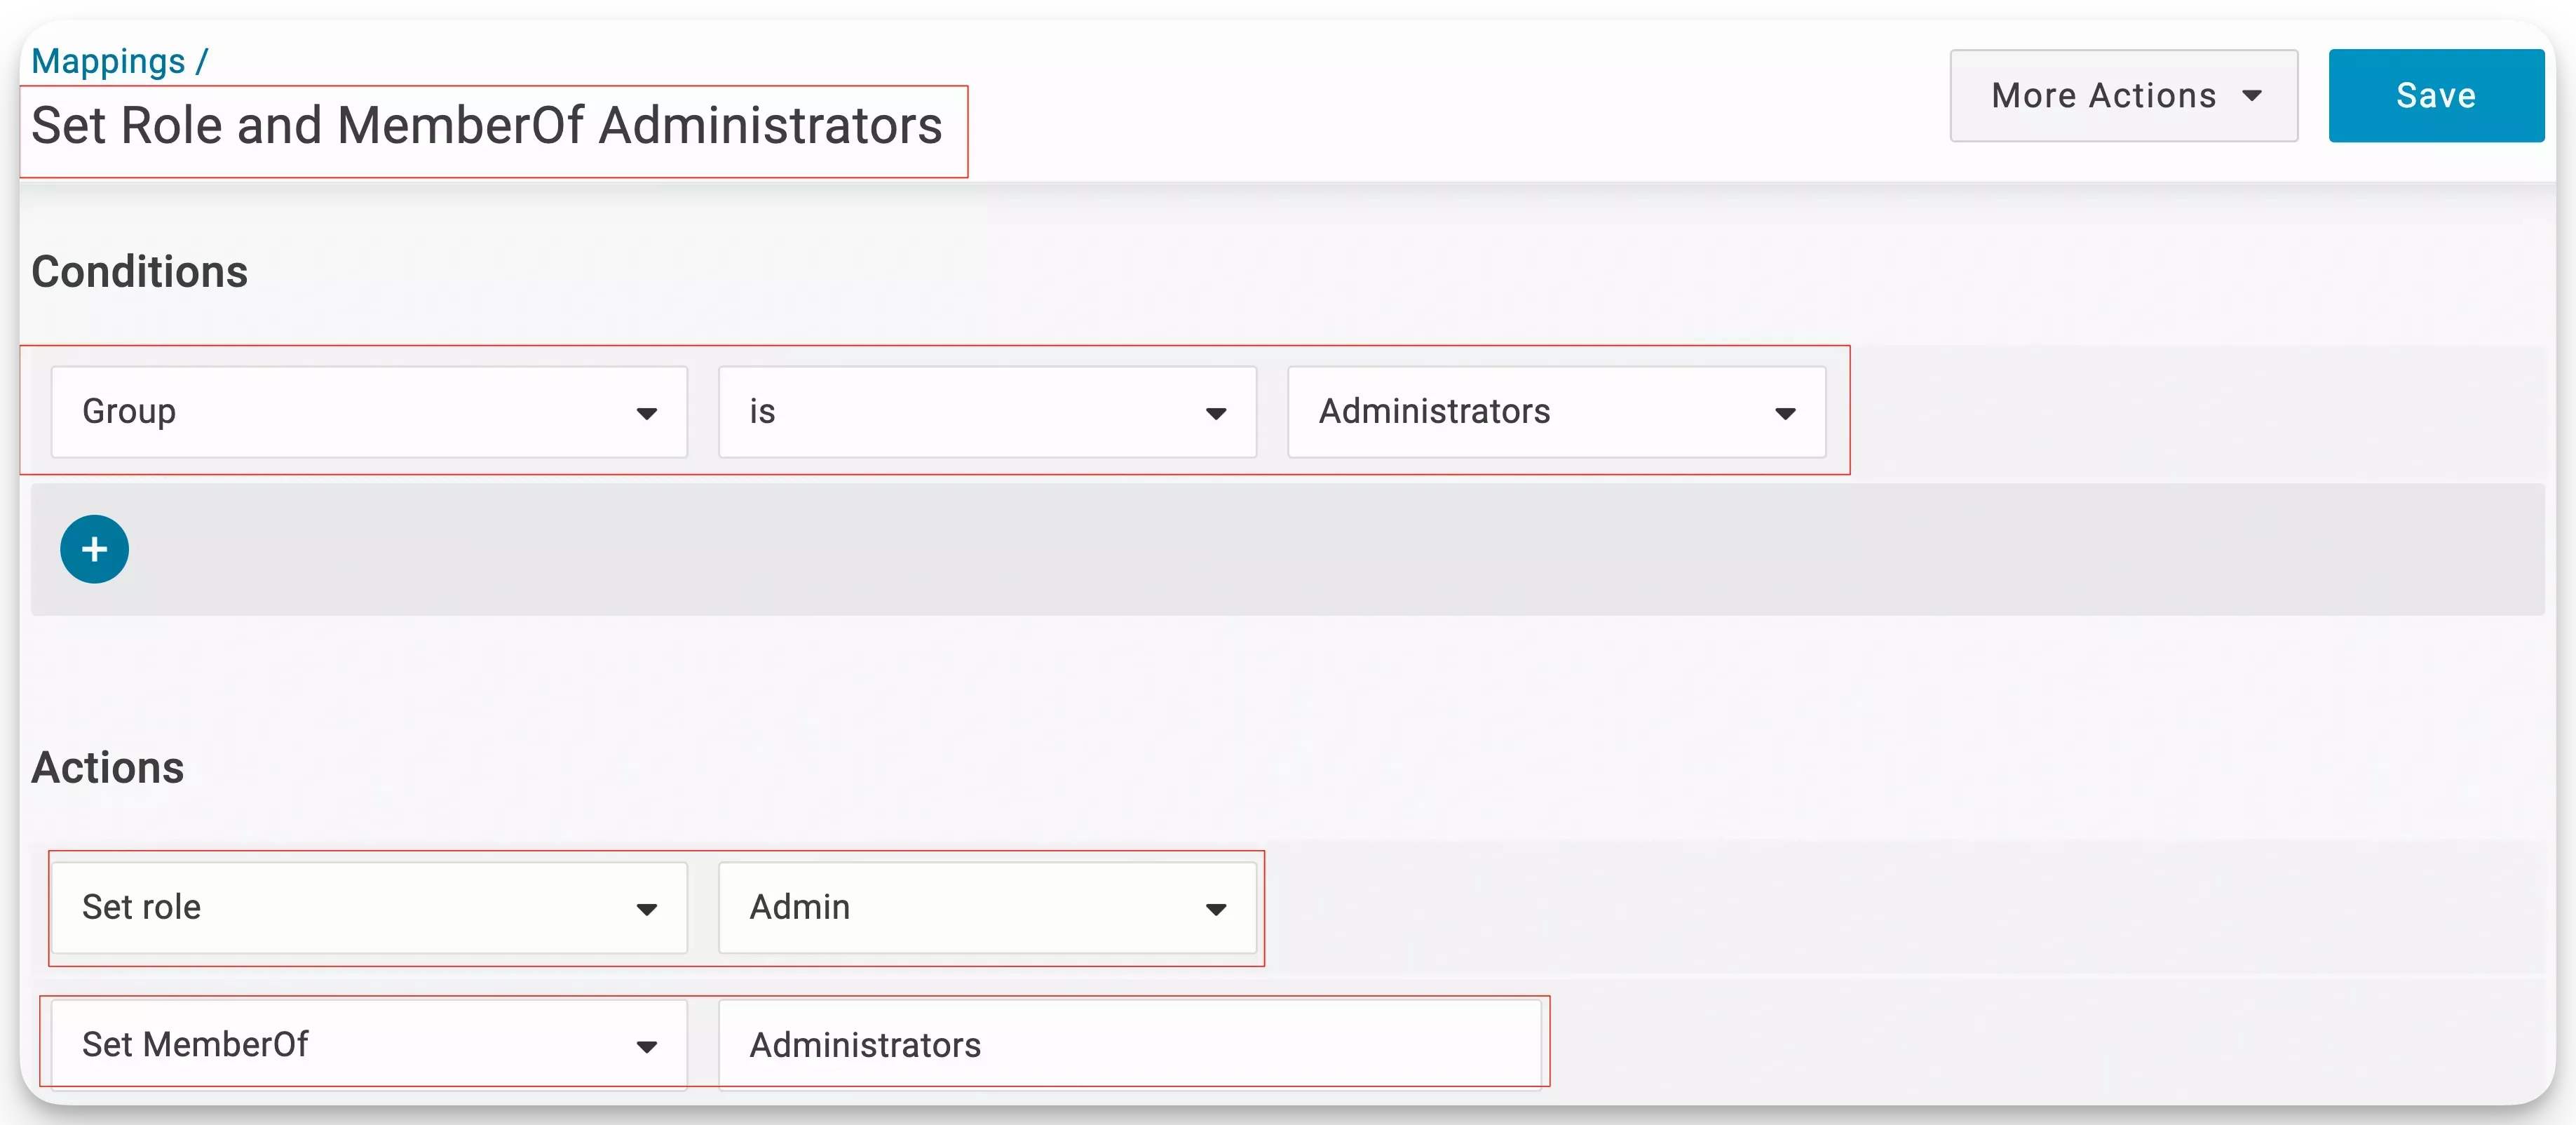
Automate the mapping of a user to a role and group by creating a Mapping. Navigate to Users, followed by Mappings and select New Mapping.
-
Assign the mapping a name and set it to map every member of the Administrators group. Set the MemberOf value to Administrators.
warningSetting the MemberOf value to Administrators is essential so the response from OneLogin contains the group name, which you will match with a Team in Palette. If you do not explicitly set the MemberOf value, Palette will not receive the group name. As a result, Palette will not be able to set the correct RBAC settings for your user.
-
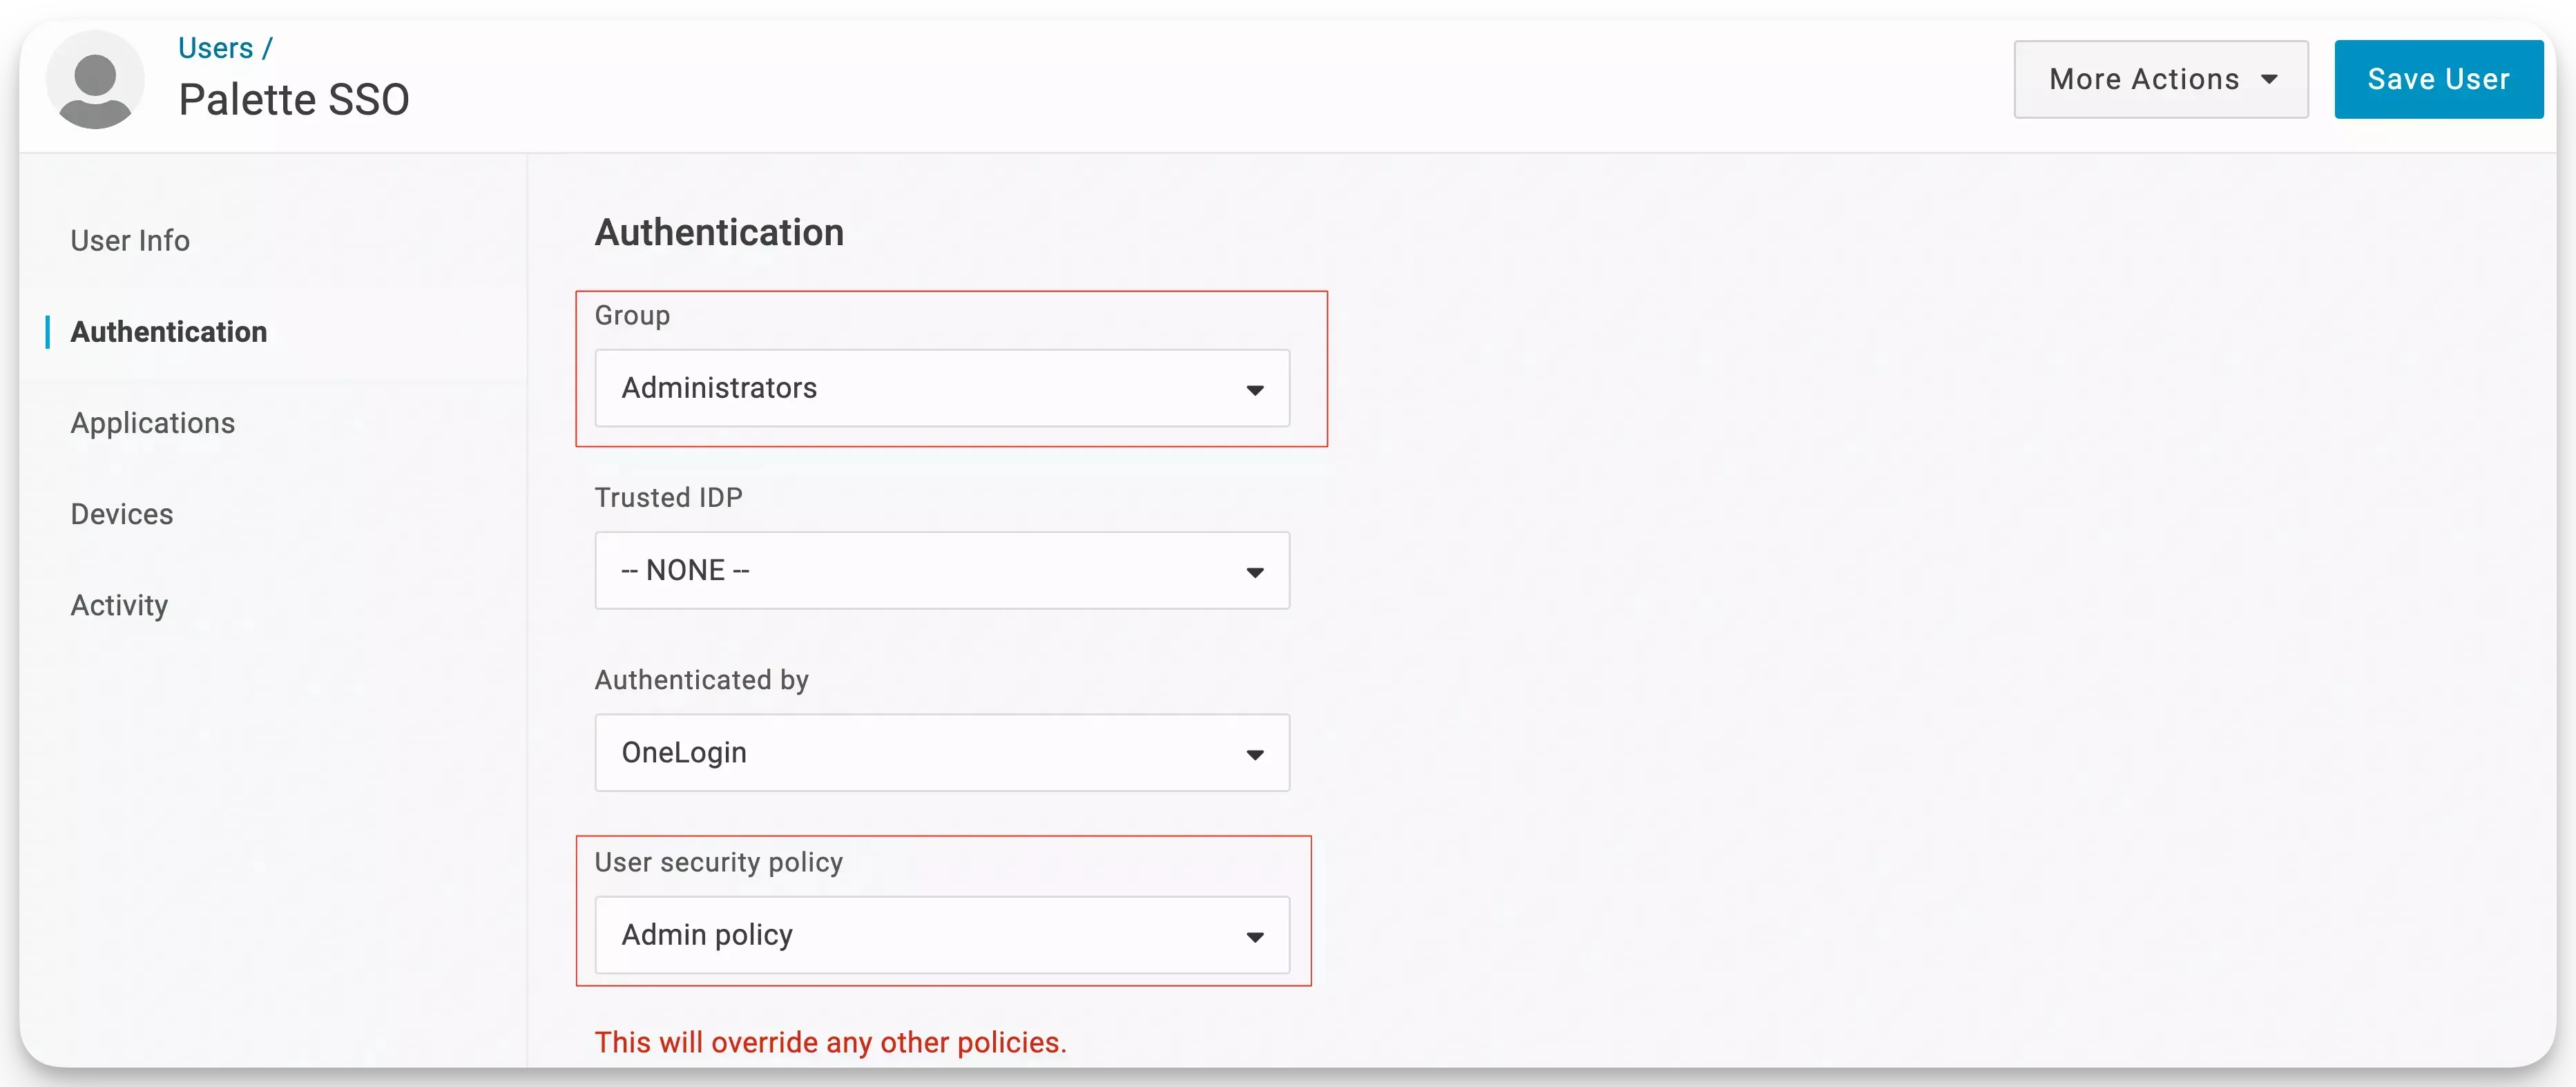
Navigate to the Users screen and select your user.
-
Select the Authentication tab and select the group and security policy you created earlier. Click on Save.
Enable OIDC in Palette
-
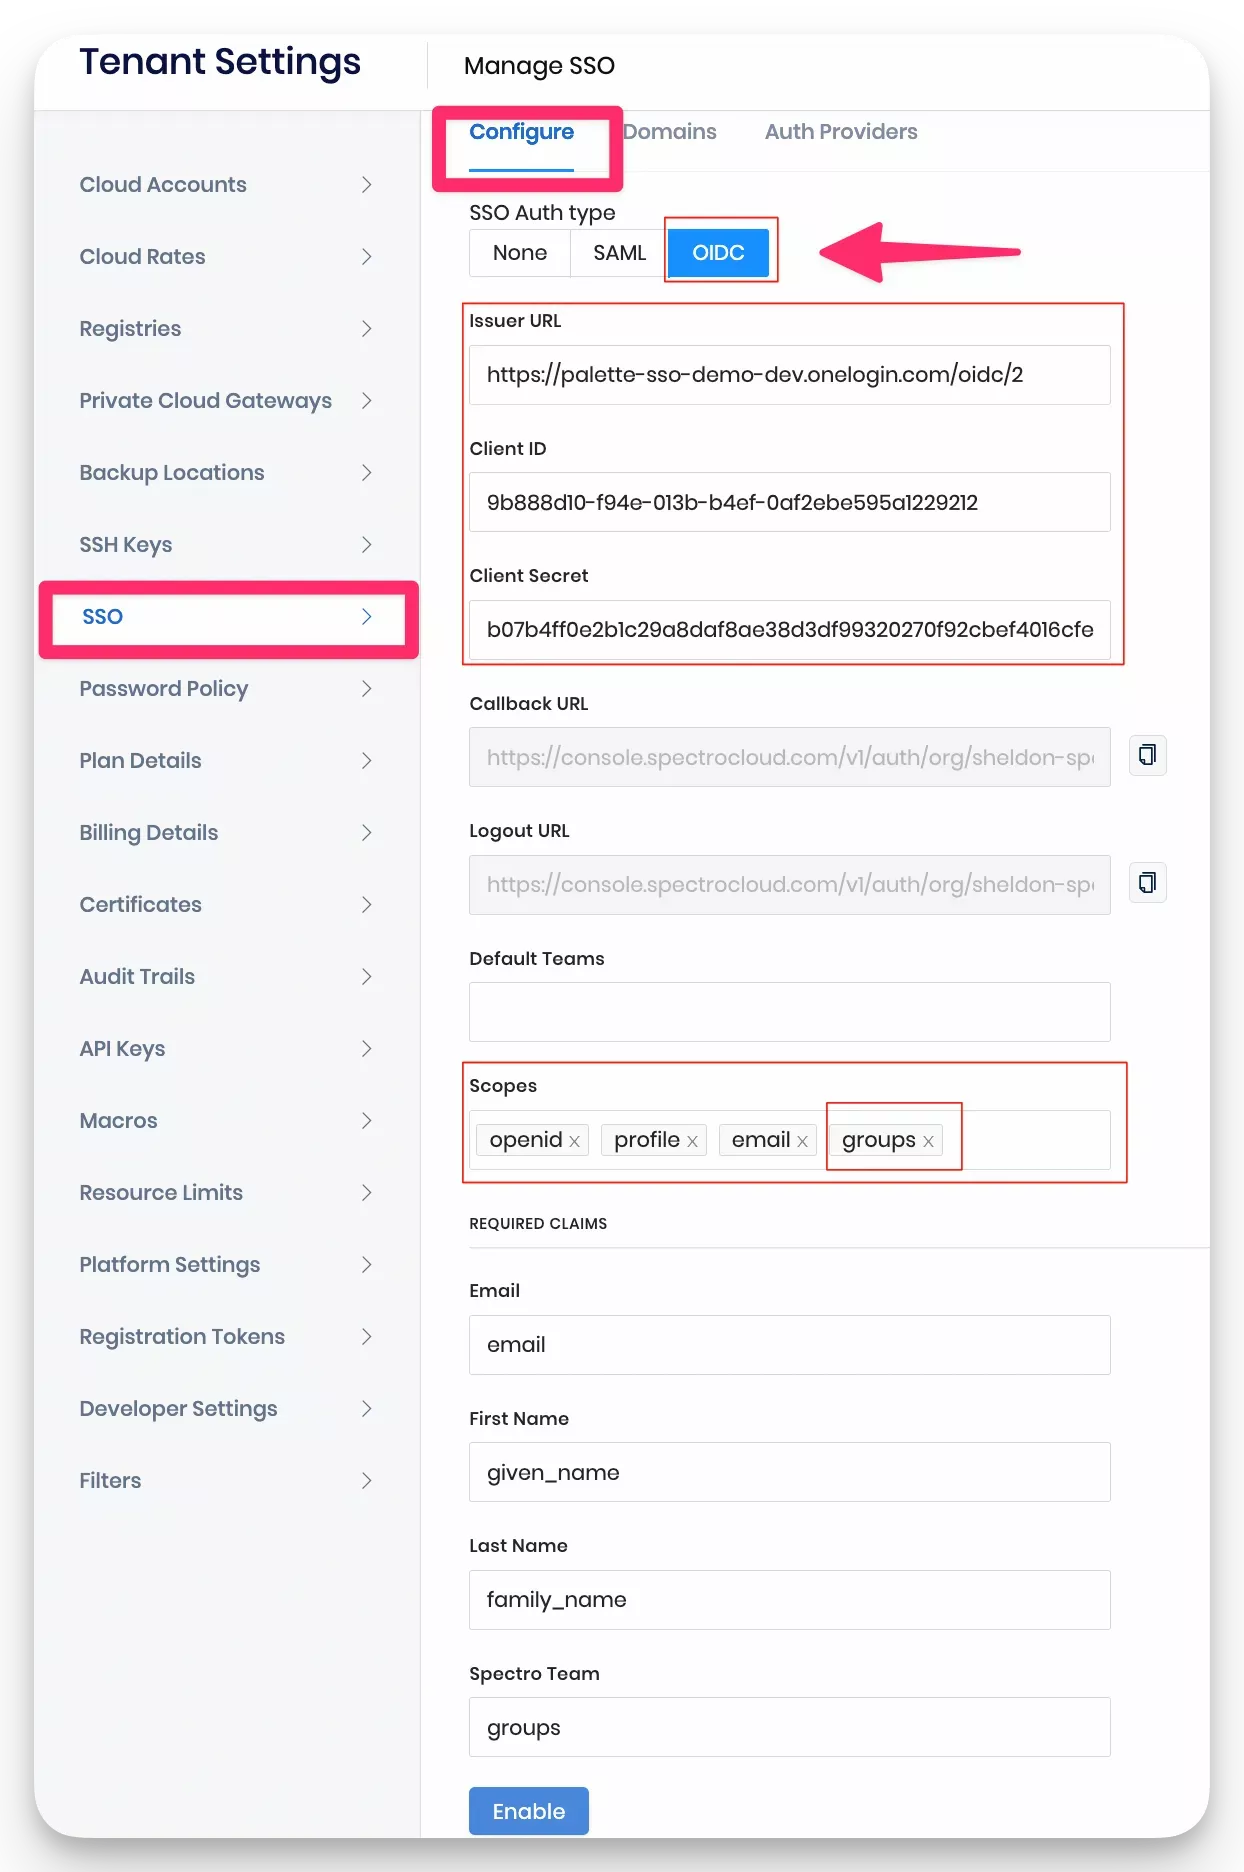
Navigate back to Palette, and from the left Main Menu, select Tenant Settings. Next, select SSO and click on the OIDC tab.
-
Fill in the fields Client ID, Client Secret, and Issuer URL with the values that OneLogin provided.
-
Next, add the groups scope in the Scopes field, and click Enable to continue.
warningEnsure the expected scopes are added. Otherwise, Palette may be unable to retrieve the group name.
You now have a working configuration for OneLogin as a third-party IdP in Palette. Check out the Create Teams in Palette section to learn how to create teams in Palette and map them to groups in OneLogin.
Validate
Use the following steps to validate the configuration.
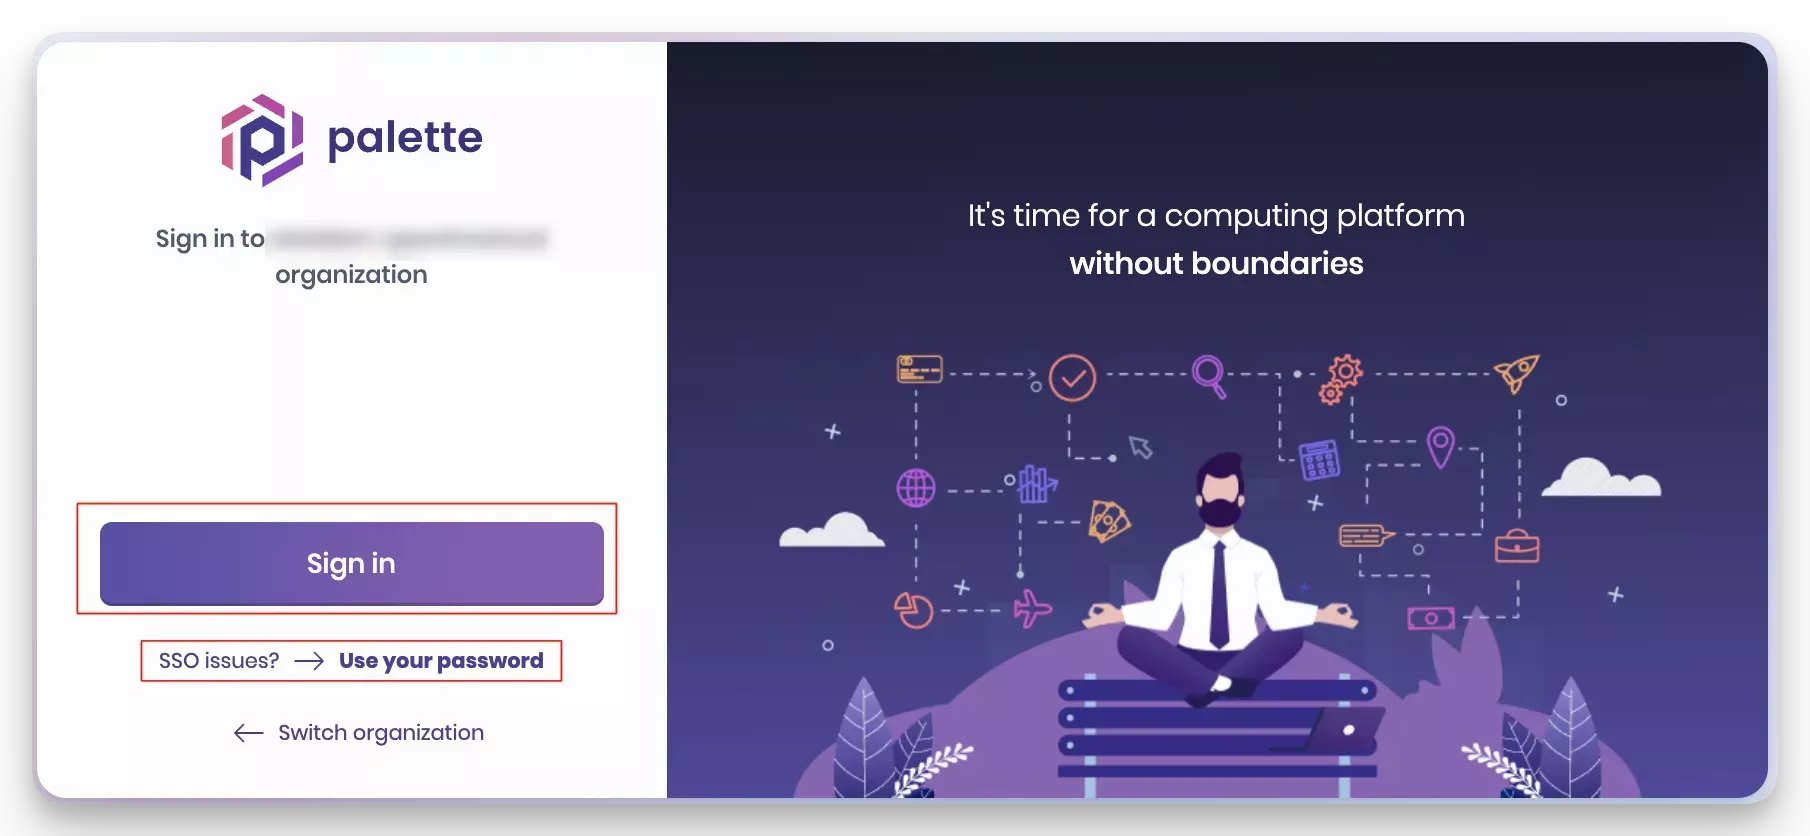
- Log out of Palette by navigating to the top right User Menu and selecting Log Out. You will be redirected to a new login screen.

- In the login screen that displays, click the Sign In button. You will be required to authenticate with OneLogin. If you are already authenticated with OneLogin, you will be signed in automatically to Palette with the proper permissions inherited from the Palette team you are a member of. If you cannot sign in, you can use the username and password method.
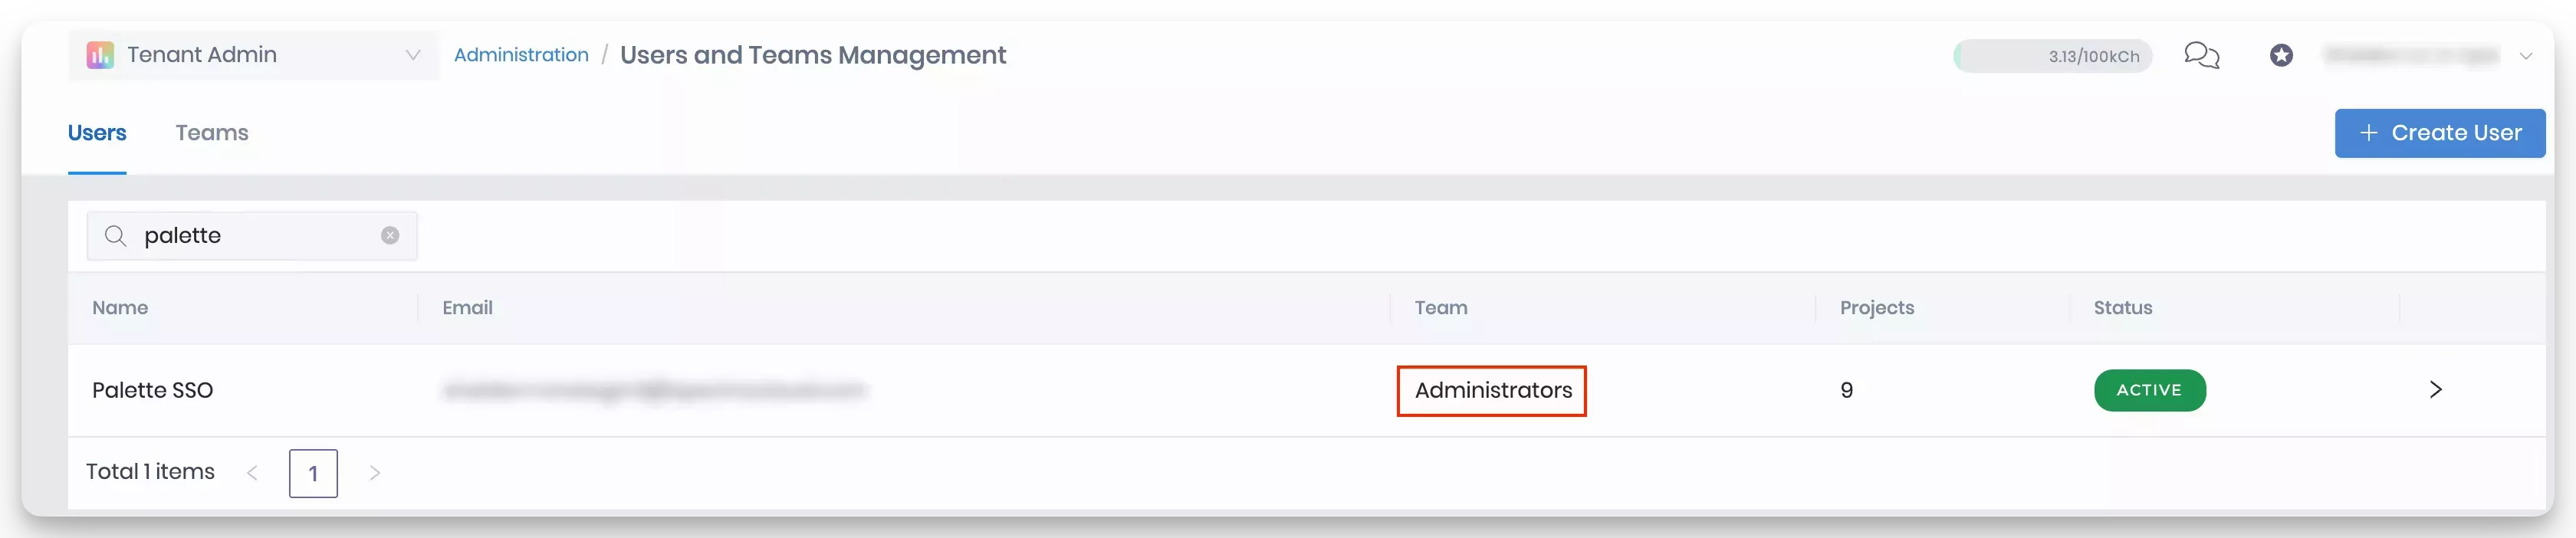
- To check which teams you are mapped to, navigate to the left Main Menu and select Users & Teams. In the Users tab, find your user name to review the teams you are a member of.
With the OpenID Connect Inspector, you can send requests to OneLogin and check what is sent in the payload. This way, you can ensure you are using the correct claims and scopes. Add the Inspector's callback URL to your application's Redirect URIs list when using the Inspector. Check out the - OpenID Connect Inspector Tutorial to learn more.
Create Teams in Palette
You must create a team in Palette so that Palette can map the team with groups configured in OneLogin. The team name must match the value returned for the groups configured in OneLogin. In this example, you will create an Administrators team in Palette. This team name matches the Administrators value assigned to each member of the Administrators group in OneLogin.
Prerequisites
-
An active Palette account with administrative permissions.
-
A OneLogin mapping that maps the user to a group.
Team Creation
-
Log in to Palette as a tenant administrator.
-
From the left Main Menu, select Users & Teams.
-
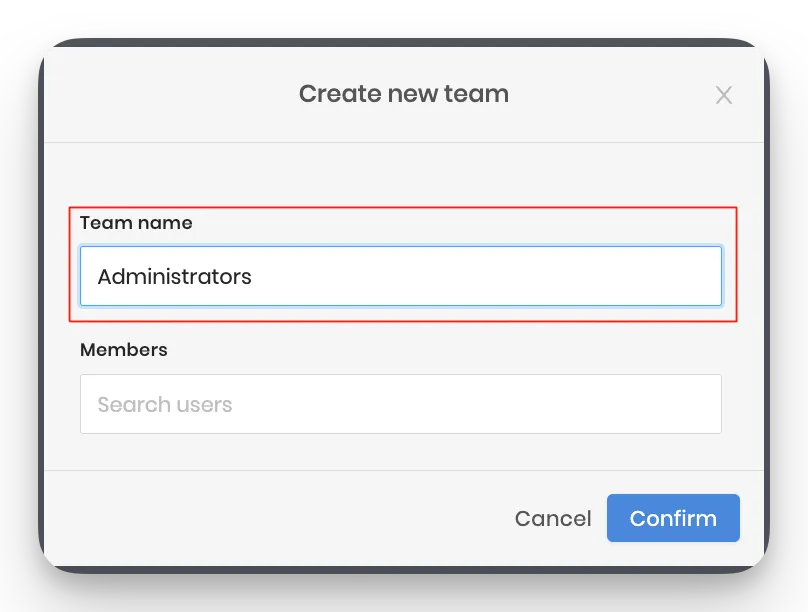
Next, select Teams, and click on Create team.
-
You only need to fill in the team name. Do not manually add members, as OneLogin will manage the users. In OneLogin, users who are part of the mapped administrators group will be automatically added to the team. Click Confirm to continue.
-
Next, you need to assign the members of this team a set of permissions. Assign all members the Tenant Admin permissions. You can customize the assigned permissions as needed. For this example admin access is granted.
-
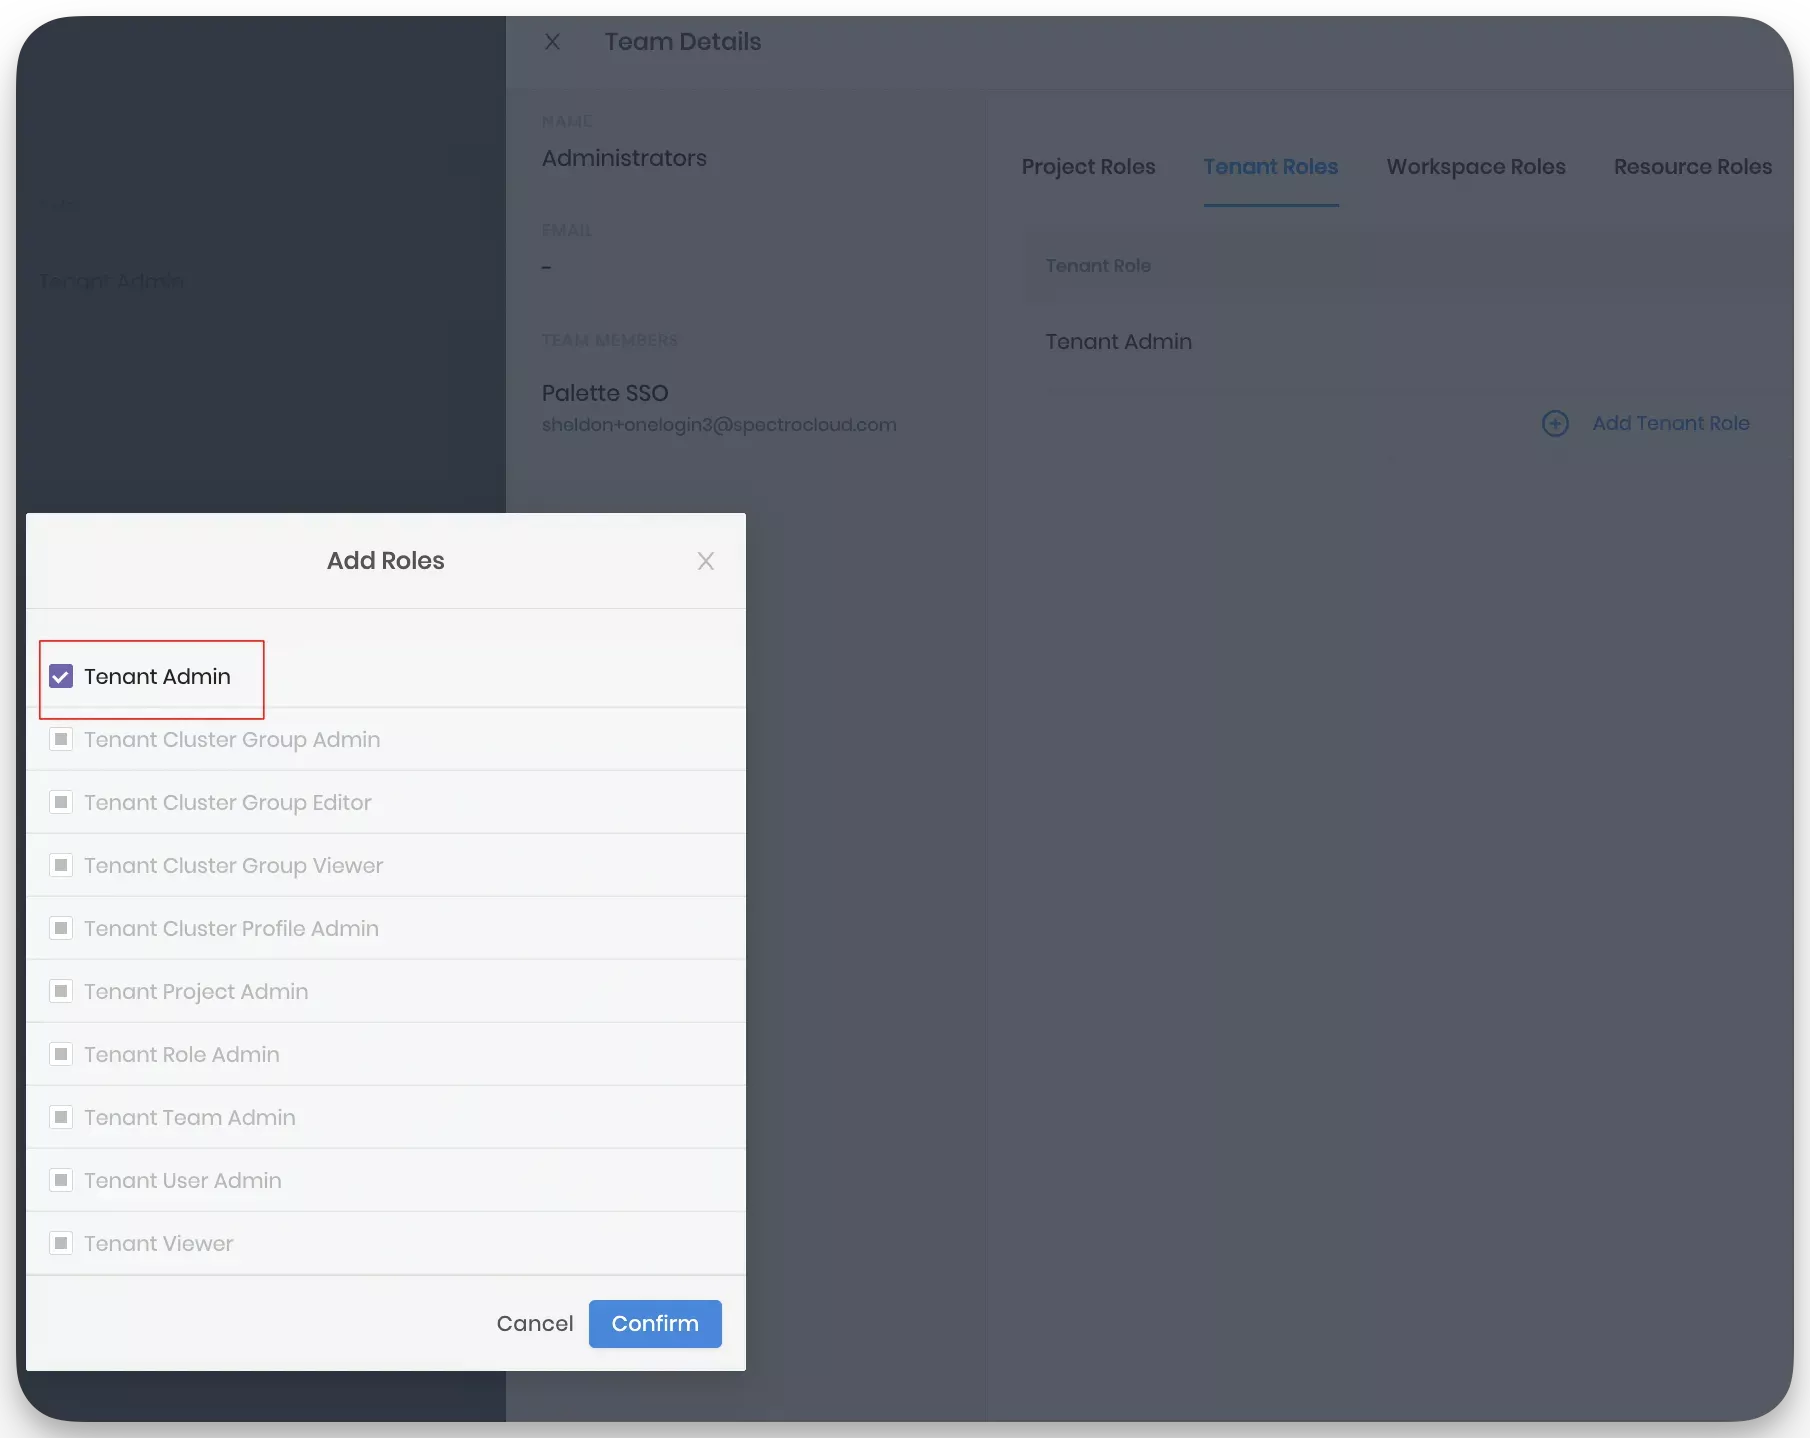
To set the correct permissions, select the team you created, and click on the Tenant Roles tab.
-
Next, click on Add Tenant Role and select the Tenant Admin box. This will automatically select all other permission boxes. Click on Confirm.
-
You should have a configuration similar to the following image.
You have now configured Palette to use OneLogin as a third-party IDP. Use the above steps to create additional groups in OneLogin and Palette.
As you start deploying clusters, keep in mind that if you use the Palette eXtended Kubernetes (PKE) distribution, you can configure the cluster to inherit OIDC configurations from the tenant. Refer to the Palette eXtended Kubernetes reference page to learn more about out-of-the-box support for OIDC.
Validate
To verify the team is created and the correct permissions are assigned, log in to Palette as a user who is a member of the team.
-
Log in to Palette as a user who is a member of the team you created and available in OneLogin.
-
Authenticate with OneLogin once you are redirected to the login screen. A successful login will redirect you to the Palette dashboard and indicate that you are logged in as a member of the team you created.
-
Ensure you can access the Tenant Settings page. Select the Tenant Admin scope. From the left Main Menu, select Tenant Settings. If you have the correct permissions, you will be able to access the settings page.