Set up Palette SSO with Microsoft Active Directory Federation Service (AD FS)
Single sign-on (SSO) is an authentication method that enables users to log in to multiple applications and websites with one set of credentials. SSO works upon a trust relationship established and maintained between the service provider (SP) and an identity provider (IdP) using certificates. Palette supports SSO based on either SAML or OIDC.
The following steps will guide you to enable Palette SSO with Microsoft AD FS based on OIDC.
You cannot use Microsoft AD FS for SAML-based SSO with Palette. Microsoft AD FS does not support the Canonical XML 1.1 standard that Palette employs. You can only use the OIDC-based approach for Microsoft AD FS.
Prerequisites
-
For Microsoft AD FS to work correctly with Palette, you must enable HTTPS and configure TLS.
-
In order to setup OIDC-based SSO with Microsoft AD FS, you need to use one of the following versions:
- Microsoft AD FS 2022 (comes with Windows Server 2022)
- Microsoft AD FS 2019 (comes with Windows Server 2019)
- Microsoft AD FS 2016 (comes with Windows Server 2016)
-
If you need to be able to your AD FS service from outside your corporate network, you will also need an AD FS Reverse Proxy. An official Microsoft tutorial for setting up an AD FS Reverse Proxy is not available, but you can use this blog post from Matrixpost for additional guidance.
Enablement
Create the AD FS Application Group for Palette
-
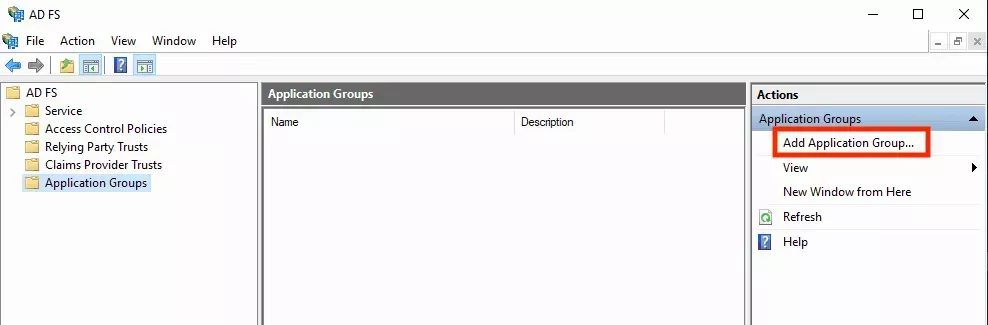
Open the AD FS Management console on your Windows Server and add a new Application Group for Palette:
-
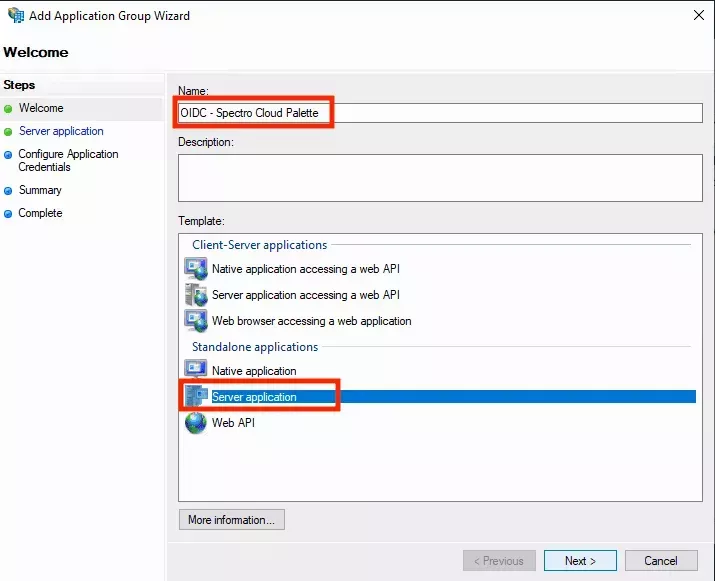
Provide a suitable name for the application group and select Server Application from the list of templates. Then click Next.
-
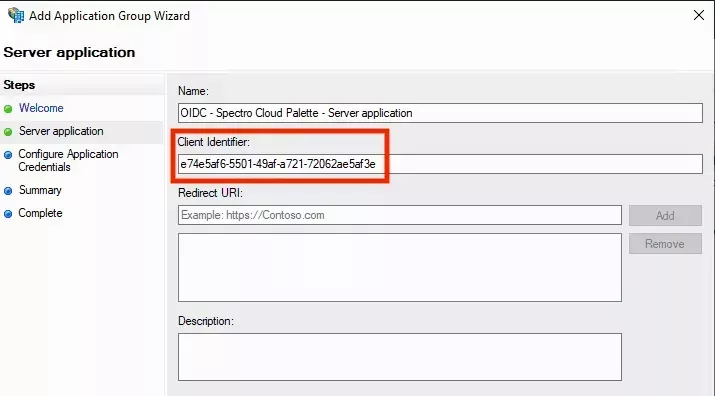
The next screen displays the Client Identifier for this Application Group.
-
Copy the client identifier value and save it somewhere. You will need to enter this value into the Palette SSO configuration later.
-
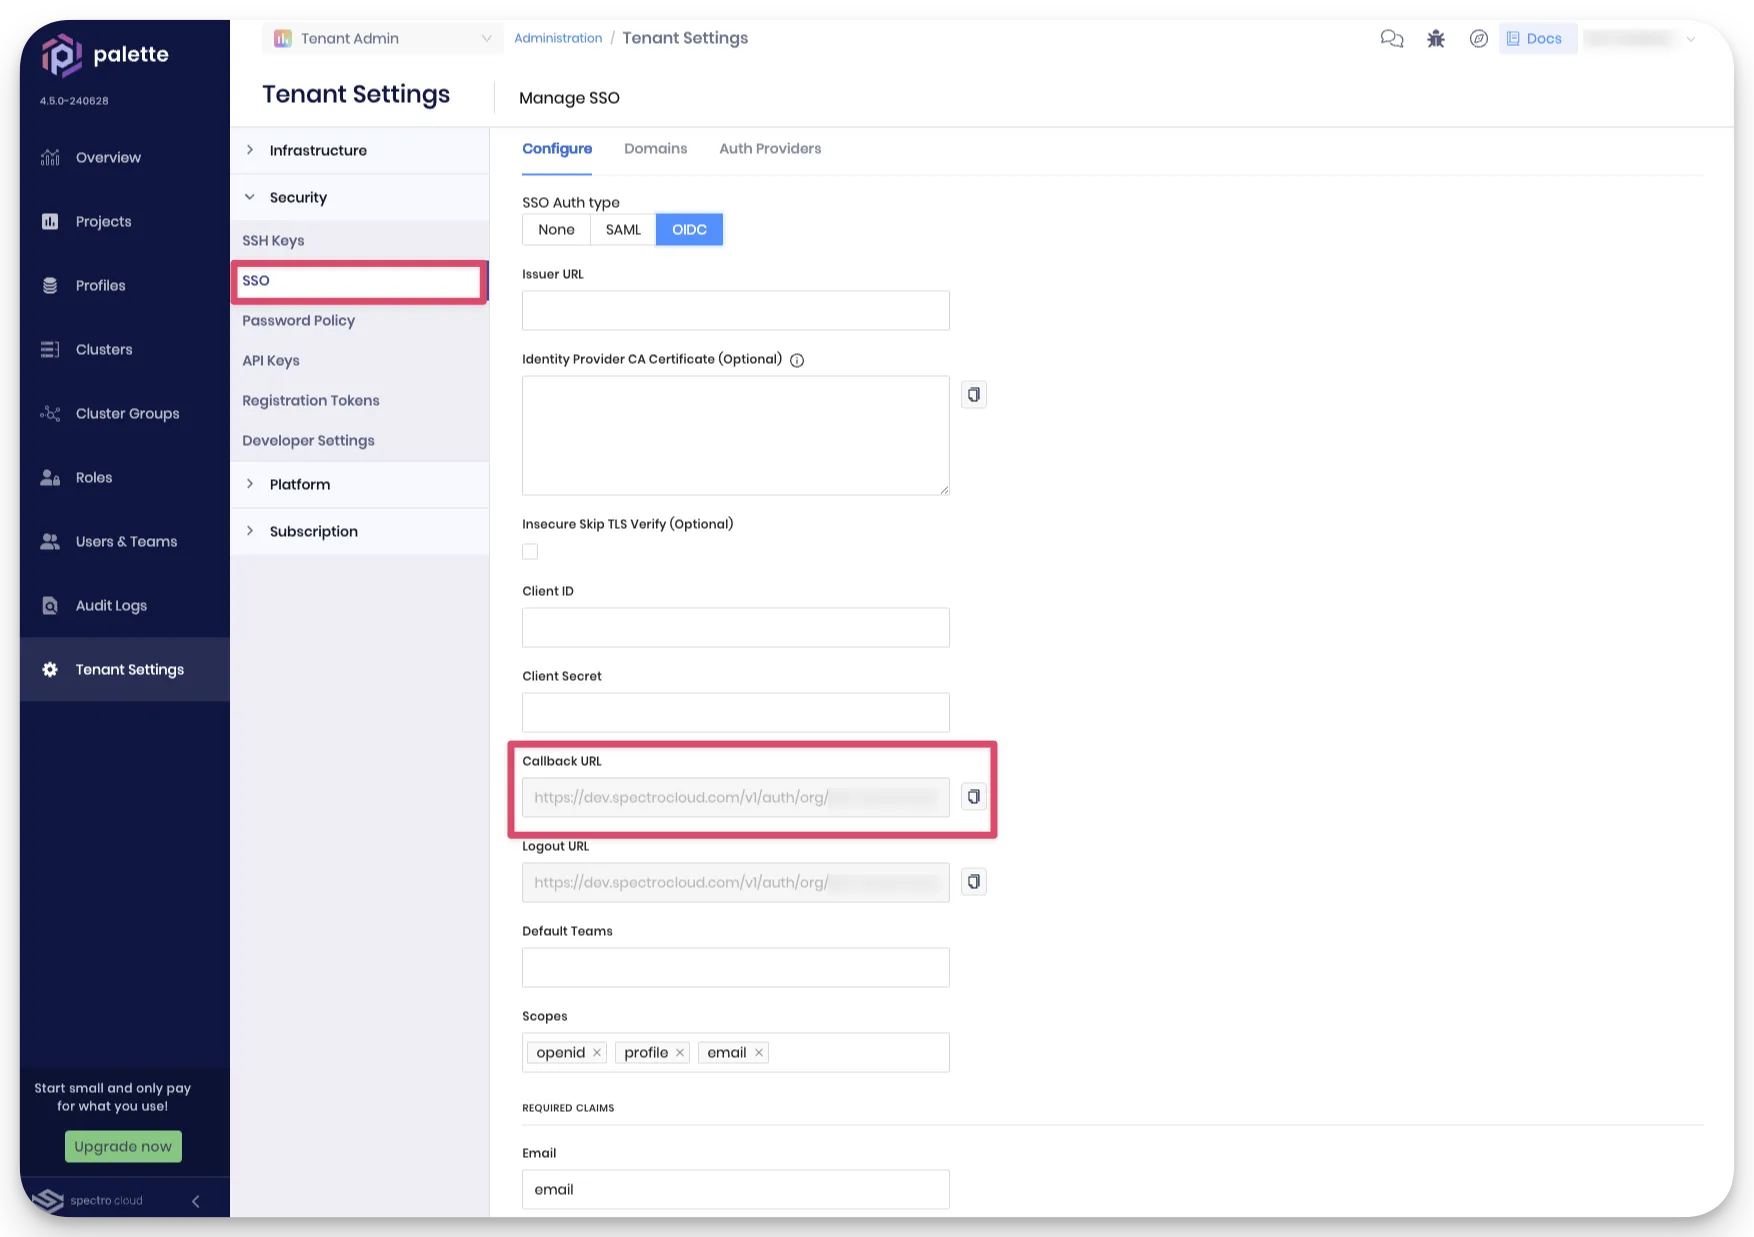
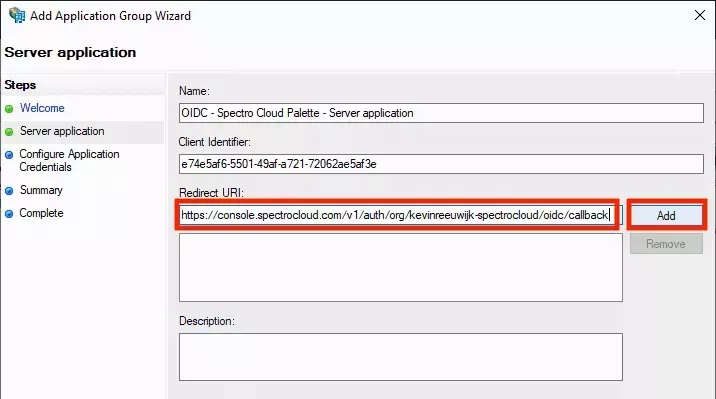
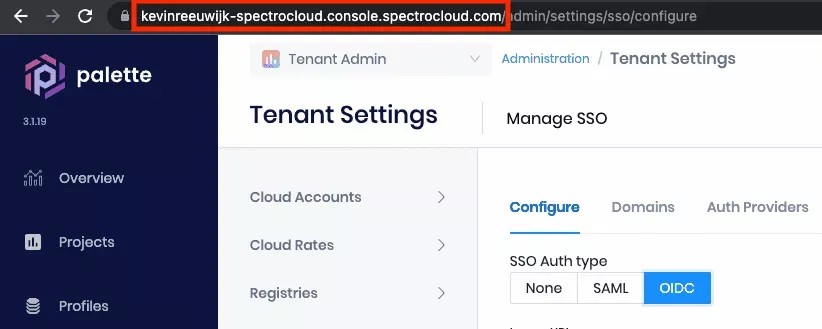
Open a web browser and navigate to your Palette subscription. Navigate to Tenant Settings --> SSO and click OIDC. Click the button next to Callback URL to copy this value to the clipboard.
-
Switch back to your AD FS Management console and paste the copied value into the Redirect URI field, then click Add to add it to the list.
-
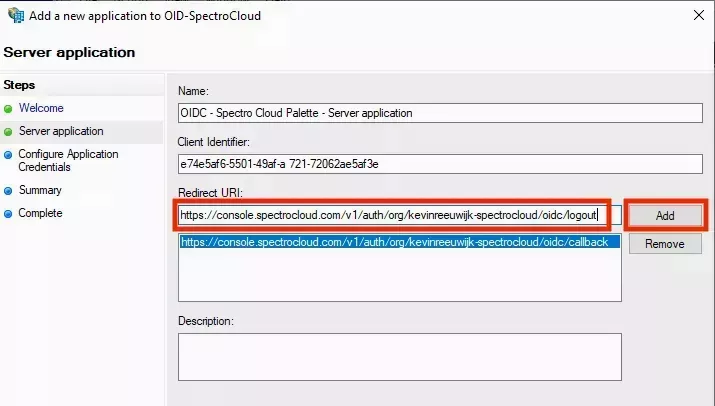
Switch back to Palette in the web browser and click the button next to Logout URL to copy this value to the clipboard.
-
Switch back to your AD FS Management console and paste the copied value into the Redirect URI field, then click Add to add it to the list.
-
These two redirect URIs are required for SSO to work with Palette. You can also add additional redirect URIs. The URIs in the table below are useful when you want to use AD FS for OIDC authentication into your Kubernetes clusters.
URL Type of Access http://localhost:8000Using kubectl with the kube-login plugin from a workstation https://console.spectrocloud.com/v1/shelly/oidc/callbackUsing the web-based kubectl console https://<fqdn_of_k8s_dashboard>/oauth/callbackUsing OIDC authentication into Kubernetes Dashboard -
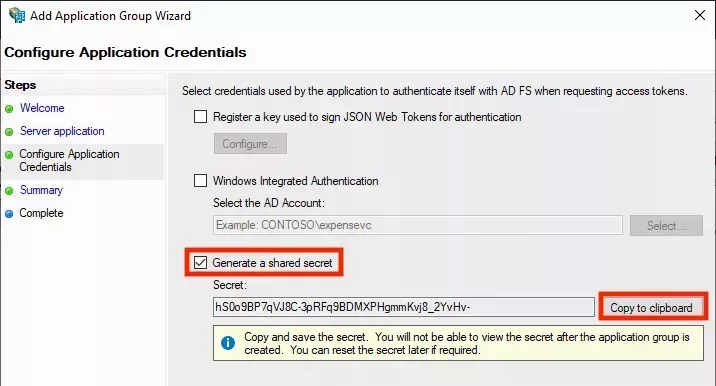
When you have completed entering redirect URIs, click Next. On the next page of the wizard, select Generate a shared secret and click Copy to clipboard to copy the secret value and save it somewhere. You will need to enter this value into the Palette SSO configuration later.
-
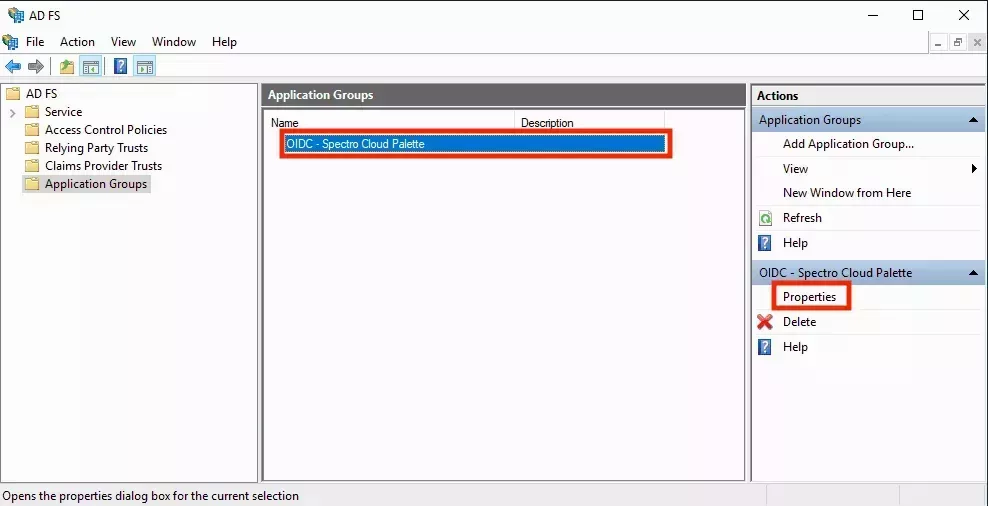
Click Next and on the Summary screen, click Next again to complete the wizard. You need to add another application to the application group. Select the newly created application group and click Properties.
-
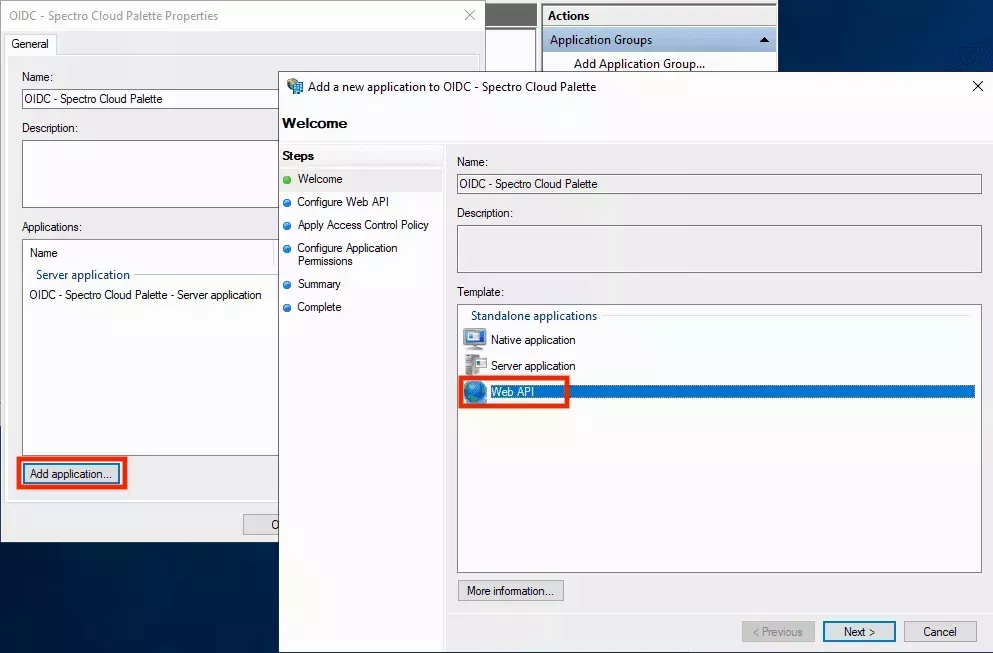
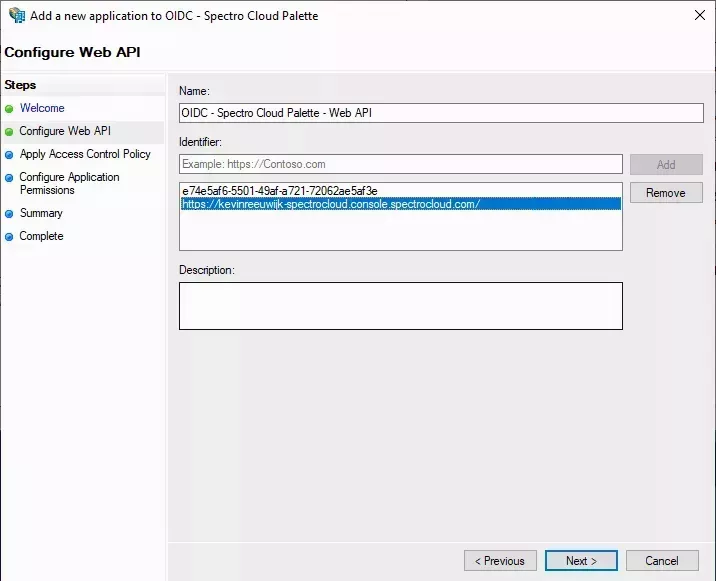
In the Properties screen, click Add application.... In the wizard that opens, select Web API and click Next.
-
In the Identifier field, add the following entries:
- The Client Identifier value you saved when creating the application group.
- The base URL of your Palette tenant. This is equal to the URL shown by your browser when logged into Palette minus
the path. Example
https://johndoe-spectrocloud.console.spectrocloud.com.
-
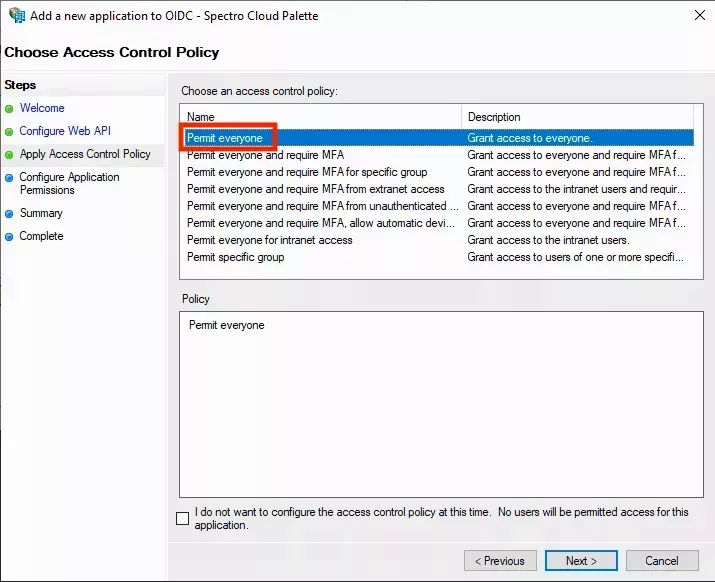
Click Next when done. On the next screen, select a suitable policy for who can use this SSO and under what circumstances. If you're not sure which policy to choose, select Permit everyone, then click Next:
-
On the next screen, by default only the openid scope is ticked. However, to include the user's groups in the OIDC claim, you need to also enable the allatclaims scope. If your AD FS server does not yet have an allatclaims scope in the list, click New scope... and type
allatclaimsin the Name field, then click OK to add it. Ensure both scopes are enabled and then click Next.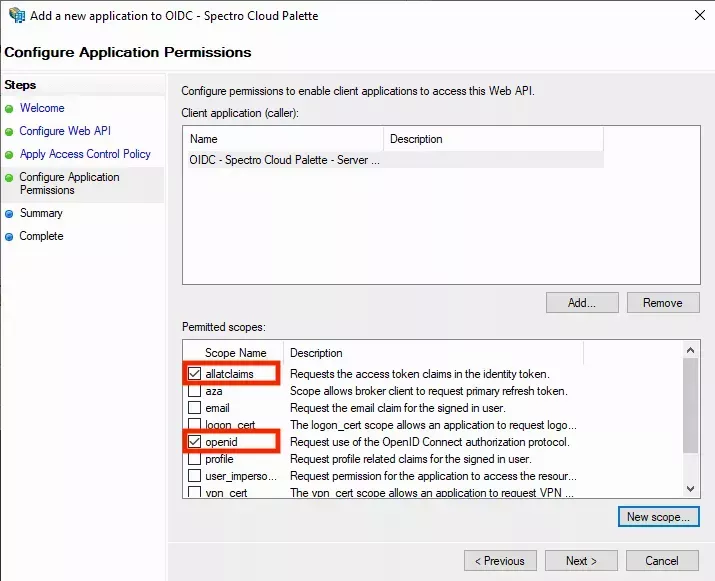
-
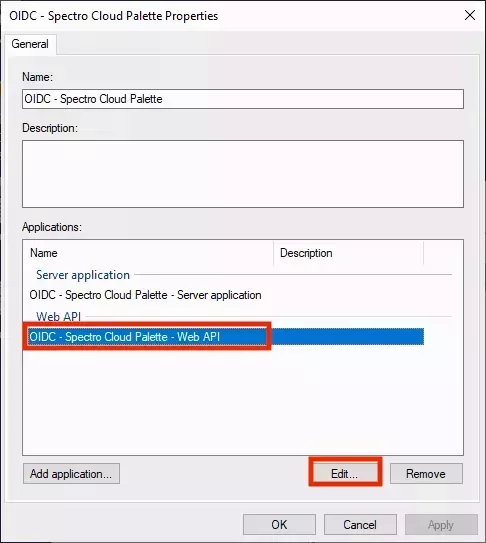
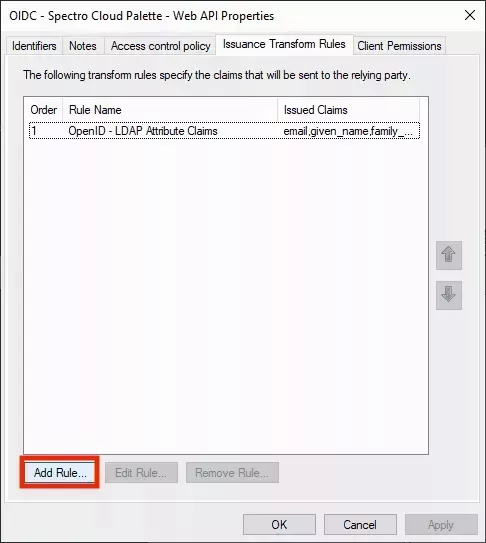
On the Summary screen, click Next to finish the wizard. You need to set the Issuance Transform Rules for the Web API application. Open the application again by double-clicking on the Web API entry or clicking Edit.
-
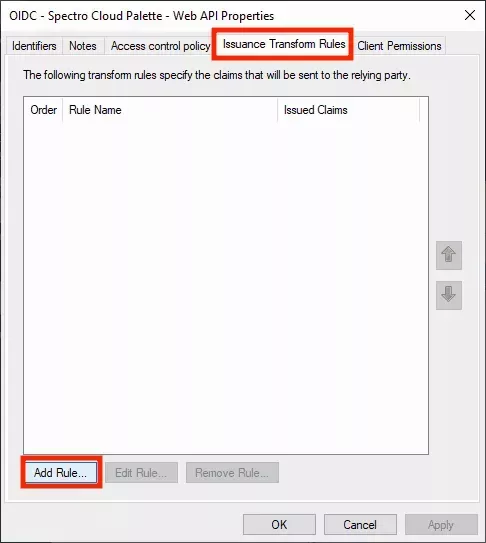
Navigate to the Issuance Transform Rules tab and click Add Rule.
-
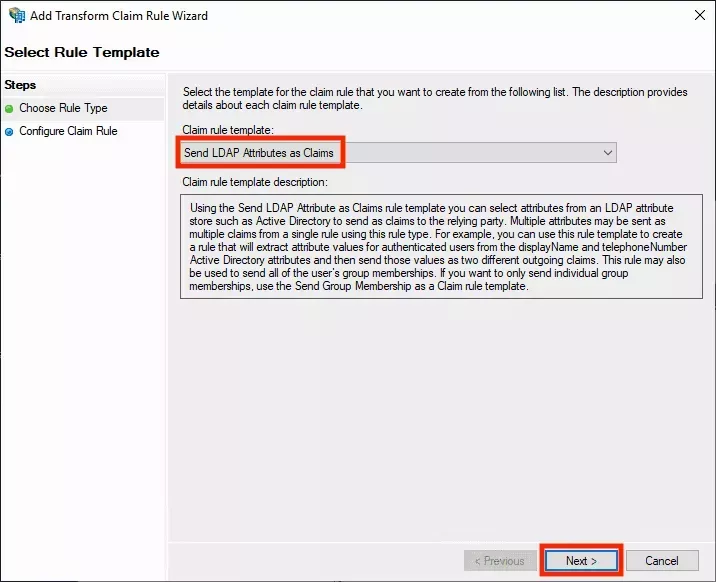
Select the Send LDAP Attributes as Claims template and click Next:
-
Name the rule
OpenID - LDAP Attribute Claims. Select Active Directory as the Attribute store and add the following LDAP mappings:- E-Mail-Addresses -->
email - Given Name -->
given_name - Surname -->
family_name
You can select the items on the left from the list. You will need to type the items on the right manually. Ensure you use all lowercase characters for the values on the right:

- E-Mail-Addresses -->
-
Click Finish to add the rule. Now click on Add Rule... again to add the second rule.
-
Select the Send Group Membership as Claims template and click Next:
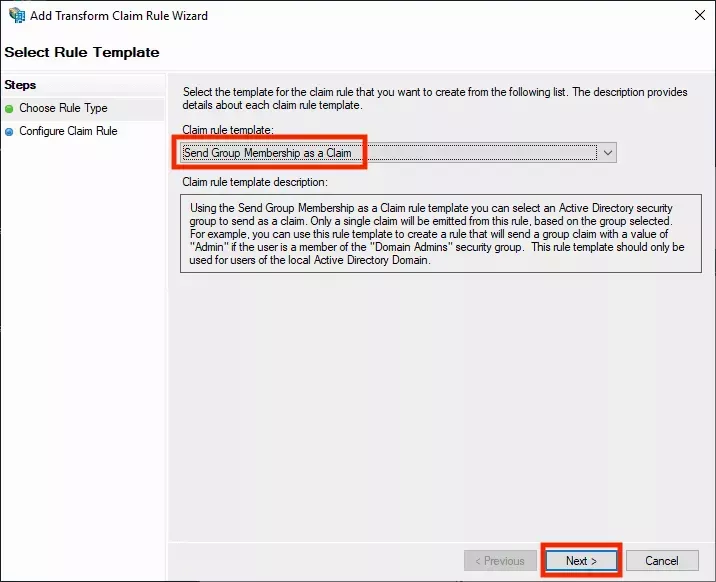
-
In the next screen, define the group claim as desired. In the following example, a group in Active Directory is called
SpectroTeam - Admins. The desired behavior is for anyone that is a member of that group, to be issued agroupsclaim with the valueAdmins. In Palette this user will automatically be mapped to a group with the same name,Admins. You can assign RBAC permissions to that group in Palette to give it the desired access.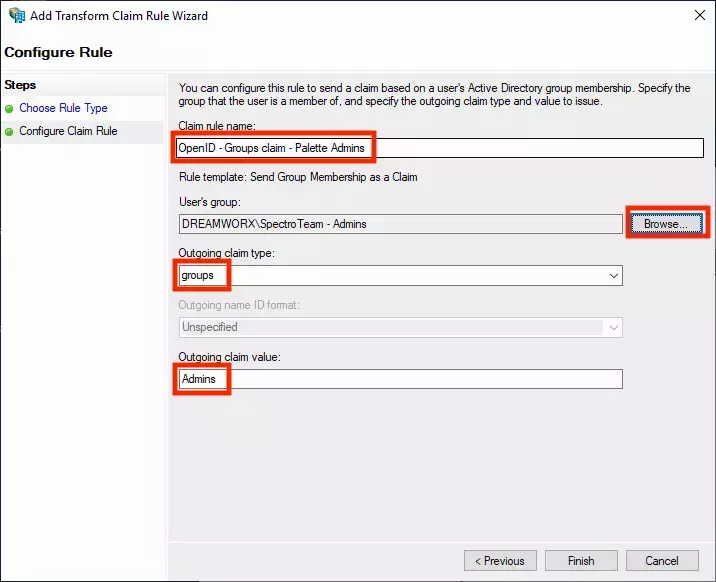
-
Click Finish to add the rule. Click OK to save the changes to the Web API rule and click OK again to save the changes to the application group.
-
Take note of your AD FS identifier, you will need this for Palette in the next step. Typically this is your AD FS name plus
/adfs. You can also take the Federation Service identifier and remove/services/trustfrom that URL.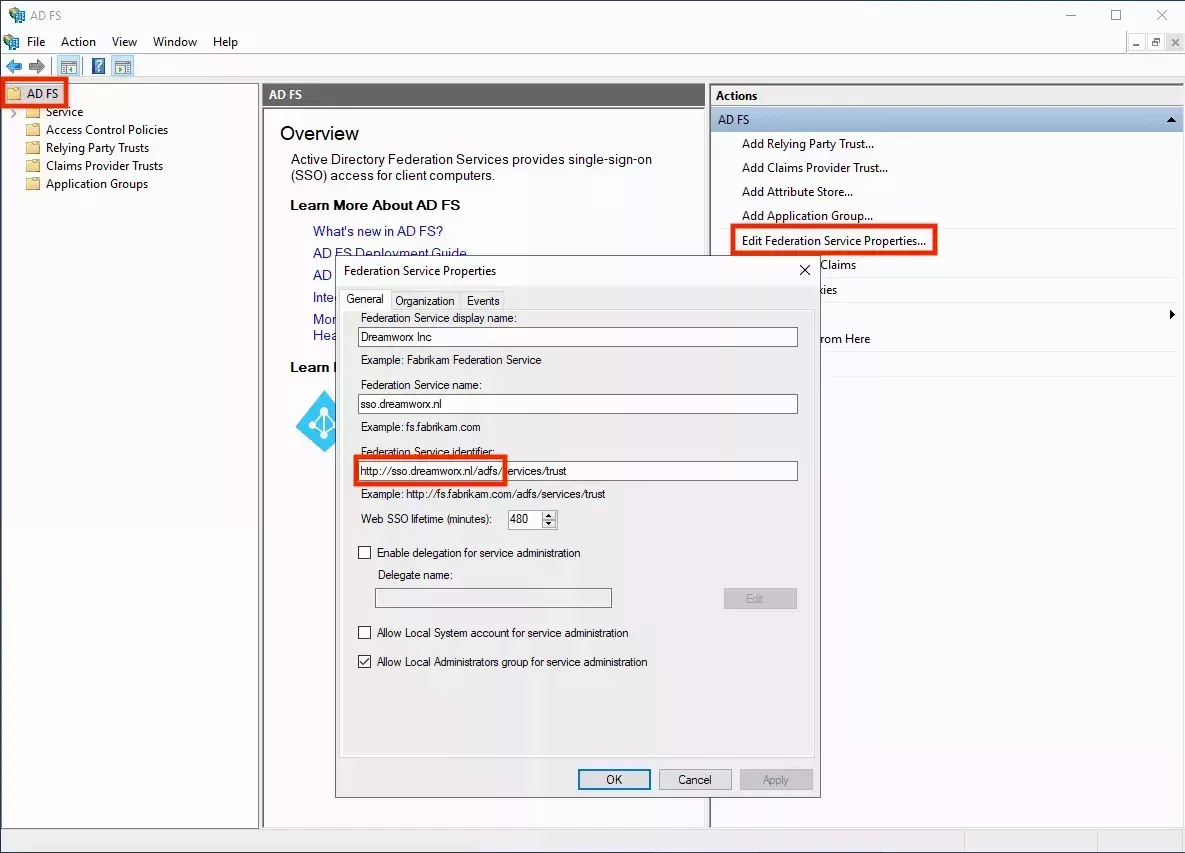
Enable OIDC SSO in Palette
-
Open a web browser and navigate to your Palette subscription.
-
Navigate to left Main Menu and select Tenant Settings. Next, click on SSO and select the OIDC tab. Enter the following information.
Parameter Value Issuer URL Your AD FS issuer URL. Typically this is your AD FS name plus /adfs. Client ID The client identifier that you saved in step 4. Client Secret The shared secret that you generated in step 8. Default Teams Leave blank if you don't want users without group claims to be assigned to a default group. If you do, enter the desired default group name. If you use this option, be careful with how much access you give to the group. Scopes Set this to openidandallatclaims.Email Keep emailas the default.First Name Keep given_nameas the default.Last Name Keep family_nameas the default.Spectro Team Keep groupsas the default.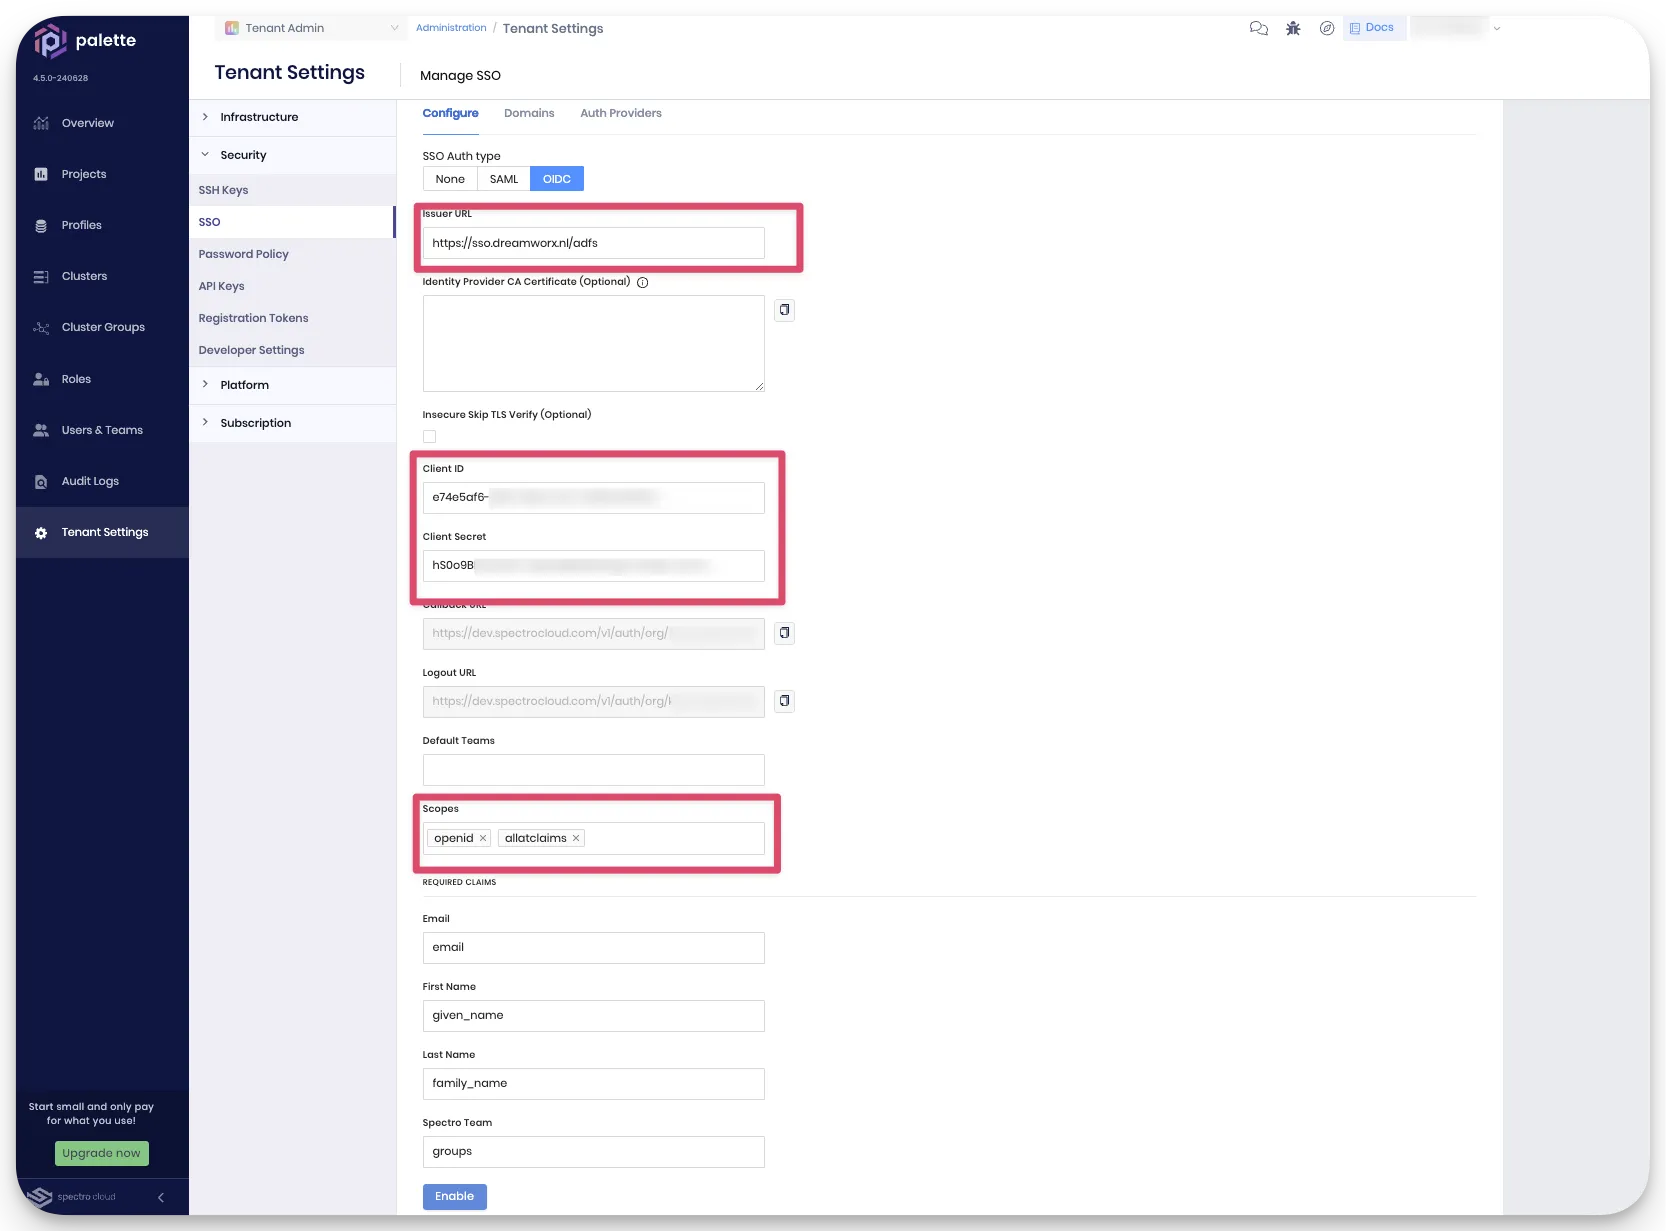
-
When all the information has been entered, click Enable to enable SSO. You will receive a message stating OIDC configured successfully.
Create Teams in Palette
The remaining step is to create teams in Palette for the group claims that you configured in AD FS, and give them the
appropriate permissions. For this example, you will create the Admins team and give it Tenant Admin permissions.
You can repeat this for any other team that you configured with group claims.
-
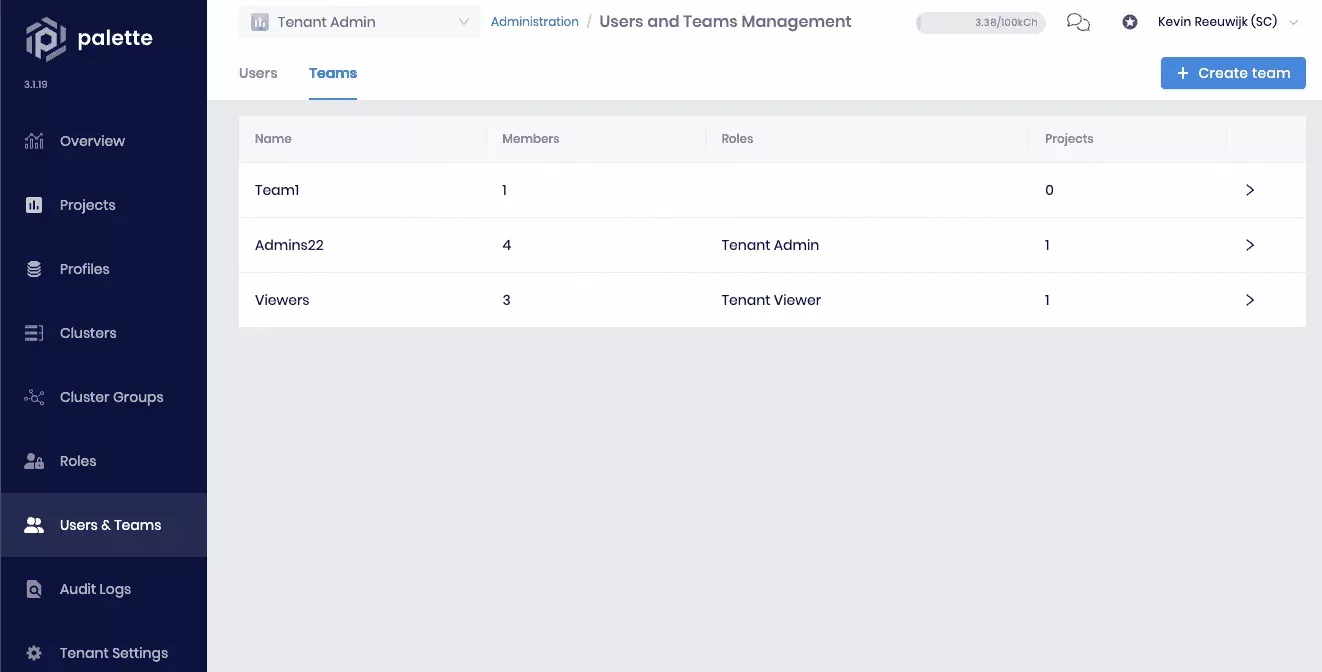
Open a web browser and navigate to your Palette subscription. Navigate to Tenant Settings --> Users & Teams --> Teams tab, and click + Create Team.
-
Specify
Adminsin the Team name field. You don't need to set any members now, as this will happen automatically from the SSO. Click Confirm to create the team.
-
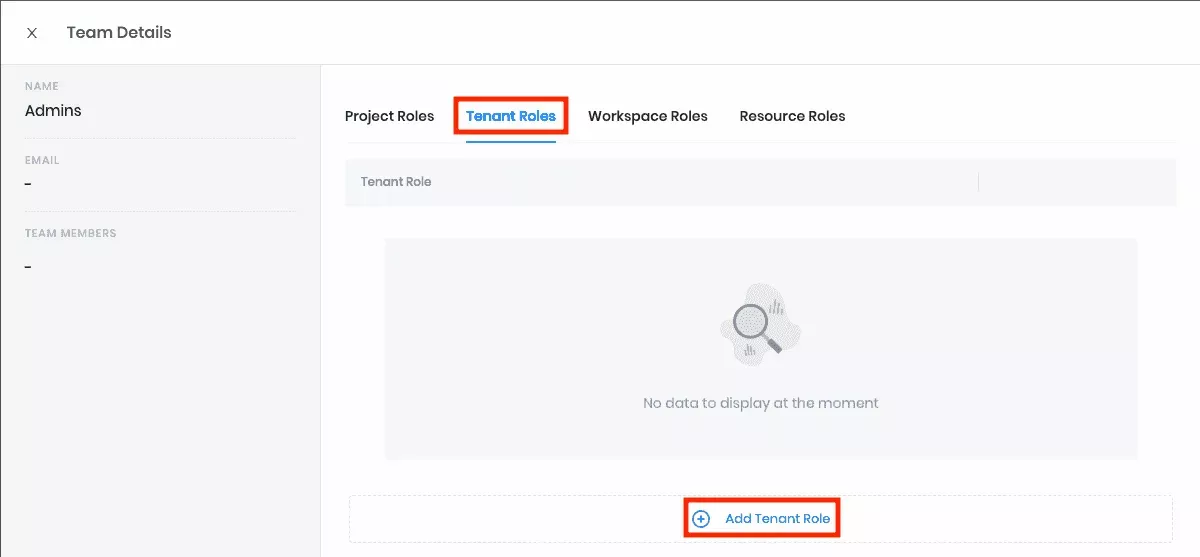
The list of teams displays again. Select the newly created Admins team to review its details. To give this team administrative access to the entire tenant and all the projects in it, assign the Tenant Admin role. Select Tenant Roles and click + Add Tenant Role.
-
Click on Tenant Admin to enable the role. Click Confirm to add the role.

You will receive a message stating Roles have been updated. Repeat this procedure for any other teams, taking care to ensure they are given the appropriate permissions.
-
Click the X next to Team Details in the top left corner to exit this screen.
You have now successfully configured Palette SSO based on OIDC with Microsoft AD FS.
Validate
-
Log in to Palette through SSO as a user that is a member of the
SpectroTeam - Adminsgroup in Active Directory to verify that users are automatically added to theAdminsgroup in Palette.If you're still logged into Palette with a non-SSO user, log out by selecting Logout in the User Menu at top right.

-
The Palette login screen now displays a Sign in button and no longer presents a username and password field. Below the Sign In button, there is an SSO issues? --> Use your password link. This link can be used to bypass SSO and log in with a local Palette account in case there is an issue with SSO and you need to access Palette without SSO.
Click on the Sign in button to log in via SSO.

-
If this is the first time you are logging in with SSO, you will be redirected to the Microsoft AD FS login page. Depending on your organization's SSO settings, this could be a simple login form or require MFA (Multi-Factor Authentication).
Make sure you log in as a user that is a member of the
SpectroTeam - Adminsgroup in Active Directory. Once authenticated, you will automatically be redirected back to Palette and logged into Palette as that user. -
You are now automatically added to the
Adminsteam in Palette. To verify, navigate to the left Main Menu, select Tenant Settings --> Users & Teams --> Teams tab. Click the Admins team and view the team members section.
The user you logged in as has automatically been added to this team.