Add Backup Location using Dynamic Credentials
This guide provides instructions for how to add a backup location in Palette using dynamic access credentials. You use the dynamic access credentials to authenticate Palette with the backup location service provider. Refer to the Backup Location section to learn more about the supported service providers.
Dynamic Credentials with AWS STS
To support dynamic credentials with AWS, Palette uses the AWS Security Token Service (STS) authentication method. You can use AWS STS when adding an S3 bucket as the backup location. The following sections outline the prerequisites and provide detailed steps to add an S3 bucket as the backup location using the STS authentication method.
Three scenarios are supported, depending on where your Kubernetes cluster runs and where the S3 bucket lives. Select the section that matches your use case.
-
Single AWS Account with AWS STS - the cluster and the S3 bucket are in the same AWS account.
-
Multiple AWS Accounts with AWS STS - the cluster is in one AWS account and the S3 bucket is in another.
-
Non-AWS Cluster with AWS STS - the cluster runs on non-AWS infrastructure such as edge-native, AKS, or vSphere, and the S3 bucket is in an AWS account.
Single AWS Account with AWS STS
Use the following steps to add an S3 bucket as the backup location using the STS authentication method when you have one AWS account.
Prerequisites
-
If you are using a self-hosted Palette or Vertex instance, you must configure an AWS account at the instance-level to allow tenants to add AWS accounts using STS. For more information, refer to Enable Adding AWS Accounts Using STS - Palette or Enable Adding AWS Accounts Using STS - VerteX
-
An S3 bucket in the AWS account. The bucket will store the backup of your clusters or workspaces.
-
If the S3 bucket is using a customer managed AWS Key Management Service (KMS) key for server-side encryption, ensure the Palette IAM role has the necessary permissions to access the KMS key. Otherwise, Palette will be unable to put objects in the S3 bucket, resulting in backup or restore failure. Check out the Troubleshooting key access guide to learn more about common KMS issues.
-
If you are using a custom Certificate Authority (CA) for SSL/TLS connections, provide the x509 certificate in Privacy-Enhanced Mail (PEM) format to Palette.
tipUse the IAM Policy Simulator to verify the IAM role has the necessary permissions to access a customer managed KMS key. Refer to the Testing IAM policies with the IAM policy simulator guide to learn more.
-
If you are using an EKS workload cluster, you must also have:
- The AWS CLI configured with credentials that have permission to update IAM role trust policies.
kubectlconfigured to access your EKS cluster.- (Optional)
eksctl. Required only if the EKS cluster's OpenID Connect (OIDC) provider is not already registered in IAM. Refer to the Install eksctl guide for installation instructions. - The name and AWS region of your EKS cluster.
Instructions
-
Log in to Palette.
-
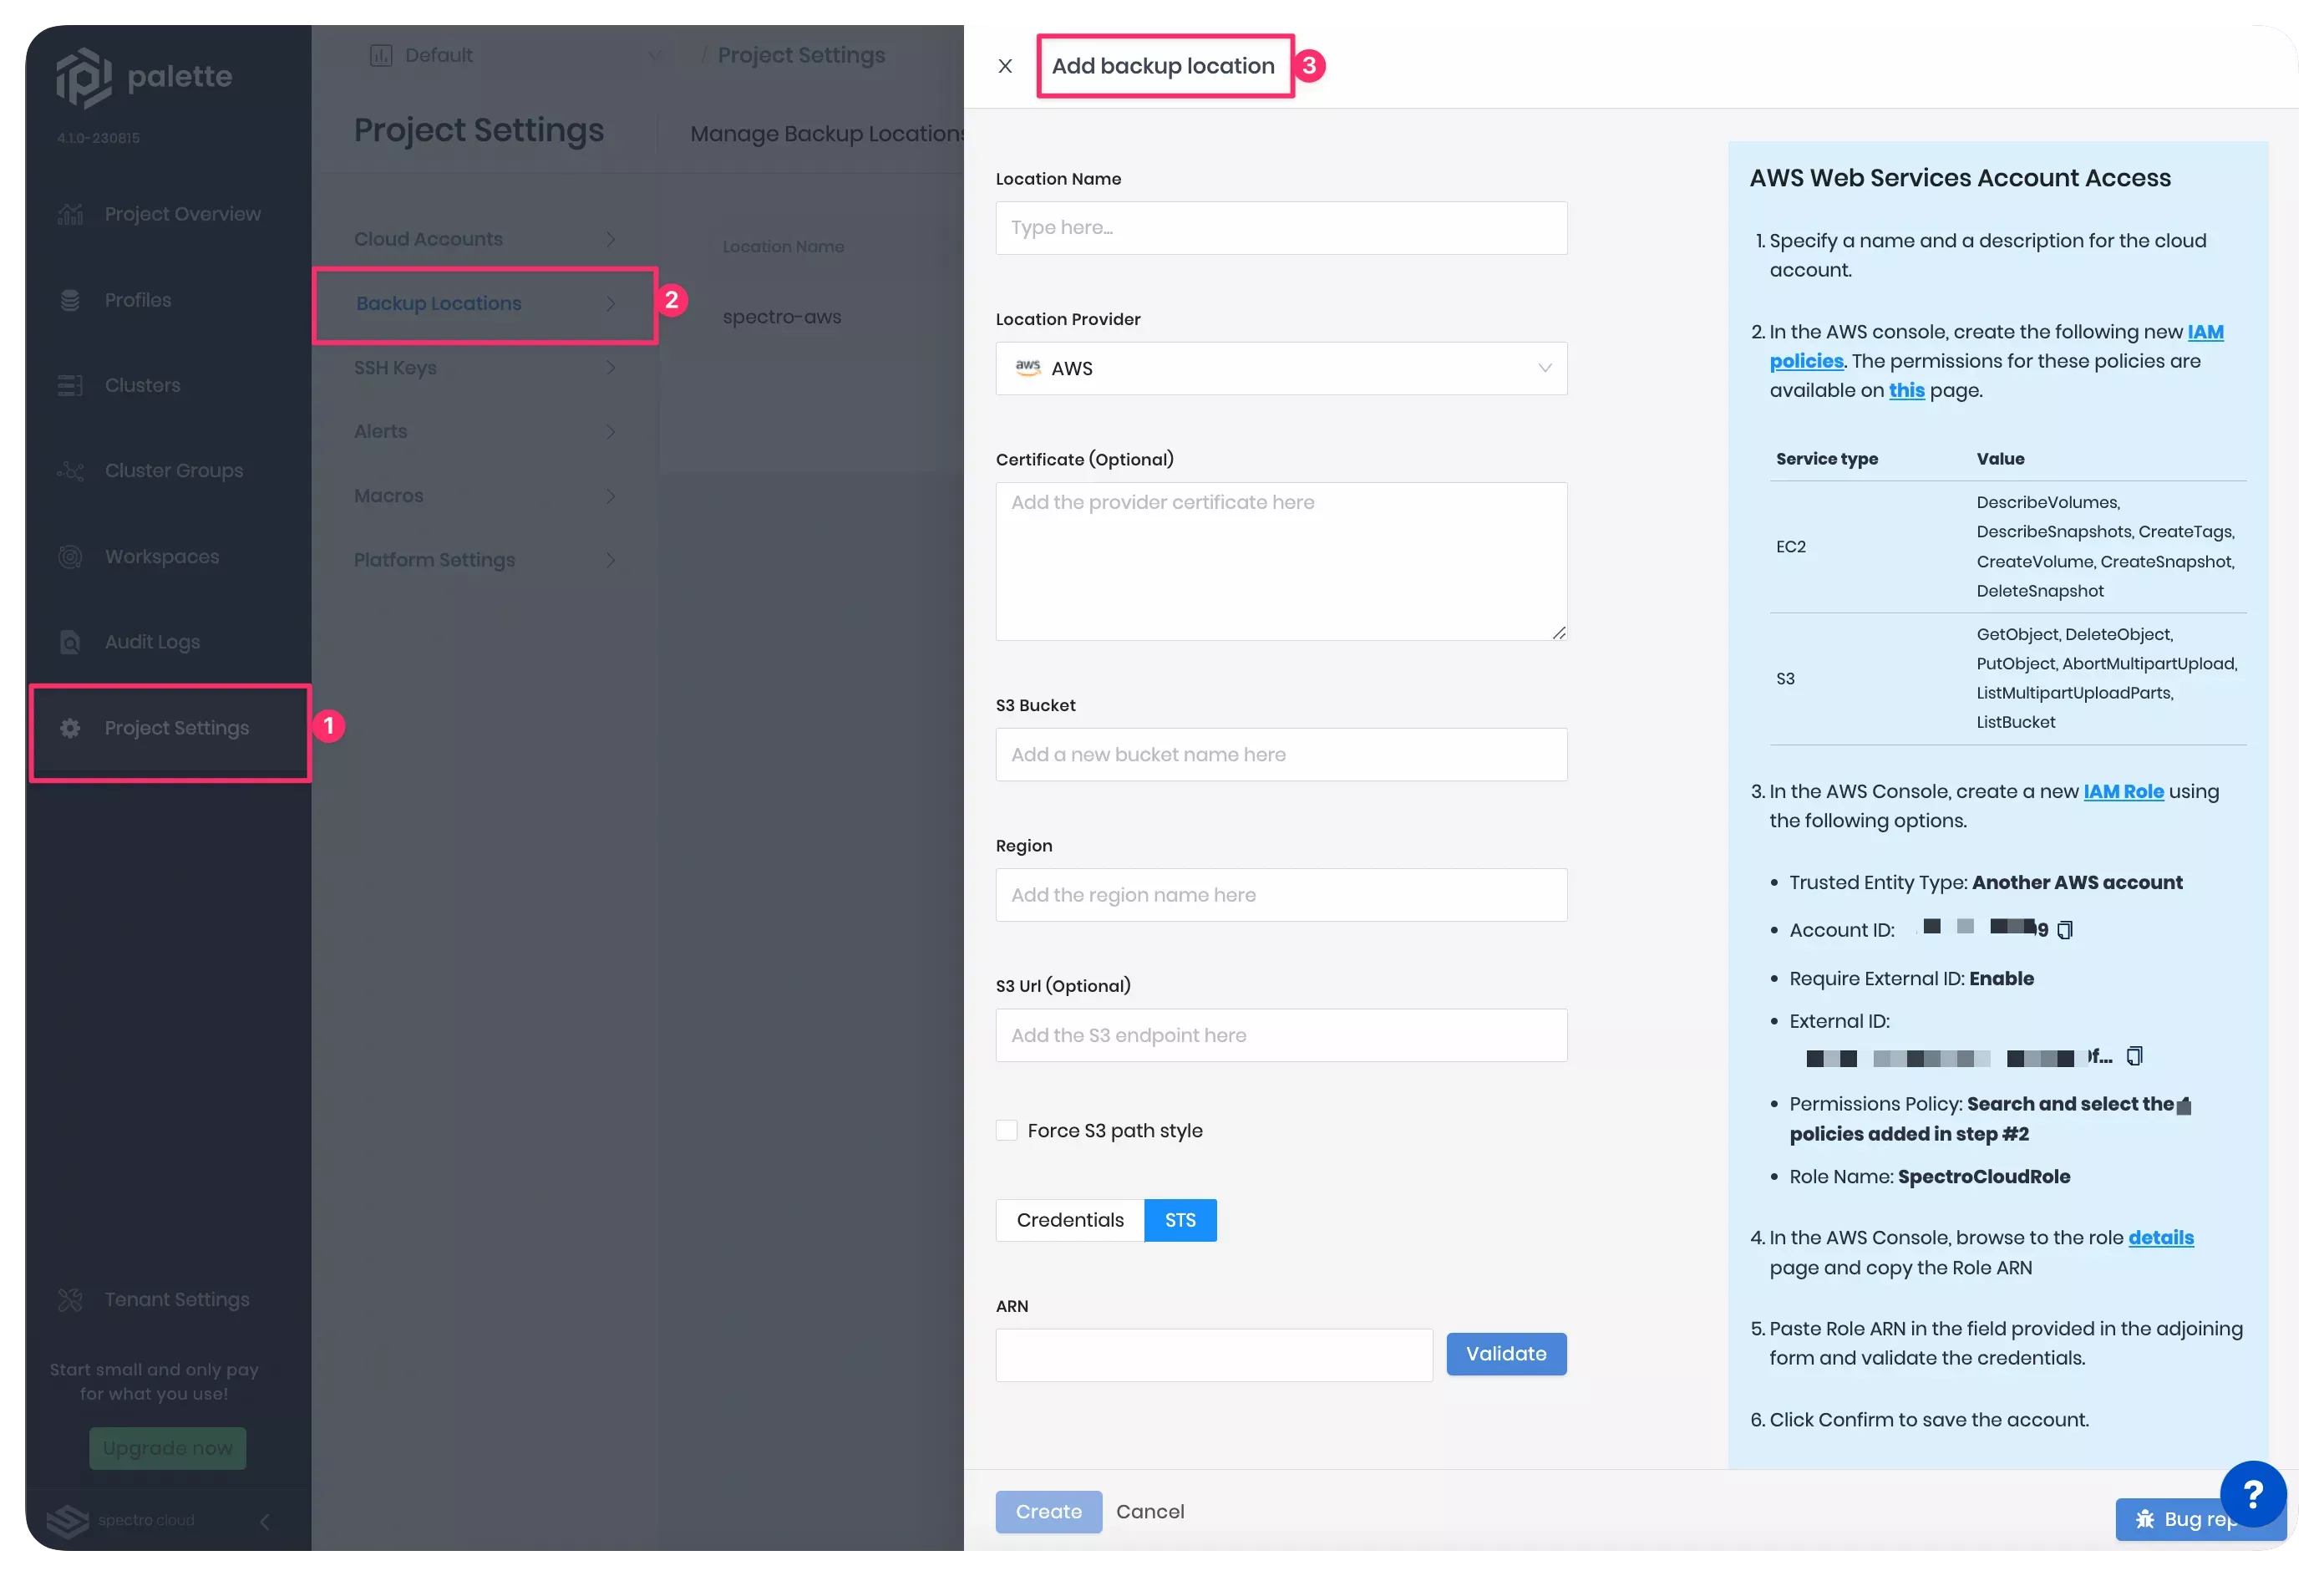
Navigate to Project Settings and click on Backup Locations.
-
Click on the Add New Backup Location button. Palette will open a wizard to configure the new backup location, as highlighted in the screenshot below.
-
Fill out the input fields listed in the table below.
Configuration Field Value Location Name Provide a name of your choice. Location Provider Select AWS from the drop-down Menu. Certificate Provide the CA bundle in PEM format if you are using a custom certificate bundle to establish SSL/TLS sessions. S3 Bucket The name of the S3 bucket you created in the object store. The bucket name must be DNS-compliant. For more information, refer to the Bucket naming rules defined by AWS. Region Region where the S3 bucket is hosted. You can check region codes in the Service endpoints section in the AWS documentation. Endpoint URL Optional bucket URL. If you choose to provide a value, refer to the Methods for accessing a bucket guide to determine the bucket URL and select the Force S3 path style checkbox. -
Next, choose the STS authentication method. You will need the Account ID and External ID values in a later step.
-
Log in to your AWS account and create the IAM policy that grants access to the S3 bucket. Palette needs permissions for the following actions to perform the backup.
Service type Actions EC2 DescribeVolumes, DescribeSnapshots, CreateTags, CreateVolume, CreateSnapshot, DeleteSnapshot S3 GetObject, DeleteObject, PutObject, AbortMultipartUpload, ListMultipartUploadParts, ListBucket If you are using the JSON view in the Policy Editor, paste the following into the editor.
{
  "Version": "2012-10-17",
  "Statement": [
    {
      "Effect": "Allow",
      "Action": [
        "ec2:DescribeVolumes",
        "ec2:DescribeSnapshots",
        "ec2:CreateTags",
        "ec2:CreateVolume",
        "ec2:CreateSnapshot",
        "ec2:DeleteSnapshot"
      ],
      "Resource": "*"
    },
    {
      "Effect": "Allow",
      "Action": [
        "s3:GetObject",
        "s3:DeleteObject",
        "s3:PutObject",
        "s3:AbortMultipartUpload",
        "s3:ListMultipartUploadParts"
      ],
      "Resource": ["arn:aws:s3:::<bucket-name>/*"]
    },
    {
      "Effect": "Allow",
      "Action": ["s3:ListBucket"],
      "Resource": ["arn:aws:s3:::<bucket-name>"]
    }
  ]
}
Refer to the Creating IAM policies guide for additional guidance.
-
Use the AWS console to create a new IAM role in your AWS account and attach the IAM policy that you created in the previous step. Use the following configuration while creating the IAM role.
AWS Console Field Value Trusted entity type Select AWS account. AWS account Select the Another AWS account radio button. AWS Account ID Use the one displayed in Palette, which is Palette's account ID. Options Select the Require external ID checkbox. External ID Use the one displayed in Palette. Palette generates the external ID. Permissions policies Attach the IAM policy you created in the previous step. Role name Provide a name of your choice. Role description Provide an optional description. 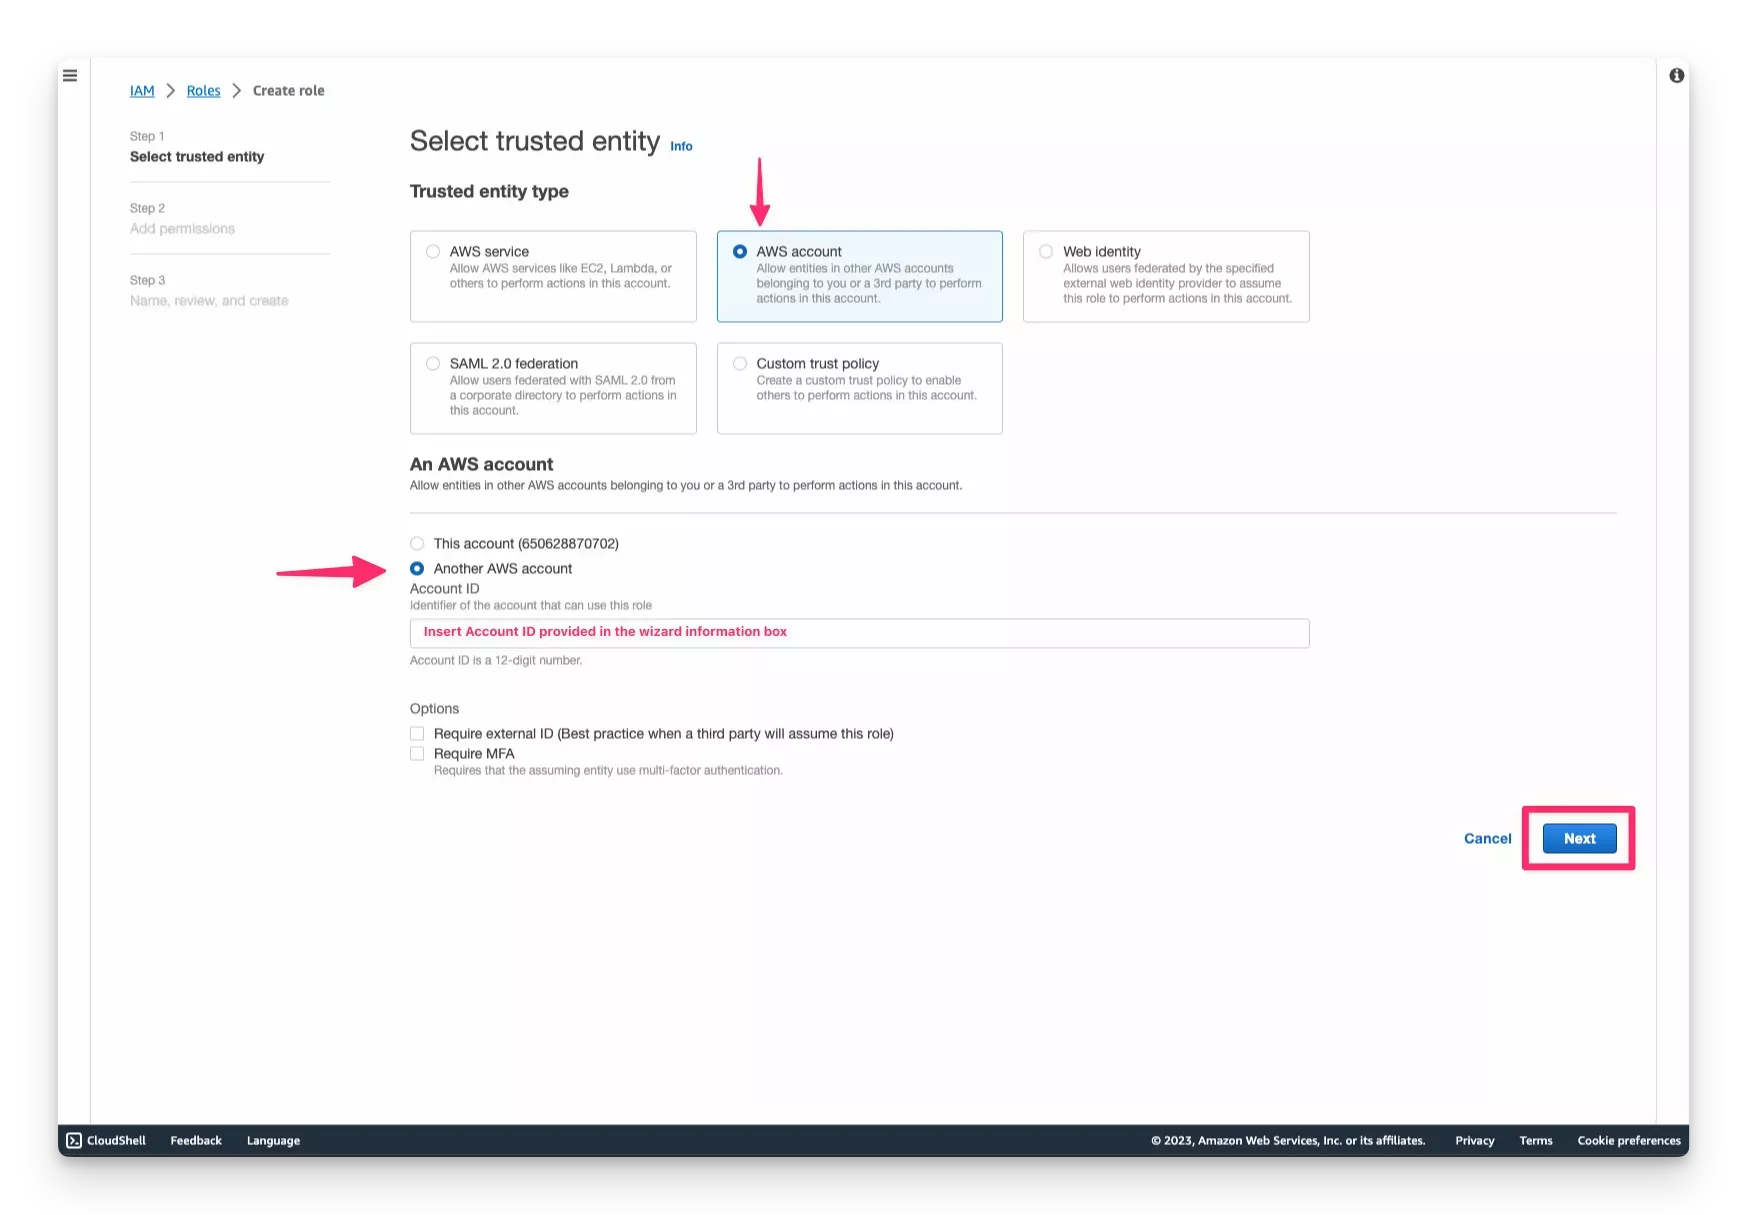
-
If you are using an IAM user or role with static credentials to deploy clusters, extend the trust policy on the backup IAM role you just created so the deployment IAM principal can also assume it. This step applies only when the backup role is separate from the role used for cluster deployment. If the same role serves both, no change is needed.
To learn how to extend the trust policy on the IAM role for this scenario, refer to Troubleshooting clusters.
-
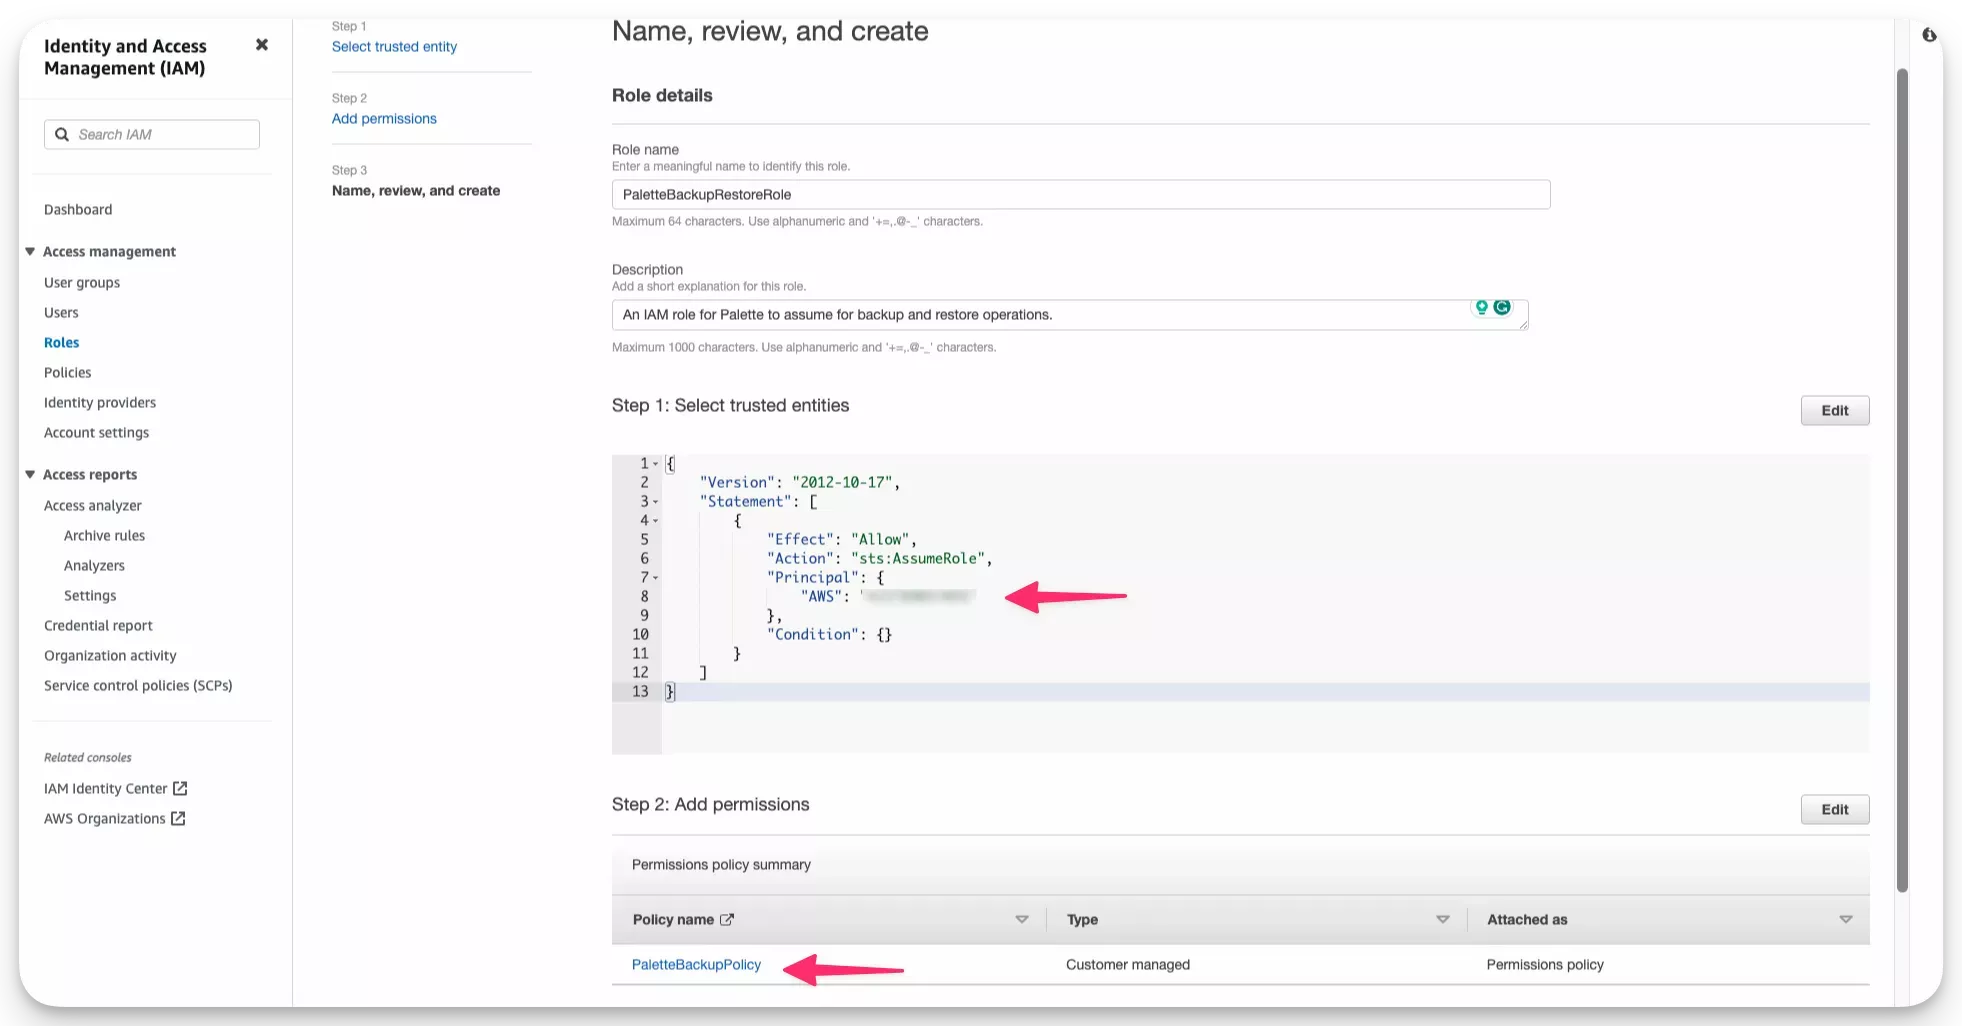
Review the details of the newly created IAM role.
-
Use the AWS console to open the role that you just created and copy the Amazon Resource Name (ARN).
-
Switch back to Palette, and resume the backup location creation wizard. Paste the copied IAM role ARN into the ARN input field.
-
Click on Validate. Palette will display a validation status message. If the validation status message indicates a success, proceed to the next step. If the validation status message indicates an error, review the error message and verify the IAM configurations you provided. Ensure you have provided the correct IAM role ARN, Palette external ID, and that the IAM role has the required IAM policy permissions defined in step 6.
-
Click on the Create button.
You now have a backup location for Palette to store the backup of your clusters or workspaces. This backup location uses AWS STS to authenticate Palette with the S3 bucket.
The next step depends on your cluster type.
- AWS IaaS workload clusters - no additional configuration is required. The node's instance role provides the credentials to access the S3 bucket.
- EKS workload clusters - update the backup IAM role trust policy to support IAM Roles for Service Accounts (IRSA). Expand the following section for the steps.
EKS workload clusters: update the backup IAM role trust policy for IRSA
When you created the backup IAM role in step 7, the AWS console generated a trust policy containing a single statement that lets Palette assume the role. The following steps append a second statement to that same trust policy so EKS pods can also assume the role using IAM Roles for Service Accounts (IRSA), while keeping the original Palette statement in place.
-
Retrieve the OIDC issuer URL for the EKS cluster. Replace
<cluster-name>and<region>with your cluster name and AWS region.aws eks describe-cluster \
--name <cluster-name> \
--region <region> \
--query "cluster.identity.oidc.issuer" \
--output textExpected outputhttps://oidc.eks.us-east-1.amazonaws.com/id/EXAMPLED539D4633E53DE1B71EXAMPLERecord the ID value at the end of the URL. The ID follows the last
/in the path. You will need this value in the following steps. -
Confirm the OIDC provider is registered in IAM.
aws iam list-open-id-connect-providersExpected output{
"OpenIDConnectProviderList": [
{
"Arn": "arn:aws:iam::123456789012:oidc-provider/oidc.eks.us-east-1.amazonaws.com/id/EXAMPLED539D4633E53DE1B71EXAMPLE"
}
]
}Palette registers the OIDC provider automatically during EKS cluster provisioning. If the provider URL from step 1 is not present in the output, run the following command to register it. Replace
<cluster-name>and<region>with your values.eksctl utils associate-iam-oidc-provider \
--cluster <cluster-name> \
--region <region> \
--approveExpected output2024-01-01 00:00:00 [ℹ] will create IAM Open ID Connect provider for cluster <cluster-name> in "<region>"
2024-01-01 00:00:00 [✔] created IAM Open ID Connect provider for cluster<cluster-name> in "<region>"For additional guidance, refer to the Creating an IAM OIDC provider for your cluster guide in the AWS documentation.
-
Retrieve the current trust policy of the backup IAM role and save it to a local file. Replace
<role-name>with the name of your backup IAM role.aws iam get-role \
--role-name <role-name> \
--query 'Role.AssumeRolePolicyDocument' \
--output json > trust-policy.jsonNo output is displayed. The current trust policy is saved to
trust-policy.jsonin the current directory. -
Open
trust-policy.jsonand add the following statement to theStatementarray. Use the table below to identify the values to substitute for each placeholder before adding the statement to the file.Placeholder Description <aws-account-id>Your AWS account ID <region>The AWS region where the EKS cluster is deployed <oidc-id>The OIDC ID from step 1 {
"Effect": "Allow",
"Principal": {
"Federated": "arn:aws:iam::<aws-account-id>:oidc-provider/oidc.eks.<region>.amazonaws.com/id/<oidc-id>"
},
"Action": "sts:AssumeRoleWithWebIdentity",
"Condition": {
"StringLike": {
"oidc.eks.<region>.amazonaws.com/id/<oidc-id>:sub": "system:serviceaccount:*:velero-server"
},
"StringEquals": {
"oidc.eks.<region>.amazonaws.com/id/<oidc-id>:aud": "sts.amazonaws.com"
}
}
}The
StringLikecondition uses a wildcard (*) for the namespace because Palette generates a unique namespace for each cluster's Velero installation in the formatcluster-<hash>.tipIf you share one backup IAM role across multiple EKS clusters, use
StringEqualswith the specific namespace and add one statement per cluster. This limits role assumption to thevelero-serverpod in a specific namespace on each cluster. To determine the Velero namespace for a given cluster, runkubectl get namespaceson that cluster and look for a namespace in the formatcluster-<hash>.After adding the new statement, the trust policy must include both the existing Palette trust statement and the new IRSA statement. The following example shows the expected result. Use the table below to identify the values to substitute for each placeholder.
Placeholder Description <aws-account-id-of-palette>The Palette AWS account ID, displayed in the backup location wizard <your-external-id>The external ID generated by Palette, displayed in the backup location wizard <aws-account-id>Your AWS account ID <region>The AWS region where the EKS cluster is deployed <oidc-id>The OIDC ID from step 1 {
"Version": "2012-10-17",
"Statement": [
{
"Effect": "Allow",
"Principal": {
"AWS": "arn:aws:iam::<aws-account-id-of-palette>:root"
},
"Action": "sts:AssumeRole",
"Condition": {
"StringEquals": {
"sts:ExternalId": "<your-external-id>"
}
}
},
{
  "Effect": "Allow",
  "Principal": {
    "Federated": "arn:aws:iam::<aws-account-id>:oidc-provider/oidc.eks.<region>.amazonaws.com/id/<oidc-id>"
  },
  "Action": "sts:AssumeRoleWithWebIdentity",
  "Condition": {
    "StringLike": {
      "oidc.eks.<region>.amazonaws.com/id/<oidc-id>:sub": "system:serviceaccount:*:velero-server"
    },
    "StringEquals": {
      "oidc.eks.<region>.amazonaws.com/id/<oidc-id>:aud": "sts.amazonaws.com"
    }
  }
}
]
} -
Apply the updated trust policy to the backup IAM role. Replace
<role-name>with the name of your backup IAM role.aws iam update-assume-role-policy \
--role-name <role-name> \
--policy-document file://trust-policy.jsonA successful update returns no output.
-
Confirm the backup location is available. First, find the Velero namespace on your cluster. Palette generates a unique namespace for each cluster's Velero installation in the format
cluster-<hash>.kubectl get namespaces | grep cluster-Expected outputcluster-6a02ef3b8cd2144fbadd2eff Active 10mThen check the
backupstoragelocationstatus. Replace<namespace>with the namespace from the previous command.kubectl get backupstoragelocation --namespace <namespace>Expected outputNAME PHASE LAST VALIDATED AGE DEFAULT
your-backup-location Available 20s 2m trueA status of
Availableconfirms that the trust policy is correctly configured. If the status showsUnavailable, check the error details. Anoperation error STS: AssumeRoleWithWebIdentity, StatusCode: 403error indicates a trust policy misconfiguration. Confirm the OIDC ID and AWS account ID are correct.
Validate
Use the following steps to validate adding the new backup location.
-
Log in to Palette.
-
Navigate to Project Settings and click on Backup Locations.
-
The Backup Locations page will display a list of all backup locations configured for the current project.
-
Search for the newly added backup location in the list. The presence of the backup location validates that you have successfully added a new backup location.
Multiple AWS Accounts with AWS STS
Suppose your Kubernetes cluster is deployed in AWS Account A, and you want to create the backup in AWS Account B, but the Palette instance is hosted in AWS Account C. In this scenario, Palette will allow you to use the STS authentication method to add a backup location. The diagram below presents this scenario and shows the order of authentication you must follow.
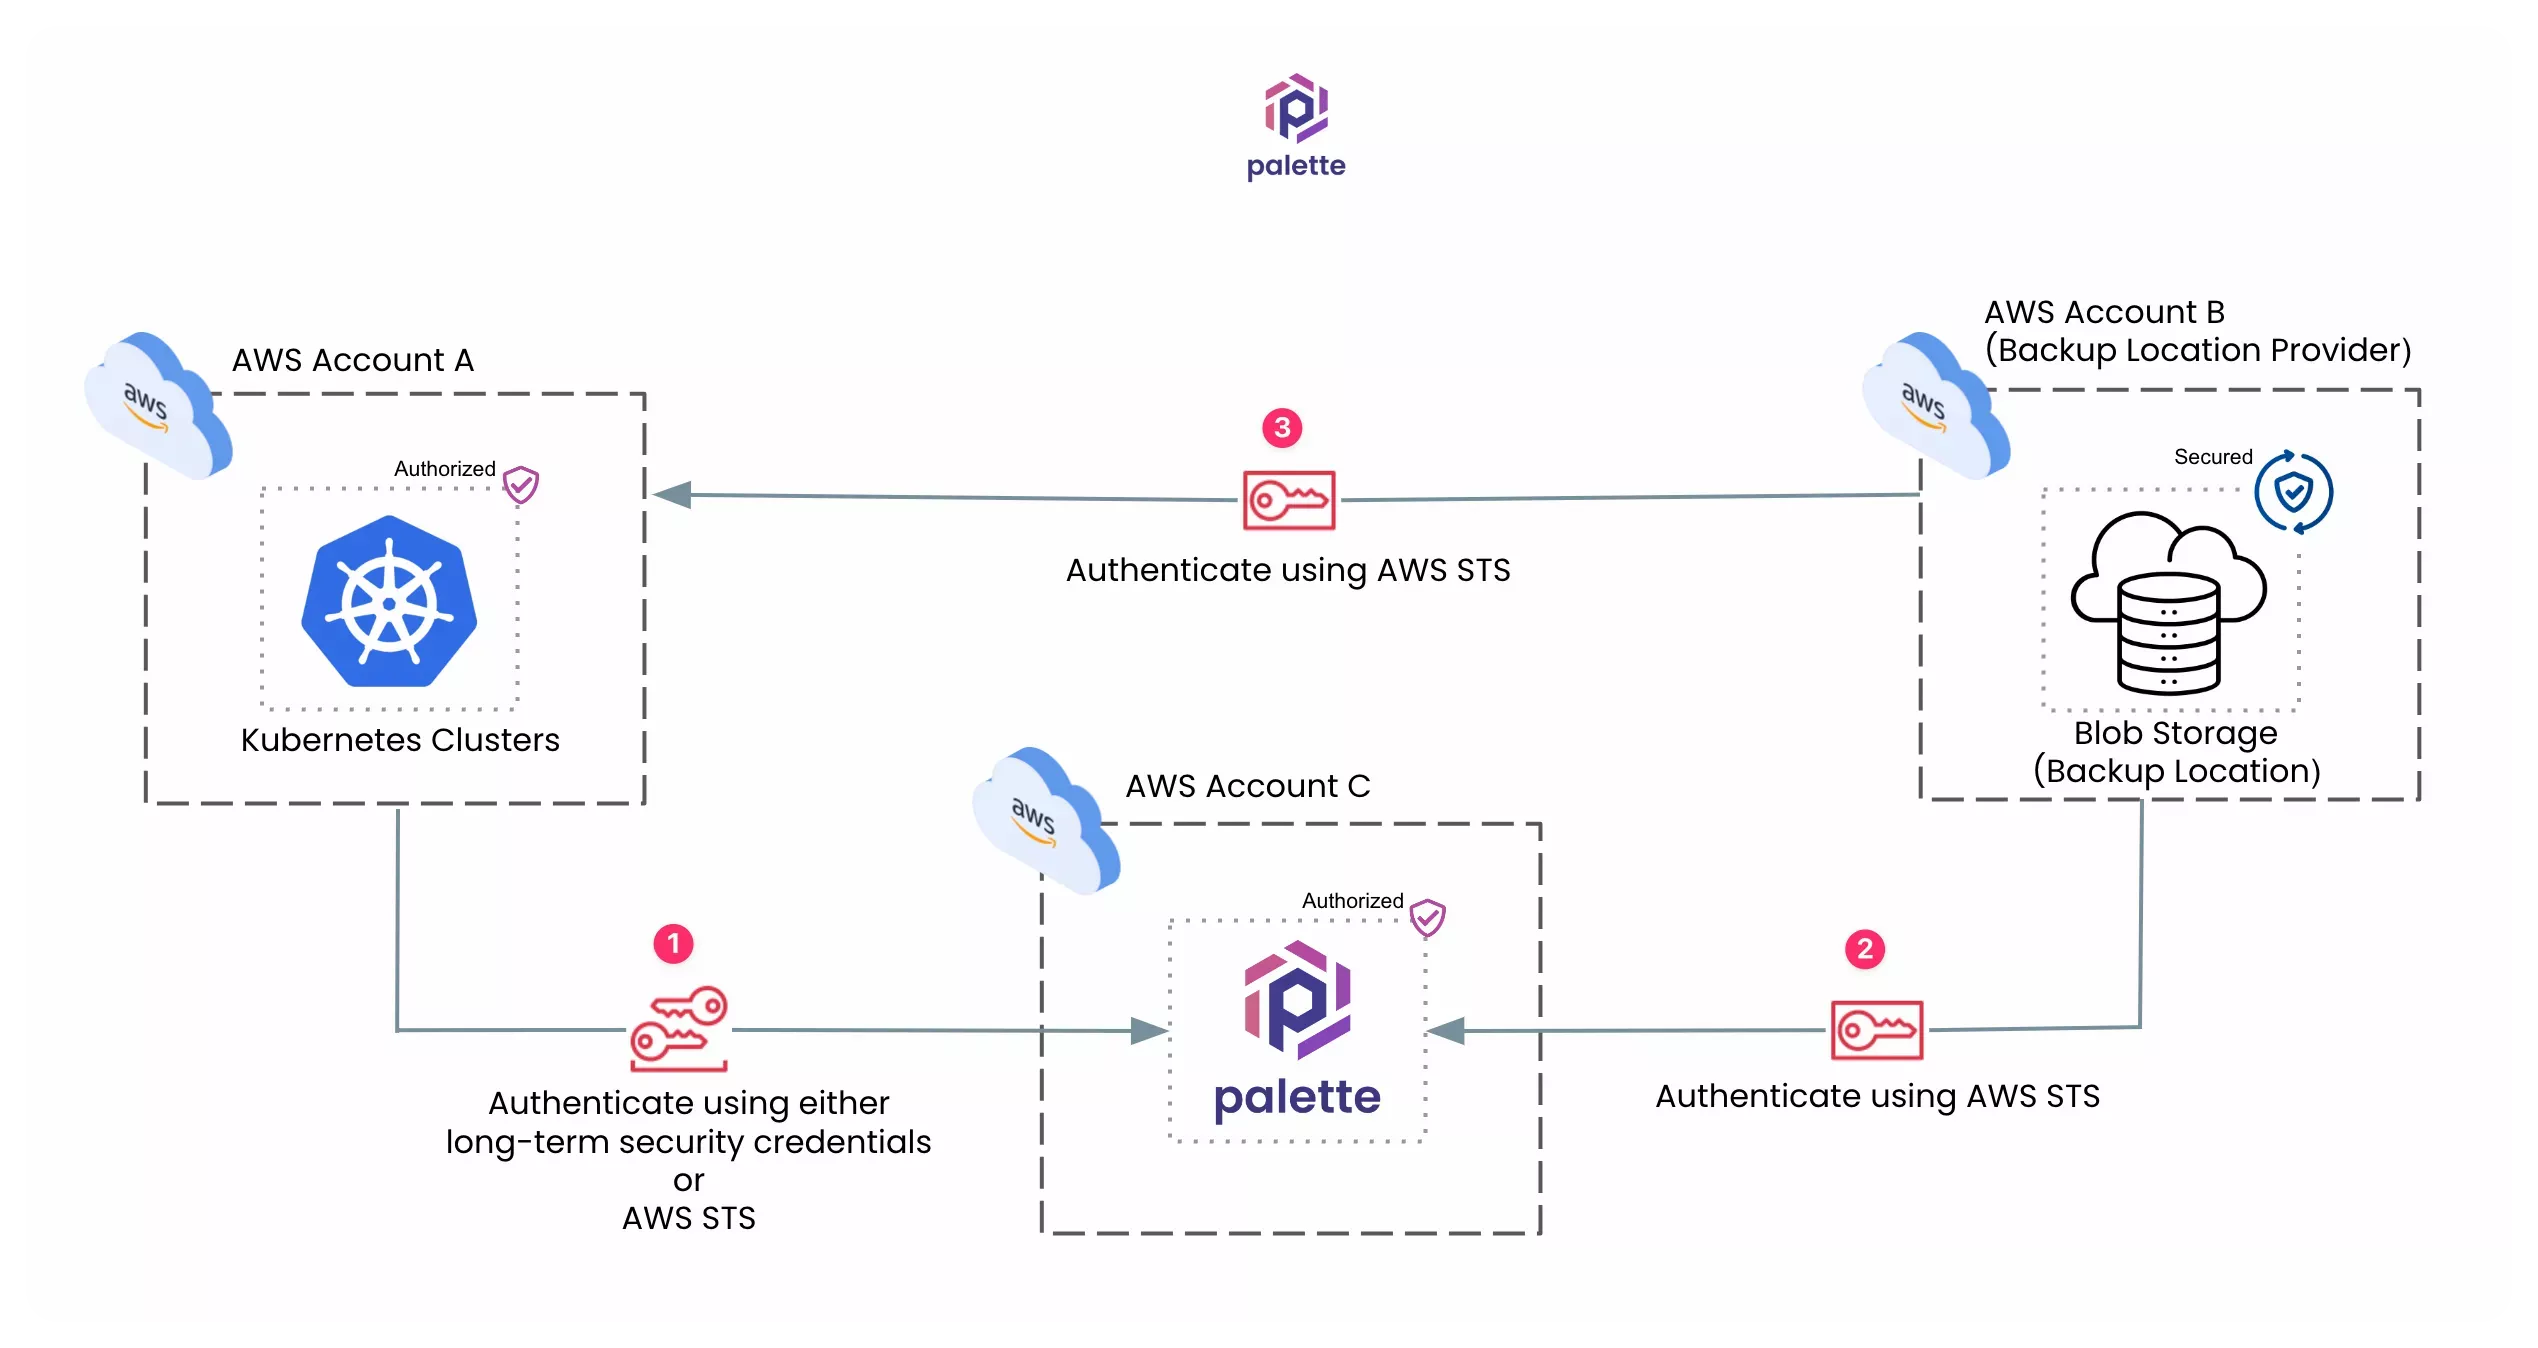
This scenario requires you to perform the following authentication steps.
-
Grant Palette access to the cluster in AWS Account A. When you register a primary cloud account in Palette, you authenticate and authorize Palette to deploy clusters in the cloud account. Check out the Add AWS Account to guidance on how to add an AWS account in Palette.
-
Give Palette permission to use the S3 buckets in AWS Account B. Set the bucket permissions and link them to an IAM role. Then, update the IAM role to let Palette assume it.
-
For EKS or AWS-only, authorize the cluster with AWS Account B for S3 bucket access. Update the IAM role to allow Palette clusters to assume it.
Use the following steps to add an S3 bucket as the backup location using the STS authentication method when you have multiple cloud accounts.
Prerequisites
-
If you are using a self-hosted Palette or Vertex instance, you must configure an AWS account at the instance-level to allow tenants to add AWS accounts using STS. For more information, refer to Enable Adding AWS Accounts Using STS - Palette or Enable Adding AWS Accounts Using STS - VerteX
-
An AWS account where you deploy Kubernetes clusters. This account will be referred to as AWS Account A.
-
Another AWS account where you want to create the backup location. This account will be referred to as AWS Account B.
-
An S3 bucket in AWS Account B. The bucket will store the backup of your clusters or workspaces.
-
If you are using a custom Certificate Authority (CA) for SSL/TLS connections, provide the x509 certificate in Privacy-Enhanced Mail (PEM) format to Palette.
-
If you are using an EKS workload cluster in AWS Account A, you must also have:
- The AWS CLI configured with credentials for AWS Account A that have permission to describe EKS clusters and list IAM OIDC providers.
- The AWS CLI configured with credentials for AWS Account B that have permission to update IAM role trust policies.
kubectlconfigured to access your EKS cluster.- (Optional)
eksctl. Required only if the EKS cluster's OIDC provider is not already registered in IAM. Refer to the Install eksctl guide for installation instructions. - The name and AWS region of your EKS cluster.
Instructions
-
Log in to Palette.
-
Navigate to Project Settings and click on Backup Locations.
-
Click on the Add New Backup Location button. Palette will open a wizard to configure the new backup location, as shown in the screenshot below.
-
Fill out the input fields listed in the table below.
Configuration Field Value Location Name Provide a name of your choice. Location Provider Select AWS from the drop-down Menu. Certificate Optional service provider x509 certificate. S3 Bucket The S3 bucket name you created in the object store. The bucket name must be DNS-compliant. For more information, refer to the Bucket naming rules defined by AWS. Region Region where the S3 bucket is hosted. You can check the region code from the Service endpoints section in the AWS documentation. Endpoint URL Optional bucket URL. If you provide a value, refer to the Methods for accessing a bucket guide to determine the bucket URL, and select the Force S3 path style checkbox. -
Next, choose the STS authentication method. You will need the Account ID and External ID values in a later step.
-
Log in to the S3 bucket's AWS account and create the IAM policy that grants access to the bucket. Palette needs permissions for the following actions to perform the backup.
Service type Actions EC2 DescribeVolumes, DescribeSnapshots, CreateTags, CreateVolume, CreateSnapshot, DeleteSnapshot S3 GetObject, DeleteObject, PutObject, AbortMultipartUpload, ListMultipartUploadParts, ListBucket If you are using the JSON view in the Policy Editor, paste the following into the editor.
{
  "Version": "2012-10-17",
  "Statement": [
    {
      "Effect": "Allow",
      "Action": [
        "ec2:DescribeVolumes",
        "ec2:DescribeSnapshots",
        "ec2:CreateTags",
        "ec2:CreateVolume",
        "ec2:CreateSnapshot",
        "ec2:DeleteSnapshot"
      ],
      "Resource": "*"
    },
    {
      "Effect": "Allow",
      "Action": [
        "s3:GetObject",
        "s3:DeleteObject",
        "s3:PutObject",
        "s3:AbortMultipartUpload",
        "s3:ListMultipartUploadParts"
      ],
      "Resource": ["arn:aws:s3:::<bucket-name>/*"]
    },
    {
      "Effect": "Allow",
      "Action": ["s3:ListBucket"],
      "Resource": ["arn:aws:s3:::<bucket-name>"]
    }
  ]
}
Refer to the Creating IAM policies guide for additional guidance.
-
In the bucket's AWS account, create a new IAM role and attach the IAM policy you created in the previous step. Refer to the Creating a role to delegate permissions to an IAM user guide to learn how to create an IAM role. Use the following configuration while creating the IAM role.
AWS Console Field Value Trusted entity type Select the AWS account option. AWS account Select the Another AWS account radio button. AWS Account ID Use the one displayed in Palette, which is Palette's account ID. Options Select the Require external ID checkbox. External ID Use the one displayed in Palette. Palette generates the external ID. Permissions policies Attach the IAM policy you created in the previous step. Role name Provide a name of your choice. Role description Provide an optional description. -
If you are using an IAM user or role with static credentials to deploy clusters, extend the trust policy on the backup IAM role you just created so the deployment IAM principal can also assume it. This step applies only when the backup role is separate from the role used for cluster deployment. If the same role serves both, no change is needed.
To learn how to extend the trust policy on the IAM role for this scenario, refer to Troubleshooting clusters.
-
Review the details of the newly created IAM role in AWS Account B.
-
With the IAM role open in the AWS Console, select the Trust relationships tab. Palette is already defined as a trusted entity in the trust policy.
-
Select Edit trust policy and append the following statement to the trust policy. This authorizes the cluster in AWS Account A to assume the role. Replace the
<account-id-for-aws-account-a>placeholder with the AWS account ID for AWS Account A.{
"Effect": "Allow",
"Principal": {
"AWS": "arn:aws:iam::<account-id-for-aws-account-a>:root"
},
"Action": "sts:AssumeRole"
}If you want to establish a trust relationship with a specific IAM role in AWS Account A, say
SpectroCloudRole, you can use the"arn:aws:iam::<account-id-for-aws-account-a>:role/SpectroCloudRole"ARN instead.Your IAM trust policy should be similar to the policy defined below. The IAM policy has two trust relationships, one for Palette and another for AWS Account A.
{
"Version": "2012-10-17",
"Statement": [
{
"Effect": "Allow",
"Principal": {
"AWS": "arn:aws:iam::<aws-account-id-of-palette>:root"
},
"Action": "sts:AssumeRole",
"Condition": {
"StringEquals": {
"sts:ExternalId": "<your-external-id>"
}
}
},
{
  "Effect": "Allow",
  "Principal": {
    "AWS": "arn:aws:iam::<account-id-for-aws-account-a>:root"
  },
  "Action": "sts:AssumeRole"
}
]
}In your case, the
<aws-account-id-of-palette>and<your-external-id>placeholders will contain the values you used while creating the IAM role.infoCheck out How to use trust policies with IAM roles for a deep dive into the IAM trust policies.
-
Use the AWS console to copy the Amazon Resource Name (ARN) of the IAM role.
-
Switch back to Palette, and resume the backup location creation wizard. Paste the copied IAM role ARN into the ARN field.
-
Click on Validate. Palette will display a validation status message. If the validation status message indicates a success, proceed to the next step. If the validation status message indicates an error, review the error message and verify the IAM configurations you provided. Ensure you have provided the correct IAM role ARN, Palette external ID, and that the IAM role has the required IAM policy permissions defined in step 6.
-
Click on the Create button.
You now have a backup location for Palette to store the backup of your clusters or workspaces. This backup location uses AWS STS to authenticate Palette with the S3 bucket in AWS Account B.
The next step depends on your cluster type.
- AWS IaaS workload clusters - no additional configuration is required. The node's instance role provides the credentials to access the S3 bucket.
- EKS workload clusters - update the backup IAM role trust policy to support IAM Roles for Service Accounts (IRSA). Expand the following section for the steps.
EKS workload clusters: update the backup IAM role trust policy for IRSA
The trust policy on the backup IAM role currently has one statement that AWS generated from the console fields in step 7 (Palette can assume) and another statement that you appended in step 11 (the AWS Account A cluster can assume). The following steps append a third statement to that same trust policy so EKS pods can assume the role using IAM Roles for Service Accounts (IRSA), while keeping the earlier statements in place.
-
Ensure your AWS CLI is configured for AWS Account A, then retrieve the OIDC issuer URL for the EKS cluster. Replace
<cluster-name>and<region>with your cluster name and AWS region.aws eks describe-cluster \
--name <cluster-name> \
--region <region> \
--query "cluster.identity.oidc.issuer" \
--output textExpected outputhttps://oidc.eks.us-east-1.amazonaws.com/id/EXAMPLED539D4633E53DE1B71EXAMPLERecord the ID value at the end of the URL. The ID follows the last
/in the path. You will need this value in the following steps. -
Confirm the OIDC provider is registered in IAM in AWS Account A.
aws iam list-open-id-connect-providersExpected output{
"OpenIDConnectProviderList": [
{
"Arn": "arn:aws:iam::123456789012:oidc-provider/oidc.eks.us-east-1.amazonaws.com/id/EXAMPLED539D4633E53DE1B71EXAMPLE"
}
]
}Palette registers the OIDC provider automatically during EKS cluster provisioning. If the provider URL from step 1 is not present in the output, run the following command to register it. Replace
<cluster-name>and<region>with your values.eksctl utils associate-iam-oidc-provider \
--cluster <cluster-name> \
--region <region> \
--approveExpected output2024-01-01 00:00:00 [ℹ] will create IAM Open ID Connect provider for cluster <cluster-name> in "<region>"
2024-01-01 00:00:00 [✔] created IAM Open ID Connect provider for cluster <cluster-name> in "<region>"For additional guidance, refer to the Creating an IAM OIDC provider for your cluster guide in the AWS documentation.
-
Switch to AWS Account B. Retrieve the current trust policy of the backup IAM role and save it to a local file. Replace
<role-name>with the name of your backup IAM role.aws iam get-role \
--role-name <role-name> \
--query 'Role.AssumeRolePolicyDocument' \
--output json > trust-policy.jsonNo output is displayed. The current trust policy is saved to
trust-policy.jsonin the current directory. -
Open
trust-policy.jsonand add the following statement to theStatementarray. Use the table below to identify the values to substitute for each placeholder before adding the statement to the file.Placeholder Description <account-id-for-aws-account-a>The AWS account ID for AWS Account A <region>The AWS region where the EKS cluster is deployed <oidc-id>The OIDC ID from step 1 {
"Effect": "Allow",
"Principal": {
"Federated": "arn:aws:iam::<account-id-for-aws-account-a>:oidc-provider/oidc.eks.<region>.amazonaws.com/id/<oidc-id>"
},
"Action": "sts:AssumeRoleWithWebIdentity",
"Condition": {
"StringLike": {
"oidc.eks.<region>.amazonaws.com/id/<oidc-id>:sub": "system:serviceaccount:*:velero-server"
},
"StringEquals": {
"oidc.eks.<region>.amazonaws.com/id/<oidc-id>:aud": "sts.amazonaws.com"
}
}
}The
StringLikecondition uses a wildcard (*) for the namespace because Palette generates a unique namespace for each cluster's Velero installation in the formatcluster-<hash>.tipIf you share one backup IAM role across multiple EKS clusters, use
StringEqualswith the specific namespace and add one statement per cluster. This limits role assumption to thevelero-serverpod in a specific namespace on each cluster. To determine the Velero namespace for a given cluster, runkubectl get namespaceson that cluster and look for a namespace in the formatcluster-<hash>.After adding the new statement, the trust policy in AWS Account B must include the existing Palette and Account A trust statements from steps 7 and 11, plus the new IRSA statement. The following example shows the expected result. Use the table below to identify the values to substitute for each placeholder.
Placeholder Description <aws-account-id-of-palette>The Palette AWS account ID, displayed in the backup location wizard <your-external-id>The external ID generated by Palette, displayed in the backup location wizard <account-id-for-aws-account-a>The AWS account ID for AWS Account A <region>The AWS region where the EKS cluster is deployed <oidc-id>The OIDC ID from step 1 {
"Version": "2012-10-17",
"Statement": [
{
"Effect": "Allow",
"Principal": {
"AWS": "arn:aws:iam::<aws-account-id-of-palette>:root"
},
"Action": "sts:AssumeRole",
"Condition": {
"StringEquals": {
"sts:ExternalId": "<your-external-id>"
}
}
},
{
"Effect": "Allow",
"Principal": {
"AWS": "arn:aws:iam::<account-id-for-aws-account-a>:root"
},
"Action": "sts:AssumeRole"
},
{
  "Effect": "Allow",
  "Principal": {
    "Federated": "arn:aws:iam::<account-id-for-aws-account-a>:oidc-provider/oidc.eks.<region>.amazonaws.com/id/<oidc-id>"
  },
  "Action": "sts:AssumeRoleWithWebIdentity",
  "Condition": {
    "StringLike": {
      "oidc.eks.<region>.amazonaws.com/id/<oidc-id>:sub": "system:serviceaccount:*:velero-server"
    },
    "StringEquals": {
      "oidc.eks.<region>.amazonaws.com/id/<oidc-id>:aud": "sts.amazonaws.com"
    }
  }
}
]
} -
Apply the updated trust policy to the backup IAM role in AWS Account B. Replace
<role-name>with the name of your backup IAM role.aws iam update-assume-role-policy \
--role-name <role-name> \
--policy-document file://trust-policy.jsonA successful update returns no output.
-
Confirm the backup location is available. First, find the Velero namespace on your cluster. Palette generates a unique namespace for each cluster's Velero installation in the format
cluster-<hash>.kubectl get namespaces | grep cluster-Expected outputcluster-6a02ef3b8cd2144fbadd2eff Active 10mThen check the
backupstoragelocationstatus. Replace<namespace>with the namespace from the previous command.kubectl get backupstoragelocation --namespace <namespace>Expected outputNAME PHASE LAST VALIDATED AGE DEFAULT
your-backup-location Available 20s 2m trueA status of
Availableconfirms that the trust policy is correctly configured. If the status showsUnavailable, check the error details. Anoperation error STS: AssumeRoleWithWebIdentity, StatusCode: 403error indicates a trust policy misconfiguration. Confirm the OIDC ID and AWS account ID are correct.
Validate
Use the following steps to validate adding the new backup location.
-
Log in to Palette.
-
Navigate to Project Settings and click on Backup Locations.
-
The Backup Locations page will display a list of all backup locations configured for the current project.
-
Search for the newly added backup location in the list. The presence of the backup location validates that you have successfully added a new backup location.
Non-AWS Cluster with AWS STS
You can back up a non-AWS Kubernetes cluster—for example, an edge-native, AKS, or vSphere cluster—to an AWS S3 bucket using STS authentication. Palette forwards the IAM role details and access credentials to an in-cluster backup agent, which assumes the role, obtains temporary STS credentials, and writes the backup to the S3 bucket. The backup agent refreshes the credentials automatically before they expire, so scheduled backups continue without manual intervention.
The authentication flow requires the following two setup steps.
-
Grant Palette permission to assume an IAM role in the AWS backup account. This is configured through the STS account setup at the Palette instance level (self-hosted) or through the Palette-managed AWS account (SaaS).
-
Create an IAM role in the AWS backup account whose trust policy allows the Palette AWS account to assume it, and whose permissions policy grants access to the S3 bucket.
Prerequisites
-
If you are using a self-hosted Palette or VerteX instance, you must configure an AWS account at the instance level to allow tenants to add AWS accounts using STS. For more information, refer to Enable Adding AWS Accounts Using STS - Palette or Enable Adding AWS Accounts Using STS - VerteX.
-
A Kubernetes cluster on a non-AWS infrastructure—for example, edge-native, AKS, or vSphere.
-
An AWS account that contains an S3 bucket where the backups will be stored.
-
If you are using a custom Certificate Authority (CA) for SSL/TLS connections, provide the x509 certificate in Privacy-Enhanced Mail (PEM) format to Palette.
Instructions
Use the following steps to add an S3 bucket as the backup location for a non-AWS cluster.
-
Log in to Palette.
-
Navigate to Project Settings and click on Backup Locations.
-
Click on Add New Backup Location.
-
Fill out the input fields listed in the table below.
Configuration Field Value Location Name A name of your choice. Location Provider Select AWS from the drop-down menu. Certificate The CA bundle in PEM format, if you are using a custom certificate bundle for SSL/TLS. S3 Bucket The name of the S3 bucket in AWS Account B. The bucket name must be DNS-compliant. Region The region where the S3 bucket is hosted. Endpoint URL Optional bucket URL. If you provide one, select the Force S3 path style checkbox. -
Choose the STS authentication method. You will need the Account ID and External ID values in a later step.
-
Log in to the S3 bucket's AWS account and create the IAM policy that grants access to the bucket. Palette needs permissions for the following actions to perform the backup.
Service type Actions EC2 DescribeVolumes, DescribeSnapshots, CreateTags, CreateVolume, CreateSnapshot, DeleteSnapshot S3 GetObject, DeleteObject, PutObject, AbortMultipartUpload, ListMultipartUploadParts, ListBucket If you are using the JSON view in the Policy Editor, paste the following into the editor.
{
  "Version": "2012-10-17",
  "Statement": [
    {
      "Effect": "Allow",
      "Action": [
        "ec2:DescribeVolumes",
        "ec2:DescribeSnapshots",
        "ec2:CreateTags",
        "ec2:CreateVolume",
        "ec2:CreateSnapshot",
        "ec2:DeleteSnapshot"
      ],
      "Resource": "*"
    },
    {
      "Effect": "Allow",
      "Action": [
        "s3:GetObject",
        "s3:DeleteObject",
        "s3:PutObject",
        "s3:AbortMultipartUpload",
        "s3:ListMultipartUploadParts"
      ],
      "Resource": ["arn:aws:s3:::<bucket-name>/*"]
    },
    {
      "Effect": "Allow",
      "Action": ["s3:ListBucket"],
      "Resource": ["arn:aws:s3:::<bucket-name>"]
    }
  ]
}
Refer to the Creating IAM policies guide for additional guidance.
-
In the bucket's AWS account, create a new IAM role and attach the IAM policy you created in the previous step. Use the following configuration while creating the IAM role.
AWS Console Field Value Trusted entity type Select AWS account. AWS account Select the Another AWS account radio button. AWS Account ID Use the one displayed in Palette, which is Palette's account ID. Options Select the Require external ID checkbox. External ID Use the one displayed in Palette. Palette generates the external ID. Permissions policies Attach the IAM policy you created in the previous step. Role name Provide a name of your choice. Role description Provide an optional description. -
Open the newly created IAM role in the AWS console, and then click Edit on the Summary card.
-
Select 12 hours from the Maximum session duration dropdown, and save your changes. This gives backup and restore operations on large clusters enough time to complete before the STS credentials expire.
You can also use the
max-session-durationparameter from the AWS command line to increase the expiration time. -
Use the AWS console to copy the Amazon Resource Name (ARN) of the IAM role.
-
Switch back to the Palette UI and paste the IAM role ARN into the ARN field.
-
Click on Validate. Palette will display a validation status message. If the validation status message indicates a success, proceed to the next step. If the validation status message indicates an error, review the error message and verify the IAM role ARN, the external ID in the trust policy, and the IAM policy attached to the role.
-
Click on the Create button.
Validate
Use the following steps to validate adding the new backup location.
-
Log in to Palette.
-
Navigate to Project Settings and click on Backup Locations.
-
The Backup Locations page will display a list of all backup locations configured for the current project.
-
Search for the newly added backup location in the list. The presence of the backup location validates that you have successfully added a new backup location.
Next Steps
You can now use the newly added backup location to create a backup of your clusters or workspaces. Refer to the Create a Backup guide to learn how to create a backup of your clusters or workspaces.