Create Cluster Backup
This guide provides instructions for how to create a cluster backup using Palette. You can refer to the cluster from where you created the backup as the source cluster.
A backup operation can only back up specified namespaces, cluster-scoped resources, and Persistent Volumes (PVs) from the source cluster.
Palette uses open-source Velero to provide backup and restore capabilities. You can learn more about Velero by checking out their Restore Reference and Backup Reference.
You can schedule a cluster backup or initiate a backup on demand. You can define a backup schedule in the cluster configuration for an existing cluster or while deploying a cluster.
Palette supports scheduling recurring backups, with the ability to customize the frequency and the time. You can also specify the backup expiry period, meaning the duration, after which Palette will delete the backup automatically. For example, you can schedule a backup for every week on Sunday at midnight and automatically expire the backup after three months. Additionally, you can initiate a backup on demand for an existing cluster.
The following sections will describe the prerequisites and the detailed instructions to create a cluster backup. You can schedule a backup or initiate a backup on demand.
Schedule a Backup
Use the following instructions to schedule a backup for an existing cluster.
Prerequisites
-
An available backup location in Palette. Refer to the Add a Backup Location using Static Credentials or Add a Backup Location using Dynamic Credentials.
-
An active cluster in Palette.
Instructions
-
Log in to Palette.
-
Navigate to the left Main Menu and select Clusters.
-
Select a cluster you want to back up. Ensure the cluster status is Healthy.
-
Click on the Settings drop-down Menu in the top right corner, and select Cluster Settings.
-
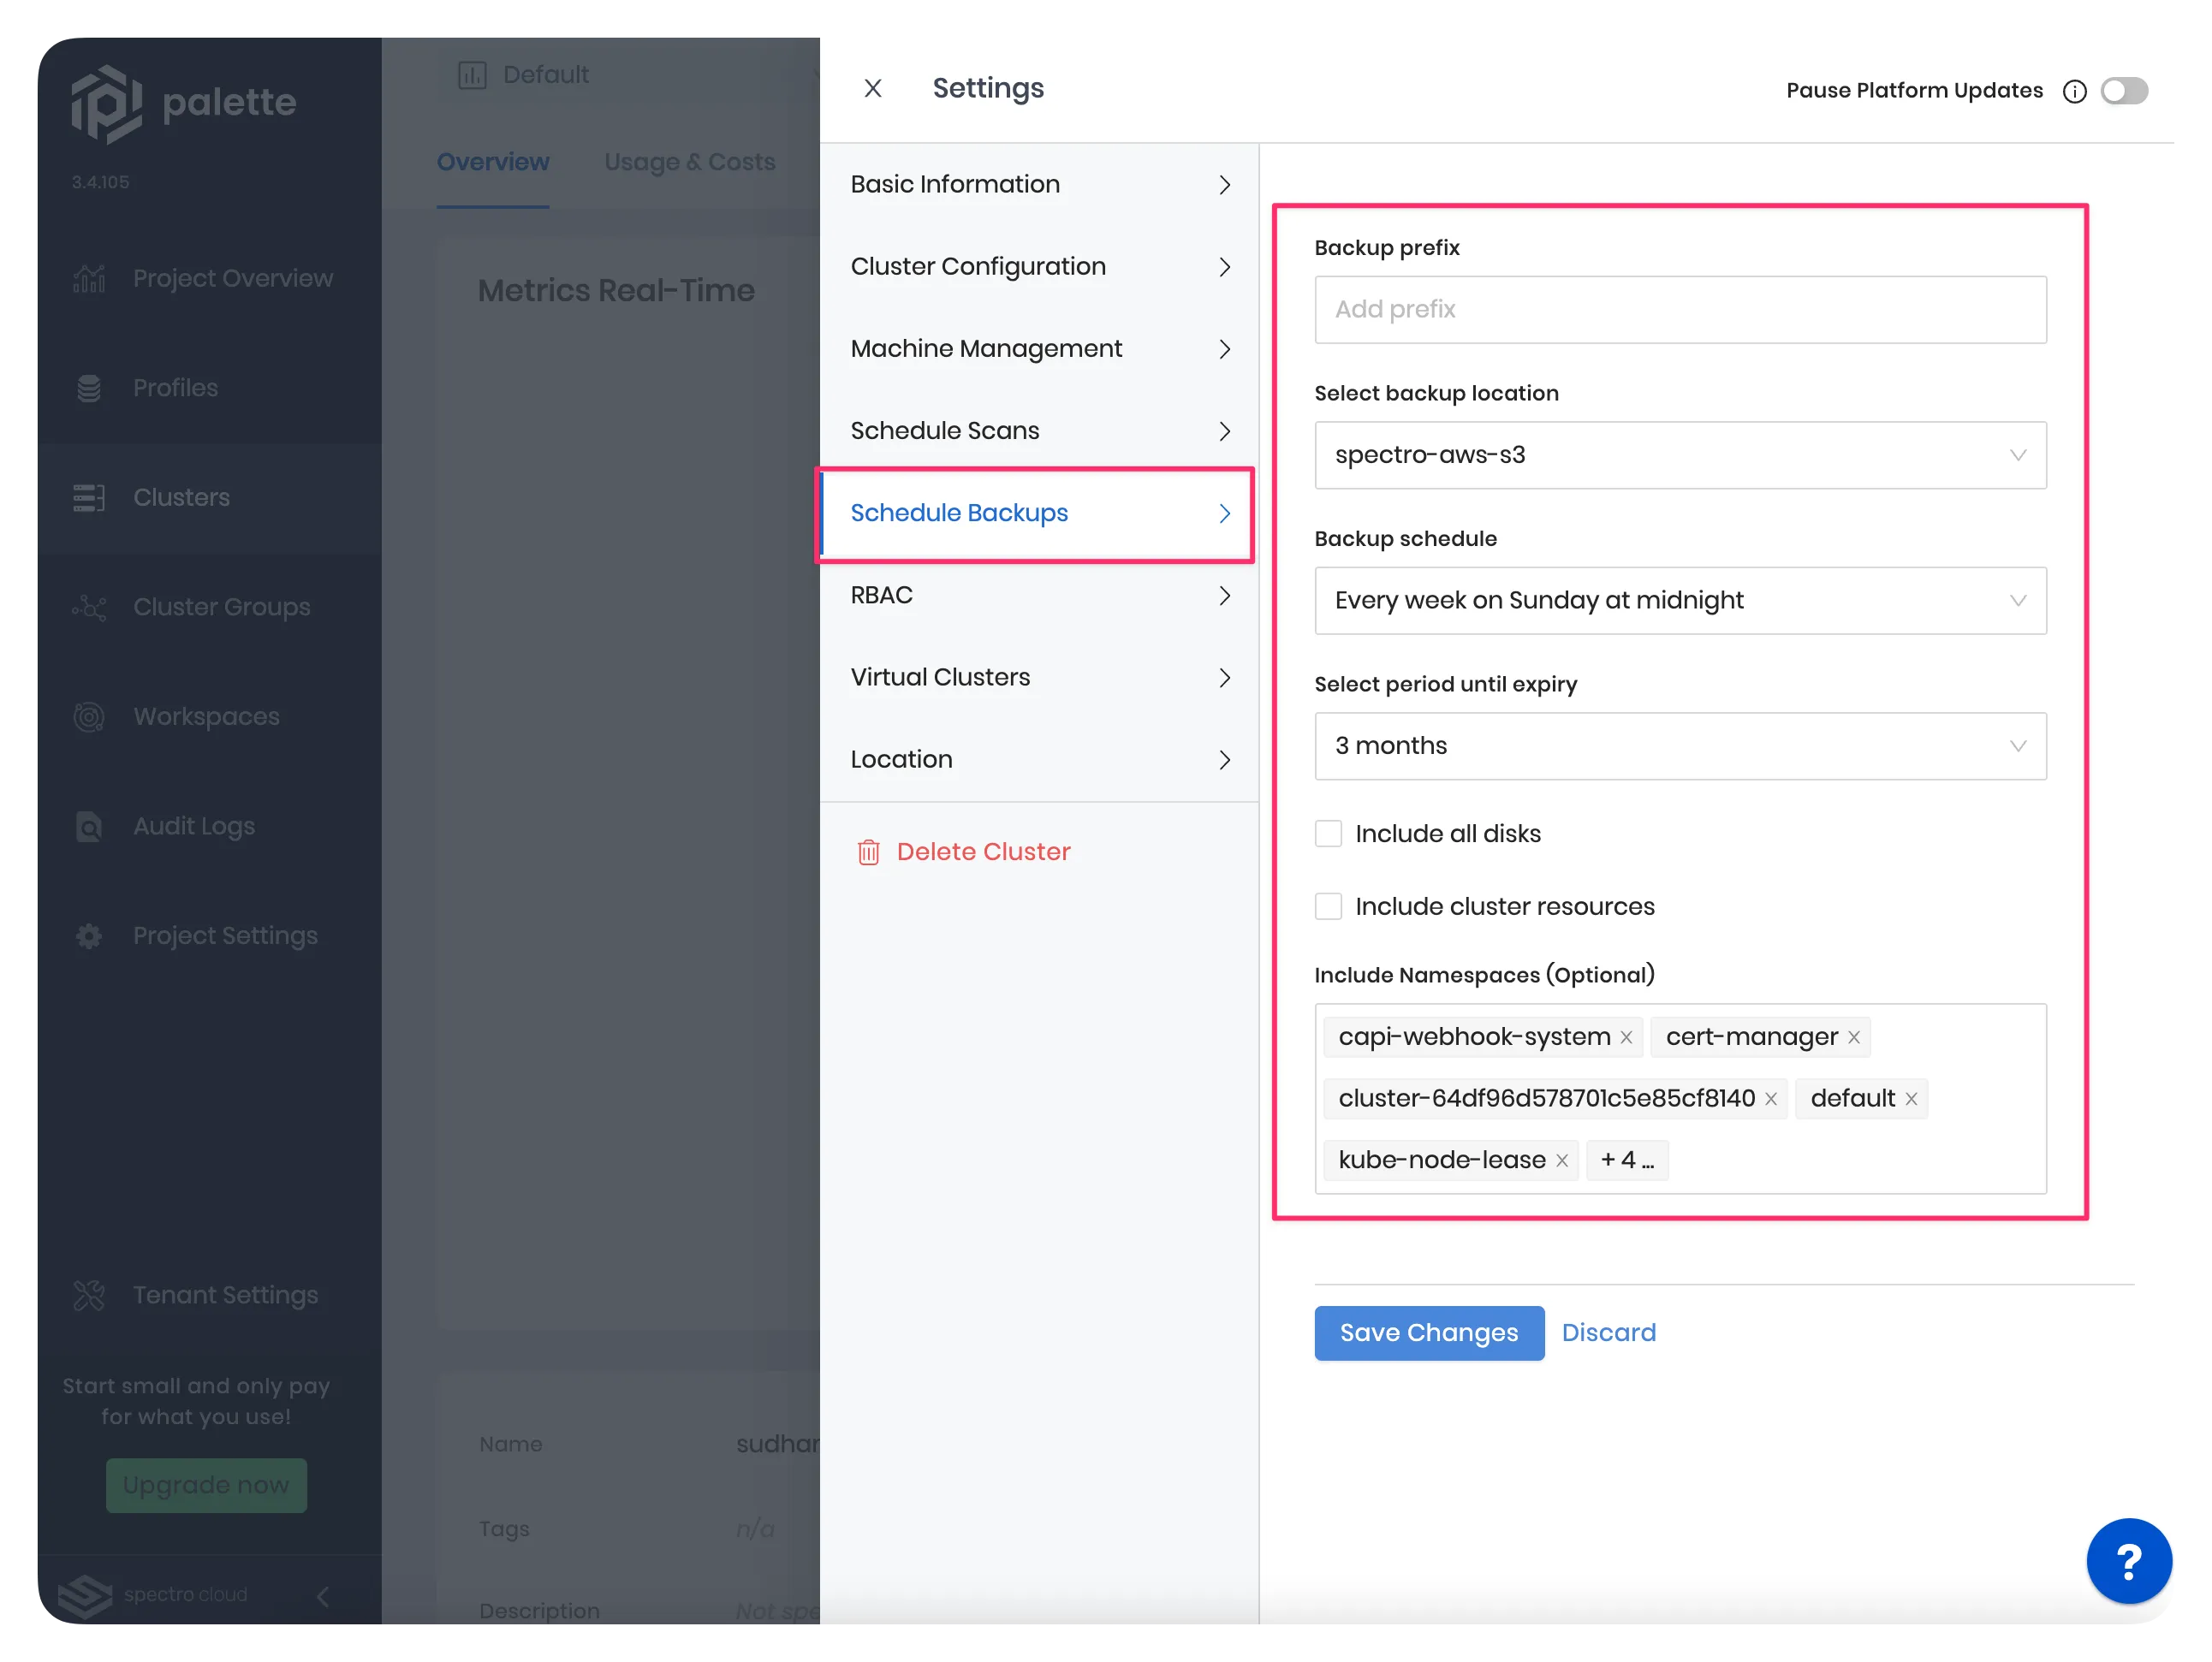
Next, on the Settings Menu, select the Schedule Backups. The screenshot below highlights the fields for scheduling a backup.
-
Fill out the required input fields to schedule a backup. Refer to the table to learn more about each input field.
Field Description Backup prefix Palette will generate a name automatically. Provide a prefix string you want to prepend to the auto-generated name. Select backup location Choose a backup location. You must configure a location before creating a backup. Backup schedule Create a backup schedule of your choice. You can review the scheduling options below the current table. Select period until expiry Select an expiry duration for the backups. Palette will delete the backup after the expiry duration. Include all disks Select this checkbox if you want to include all the disks in the backup. Include cluster resources Select the checkbox if you want Palette to back up the cluster-scoped and the namespace-scoped resources. However, if you do not select the checkbox, Palette will back up only the namespace-scoped resources. Include Namespaces (Optional) Palette will back up all namespaces by default. However, you can specify any namespaces you do not want backed up.
In Kubernetes, there are two types of resources: cluster-scoped and namespace-scoped.
Cluster-scoped resources, such as StorageClasses, ClusterRoles, and others, are visible and accessible to all users in the cluster, regardless of the namespaces.
Namespace-scoped resources, like Pods, Deployments, Services, and others, belong to a specific namespace and can only be accessed by users with the necessary permissions.
A cluster backup supports the following scheduling options:
- You can customize your backup to occur at a specific month, day, hour, and minute that suits your needs.
- Every week on Sunday at midnight
- Every two weeks at midnight
- Every month on the first at midnight
- Every two months on the first at midnight
- Never
- Click on the Create Backup button.
You now have successfully created a scheduled backup for the selected cluster. You can view the status of the backup in the Backups tab.
Validate
Use the following steps to validate creating a backup in Palette.
-
Log in to Palette.
-
Navigate to the left Main Menu, and select Clusters.
-
Select the cluster from where you created the backup. Palette displays the details of the selected cluster.
-
Navigate to the Backups tab and click on the Backups nested tab. Palette displays a list of all available backups for the current cluster, including the newly created one. The screenshot below shows an example backup. This step validates that you have successfully created the backup.
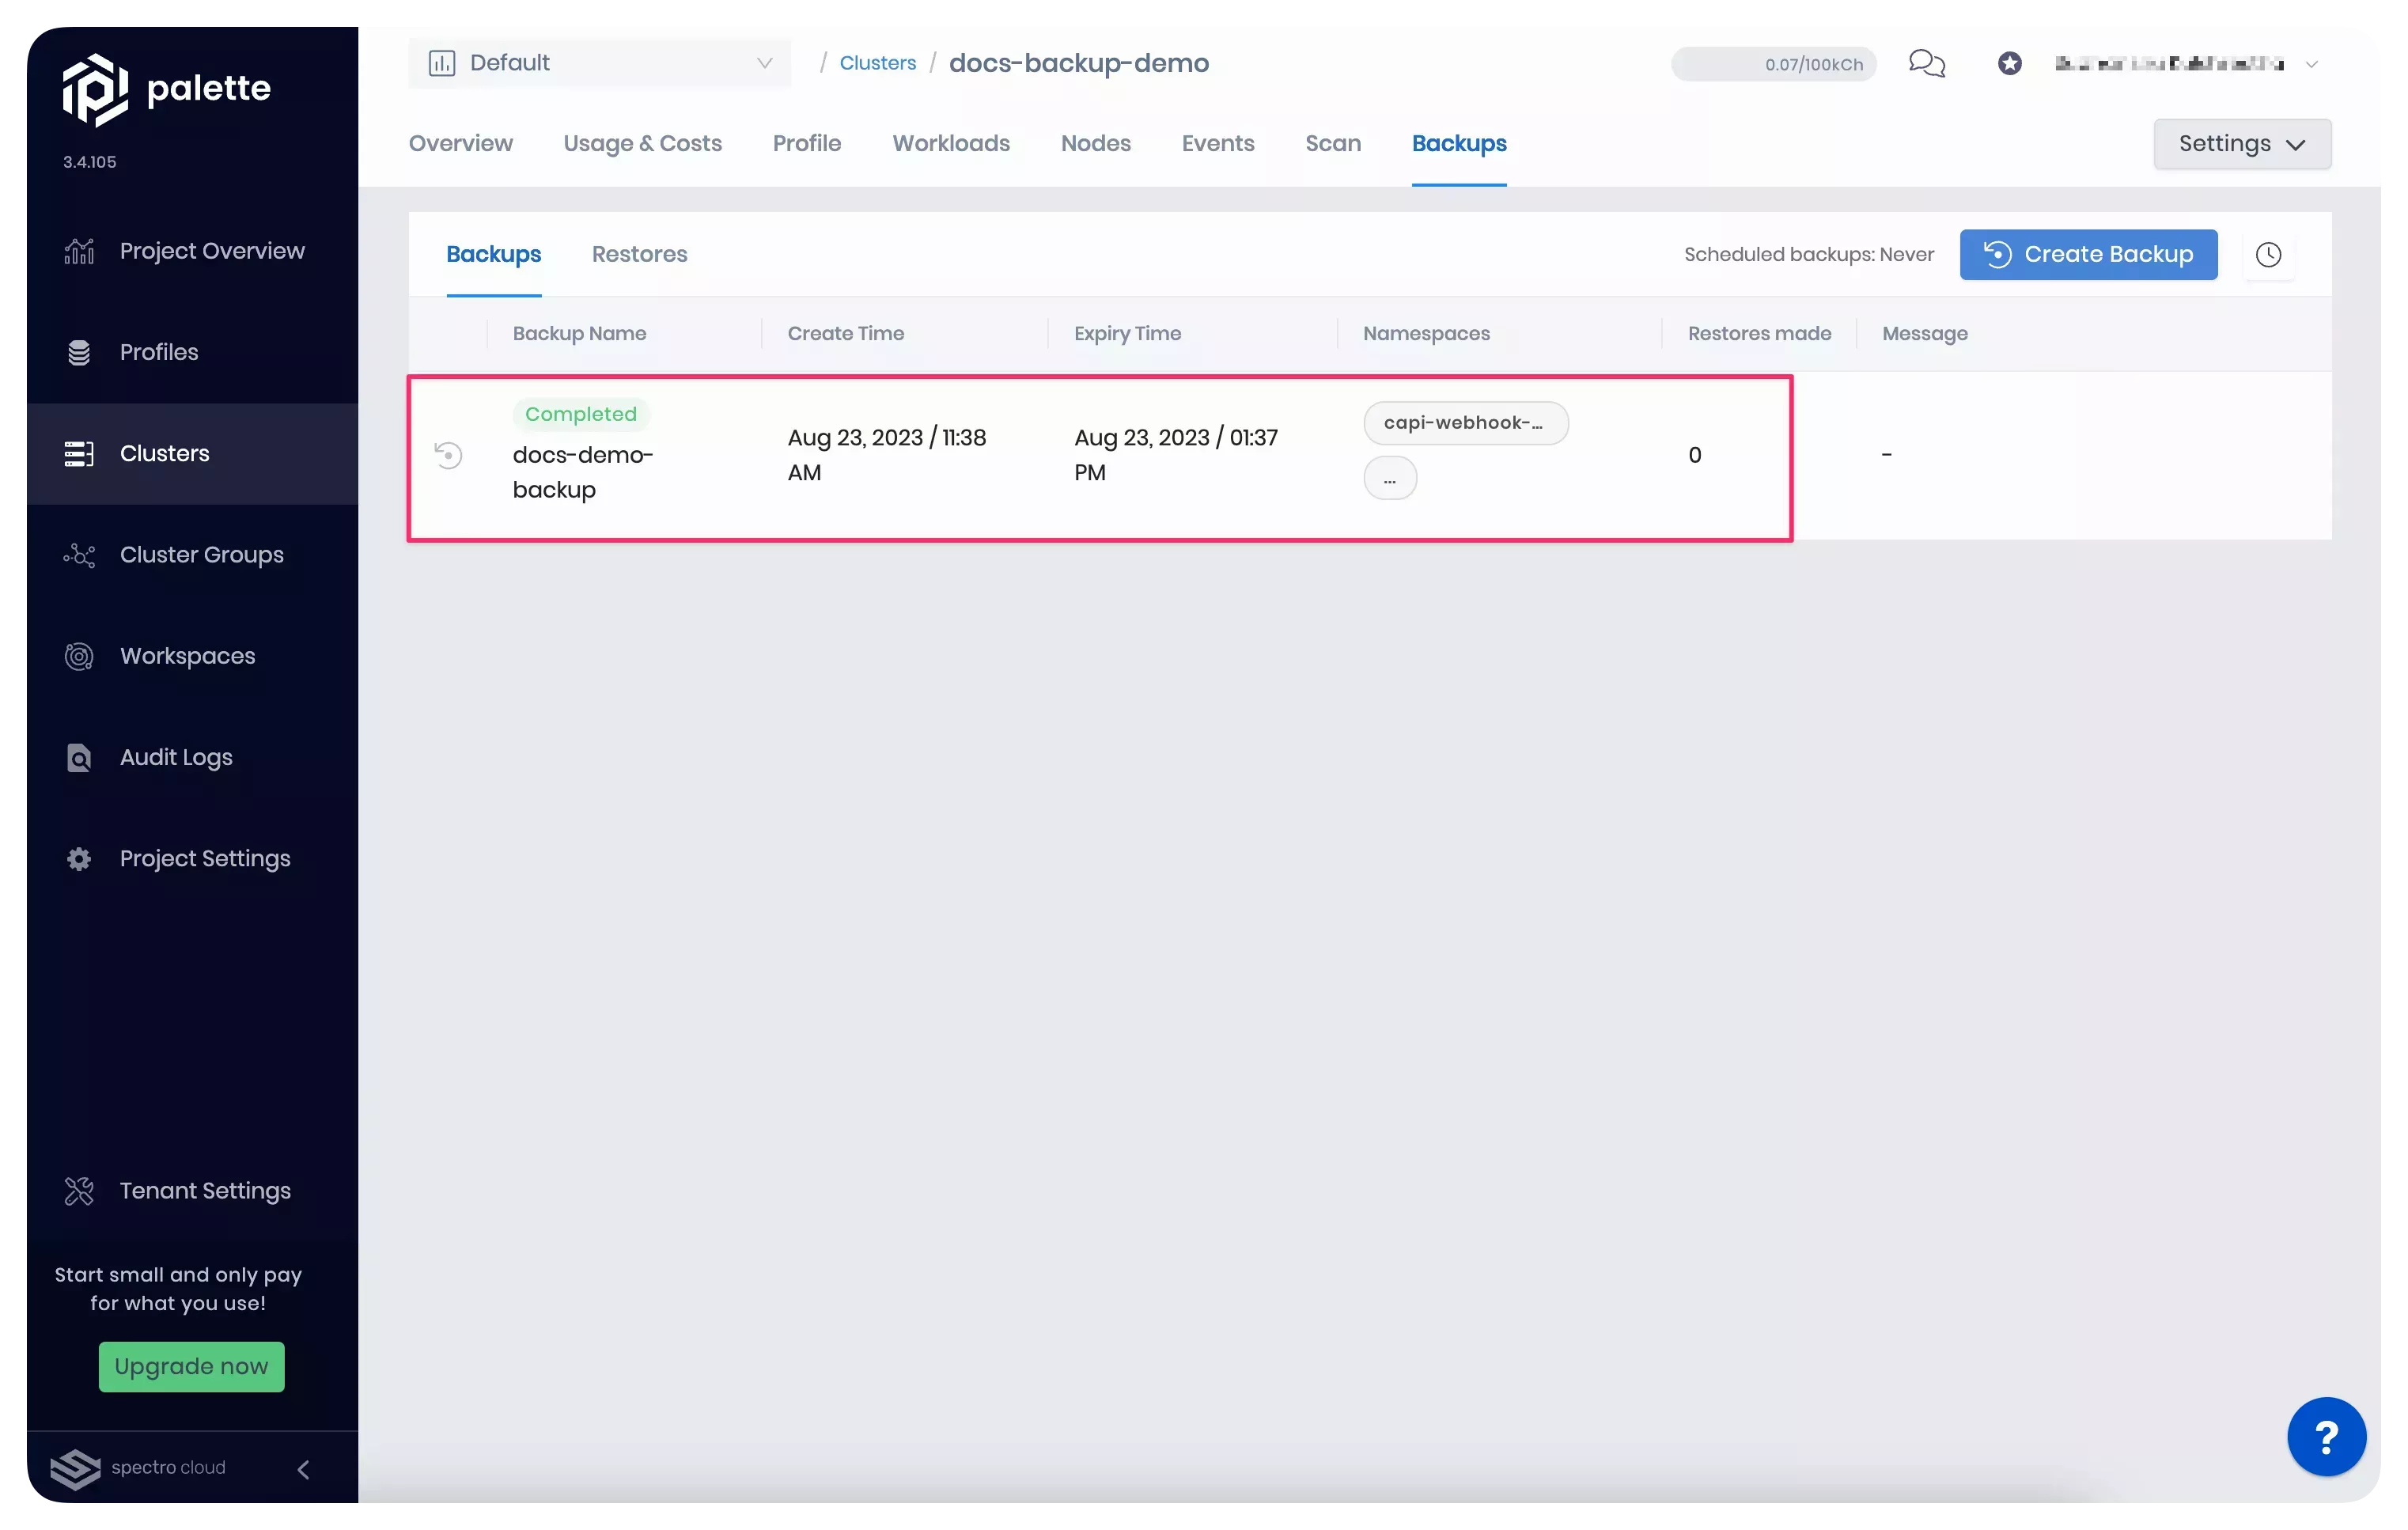
- You can click on the newly created backup from the list to view its details. Palette displays the backup name, status, creation date, expiry date, list of backed-up namespaces, and a boolean field indicating whether the backup includes all disks and cluster-scoped resources.
On-demand Backup
Use the following instructions to create an on-demand backup for an existing cluster.
Prerequisites
- An available backup location in Palette. Refer to the Add a Backup Location using Static Credentials or Add a Backup Location using Dynamic Credentials.
Instructions
- An active cluster in Palette.
-
Log in to Palette.
-
Navigate to the left Main Menu and select Clusters.
-
Select a cluster you want to back up. Ensure the cluster status is Healthy.
-
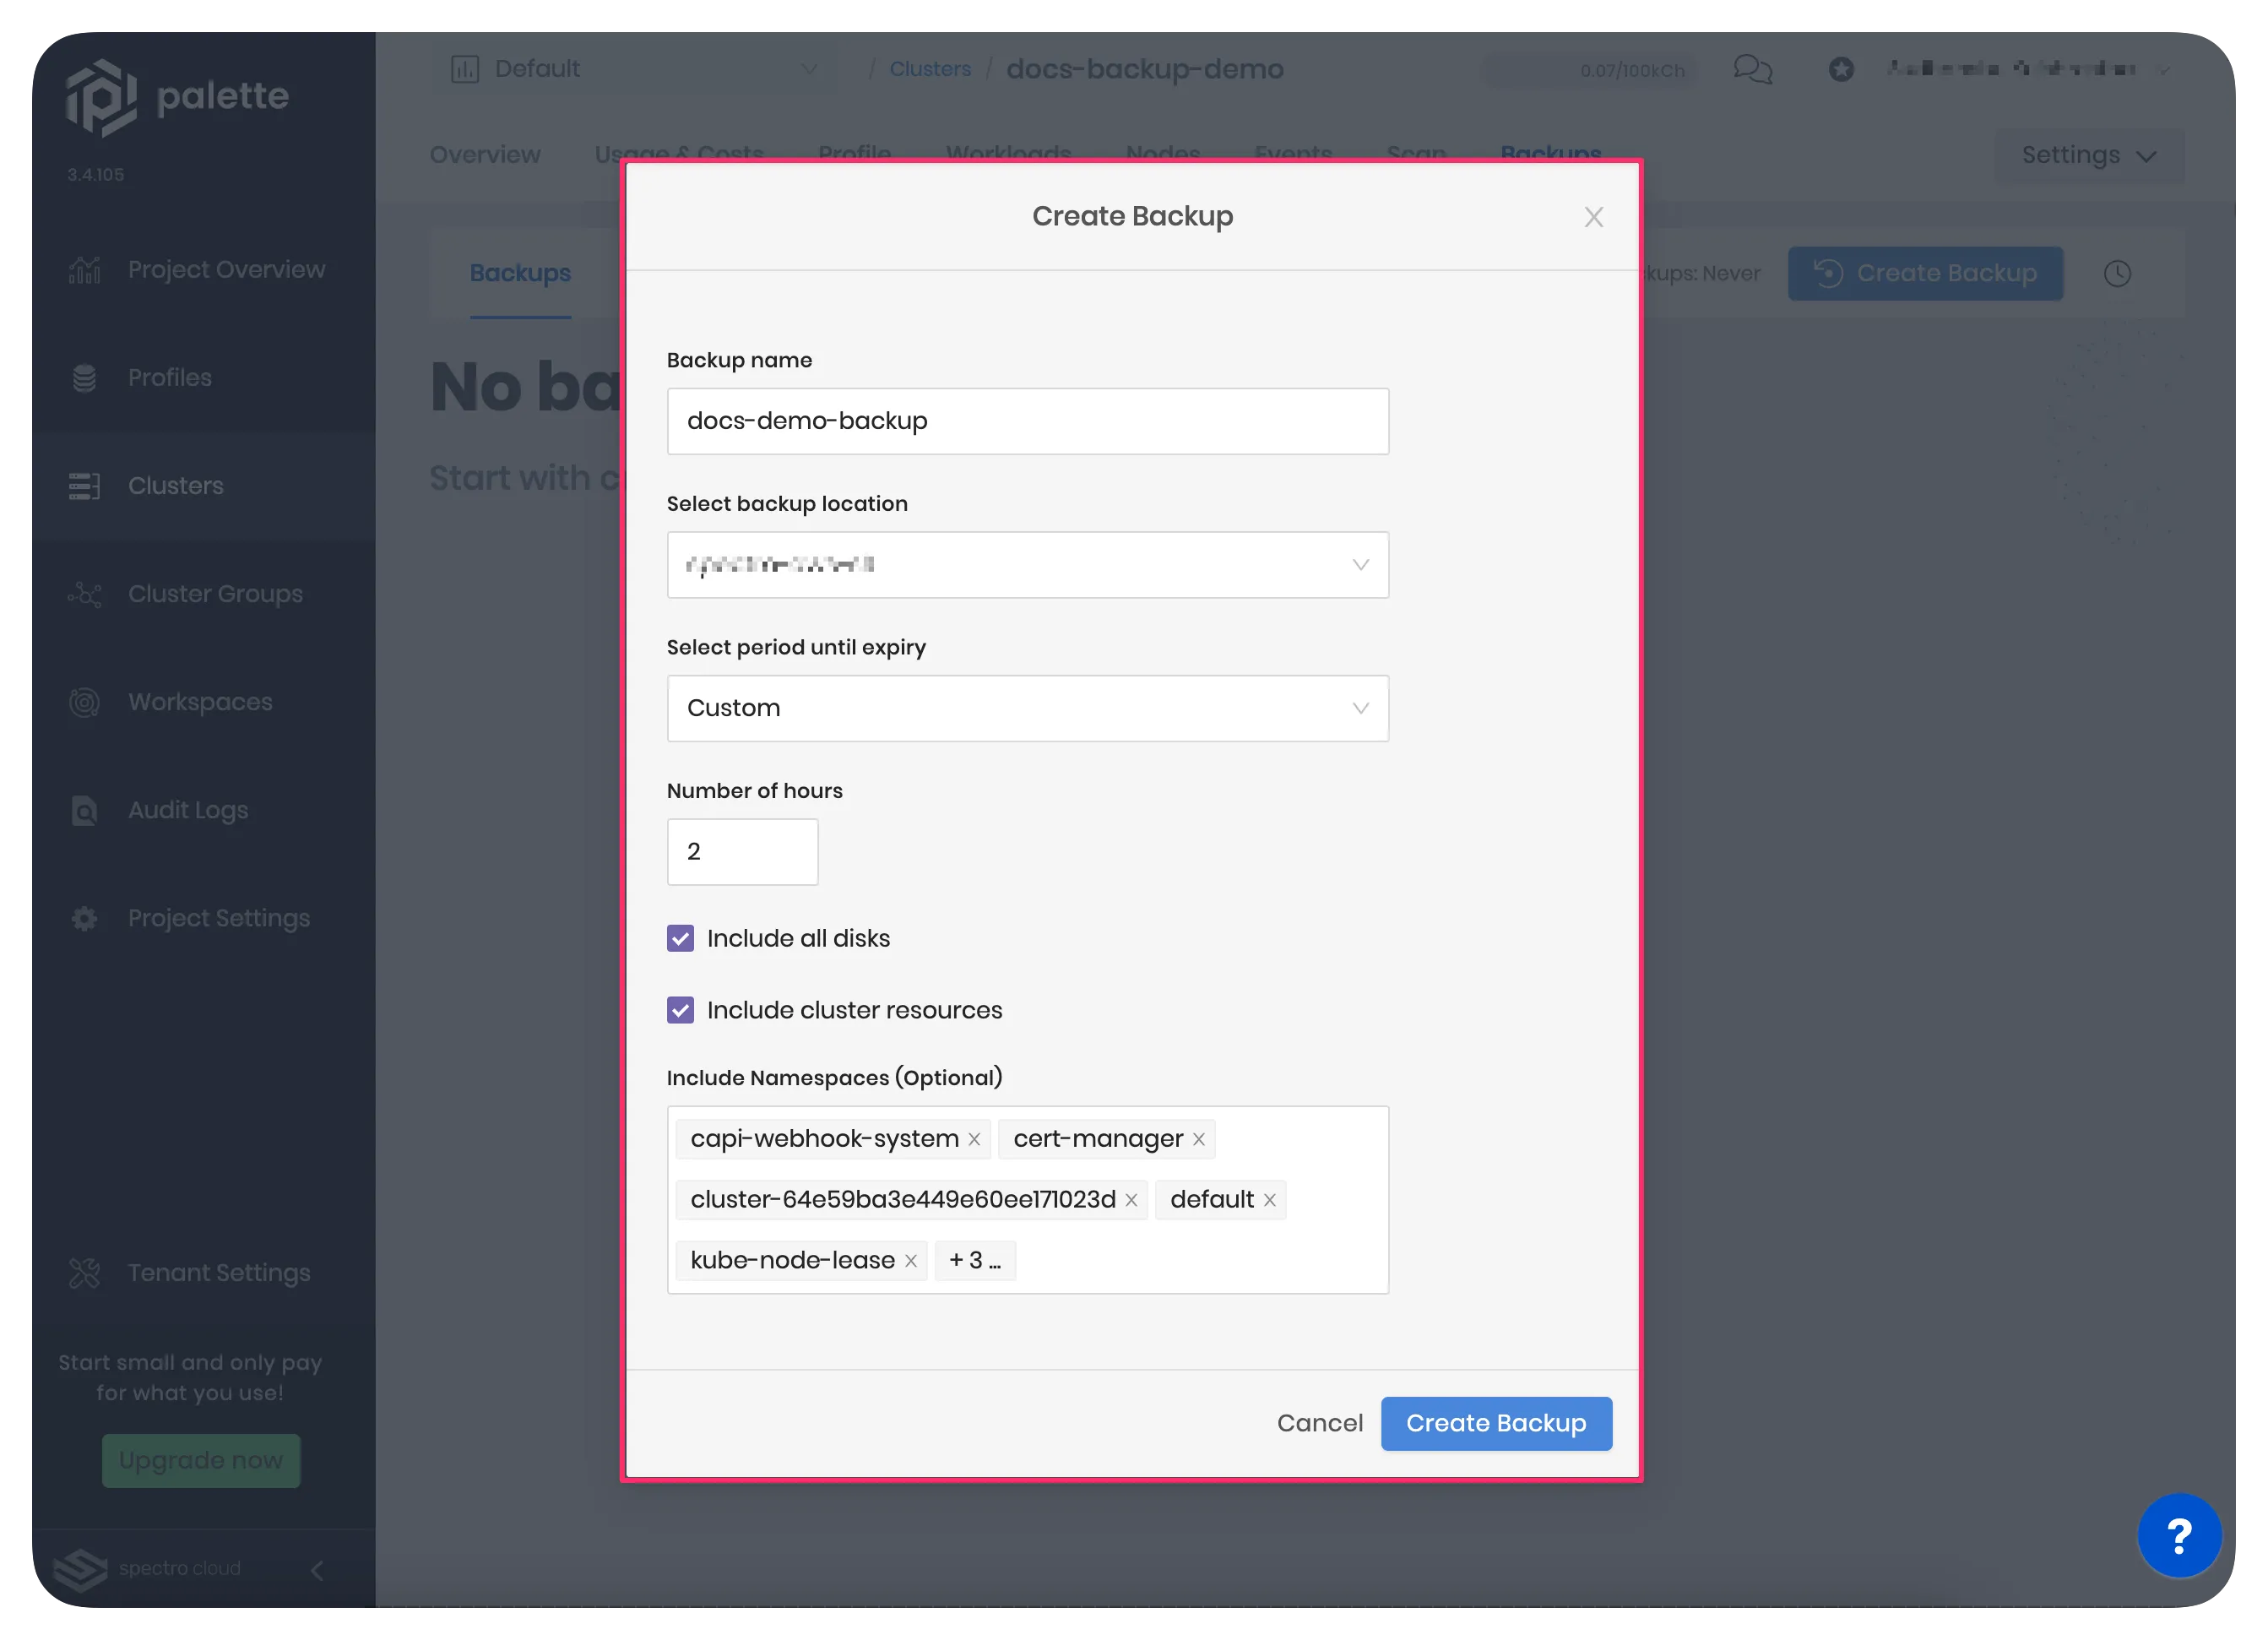
Navigate to the Backups tab and click on the Create Backup button. The screenshot below shows the popup window Palette opens to initiate an on-demand backup.
-
Use the following information to configure a scheduled backup.
Field Description Backup name Provide a name for the backup. Select backup location Choose a backup location. You must configure a backup location before creating a backup. Refer to the Add a Backup Location using Static Credentials or Add a Backup Location using Dynamic Credentials guides to learn about adding a backup location using static or dynamic credentials. Select period until expiry Select an expiry duration for the backup. The backup will be automatically removed after the expiry duration. Include all disks Select this checkbox if you want to include PVs and volume snapshots in the backup. Include cluster resources Select the checkbox if you want to include cluster-scoped resources in the backup. If you do not select the checkbox, Palette will back up only the namespace-scoped resources. Include Namespaces (Optional) Palette will back up all namespaces by default. However, you can specify namespaces you do not want backed up.
In Kubernetes, there are two types of resources: cluster-scoped and namespace-scoped.
Cluster-scoped resources, such as StorageClasses, ClusterRoles, and others, are visible and accessible to all users in the cluster, regardless of the namespaces.
Namespace-scoped resources, like Pods, Deployments, Services, and others, belong to a specific namespace and can only be accessed by users with the necessary permissions.
- Click on the Create Backup button.
You now have successfully created a backup for the selected cluster. Depending on the size of the cluster, the backup process may take some time to complete. You can view the status of the backup in the Backups tab.
Validate
Use the following steps to validate creating a backup in Palette.
-
Log in to Palette.
-
Navigate to the left Main Menu, and select Clusters.
-
Select the cluster from where you created the backup. Palette displays the details of the selected cluster.
-
Navigate to the Backups tab and click on the Backups nested tab. Palette displays a list of all available backups for the current cluster, including the newly created one. The screenshot below shows an example backup. This step validates that you have successfully created the backup.
- You can click on the newly created backup from the list to view its details. Palette displays the backup name, status, creation date, expiry date, list of backed-up namespaces, and a boolean field indicating whether the backup includes all disks and cluster-scoped resources.
Next Steps
When the backup is available, you can restore it to the same or to a different cluster. Refer to the Restore a Cluster Backup guide to learn more about restoring a backup.