Deploy a Cluster
Palette helps you create and manage Kubernetes clusters in various cloud environments with minimal overhead.
Palette offers profile-based management for Kubernetes, enabling consistency, repeatability, and operational efficiency across multiple clusters. A cluster profile allows you to customize the cluster infrastructure stack, allowing you to choose the desired Operating System (OS), Kubernetes, Container Network Interfaces (CNI), Container Storage Interfaces (CSI). You can further customize the stack with add-on application layers. For more information about cluster profile types, refer to Cluster Profiles.
After defining a cluster profile, you can provide the cloud environment details, the control plane, and worker node configurations to deploy a host cluster.
This tutorial will teach you how to deploy a host cluster with Palette using Amazon Web Services (AWS), Microsoft Azure, or Google Cloud Platform (GCP) cloud providers. You can deploy a cluster using either Palette or Terraform. You will learn about Cluster Mode and Cluster Profiles and how these components enable you to deploy customized applications to Kubernetes with minimal effort.
Architecture
As you navigate the tutorial, refer to this diagram to help you understand how Palette uses a cluster profile as a blueprint for the host cluster you deploy. Palette clusters have the same node pools you may be familiar with: control plane nodes, often called control plane nodes, and worker nodes where you will deploy applications. The result is a host cluster that Palette manages.

Deploy the Cluster and the Application
Select the workflow you want to learn more about.
UI Workflow
You can create and manage clusters directly from the Palette dashboard. Use the following steps to learn how to deploy a host cluster to multiple cloud providers.
Prerequisites
To complete this tutorial, you will need the following.
-
A public cloud account from one of these providers:
-
Register the cloud account in Palette. The following resources provide additional guidance.
- Register and Manage AWS Accounts
- Register and Manage Azure Cloud Accounts
- Register and Manage GCP Accounts
-
An SSH Key Pair. Use the Create and Upload an SSH Key guide to learn how to create an SSH key and upload it to Palette.
- AWS users must create an AWS Key pair before starting the tutorial. If you need additional guidance, check out the Create EC2 SSH Key Pair tutorial.
Deploy the Environment
The following steps will guide you through deploying the cluster infrastructure. You will start by creating a cluster profile that you apply to the host cluster.
- AWS
- Azure
- Google Cloud
Create Cluster Profile (AWS)
Cluster profiles are templates you create with the following core layers and any add-on layers such as security, monitoring, logging, and more.
- Operating System (OS)
- Kubernetes distribution and version
- Network Container Interface (CNI)
- Storage Container Interface (CSI)
You customize profiles by choosing the type of component and version. In this way, profiles offer a reproducible way to create clusters.
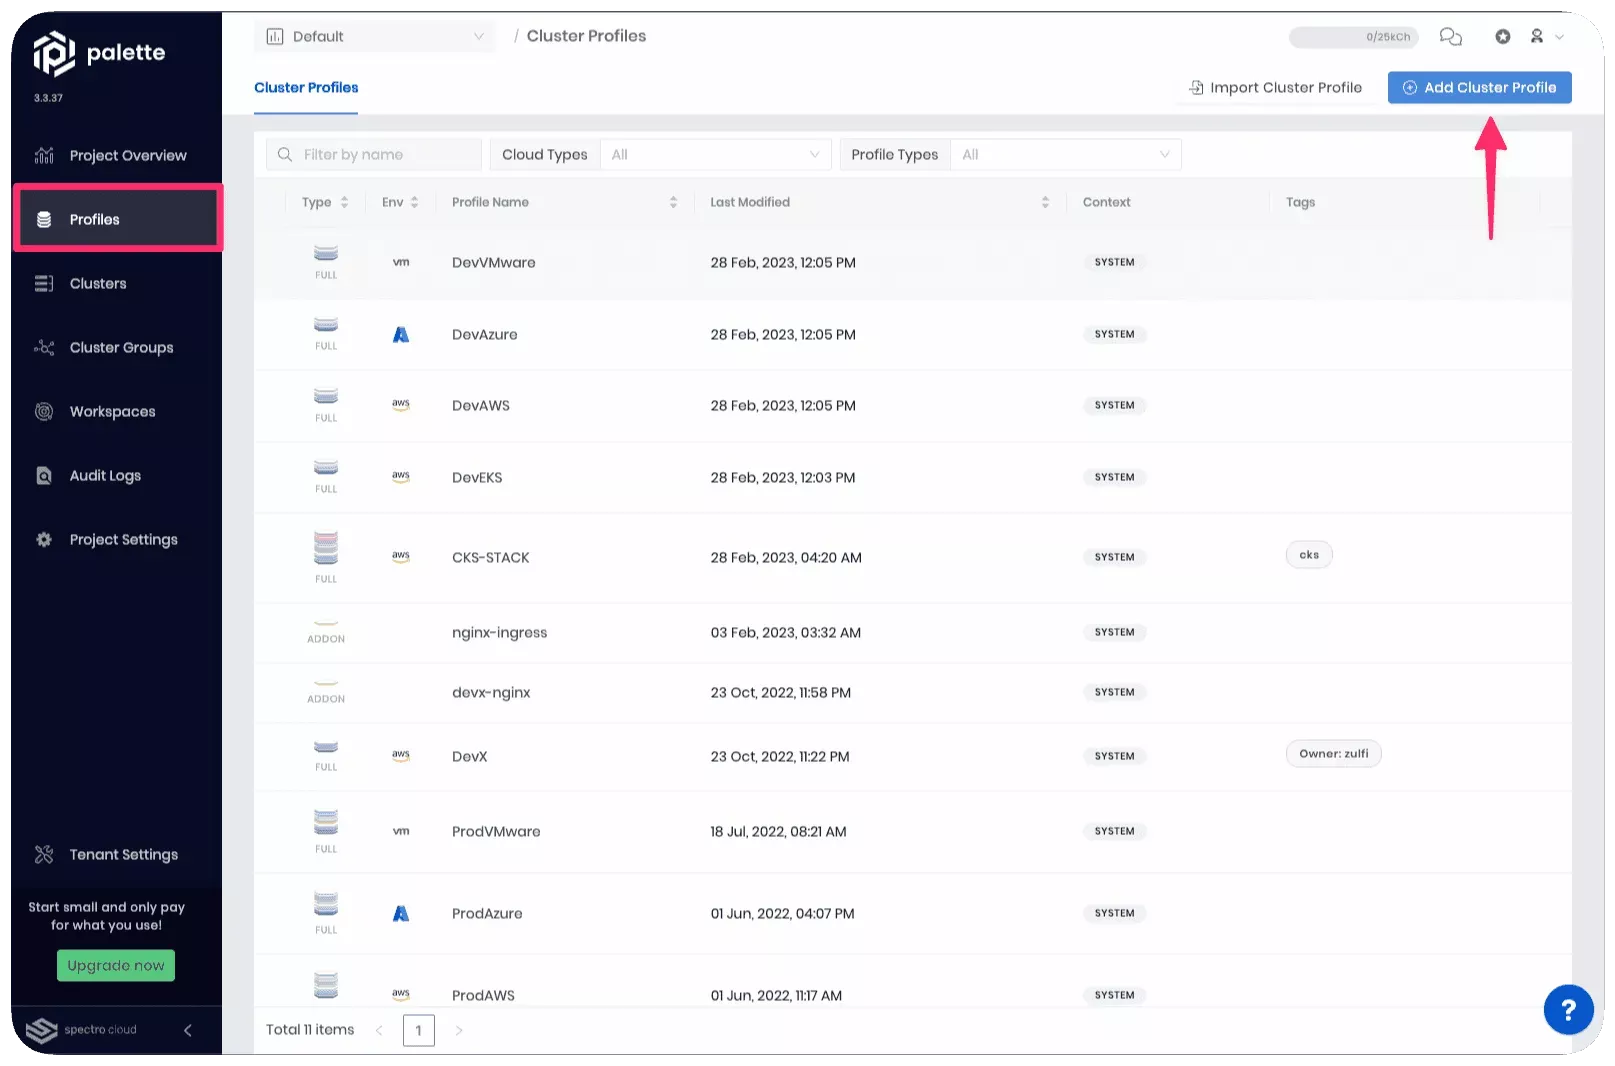
Log in to Palette and navigate to the left Main Menu. Select Profiles to view the cluster profile page. You can view the list of available cluster profiles. To create a cluster profile, click the Add Cluster Profile button.
Follow the wizard to create a new profile.
In the Basic Information section, assign the name aws-profile, a brief profile description, select the type as Full, and assign the tag env:aws. You can leave the version empty if you want to. Just be aware that the version defaults to 1.0.0. Click on Next.
Cloud Type allows you to choose the infrastructure provider with which this cluster profile is associated. Select AWS and click on Next.
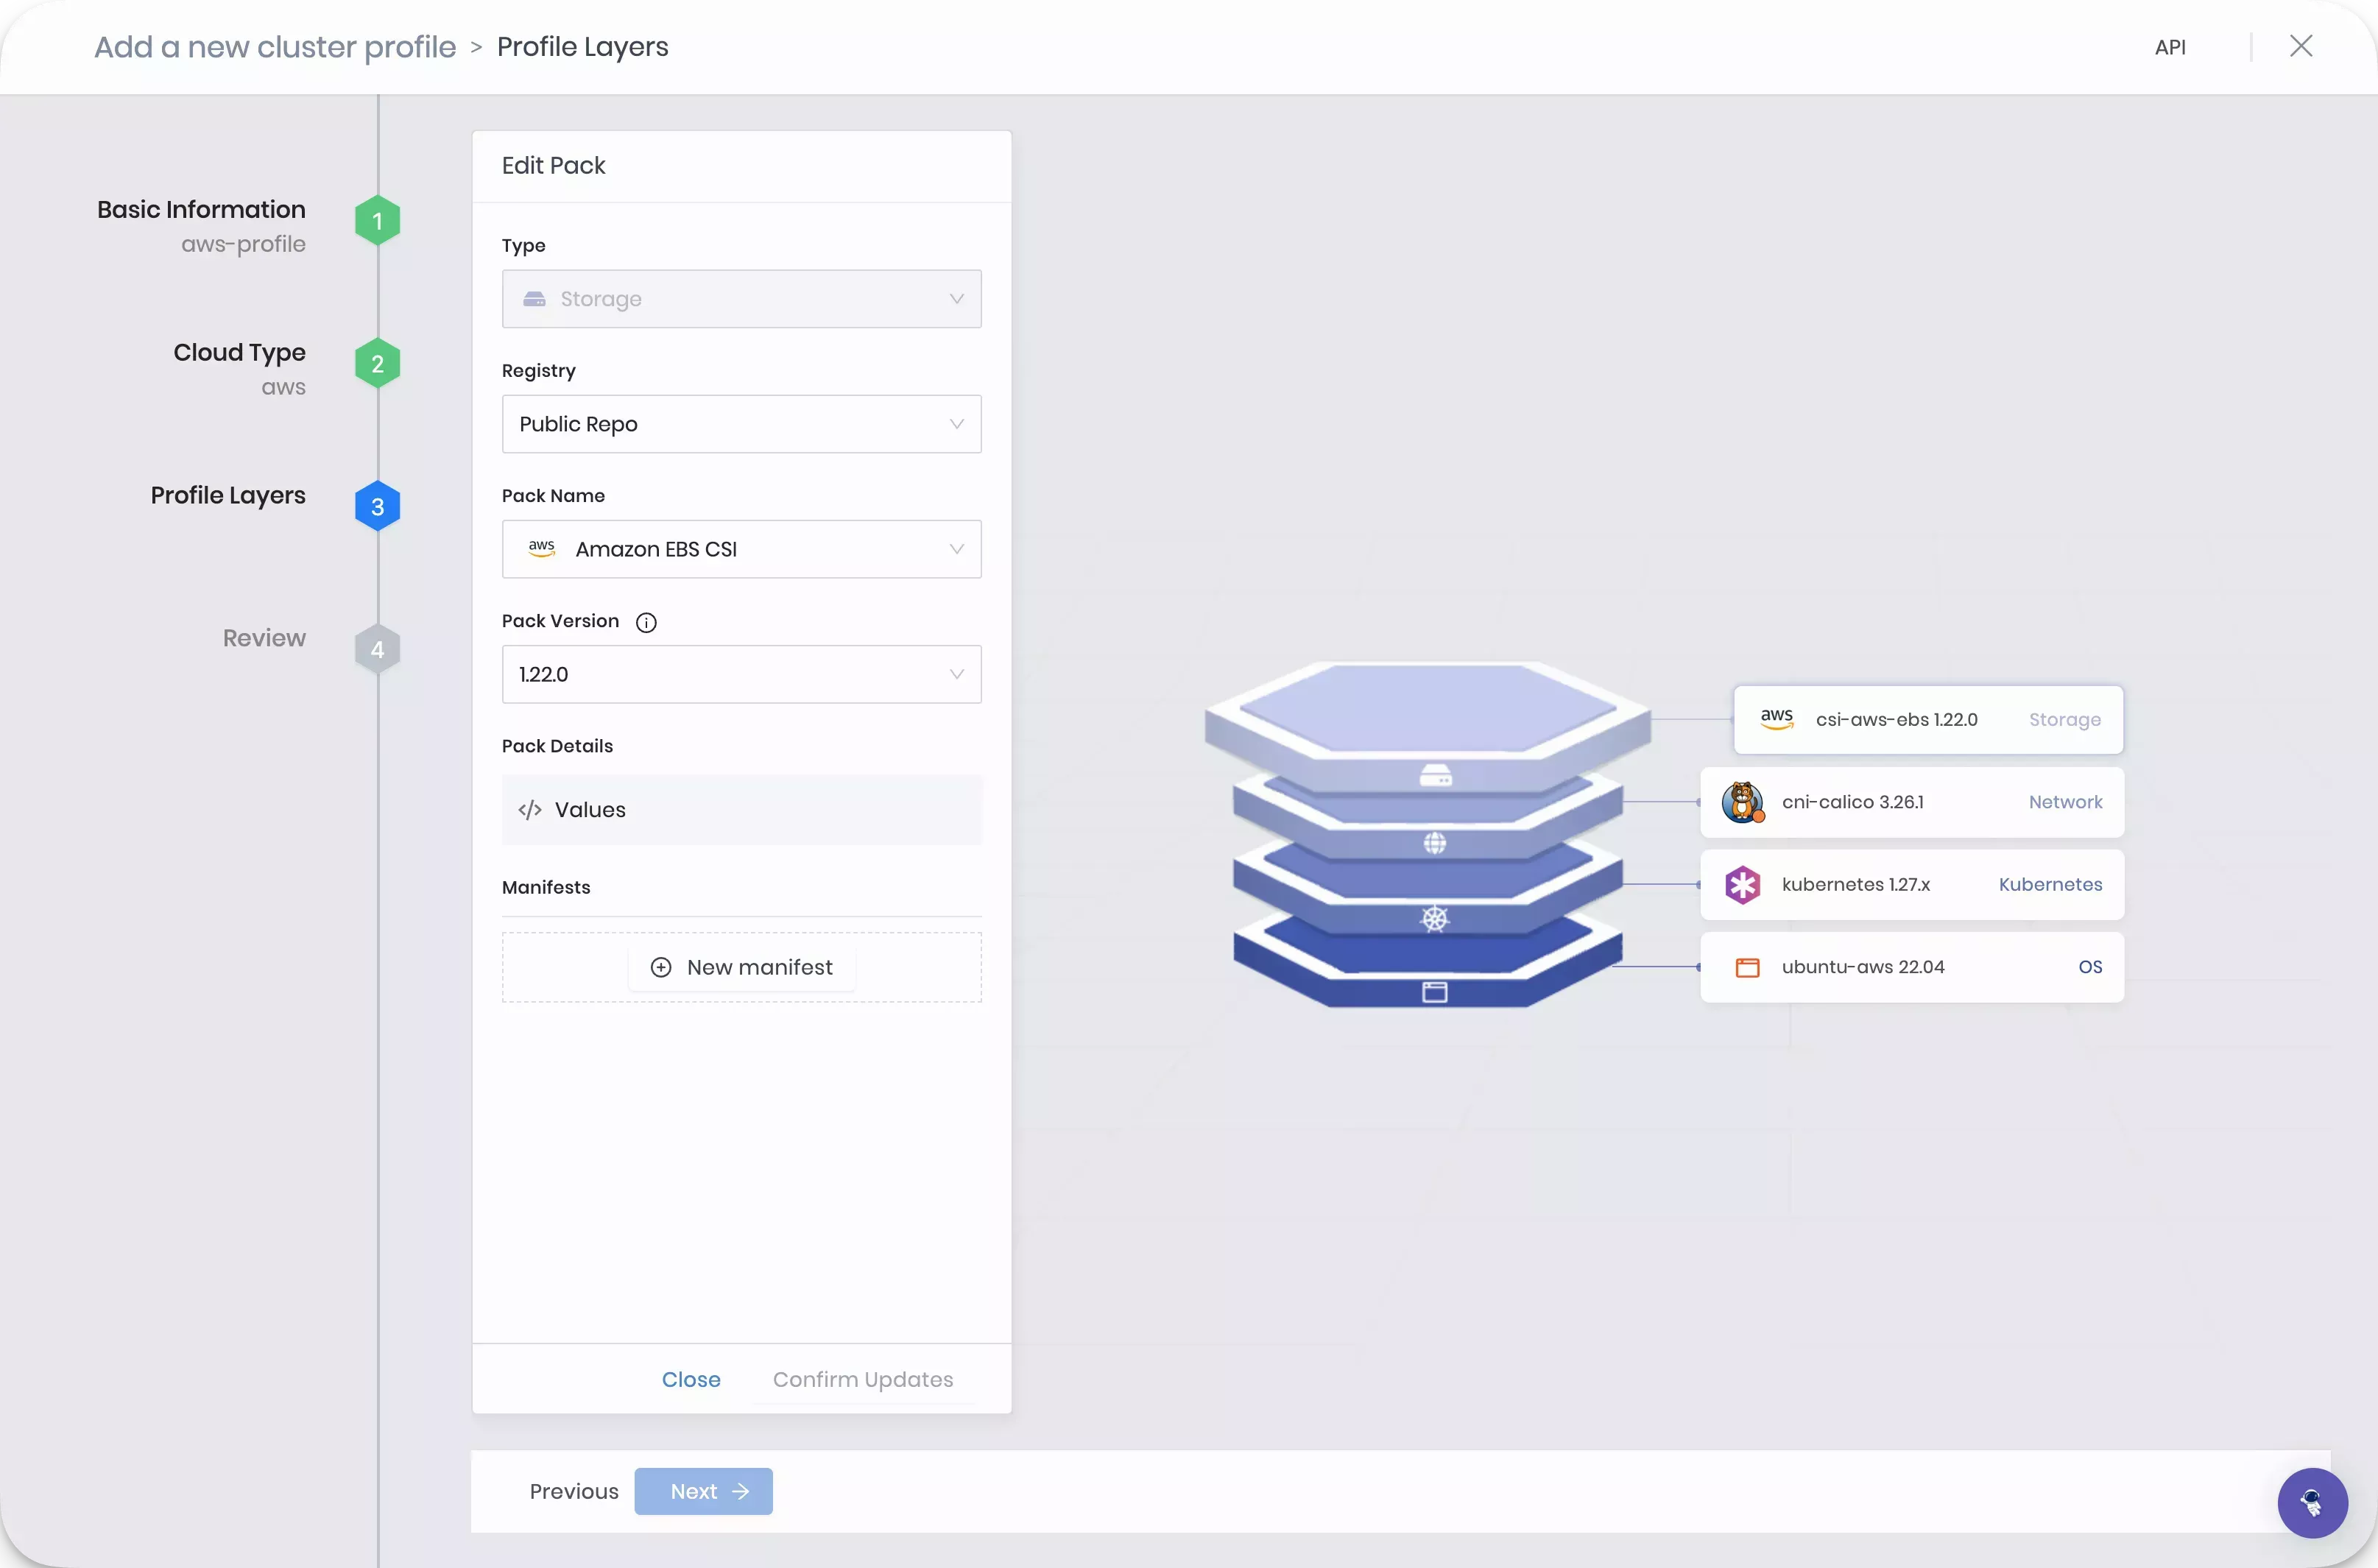
Profile Layers, this is the main configuration step where you specify the packs that compose the profile. There are four required infrastructure packs and several optional add-on packs you can choose from. Every pack requires you to select the Pack Type, Registry, and Pack Name.
For this tutorial, use the following packs:
| Pack Name | Version | Layer |
|---|---|---|
| ubuntu-aws LTS | 22.4.x | Operating System |
| Kubernetes | 1.27.x | Kubernetes |
| cni-calico | 3.26.x | Network |
| csi-aws-ebs | 1.22.x | Storage |
As you fill out the information for each layer, click on Next to proceed to the next layer.
Click on Confirm after you have completed filling out all the core layers.
The review section gives an overview of the cluster profile configuration you selected. Click on Finish Configuration to create the cluster profile.
You can modify cluster profiles after you create them by adding, removing, or editing the layers.
Create a New Cluster
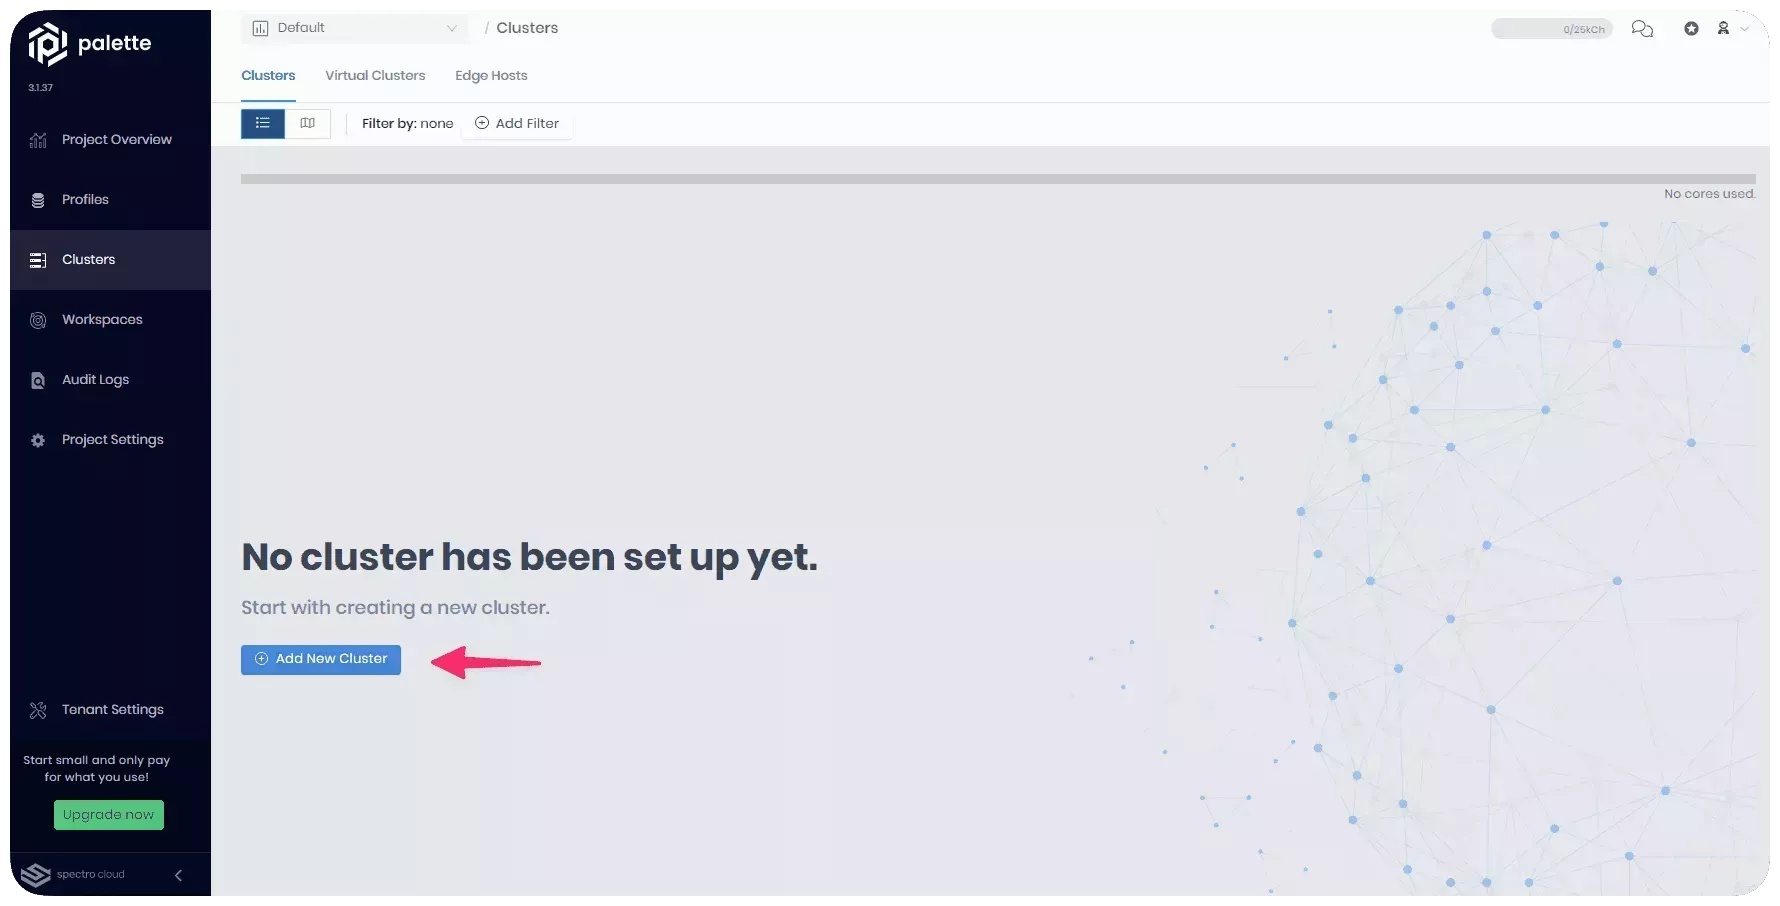
Navigate to the left Main Menu and select Cluster. From the clusters page, click on the Add New Cluster button.
Palette will prompt you to either deploy a new cluster or import an existing one. Click on Deploy New Cluster to access the cluster deployment wizard. Select AWS and click the Start AWS Configuration button. Use the following steps to create a host cluster in AWS.
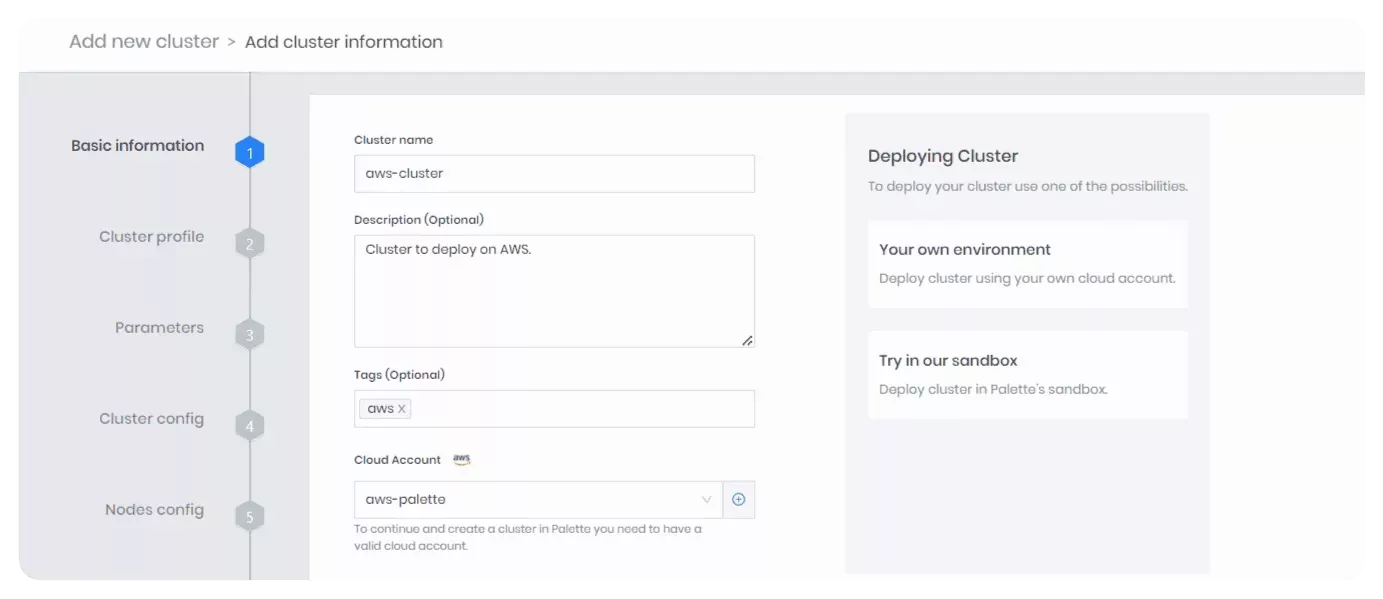
Basic information
In the Basic information section, insert the general information about the cluster, such as the Cluster name, Description, Tags, and Cloud account. Click on Next.
Cluster Profile
A list is displayed of available profiles you can choose to deploy to AWS. Select the cluster profile you created earlier and click on Next.
Parameters
The Parameters section displays all the layers in the cluster profile.
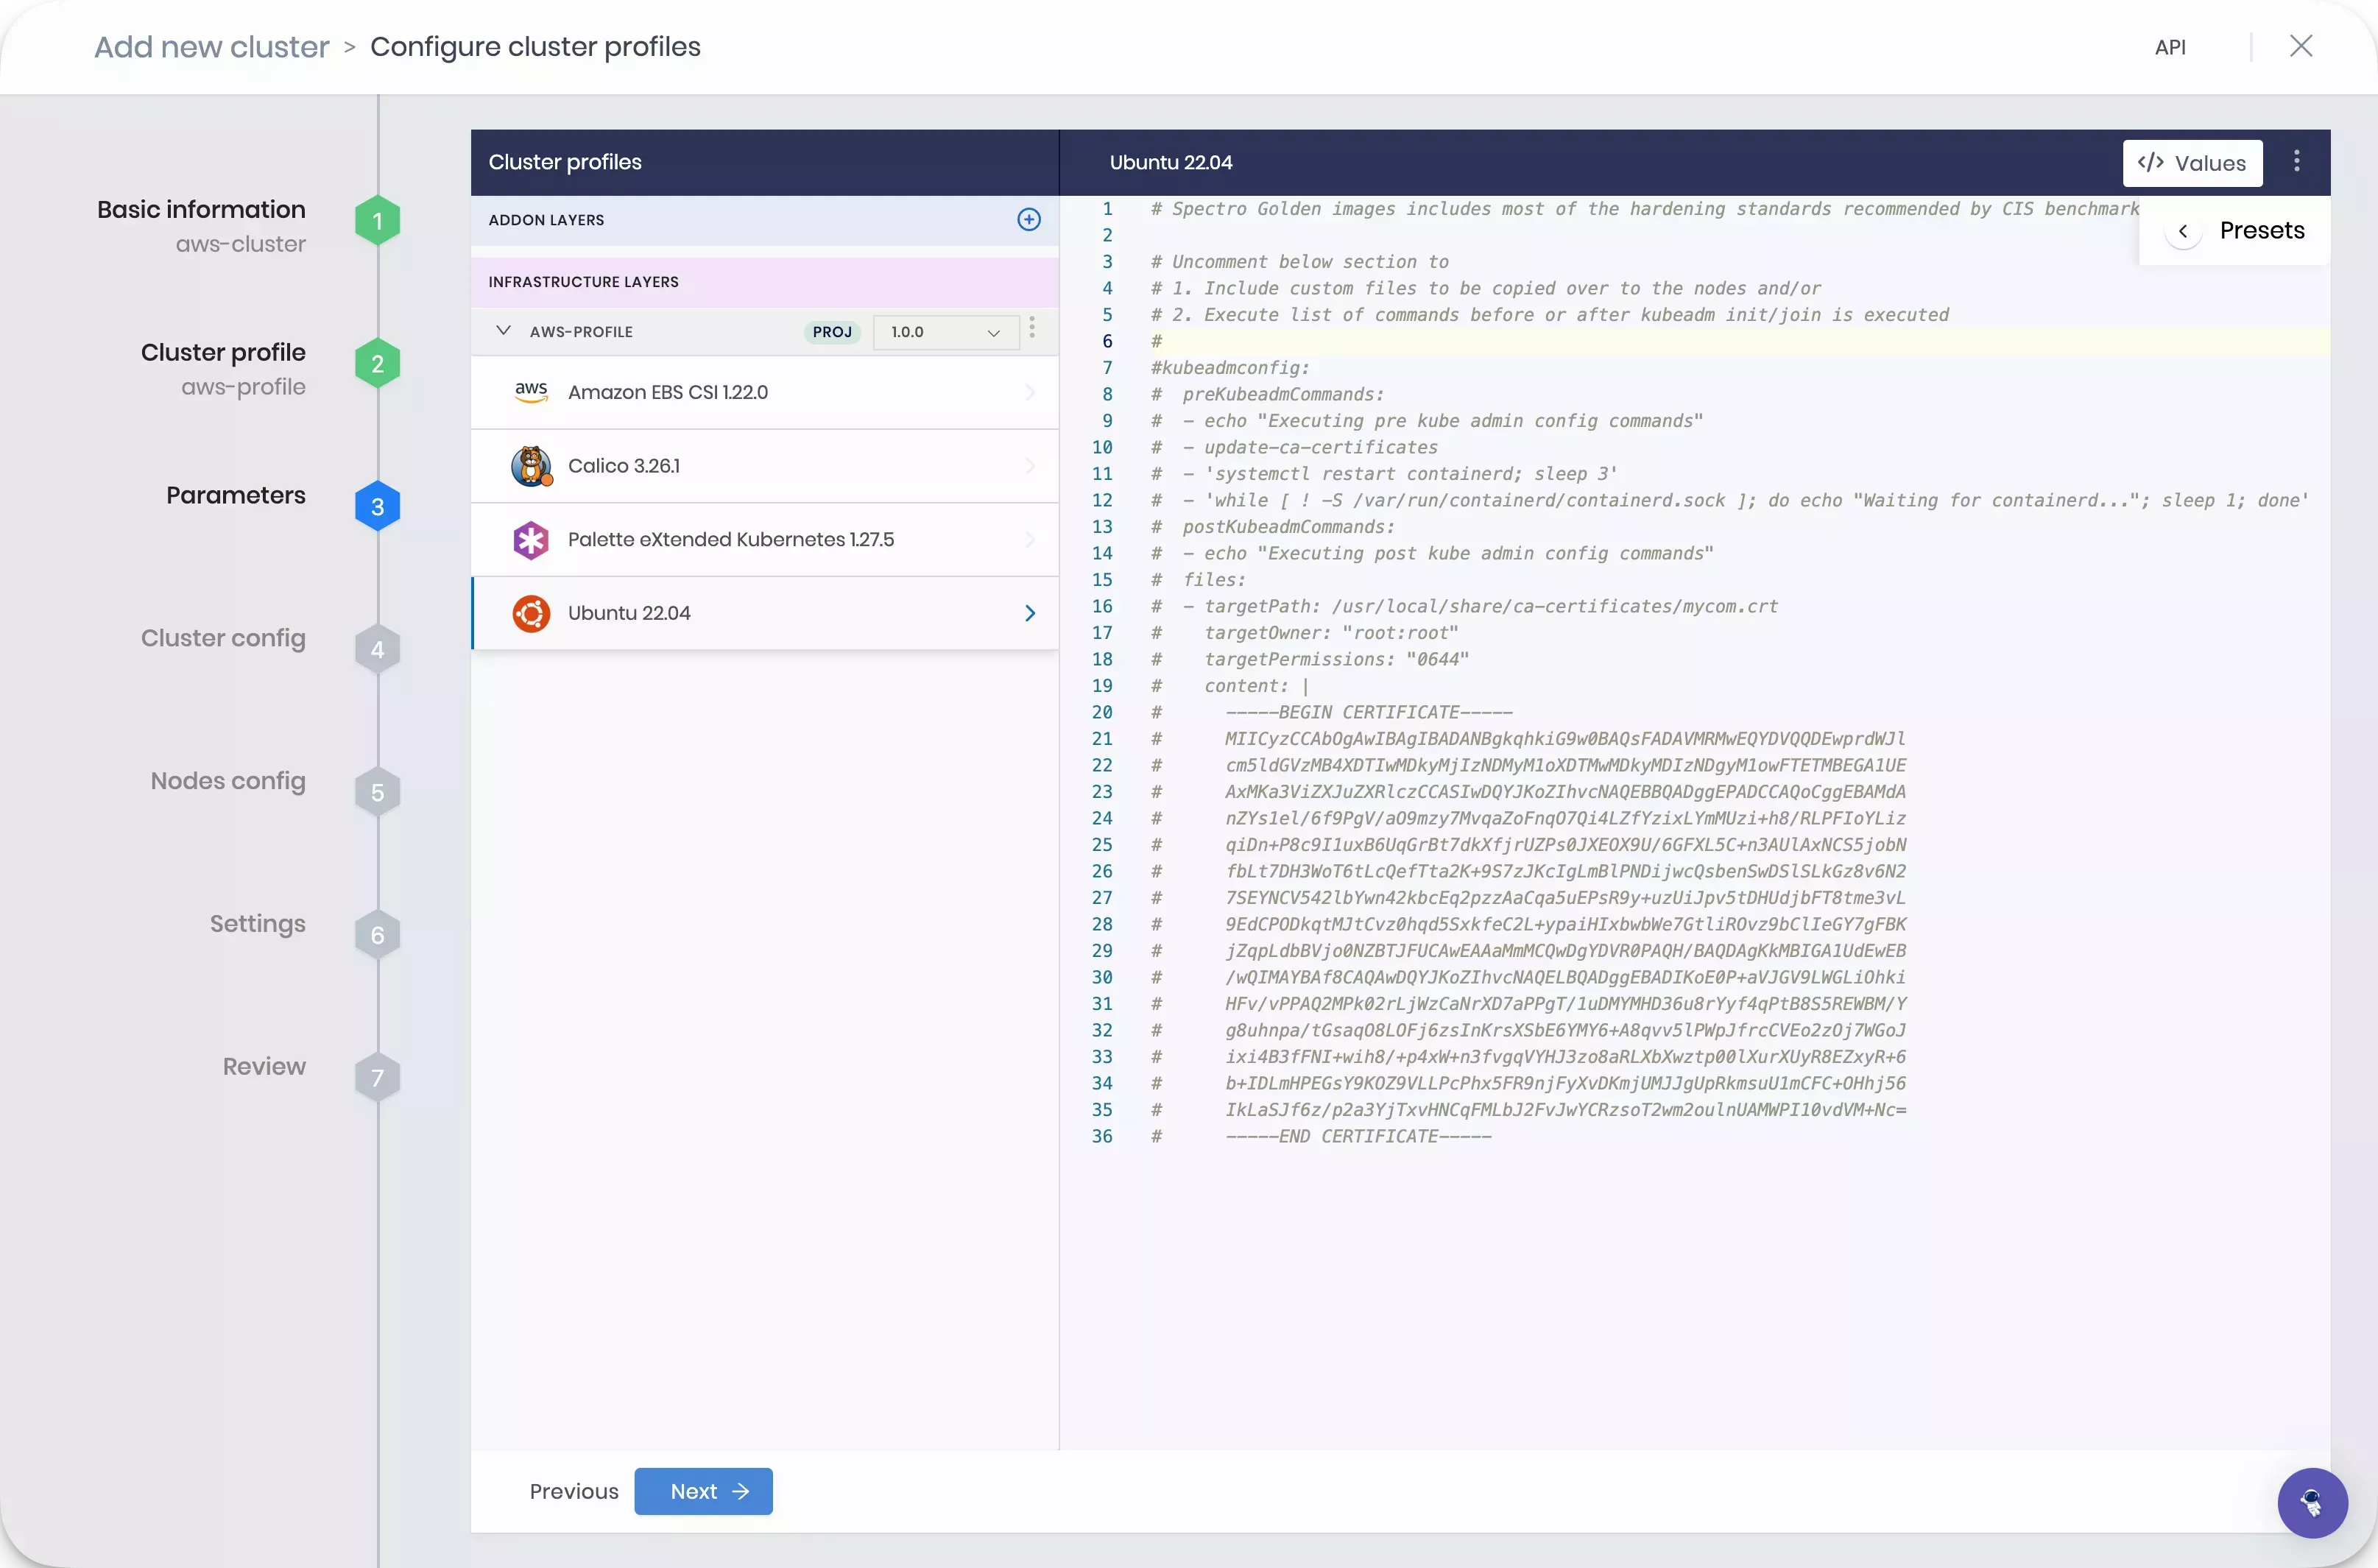
Each layer has a pack manifest file with the deploy configurations. The pack manifest file is in a YAML format. Each pack contains a set of default values. You can change the manifest values if needed. Click on Next to proceed.
Cluster Configuration
The Cluster config section allows you to select the Region in which to deploy the host cluster and specify other options such as the SSH Key Pair to assign to the cluster. All clusters require you to select an SSH key. After you have selected the Region and your SSH Key Pair Name, click on Next.
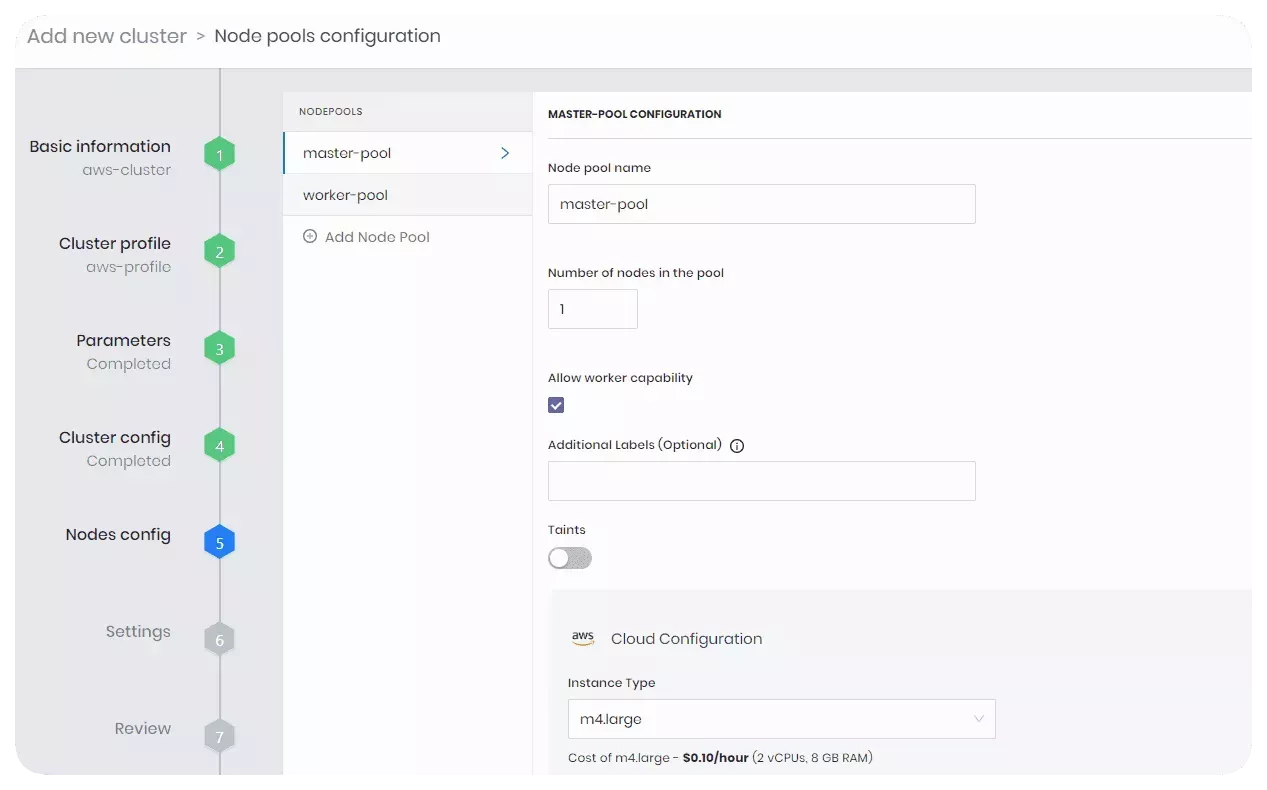
Nodes Configuration
The Nodes config section allows you to configure the nodes that make up the control plane and worker nodes of the host cluster.
Before you proceed to next section, review the following parameters.
-
Number of nodes in the pool - This option sets the number of control plane or worker nodes in the control plane or worker pool. For this tutorial, set the count to one for the control plane pool and two for the worker pool.
-
Allow worker capability - This option allows the control plane node to also accept workloads. This is useful when spot instances are used as worker nodes. You can check this box if you want to.
-
Instance Type - Select the compute type for the node pool. Each instance type displays the amount of CPU, RAM, and hourly cost of the instance. Select
m4.2xlarge. -
Availability zones - Used to specify the availability zones in which the node pool can place nodes. Select an availability zone.
-
Disk size - Set the disk size to 60 GiB.
- Instance Option - This option allows you to choose on-demand instance or spot instance for worker nodes. Select On Demand.
Select Next to proceed with the cluster deployment.
Settings
In the Settings section, you can configure advanced options such as when to patch the OS, enable security scans, manage backups, add role-based access control (RBAC) bindings, and more.
For this tutorial, you can use the default settings. Click on Validate to continue.
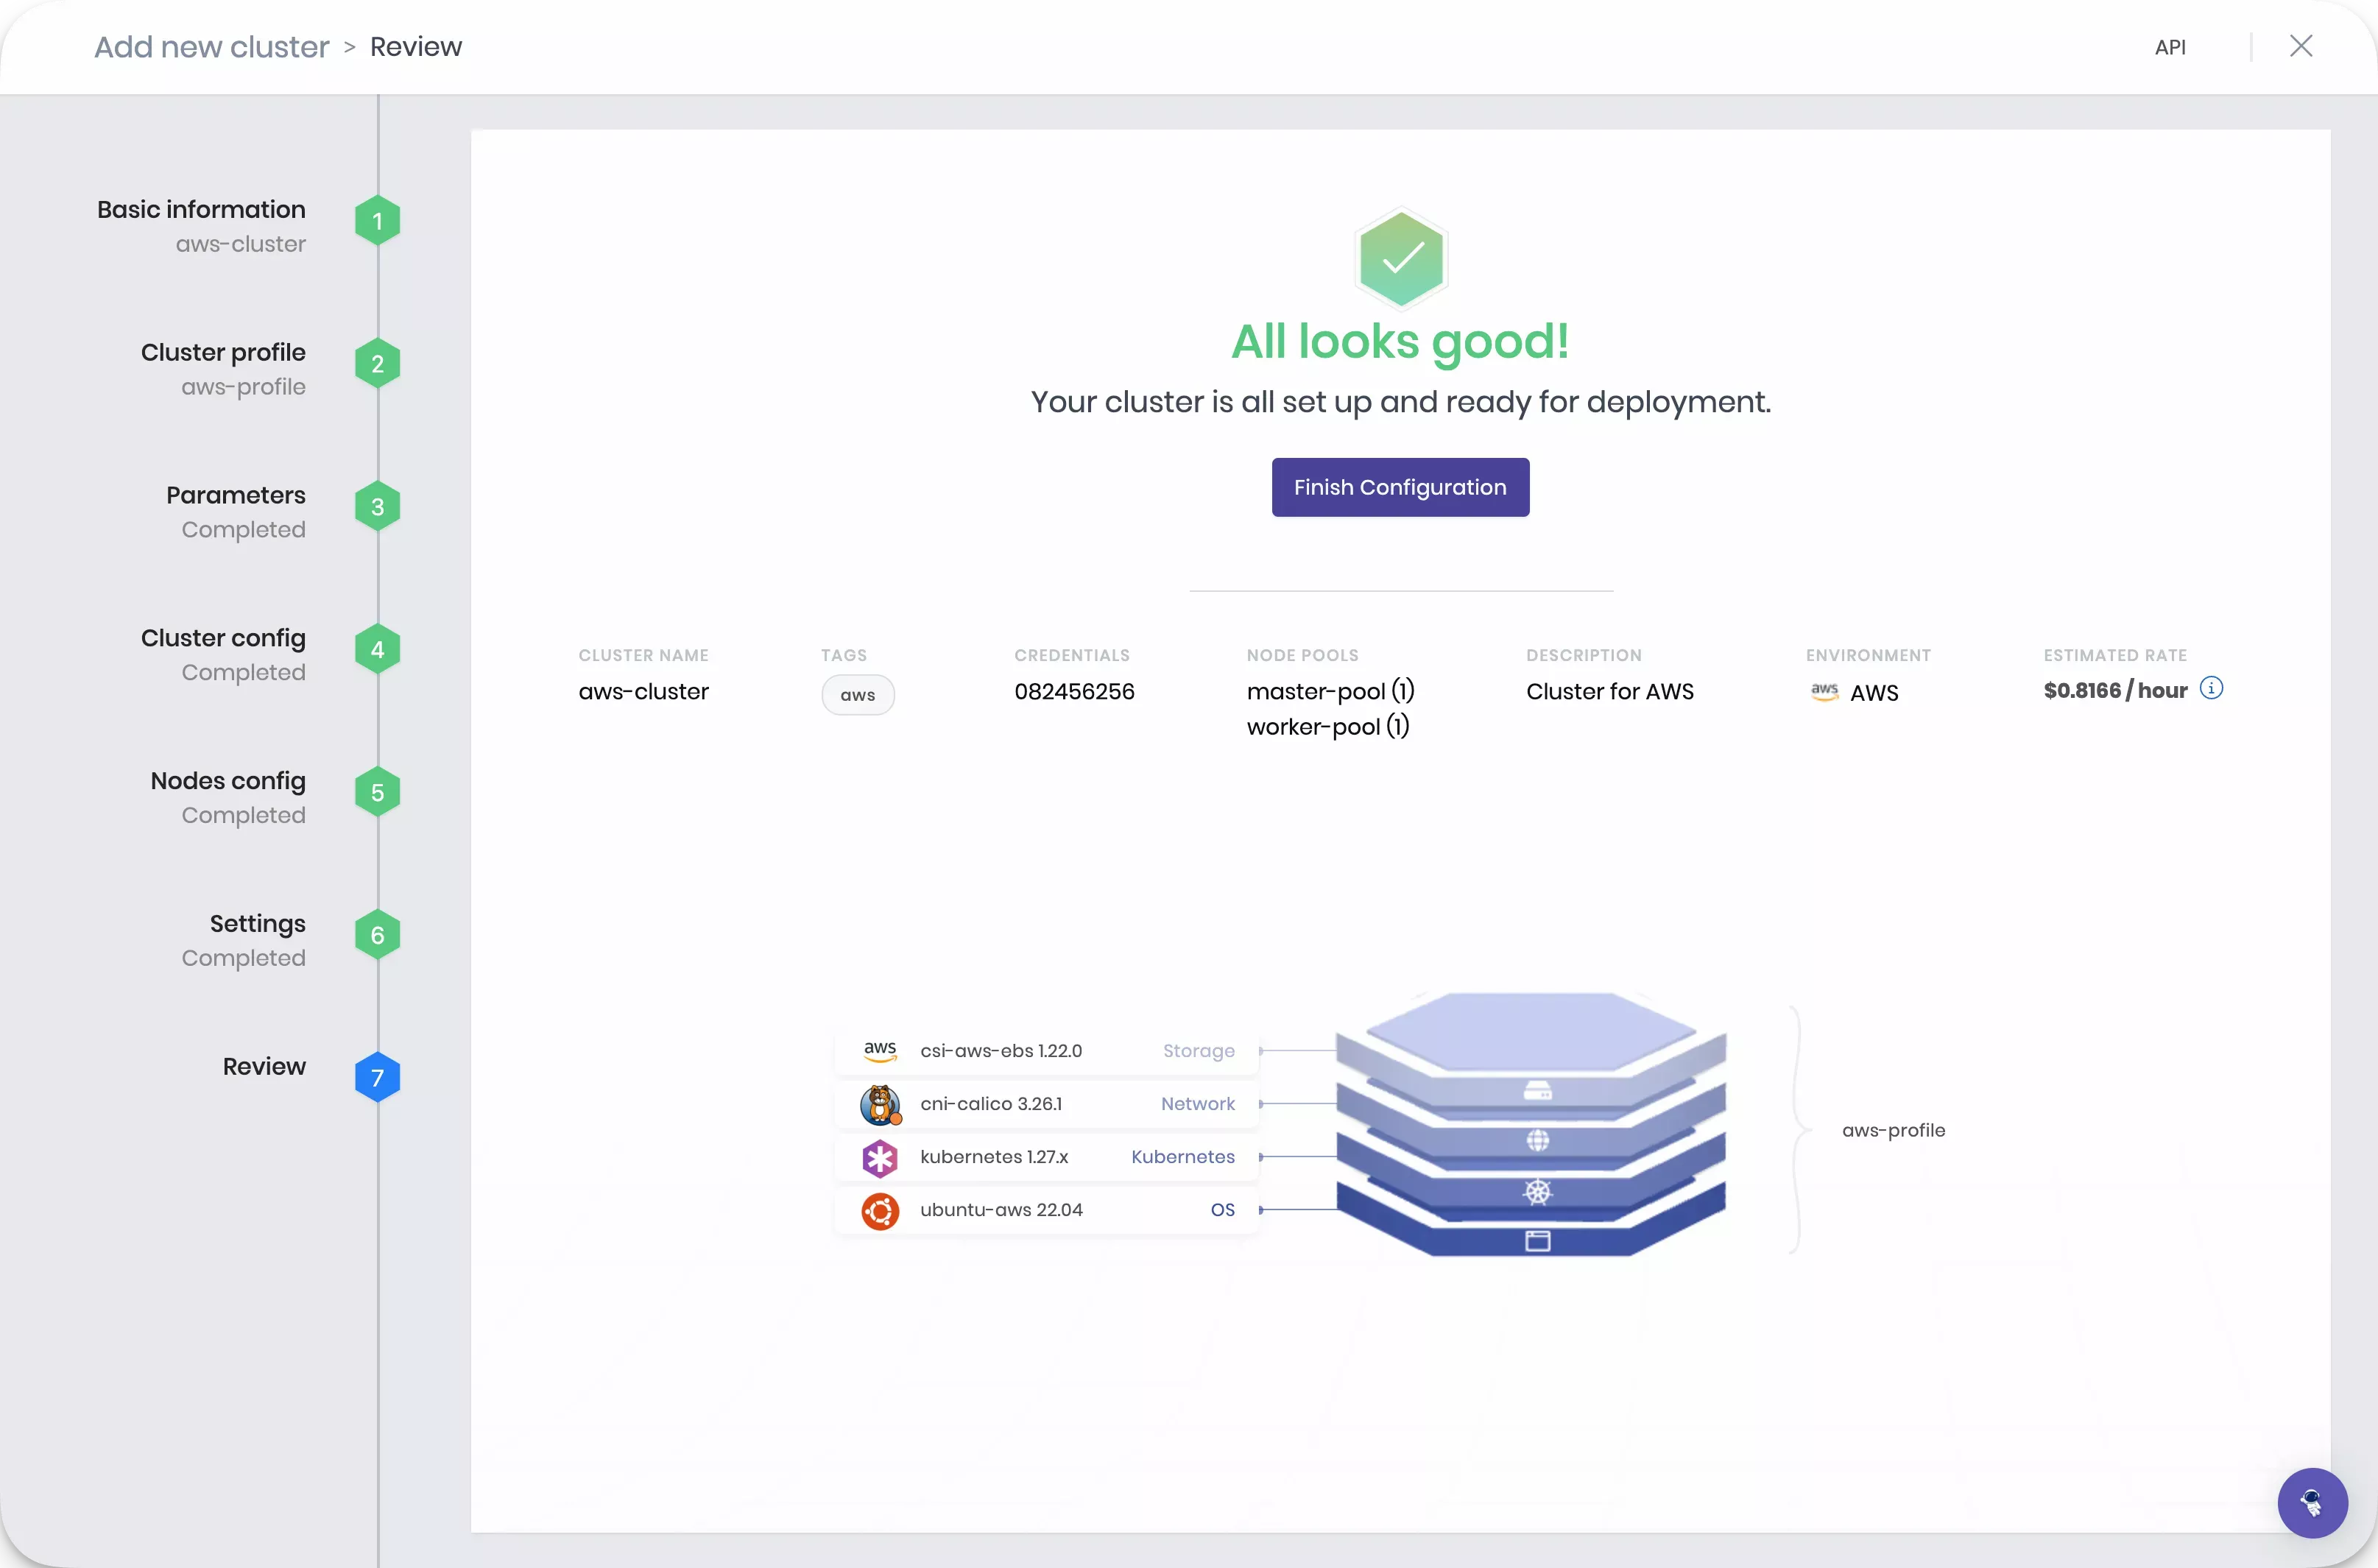
Review
The Review section allows you to review the cluster configuration prior to deploying the cluster. Review all the settings and click on Finish Configuration to deploy the cluster.
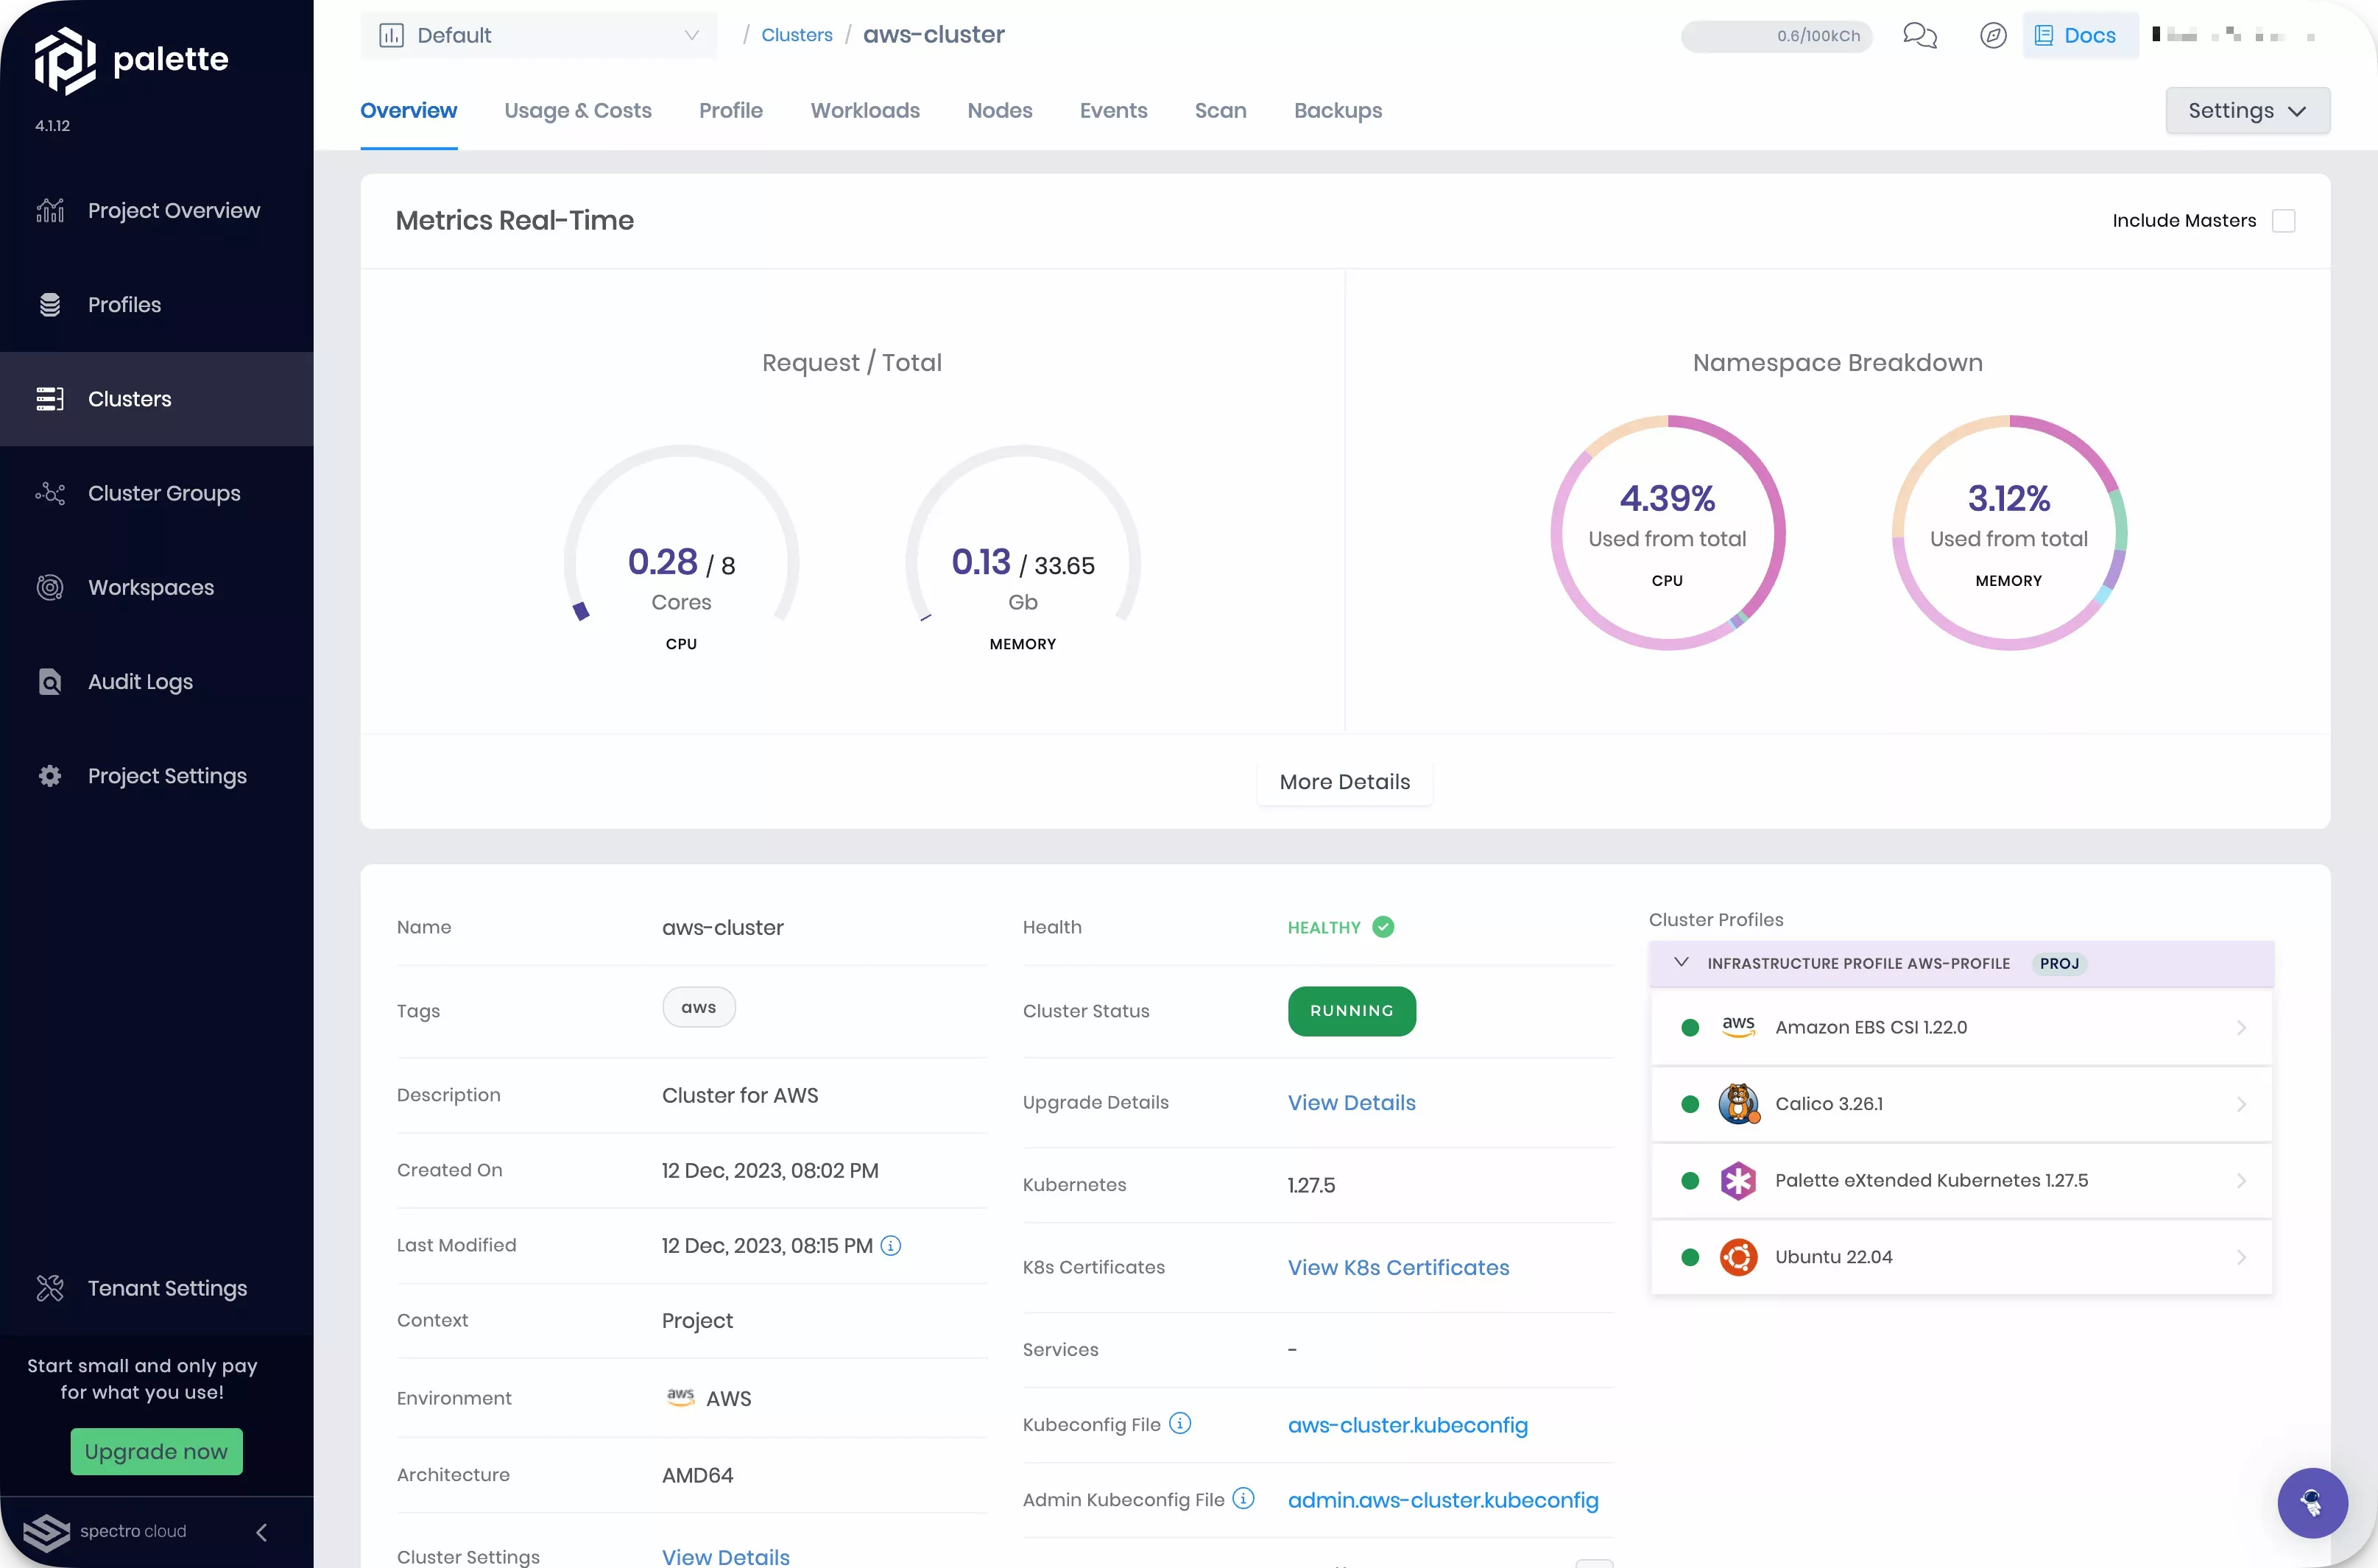
Navigate to the left Main Menu and select Clusters.

Click on your cluster to review its details such as deployment status, event logs, cluster profile, monitoring data, and other information about the cluster.
Create Cluster Profile (Azure)
Cluster profiles are templates you create with the following core layers and any add-on layers such as security, monitoring, logging, and more.
- Operating System (OS)
- Kubernetes distribution and version
- Network Container Interface (CNI)
- Storage Container Interface (CSI)
A cluster profile contains these core and additional add-on layers, such as security, monitoring, logging, etc.
You customize profiles by choosing the type of component and version. In this way, profiles offer a reproducible way to create clusters.
Log in to Palette and navigate to the left Main Menu. Select Profiles to view the cluster profile page. You can view the list of available cluster profiles. To create a cluster profile, click the Add Cluster Profile button.
Follow the wizard to create a new profile.
In the Basic Information section, assign the name azure-profile, a brief profile description, select the type as Full, and assign the tag env:azure. You can leave the version empty if you want to. Just be aware that the version defaults to 1.0.0. Click on Next.
Cloud Type allows you to choose the infrastructure provider with which this cluster profile is associated. Select Azure and click on Next.
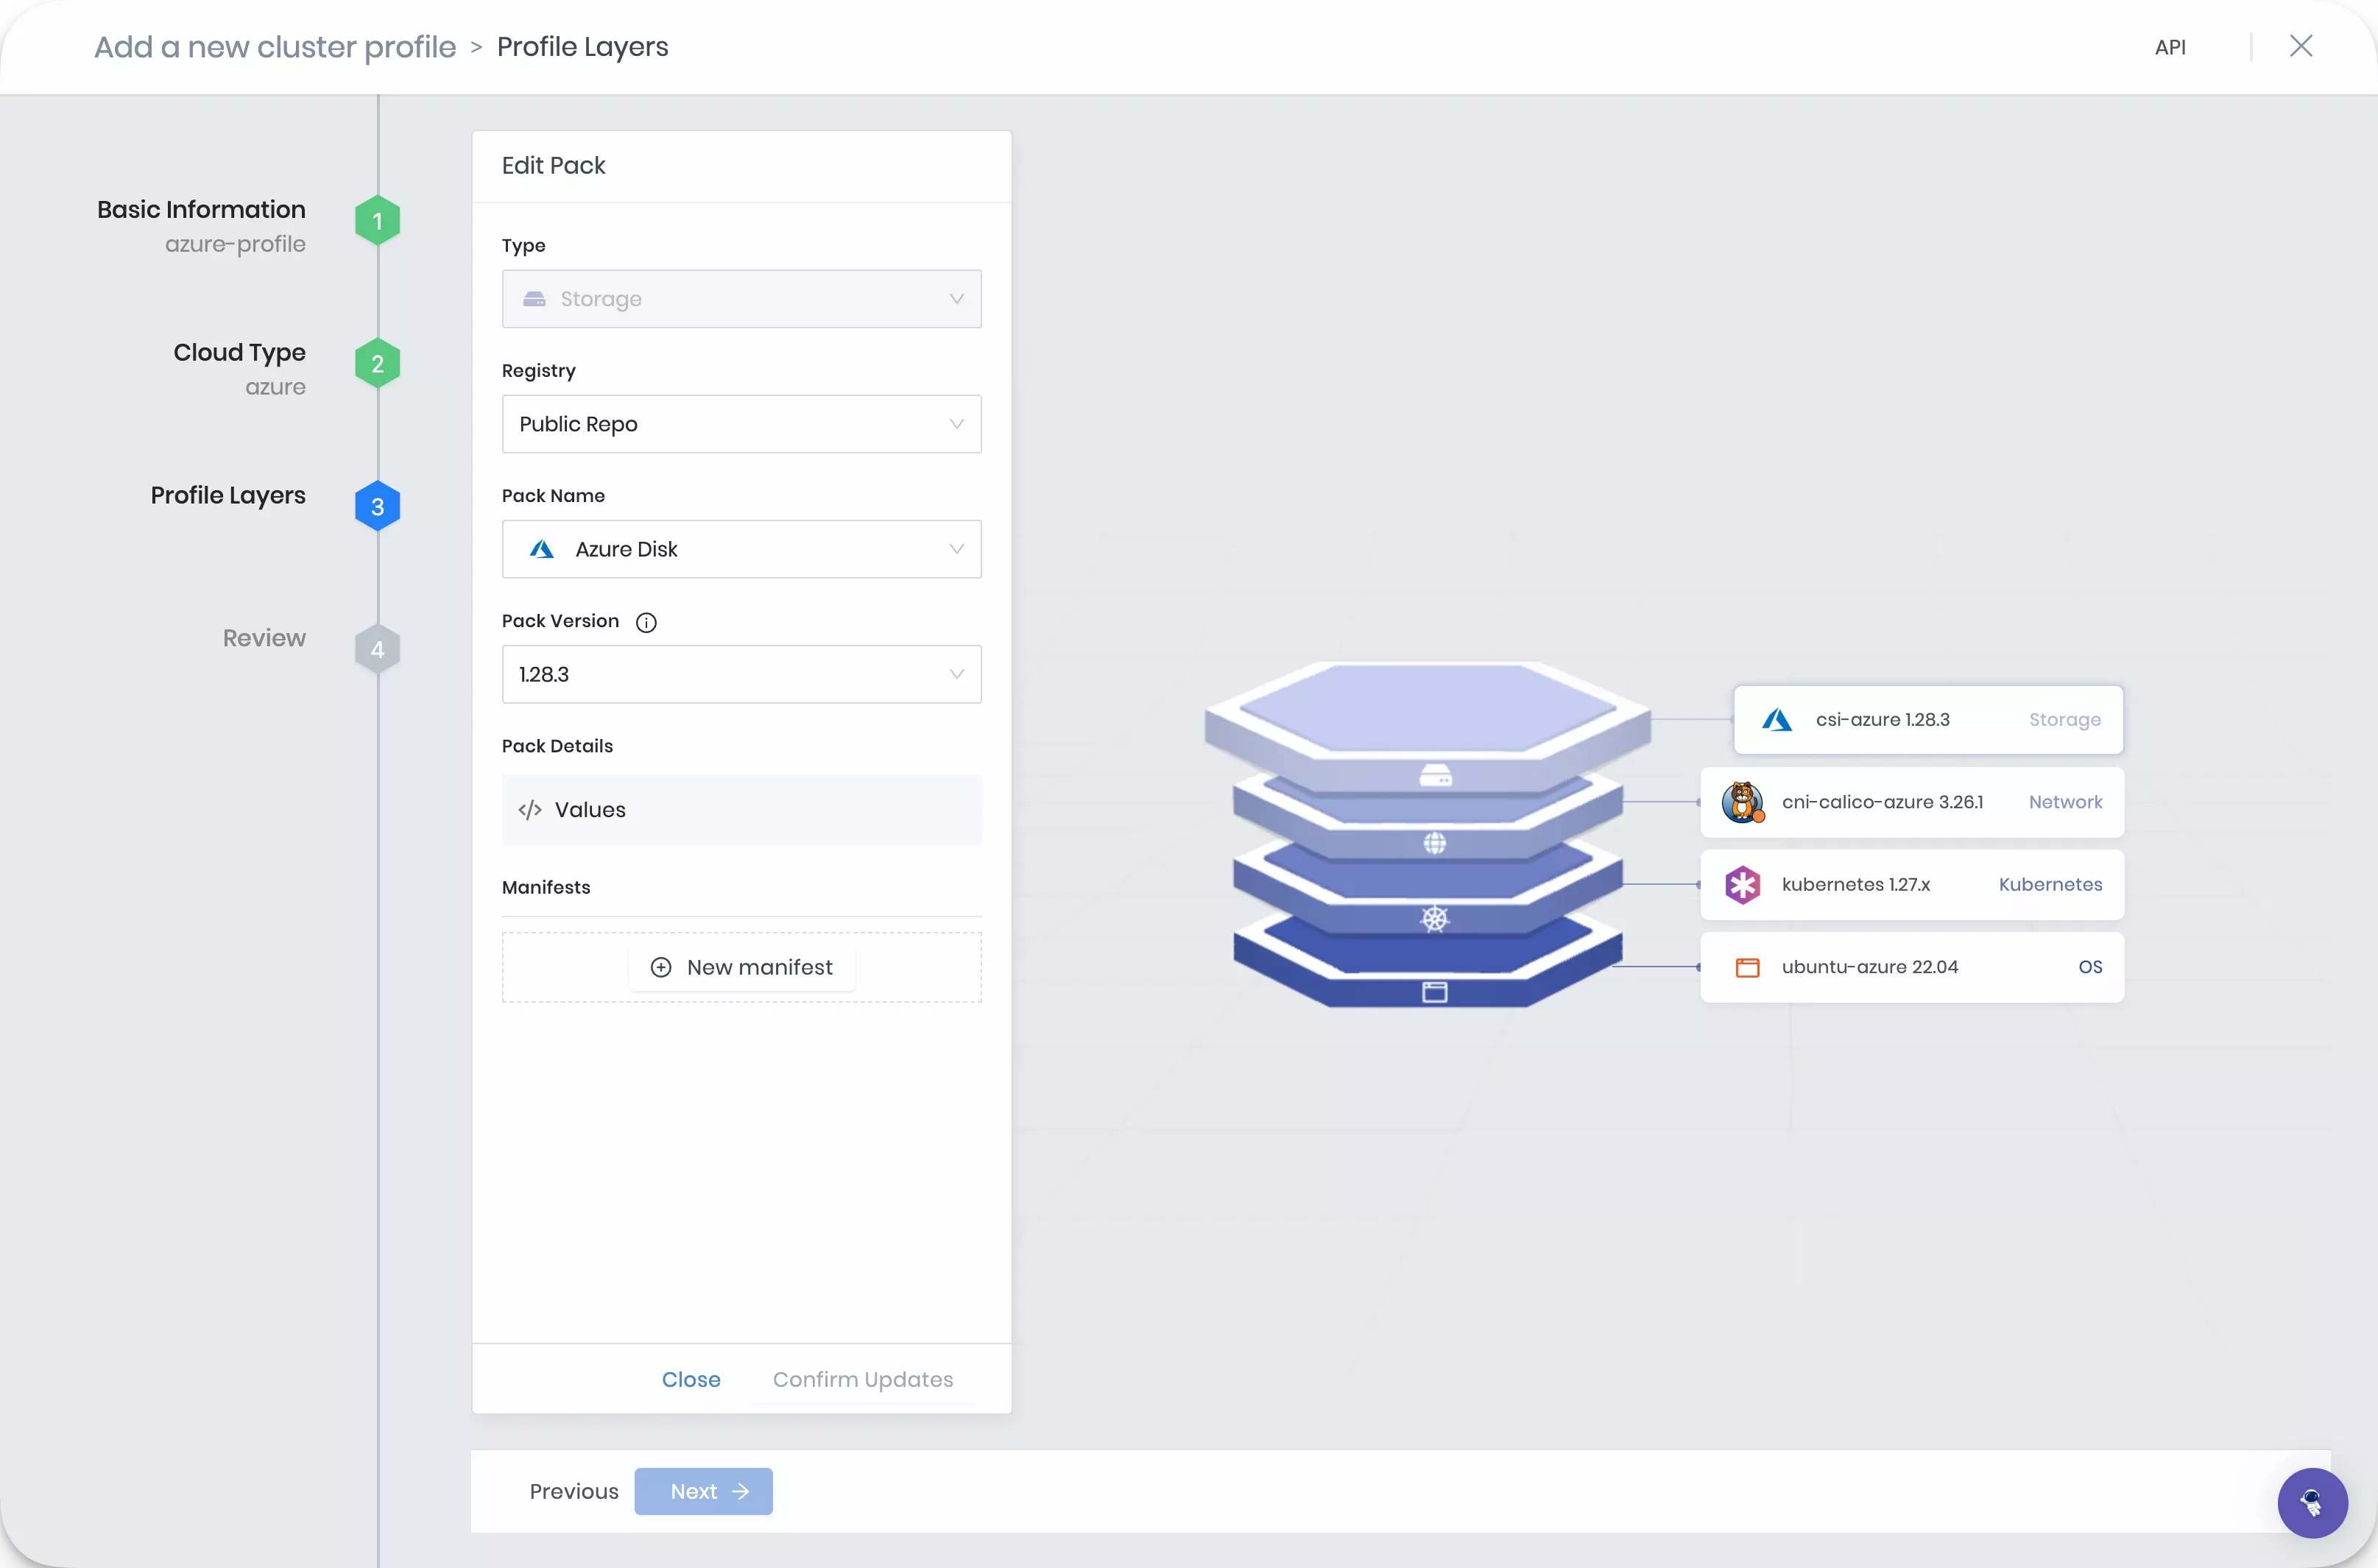
Profile Layers is the main configuration step where you specify the packs that compose the profile. You can choose from four required infrastructure packs and several optional add-on packs. Every pack requires you to select the Pack Type, Registry, and Pack Name.
For this tutorial, use the following packs:
| Pack Name | Version | Layer |
|---|---|---|
| ubuntu-azure LTS | 22.4.x | Operating System |
| Kubernetes | 1.27.x | Kubernetes |
| cni-calico-azure | 3.26.x | Network |
| Azure Disk | 1.28.x | Storage |
As you fill out the information for each layer, click on Next to proceed to the next layer.
Click on Confirm after you have completed filling out all the core layers.
The review section gives an overview of the cluster profile configuration you selected. Click on Finish Configuration to finish creating the cluster profile.
You can modify cluster profiles after you create them by adding, removing, or editing the layers.
Create a New Cluster
Navigate to the left Main Menu and select Clusters. Click the Add New Cluster button.
Click on Deploy New Cluster to access the cluster deployment wizard. Select Azure and click the Start Azure Configuration button. Use the following steps to create a host cluster in Azure.
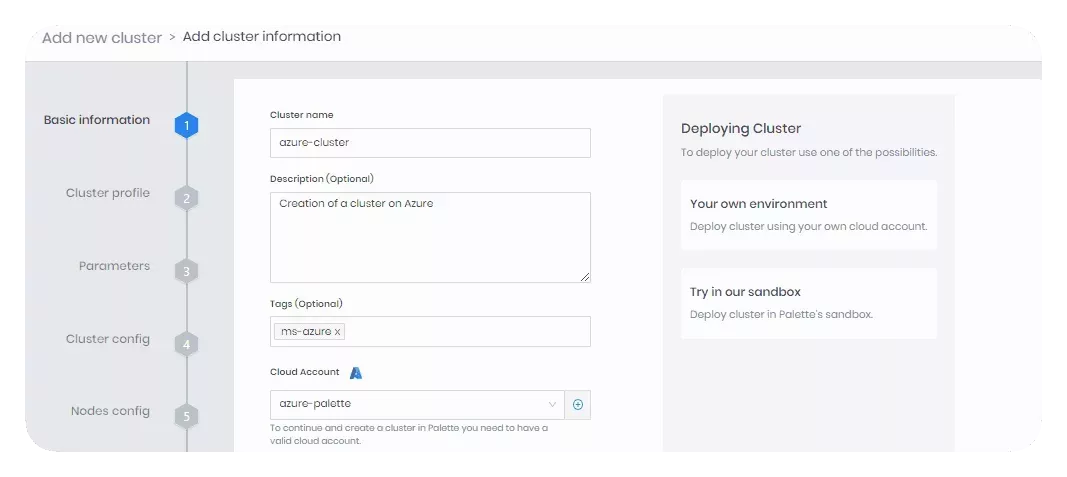
Basic information
In the Basic information section, insert the general information about the cluster, such as the Cluster name, Description, Tags, and Cloud account. Click on Next.
Cluster Profile
A list is displayed of available profiles you can choose to deploy to Azure. Select the cluster profile you created earlier and click on Next.
Parameters
The Parameters section displays all the layers in the cluster profile.
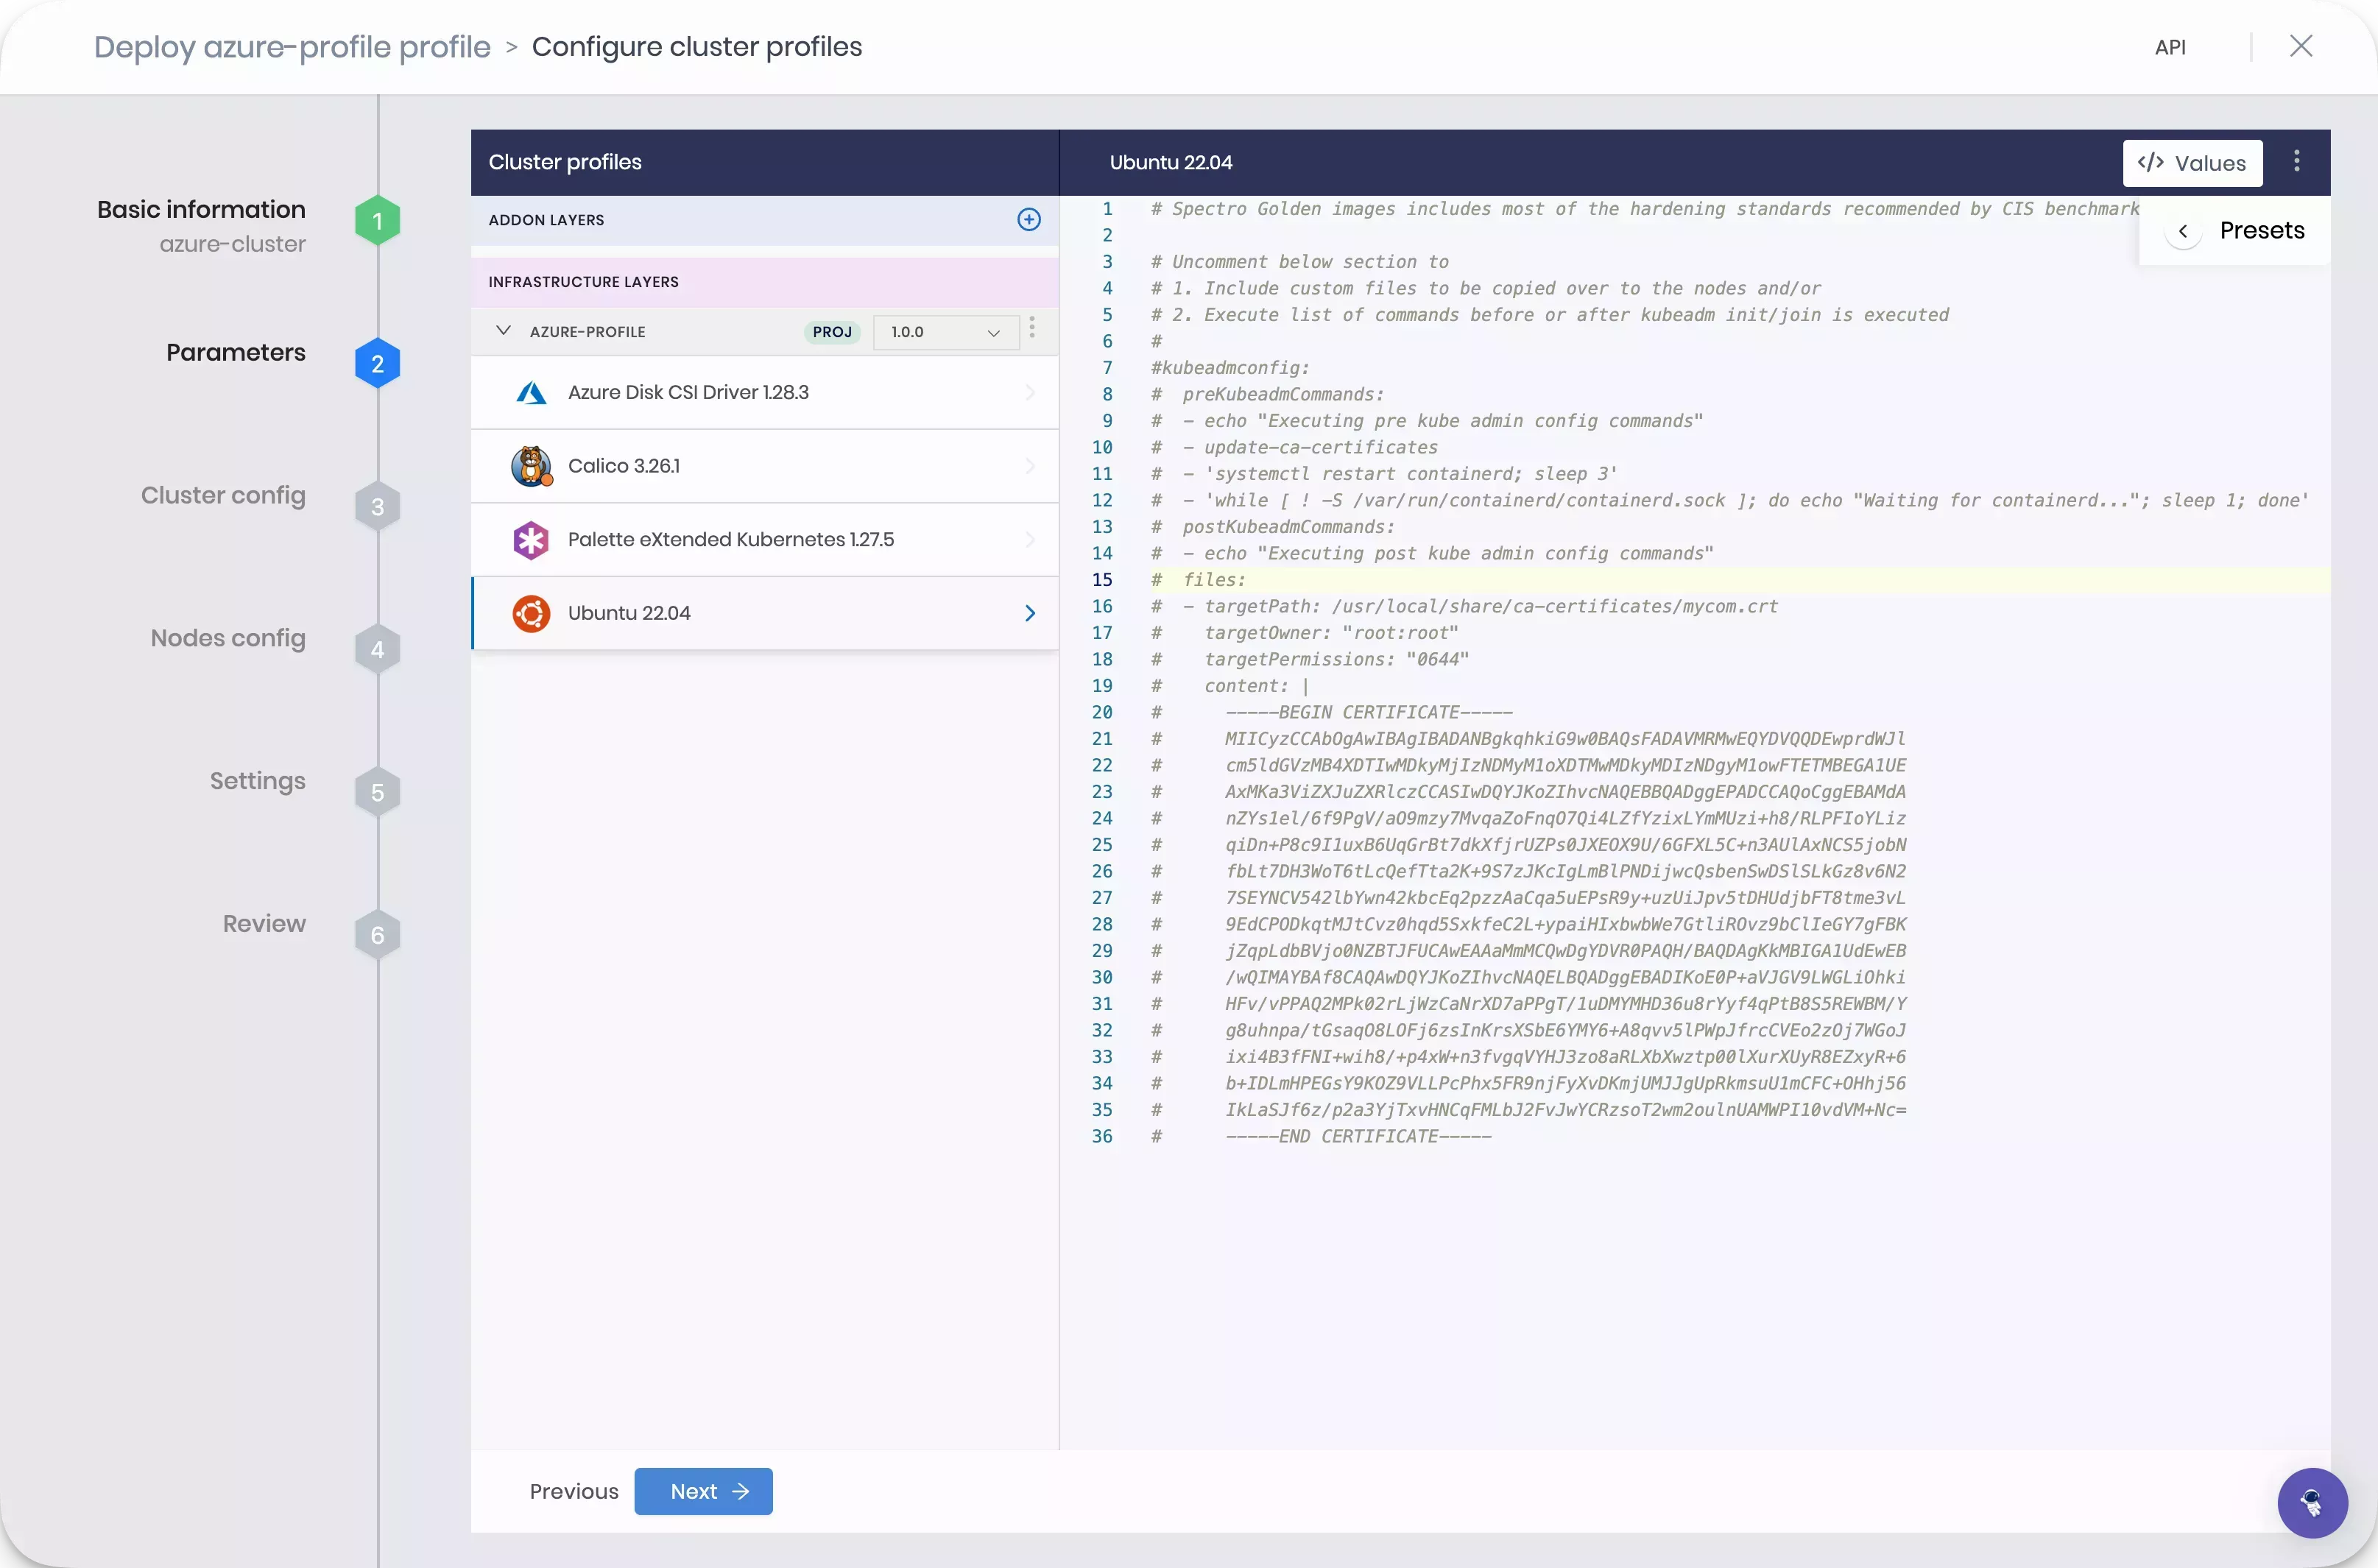
Each layer has a pack manifest file with the deploy configurations. The pack manifest file is in a YAML format. Each pack contains a set of default values. You can change the manifest values if needed. Click on Next to proceed.
Cluster Configuration
The Cluster config section allows you to select the Subscription, Region, Resource Group, Storage account, and SSH Key to apply to the host cluster. All clusters require you to assign an SSH key. Refer to the SSH Keys guide for information about uploading an SSH key.
When you are done selecting a Subscription, Region, Resource Group, Storage account and SSH Key,
click on Next.
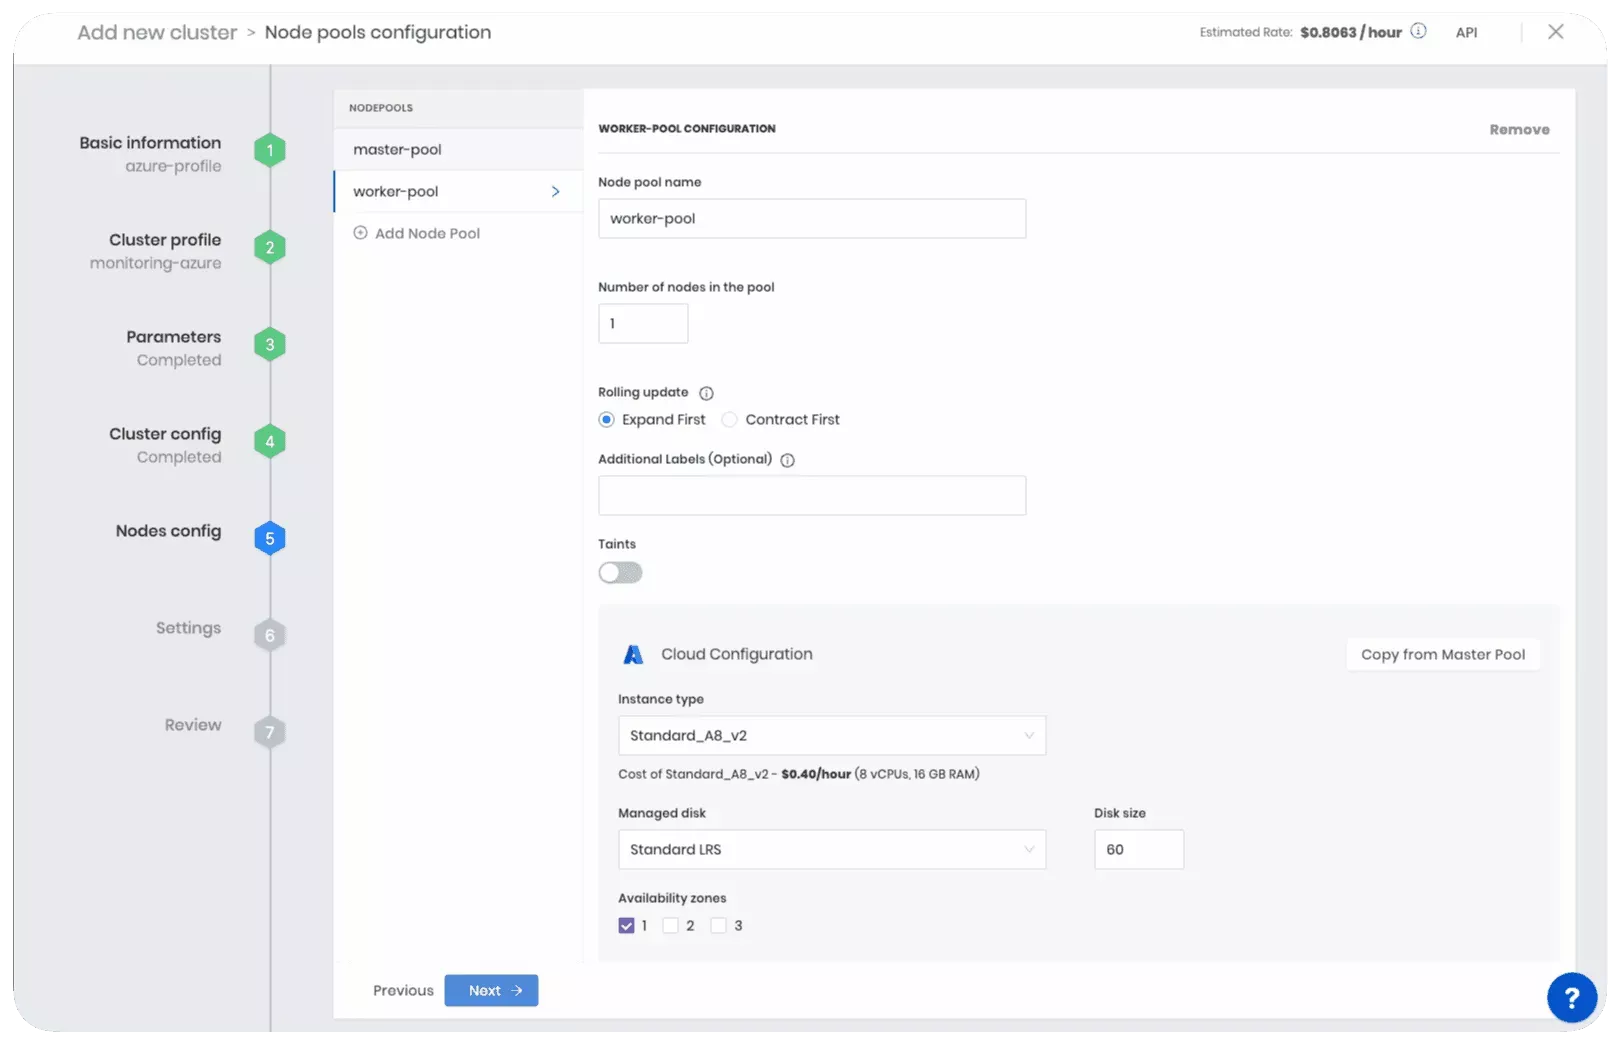
Nodes Configuration
The Nodes config section allows you to configure the nodes that compose the control plane nodes and worker nodes of the Kubernetes cluster.
Refer to the Node Pool guide for a list and description of parameters.
Before you proceed to next section, review the following parameters.
Number of nodes in the pool - This option sets the number of control plane or worker nodes in the control plane or worker pool. For this tutorial, set the count to one for both the control plane and worker pools.
Allow worker capability - This option allows the control plane node to also accept workloads. This is useful when spot instances are used as worker nodes. You can check this box if you want to.
-
Instance Type - Select the compute type for the node pool. Each instance type displays the amount of CPU, RAM, and hourly cost of the instance. Select Standard_A8_v2.
-
Managed disk - Used to select the storage class. Select Standard LRS and set the disk size to 60.
-
Availability zones - Used to specify the availability zones in which the node pool can place nodes. Select an availability zone.
Settings
In the Settings section, you can configure advanced options such as when to patch the OS, enable security scans, manage backups, add Role-Based Access Control (RBAC) bindings, and more.
For this tutorial, you can use the default settings. Click on Validate to continue.
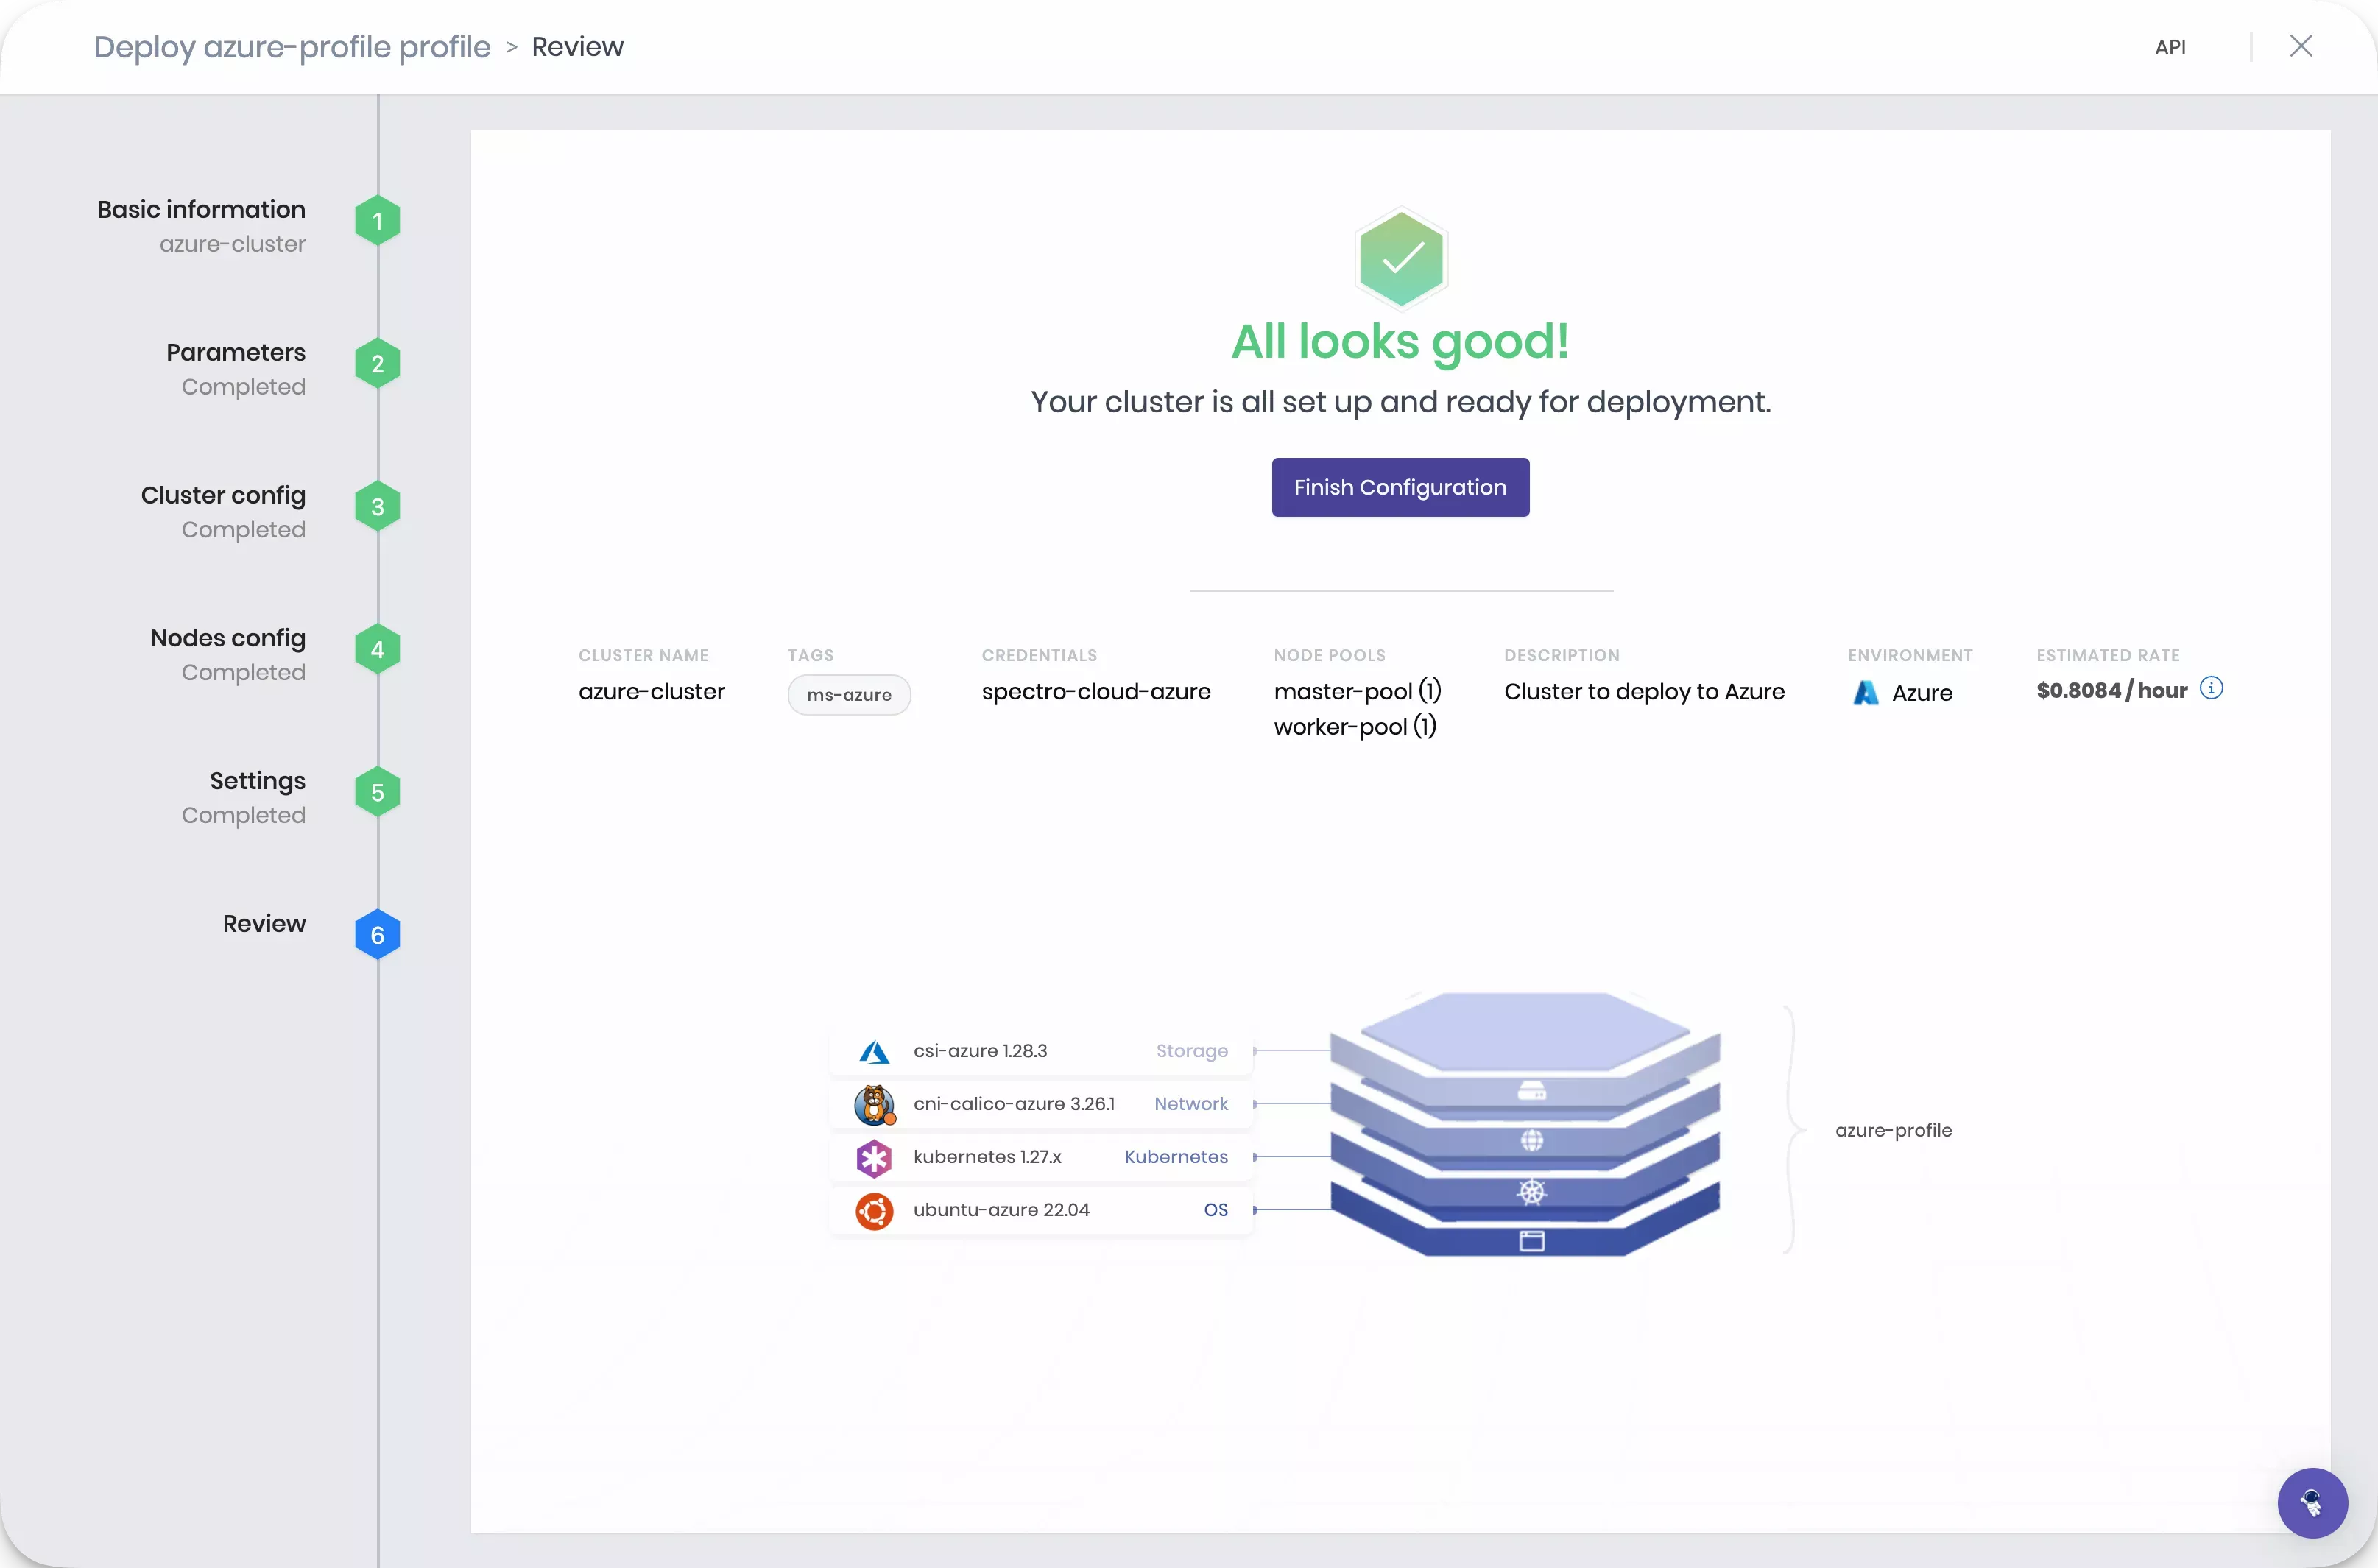
Review
The Review section allows you to review the cluster configuration before deploying the cluster. Review all the settings and click on Finish Configuration to deploy the cluster.
Navigate to the left Main Menu and select Clusters.
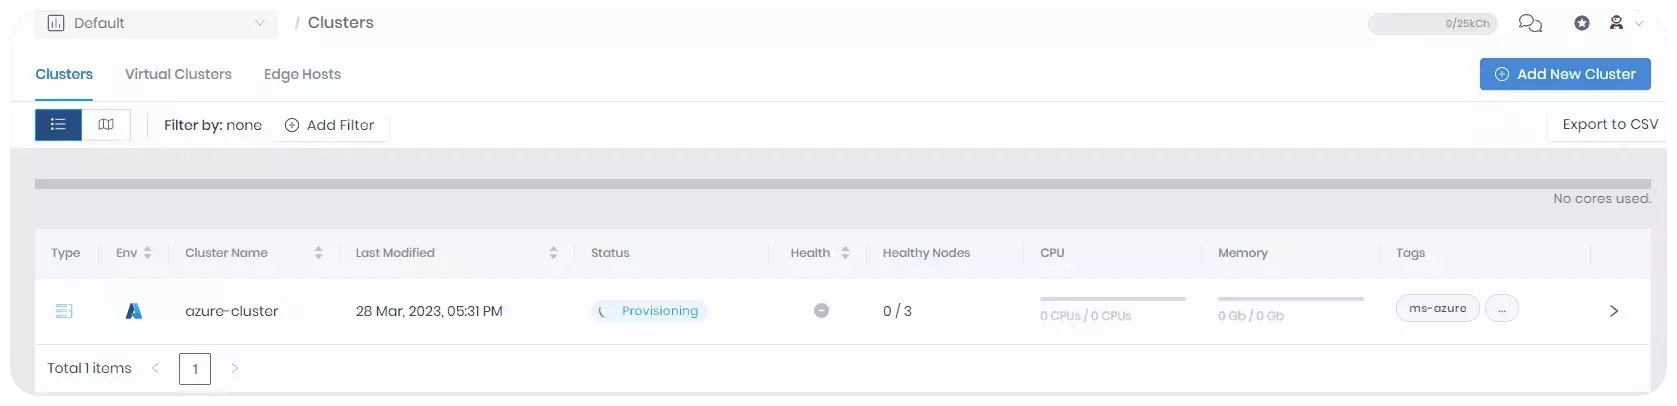
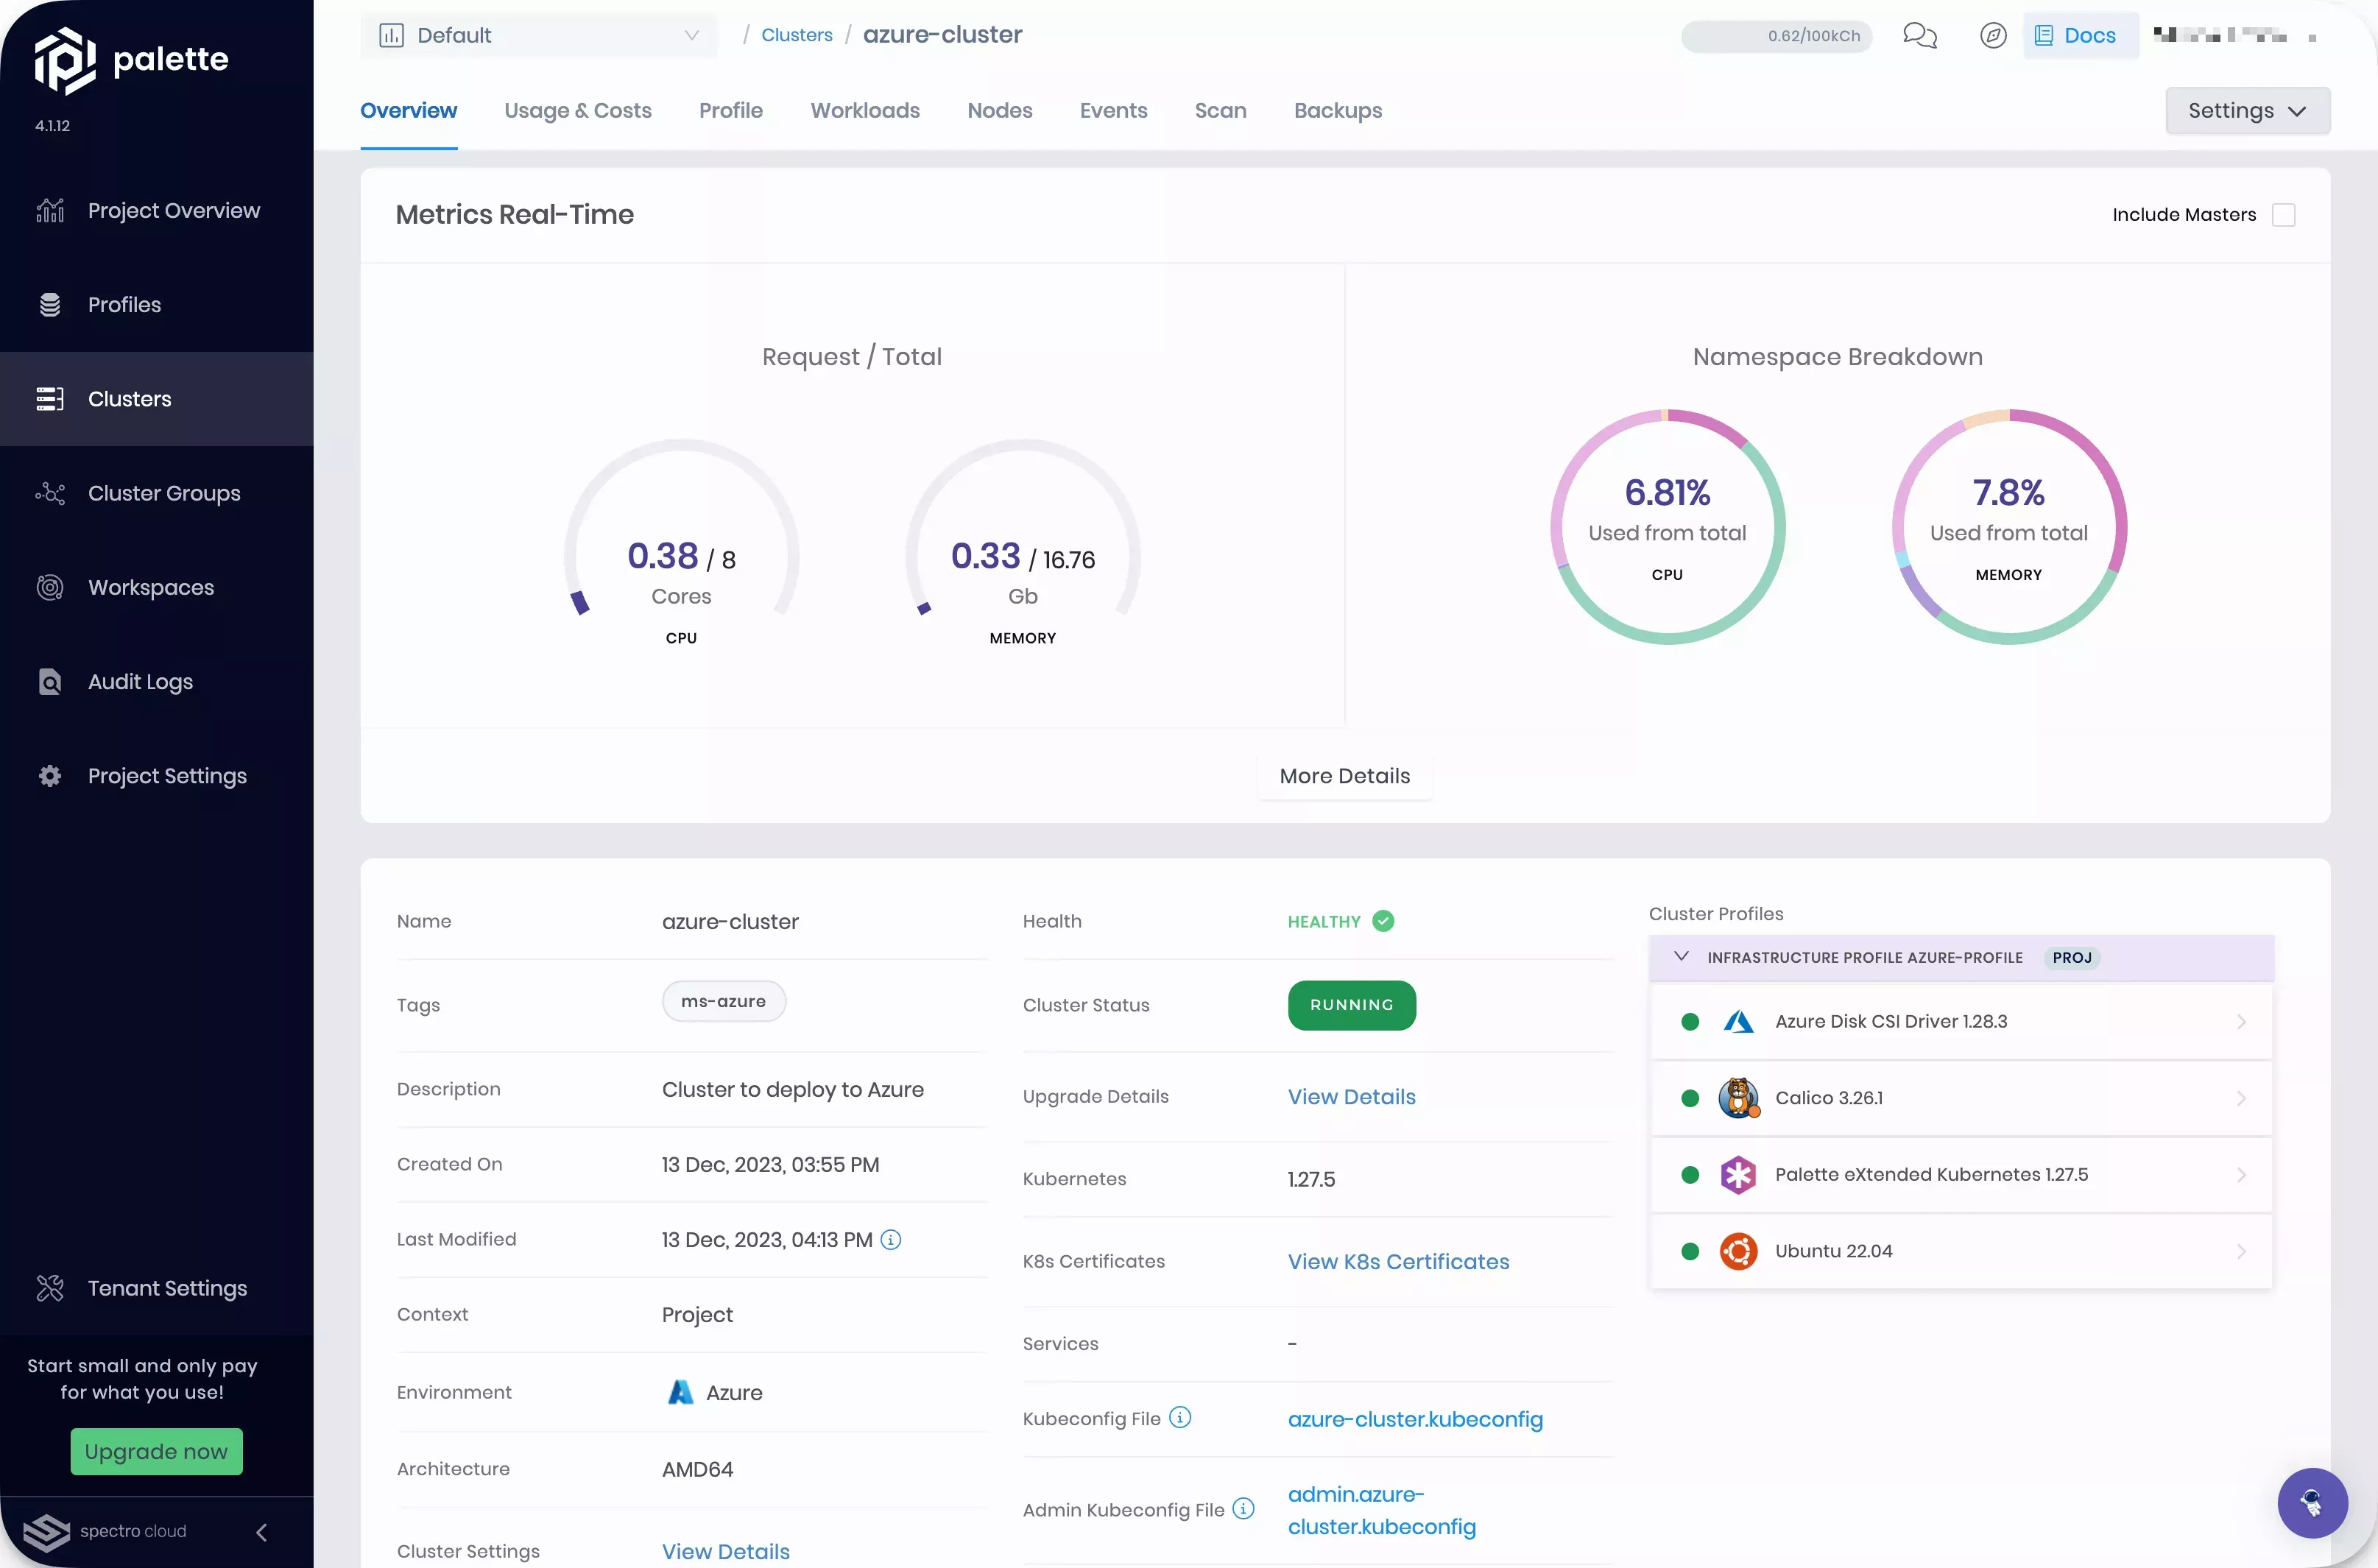
Click on your cluster to review details such as deployment status, event logs, cluster profile, monitoring data, and other information about the cluster.
Create Cluster Profile (GCP)
Cluster profiles are templates you create with the following core layers and any add-on layers such as security, monitoring, logging, and more.
- Operating System (OS)
- Kubernetes distribution and version
- Network Container Interface (CNI)
- Storage Container Interface (CSI)
You customize profiles by choosing the type of component and version. In this way, profiles offer a reproducible way to create clusters.
Log in to Palette and navigate to the left Main Menu. Select Profiles to view the cluster profile page. You can view the list of available cluster profiles. To create a cluster profile, click the Add Cluster Profile button.
Follow the wizard to create a new profile.
In the Basic Information section, assign the name gcp-profile, provide a profile description, select the type as Full, and assign the tag env:gcp. You can leave the version empty if you want to. Just be aware that the version defaults to 1.0.0. Click on Next.
Cloud Type allows you to choose the infrastructure provider with which this cluster profile is associated. Select Google Cloud and click on Next.
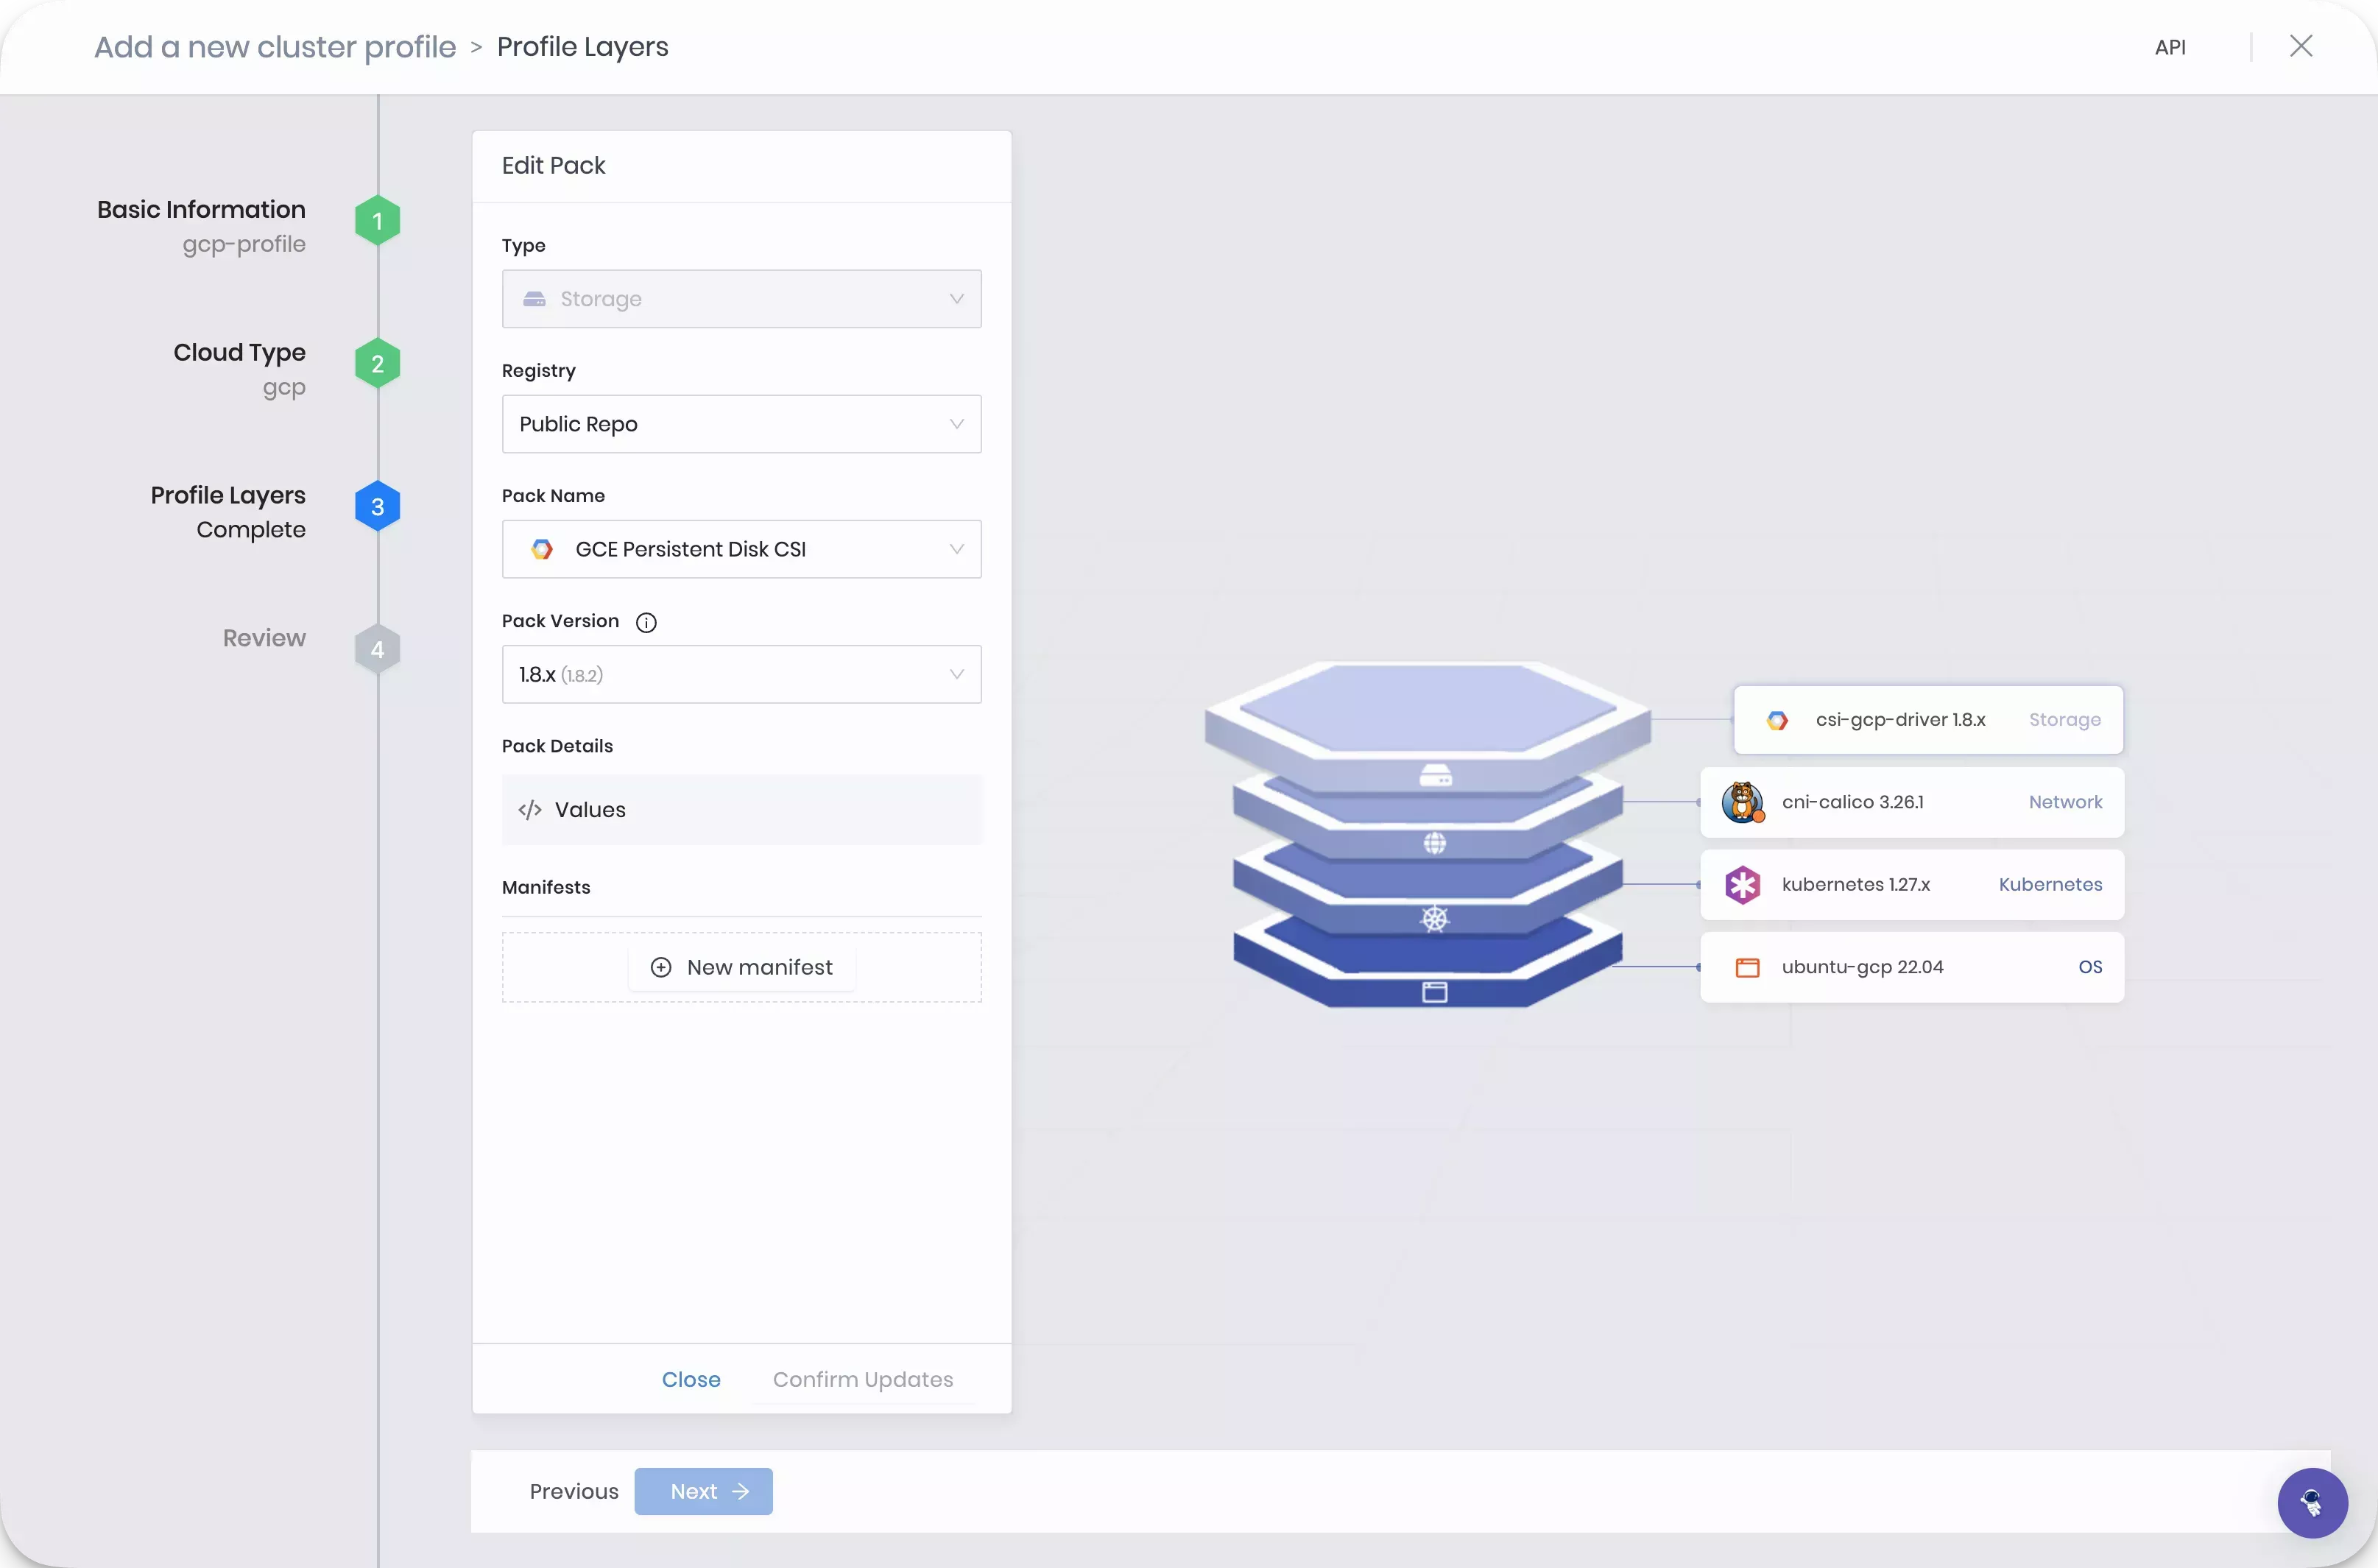
Profile Layers, this is the main configuration step where you specify the packs that compose the profile. You can choose from four required infrastructure packs and several optional add-on packs. Every pack requires you to select the Pack Type, Registry, and Pack Name.
For this tutorial, use the following packs:
| Pack Name | Version | Layer |
|---|---|---|
| ubuntu-gcp LTS | 22.4.x | Operating System |
| Kubernetes | 1.27.x | Kubernetes |
| cni-calico | 3.26.x | Network |
| csi-gcp-driver | 1.8.x | Storage |
As you fill out the information for each layer, click on Next to proceed to the next layer.
Click on Confirm after you have completed filling out all the core layers.
The review section gives an overview of the cluster profile configuration you selected. Click on Finish Configuration to create the cluster profile.
You can modify cluster profiles after you create them by adding, removing, or editing the layers.
Navigate to the left Main Menu and select Cluster. Click the Add New Cluster button.
Click on Deploy New Cluster to access the cluster deployment wizard. Select Google Cloud and click the Start Google Cloud Configuration button. Use the following steps to create a host cluster in Google Cloud.
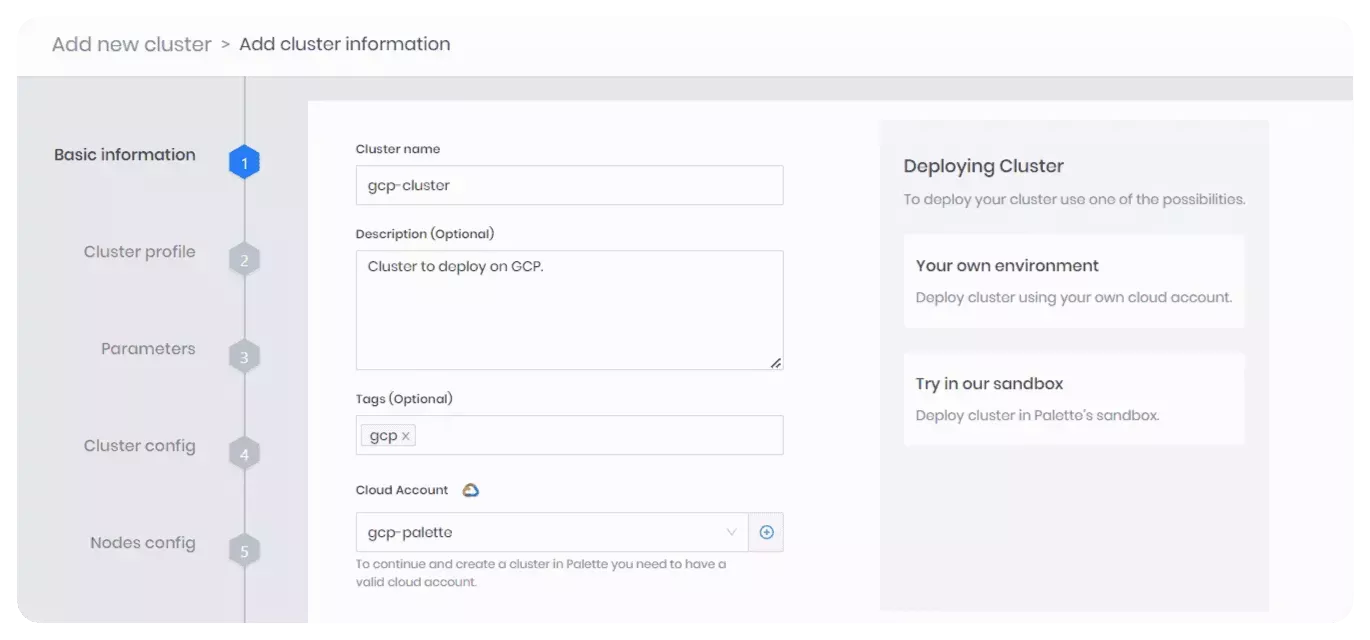
Basic information
In the Basic information section, insert the general information about the cluster, such as the Cluster name, Description, Tags, and Cloud account. Click on Next.
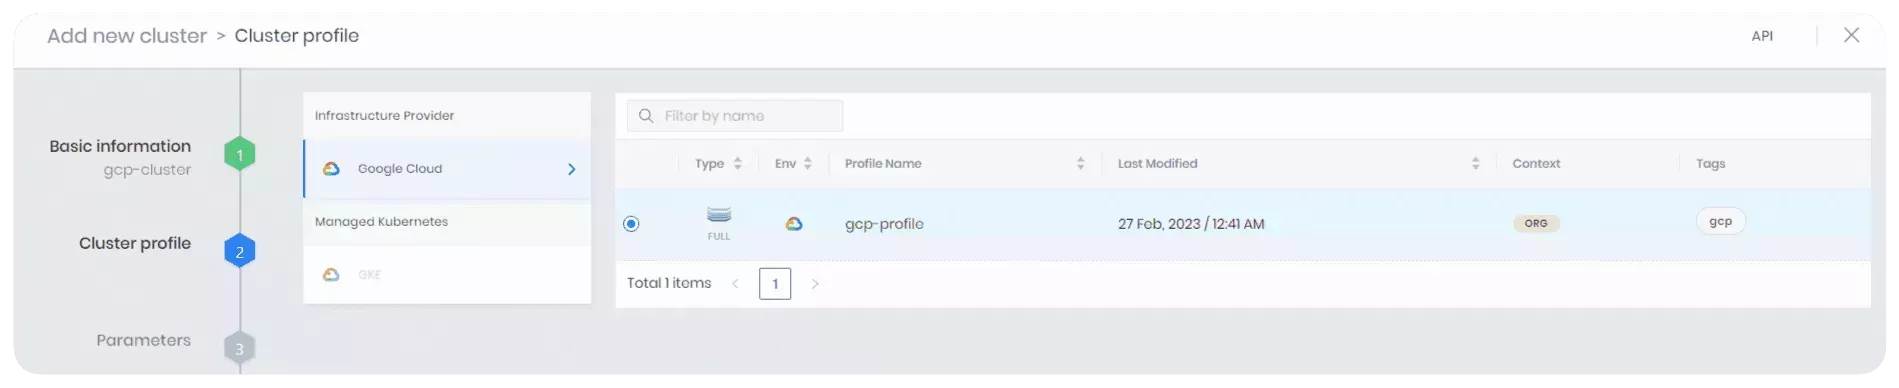
Cluster Profile
A list is displayed of available profiles you can choose to deploy to GCP. Select the cluster profile you created earlier and click on Next.
Parameters
The Parameters section displays all the layers in the cluster profile.
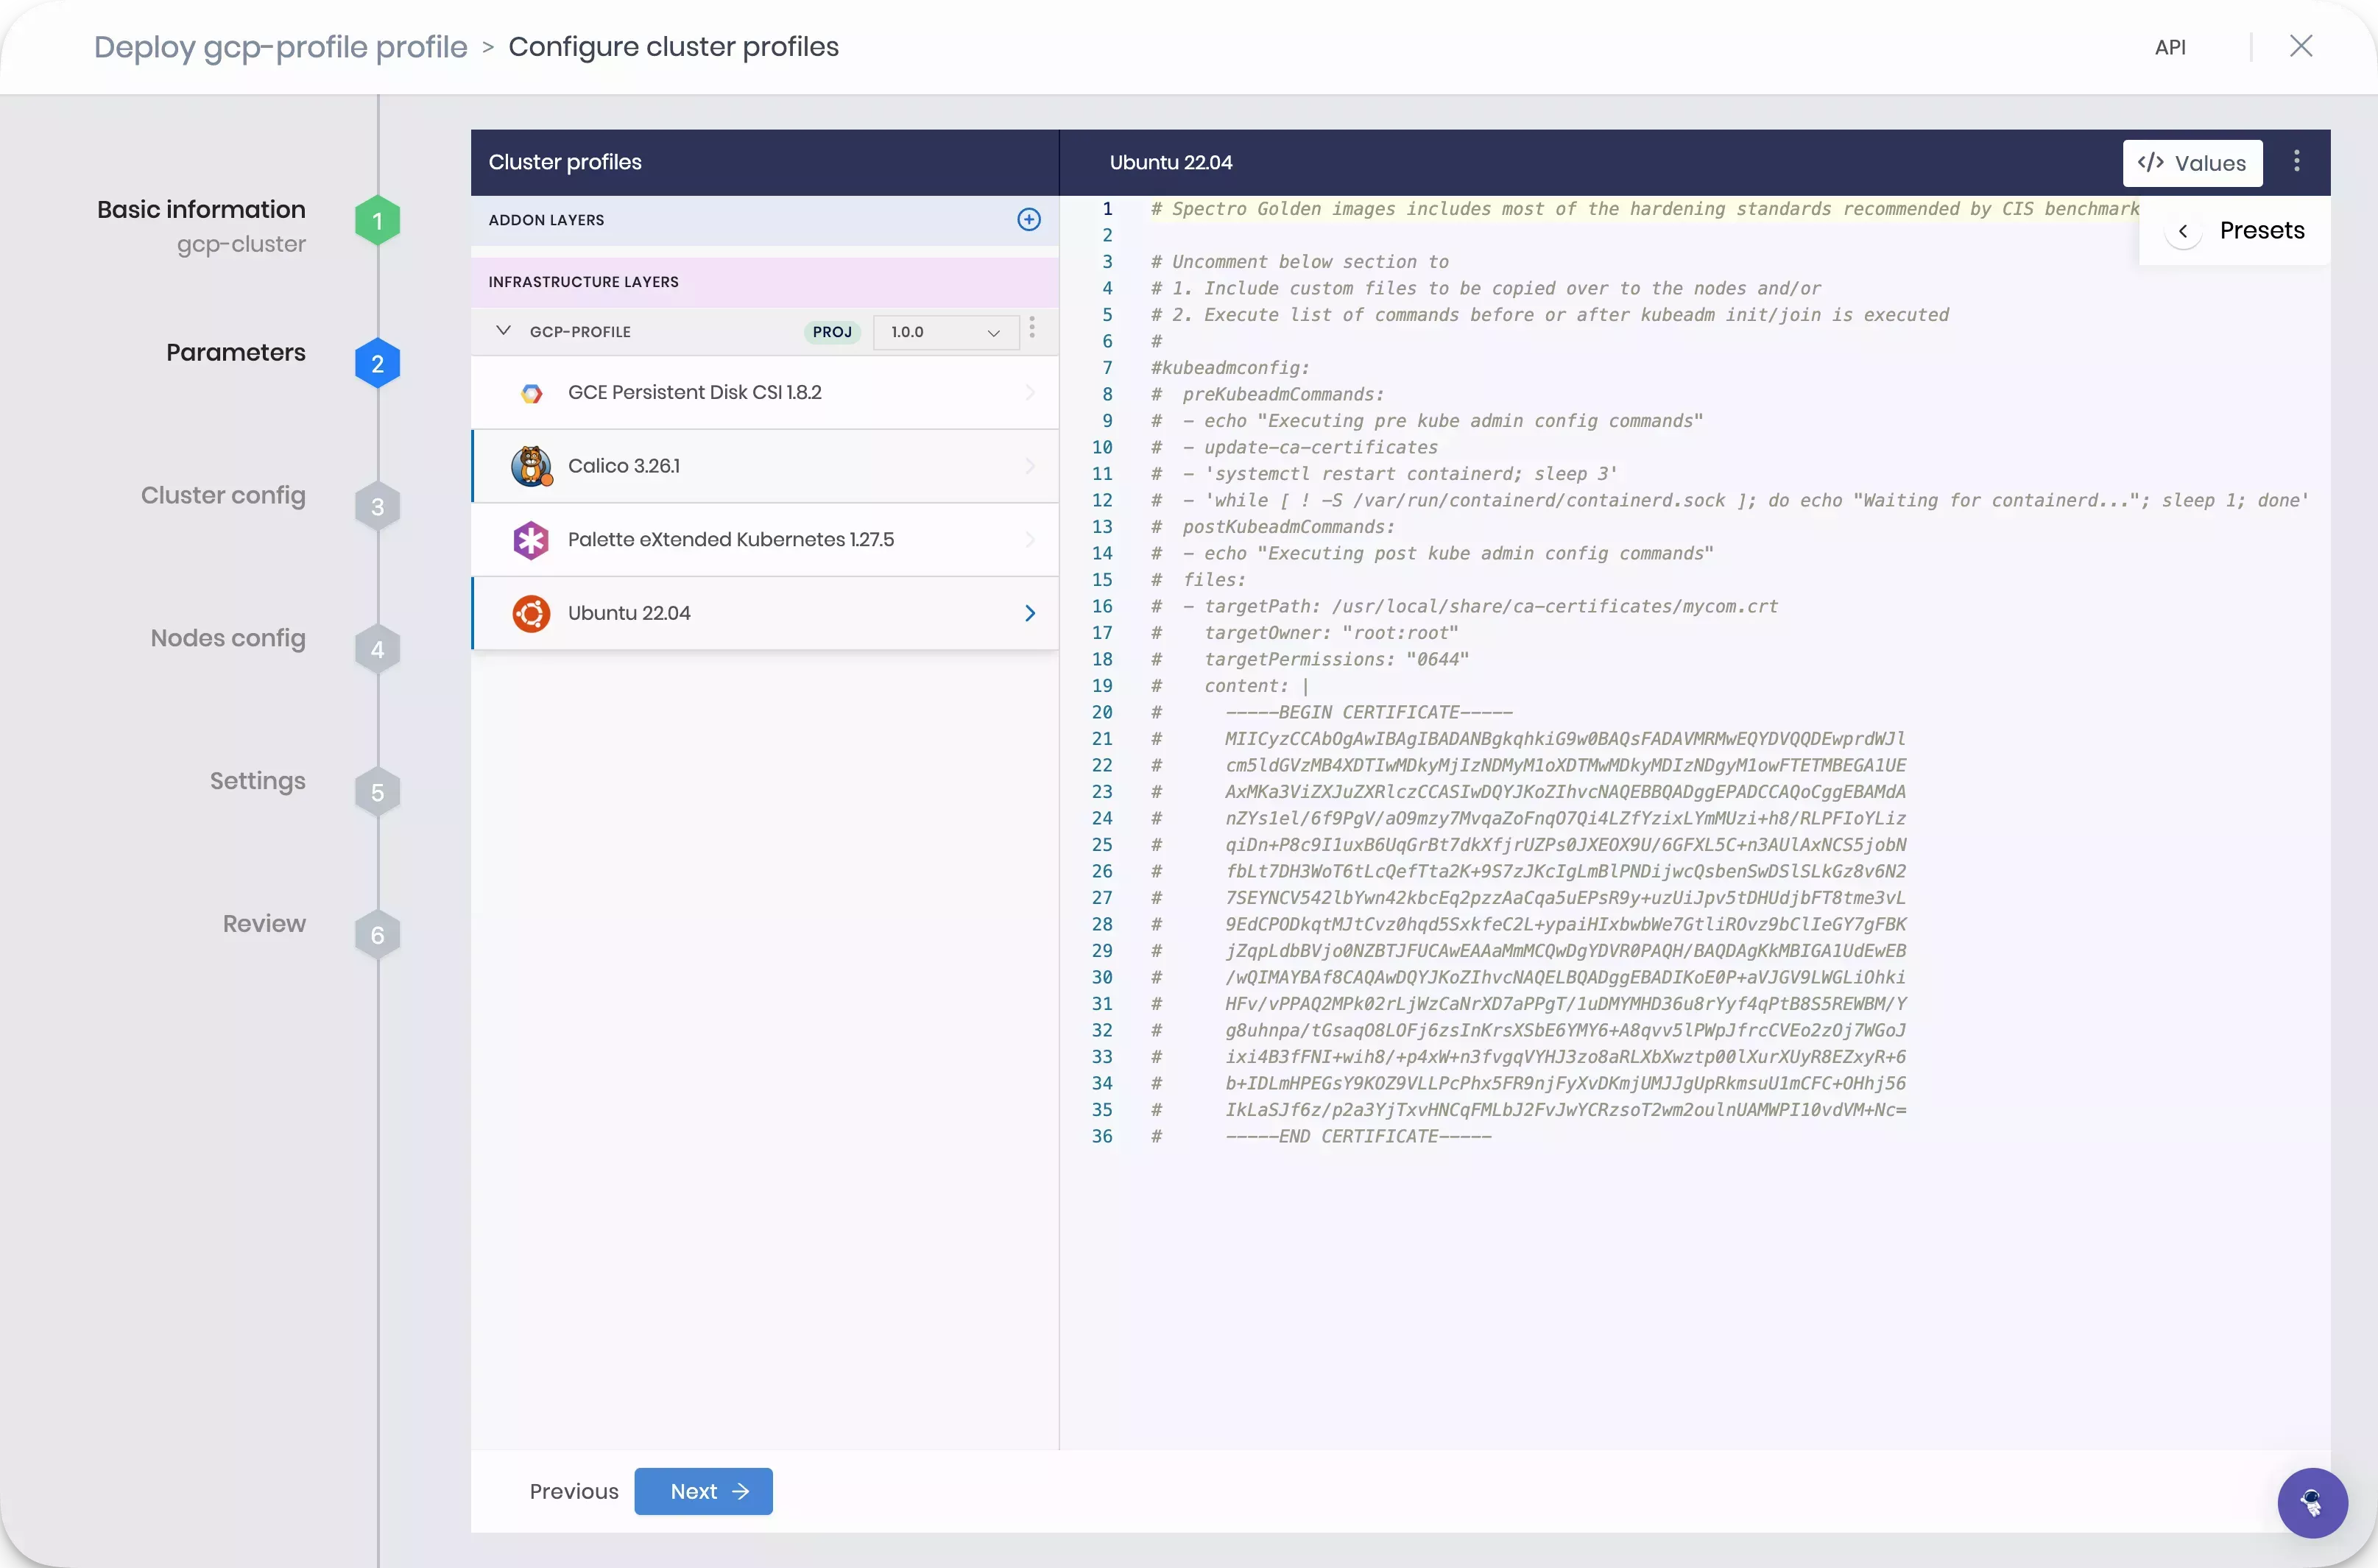
Each layer has a pack manifest file with the deploy configurations. The pack manifest file is in a YAML format. Each pack contains a set of default values. You can change the manifest values if needed. Click on Next to proceed.
Cluster Configuration
The Cluster config section allows you to select the Project, Region, and SSH Key to apply to the host cluster. All clusters require you to assign an SSH key. Refer to the SSH Keys guide for information about uploading an SSH key.
After selecting a Project, Region, and SSH Key, click on Next.
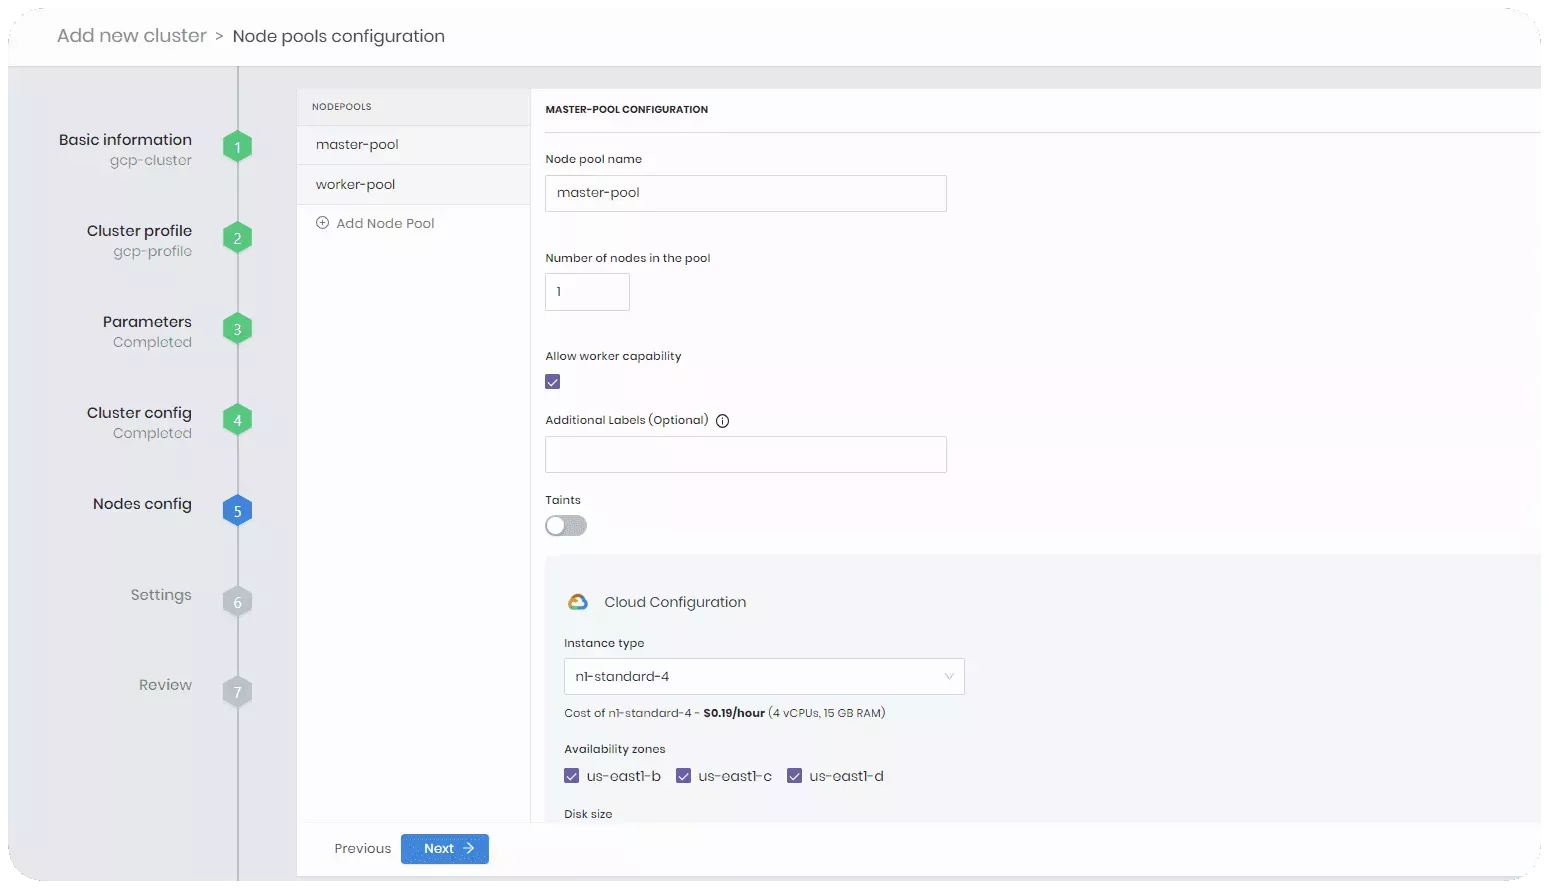
Nodes Configuration
The Nodes config section allows you to configure the nodes that make up the control plane and worker nodes of the host cluster.
Before you proceed to the next section, review the following parameters.
Refer to the Node Pool guide for a list and description of parameters.
Before you proceed to next section, review the following parameters.
-
Number of nodes in the pool - This option sets the number of control plane or worker nodes in the control plane or worker pool. For this tutorial, set the count to one for the control plane pool and two for the worker pool.
-
Allow worker capability - This option allows the control plane node to also accept workloads. This is useful when spot instances are used as worker nodes. You can check this box if you want to.
-
Instance Type - Select the compute type for the node pool. Each instance type displays the amount of CPU, RAM, and hourly cost of the instance. Select n1-standard-4.
-
Disk size - Set the disk size to 60.
-
Availability zones - Used to specify the availability zones in which the node pool can place nodes. Select an availability zone.
Select Next to proceed with the cluster deployment.
Settings
In the Settings section, you can configure advanced options such as when to patch the OS, enable security scans, manage backups, add Role-Based Access Control (RBAC) bindings, and more.
For this tutorial, you can use the default settings. Click on Validate to continue.
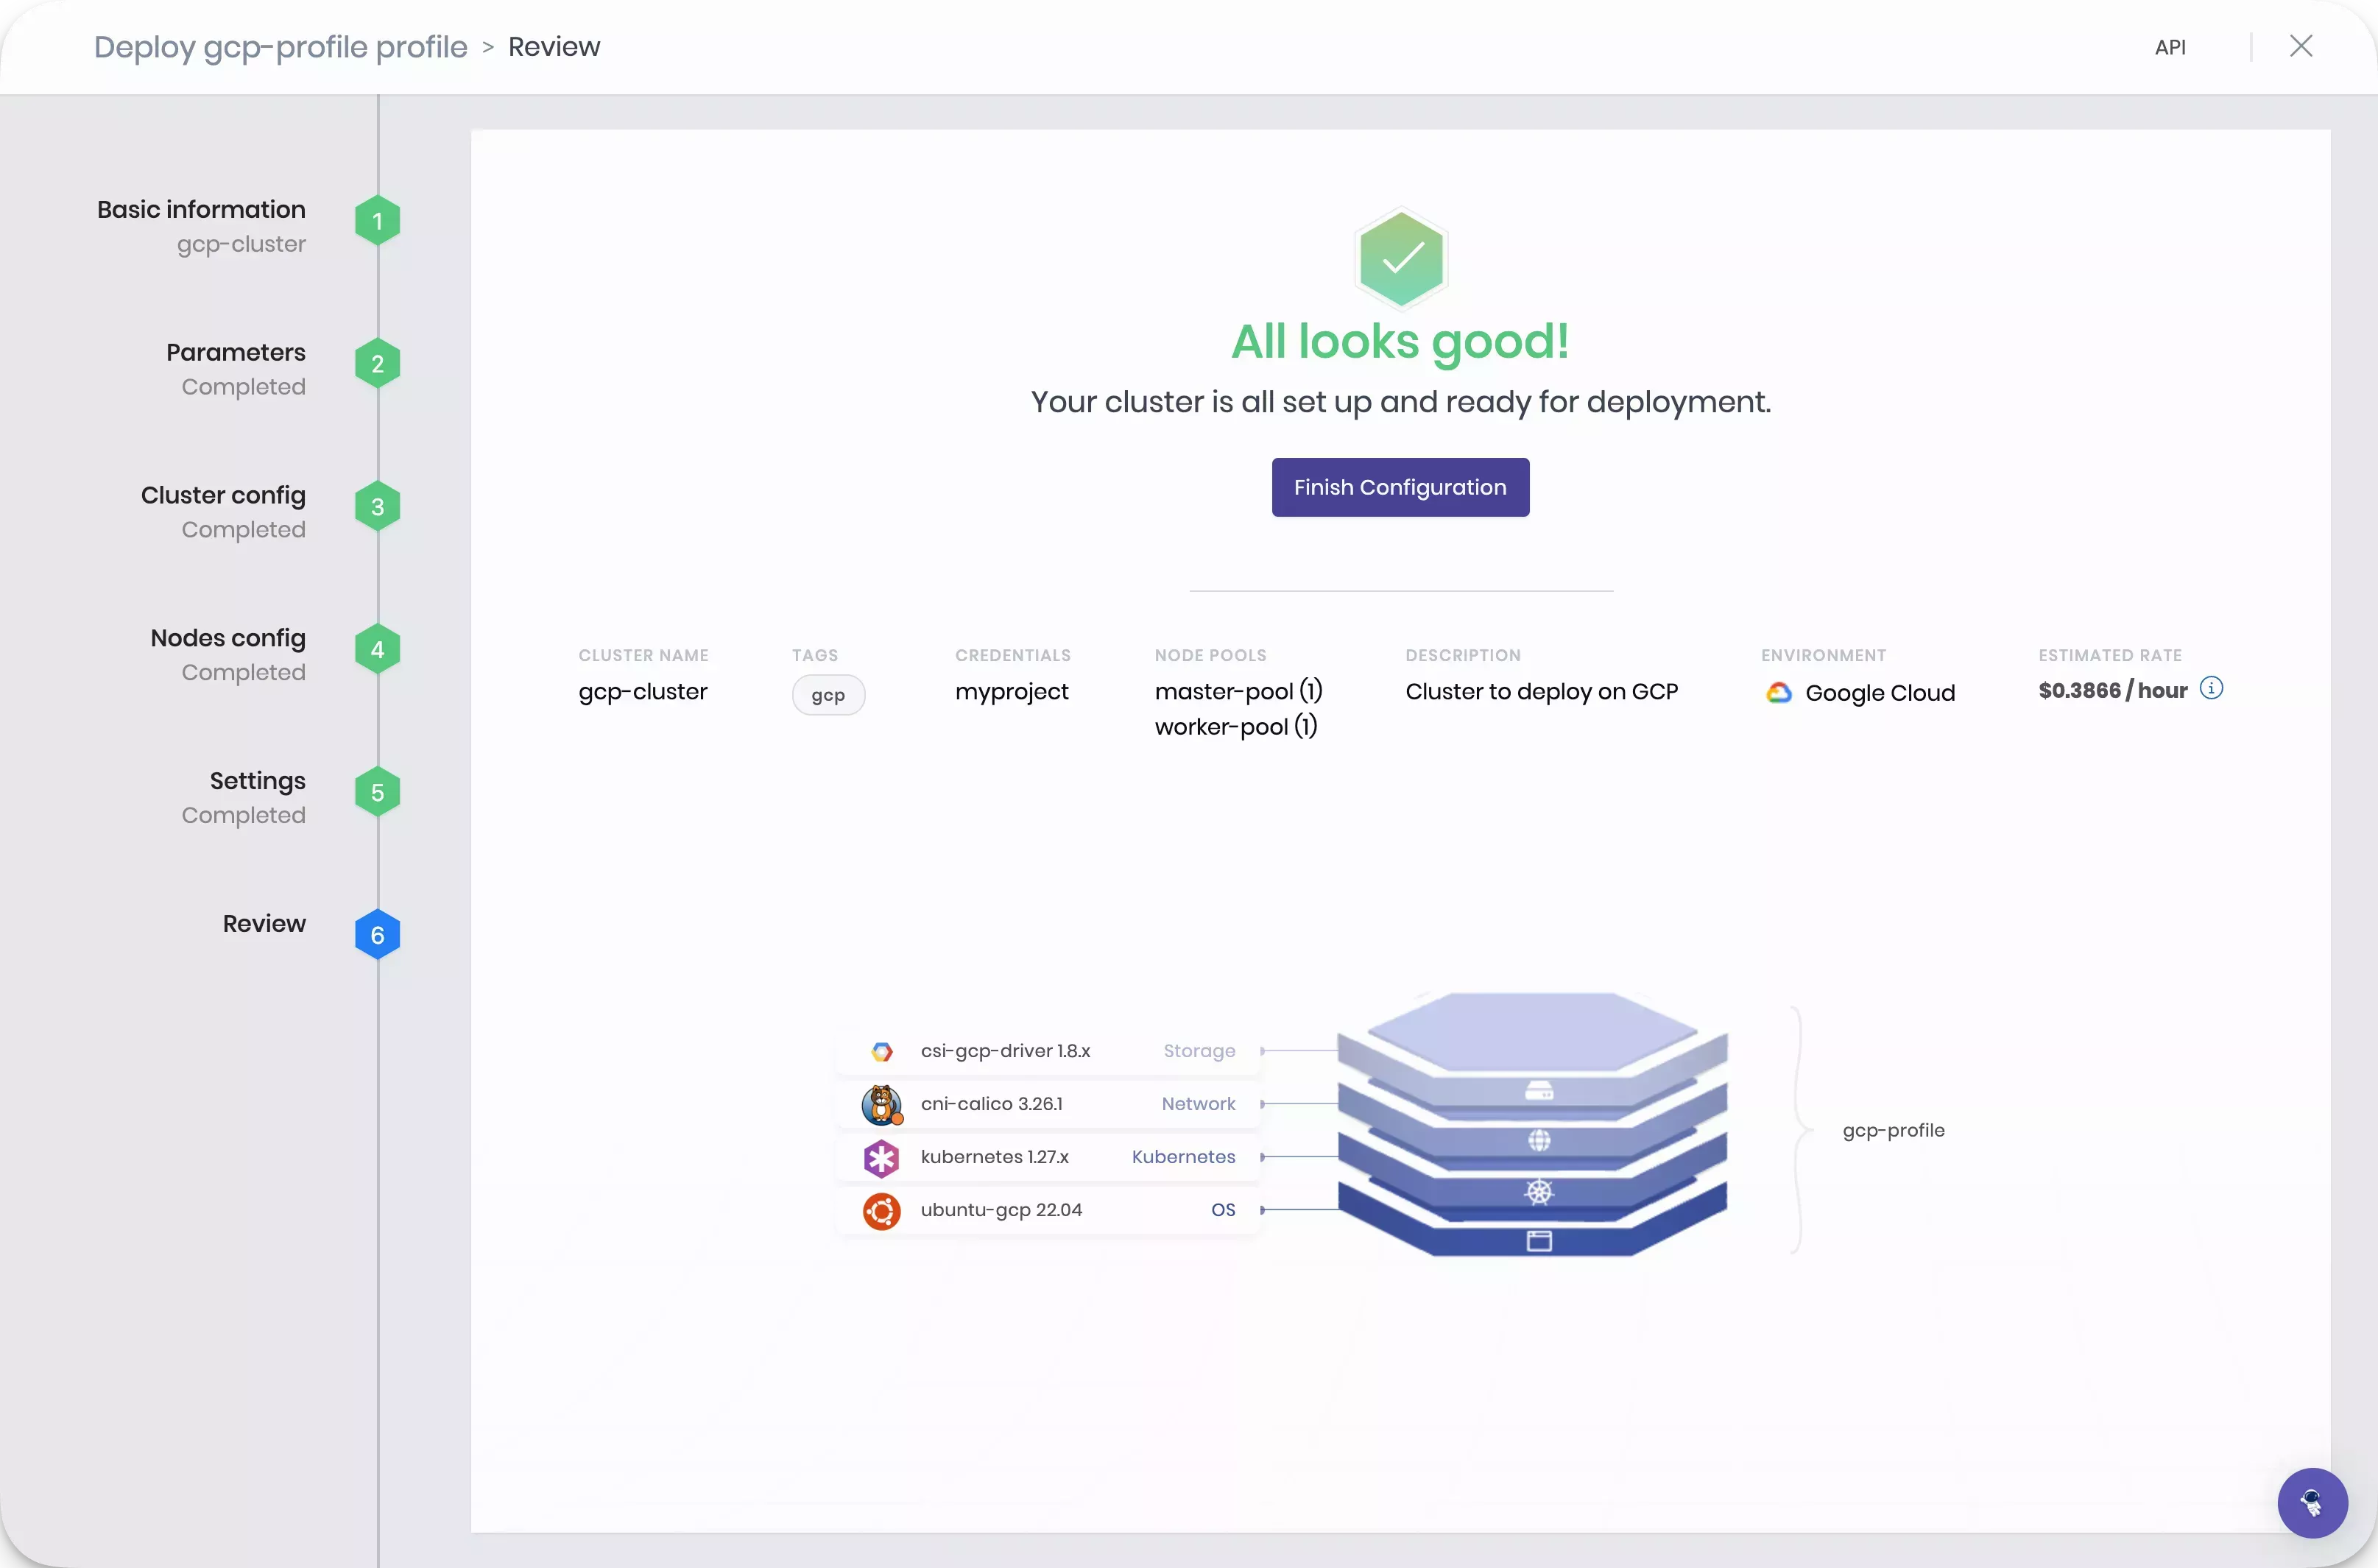
Review
The Review section allows you to review the cluster configuration before deploying the cluster. Review all the settings and click on Finish Configuration to deploy the cluster.
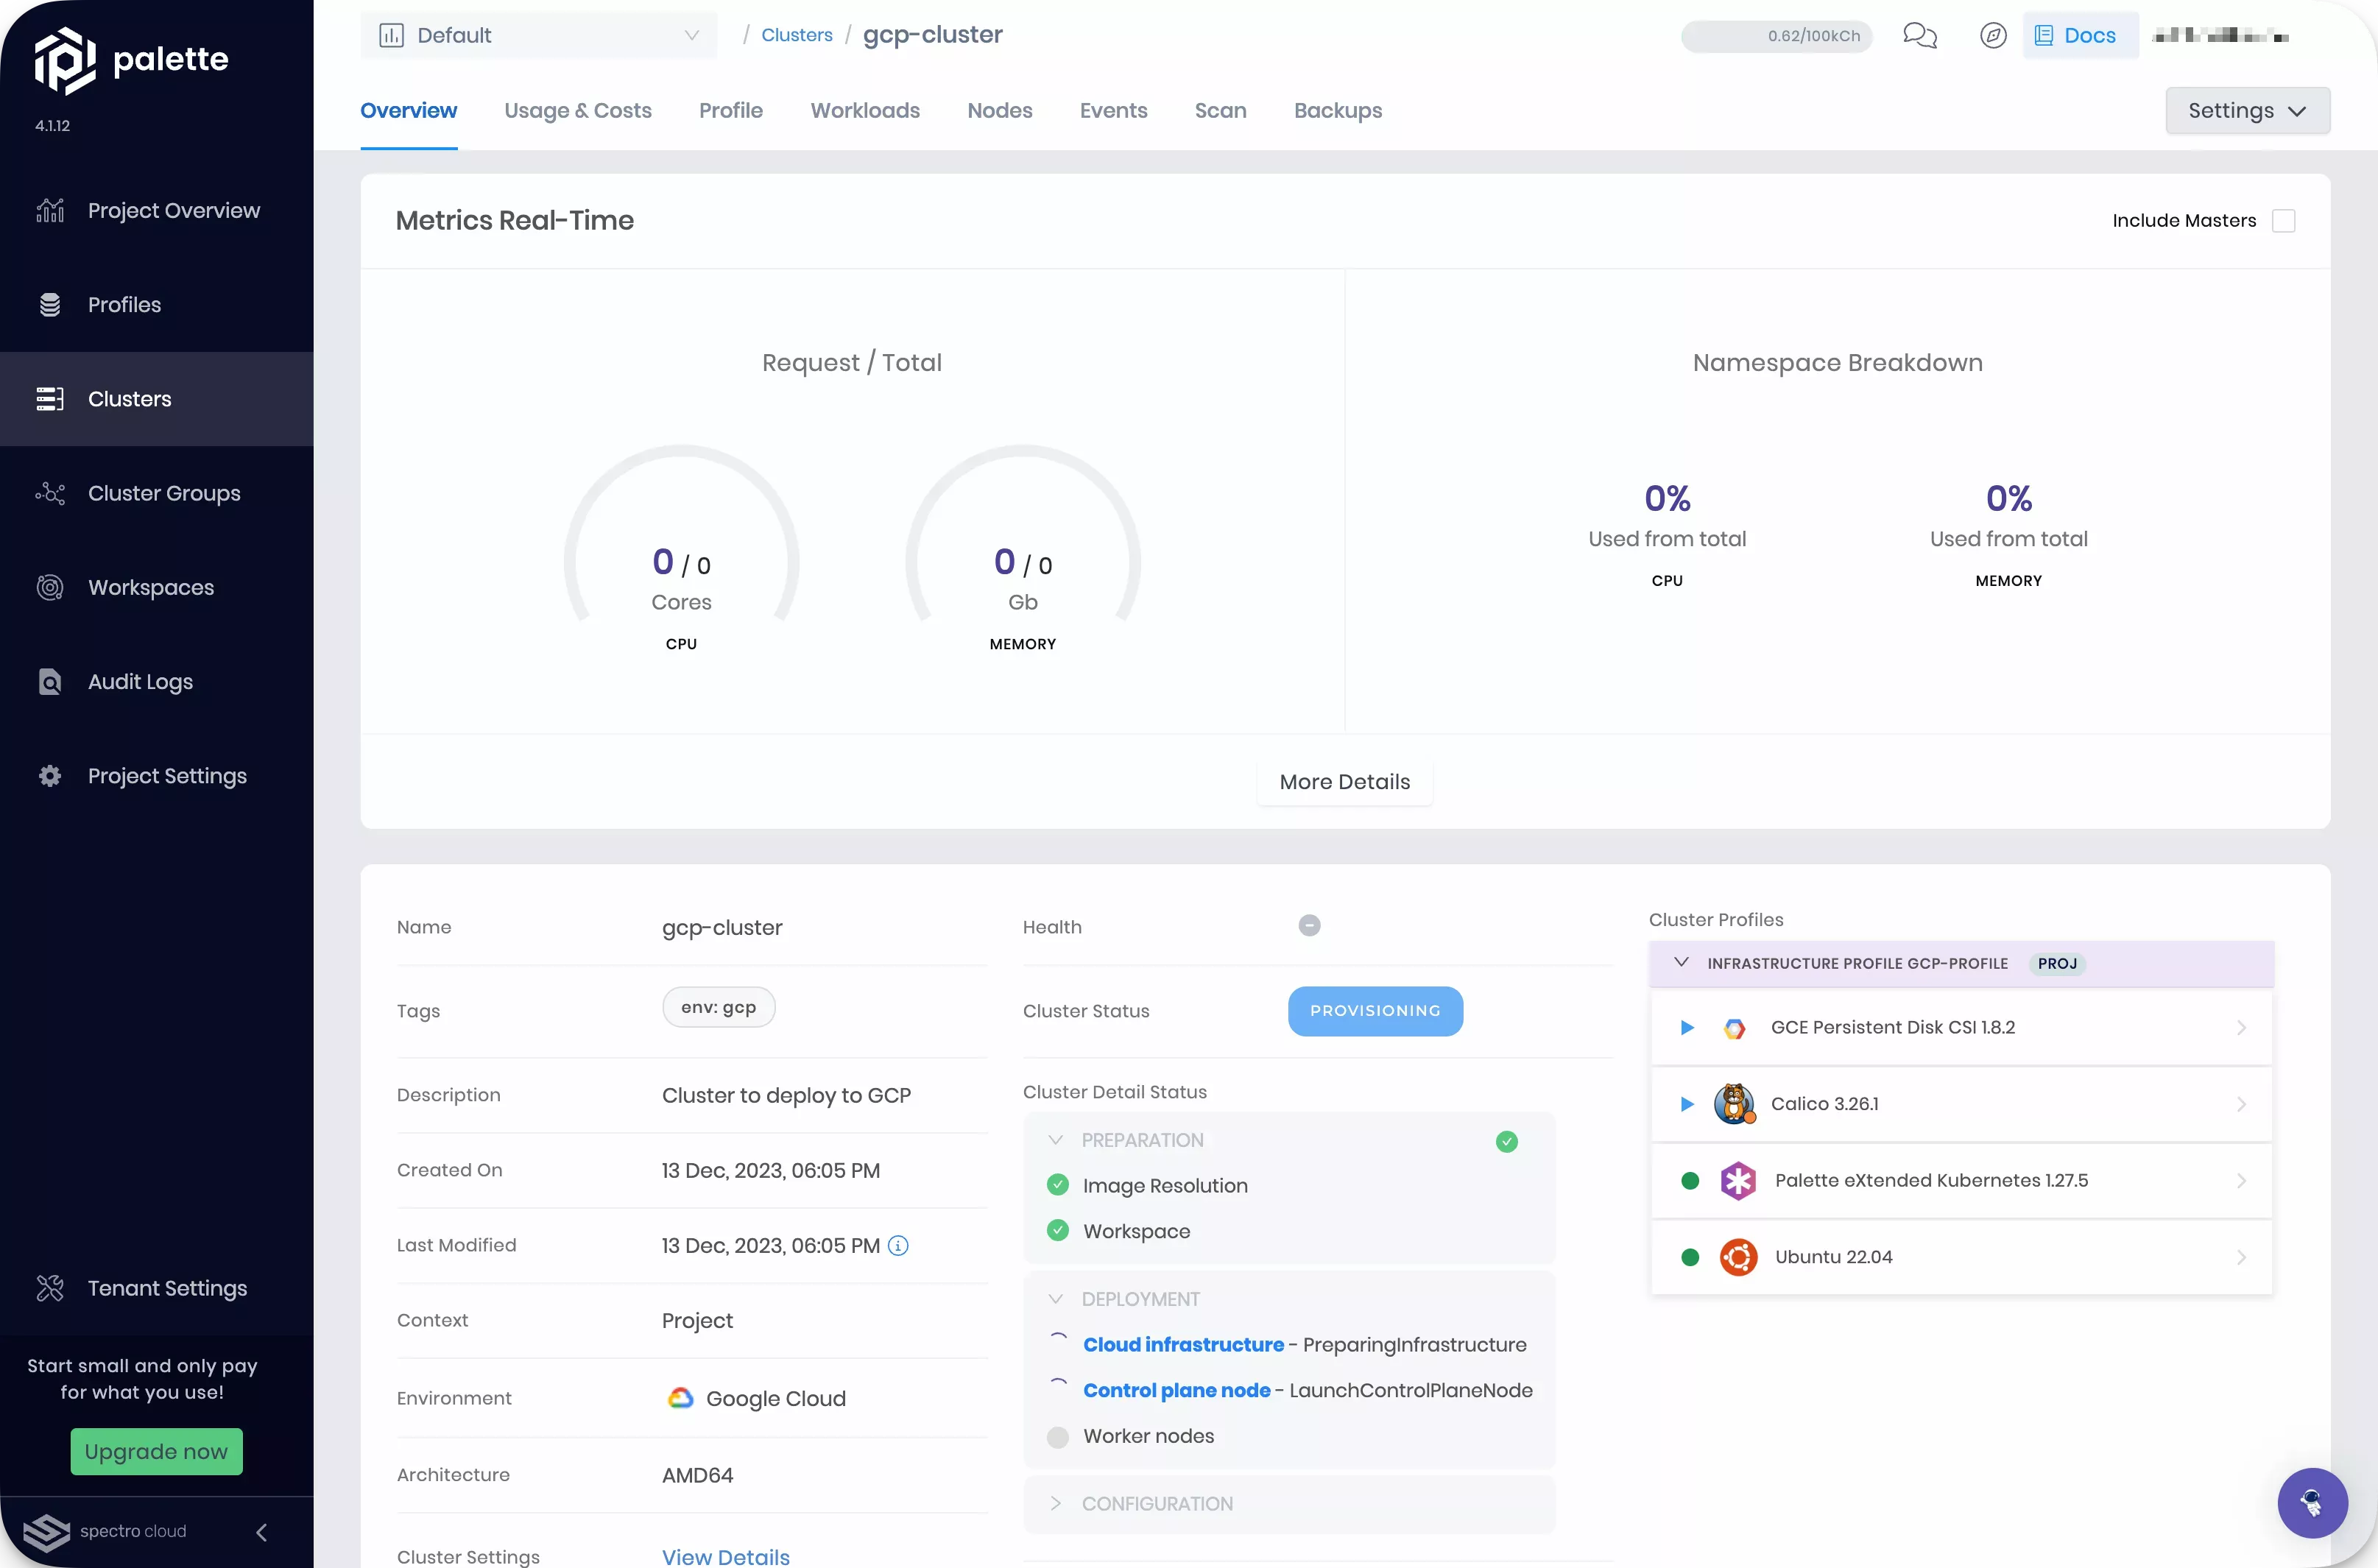
Navigate to the left Main Menu and select Clusters.
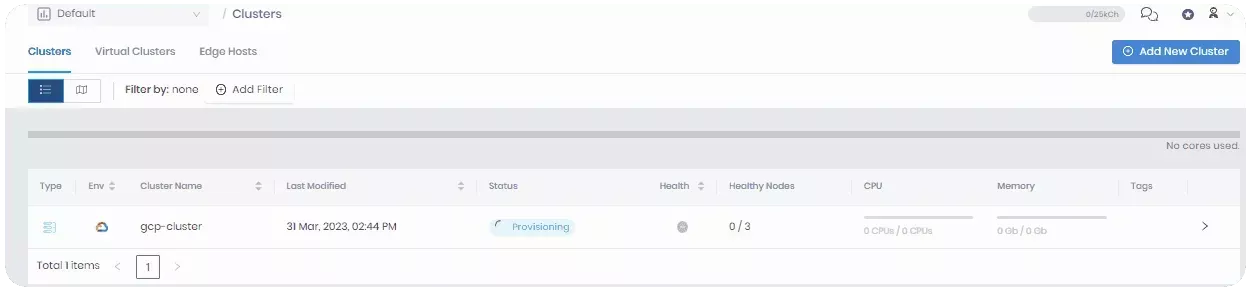
Click on your cluster to review details such as deployment status, event logs, cluster profile, monitoring data, and other information about the cluster.
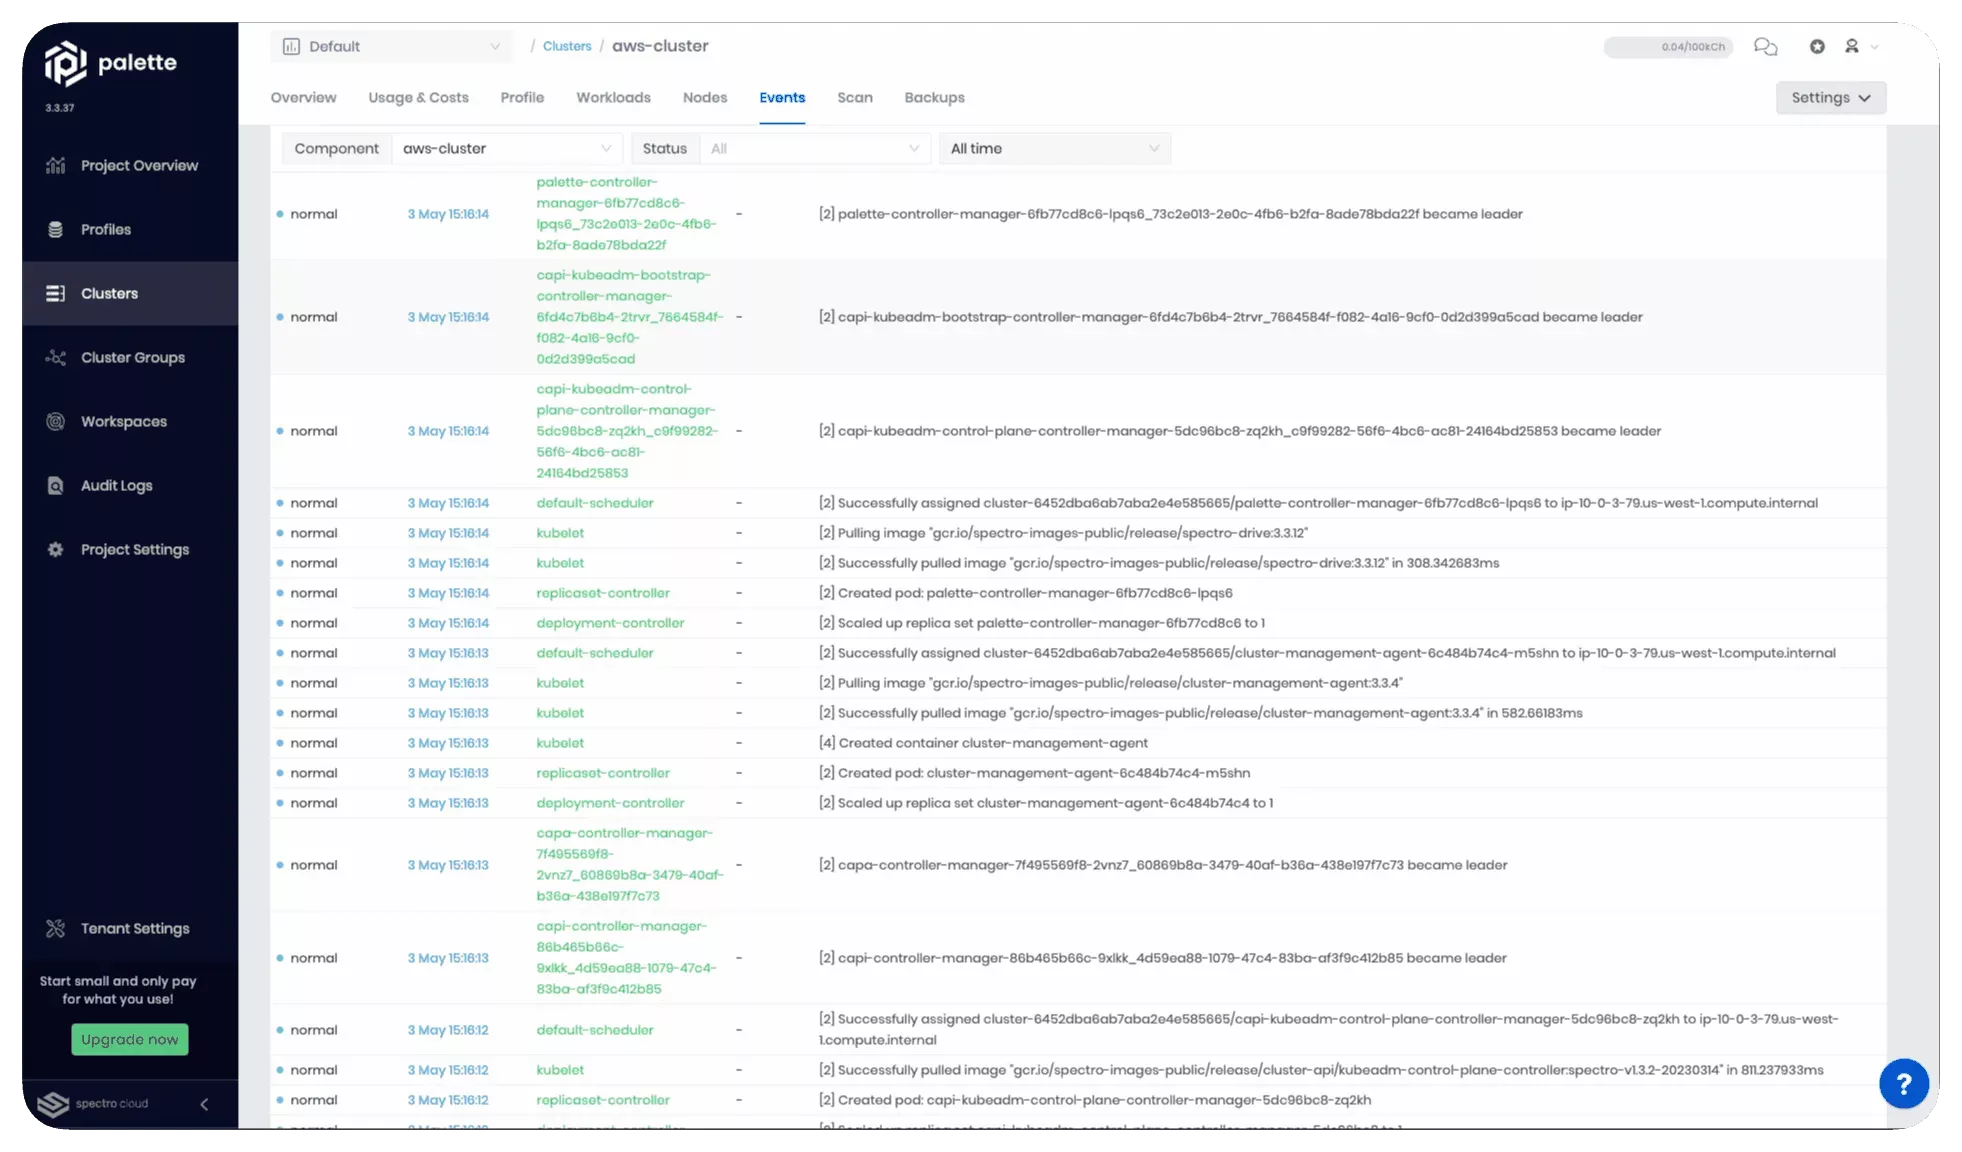
The cluster deployment process can take 15 to 30 min. The deployment time varies depending on the cloud provider, cluster profile, cluster size, and the node pool configurations provided. You can learn more about the deployment progress by reviewing the event log. Click on the Events tab to view the log.
While you wait for the cluster deployment process to complete, feel free to check out a video where we discuss the growing pains of using Kubernetes and how Palette can help your address these pain points.
Update Cluster Profile
In the following steps, you will learn how to update a cluster profile by adding a new layer to it that contains the application.
Add a Manifest
Navigate to the left Main Menu and select Profiles. Select the cluster profile you created earlier and which you applied to the host cluster.
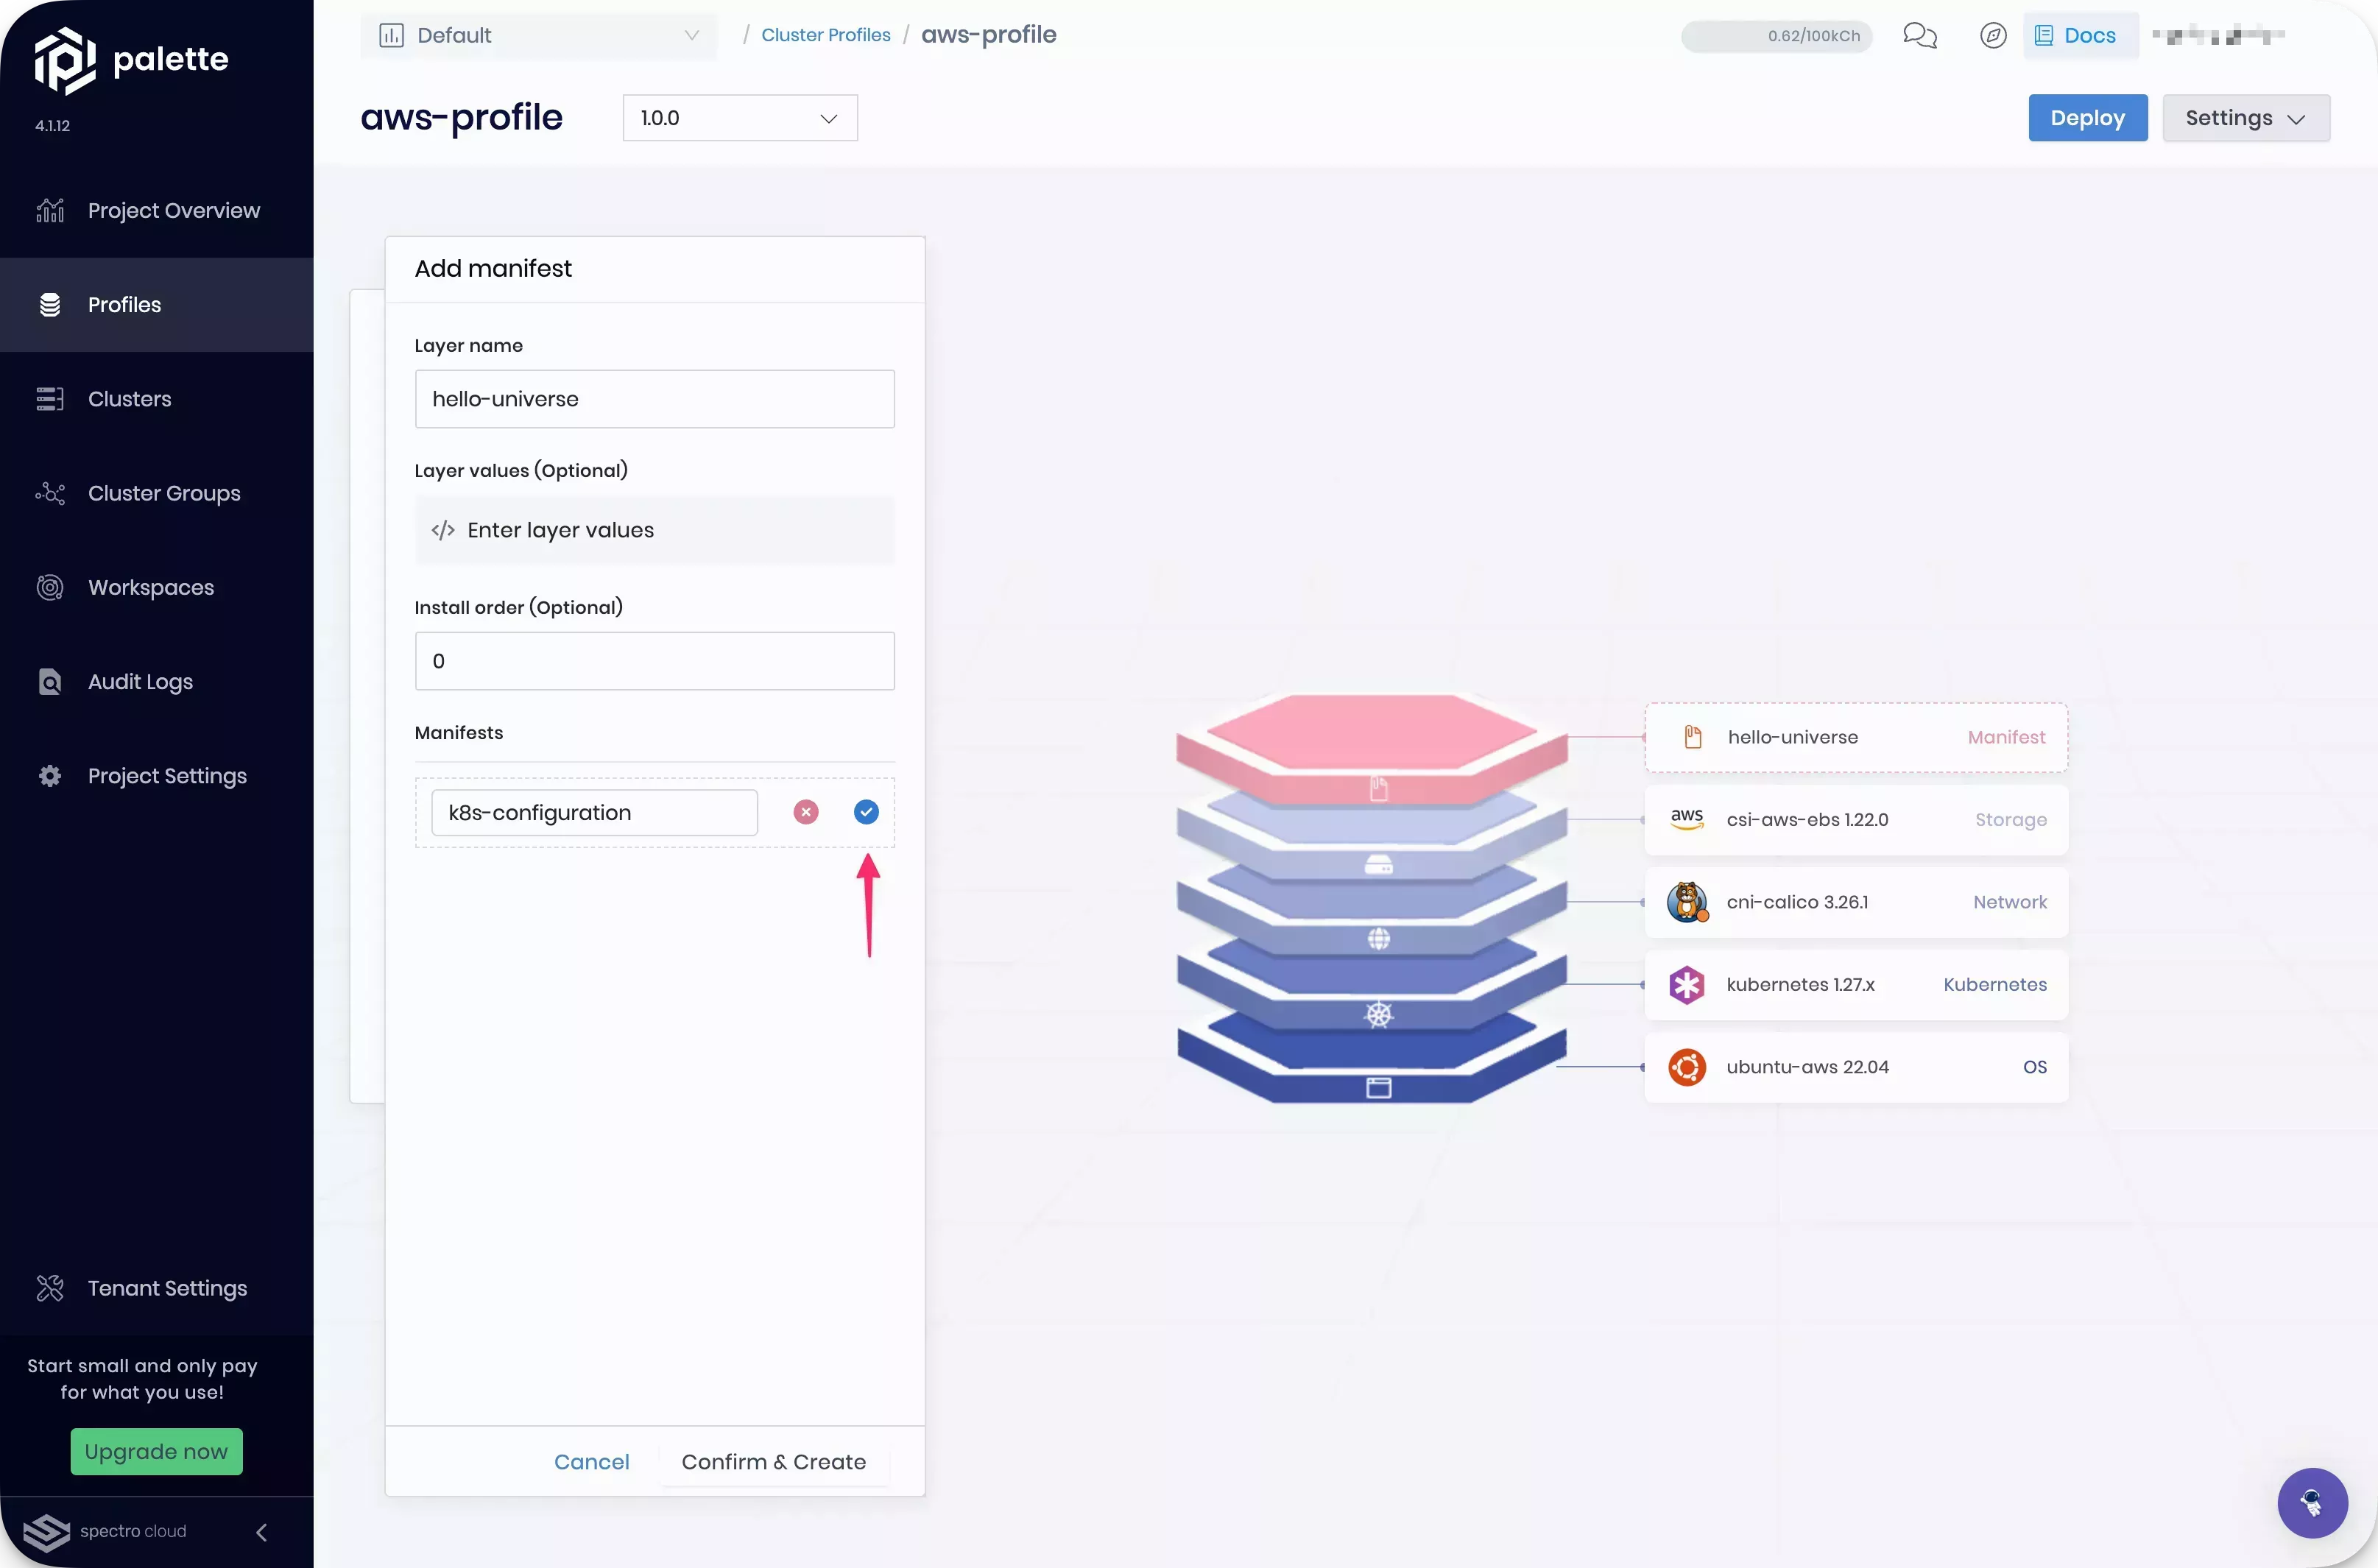
Click on Add Manifest at the top of the page and fill out the following input fields.
-
Layer name - The name of the layer. Assign the name application.
-
Manifests - Add your manifest by giving it a name and clicking the New Manifest button. Assign a name to the internal manifest and click on the blue button An empty editor will be displayed on the right side of the screen.
In the manifest editor, insert the following content.
apiVersion: v1
kind: Service
metadata:
  name: hello-universe-service
spec:
  type: LoadBalancer
  ports:
    - protocol: TCP
      port: 8080
      targetPort: 8080
  selector:
    app: hello-universe
---
apiVersion: apps/v1
kind: Deployment
metadata:
  name: hello-universe-deployment
spec:
  replicas: 2
  selector:
    matchLabels:
      app: hello-universe
  template:
    metadata:
      labels:
        app: hello-universe
    spec:
      containers:
        - name: hello-universe
          image: ghcr.io/spectrocloud/hello-universe:1.1.0
          imagePullPolicy: IfNotPresent
          ports:
            - containerPort: 8080
The code snippet you added will deploy the hello-universe application. You may have noticed that the code snippet you added is a Kubernetes configuration. Manifest files are a method you can use to achieve more granular customization of your Kubernetes cluster. You can add any valid Kubernetes configuration to a manifest file.
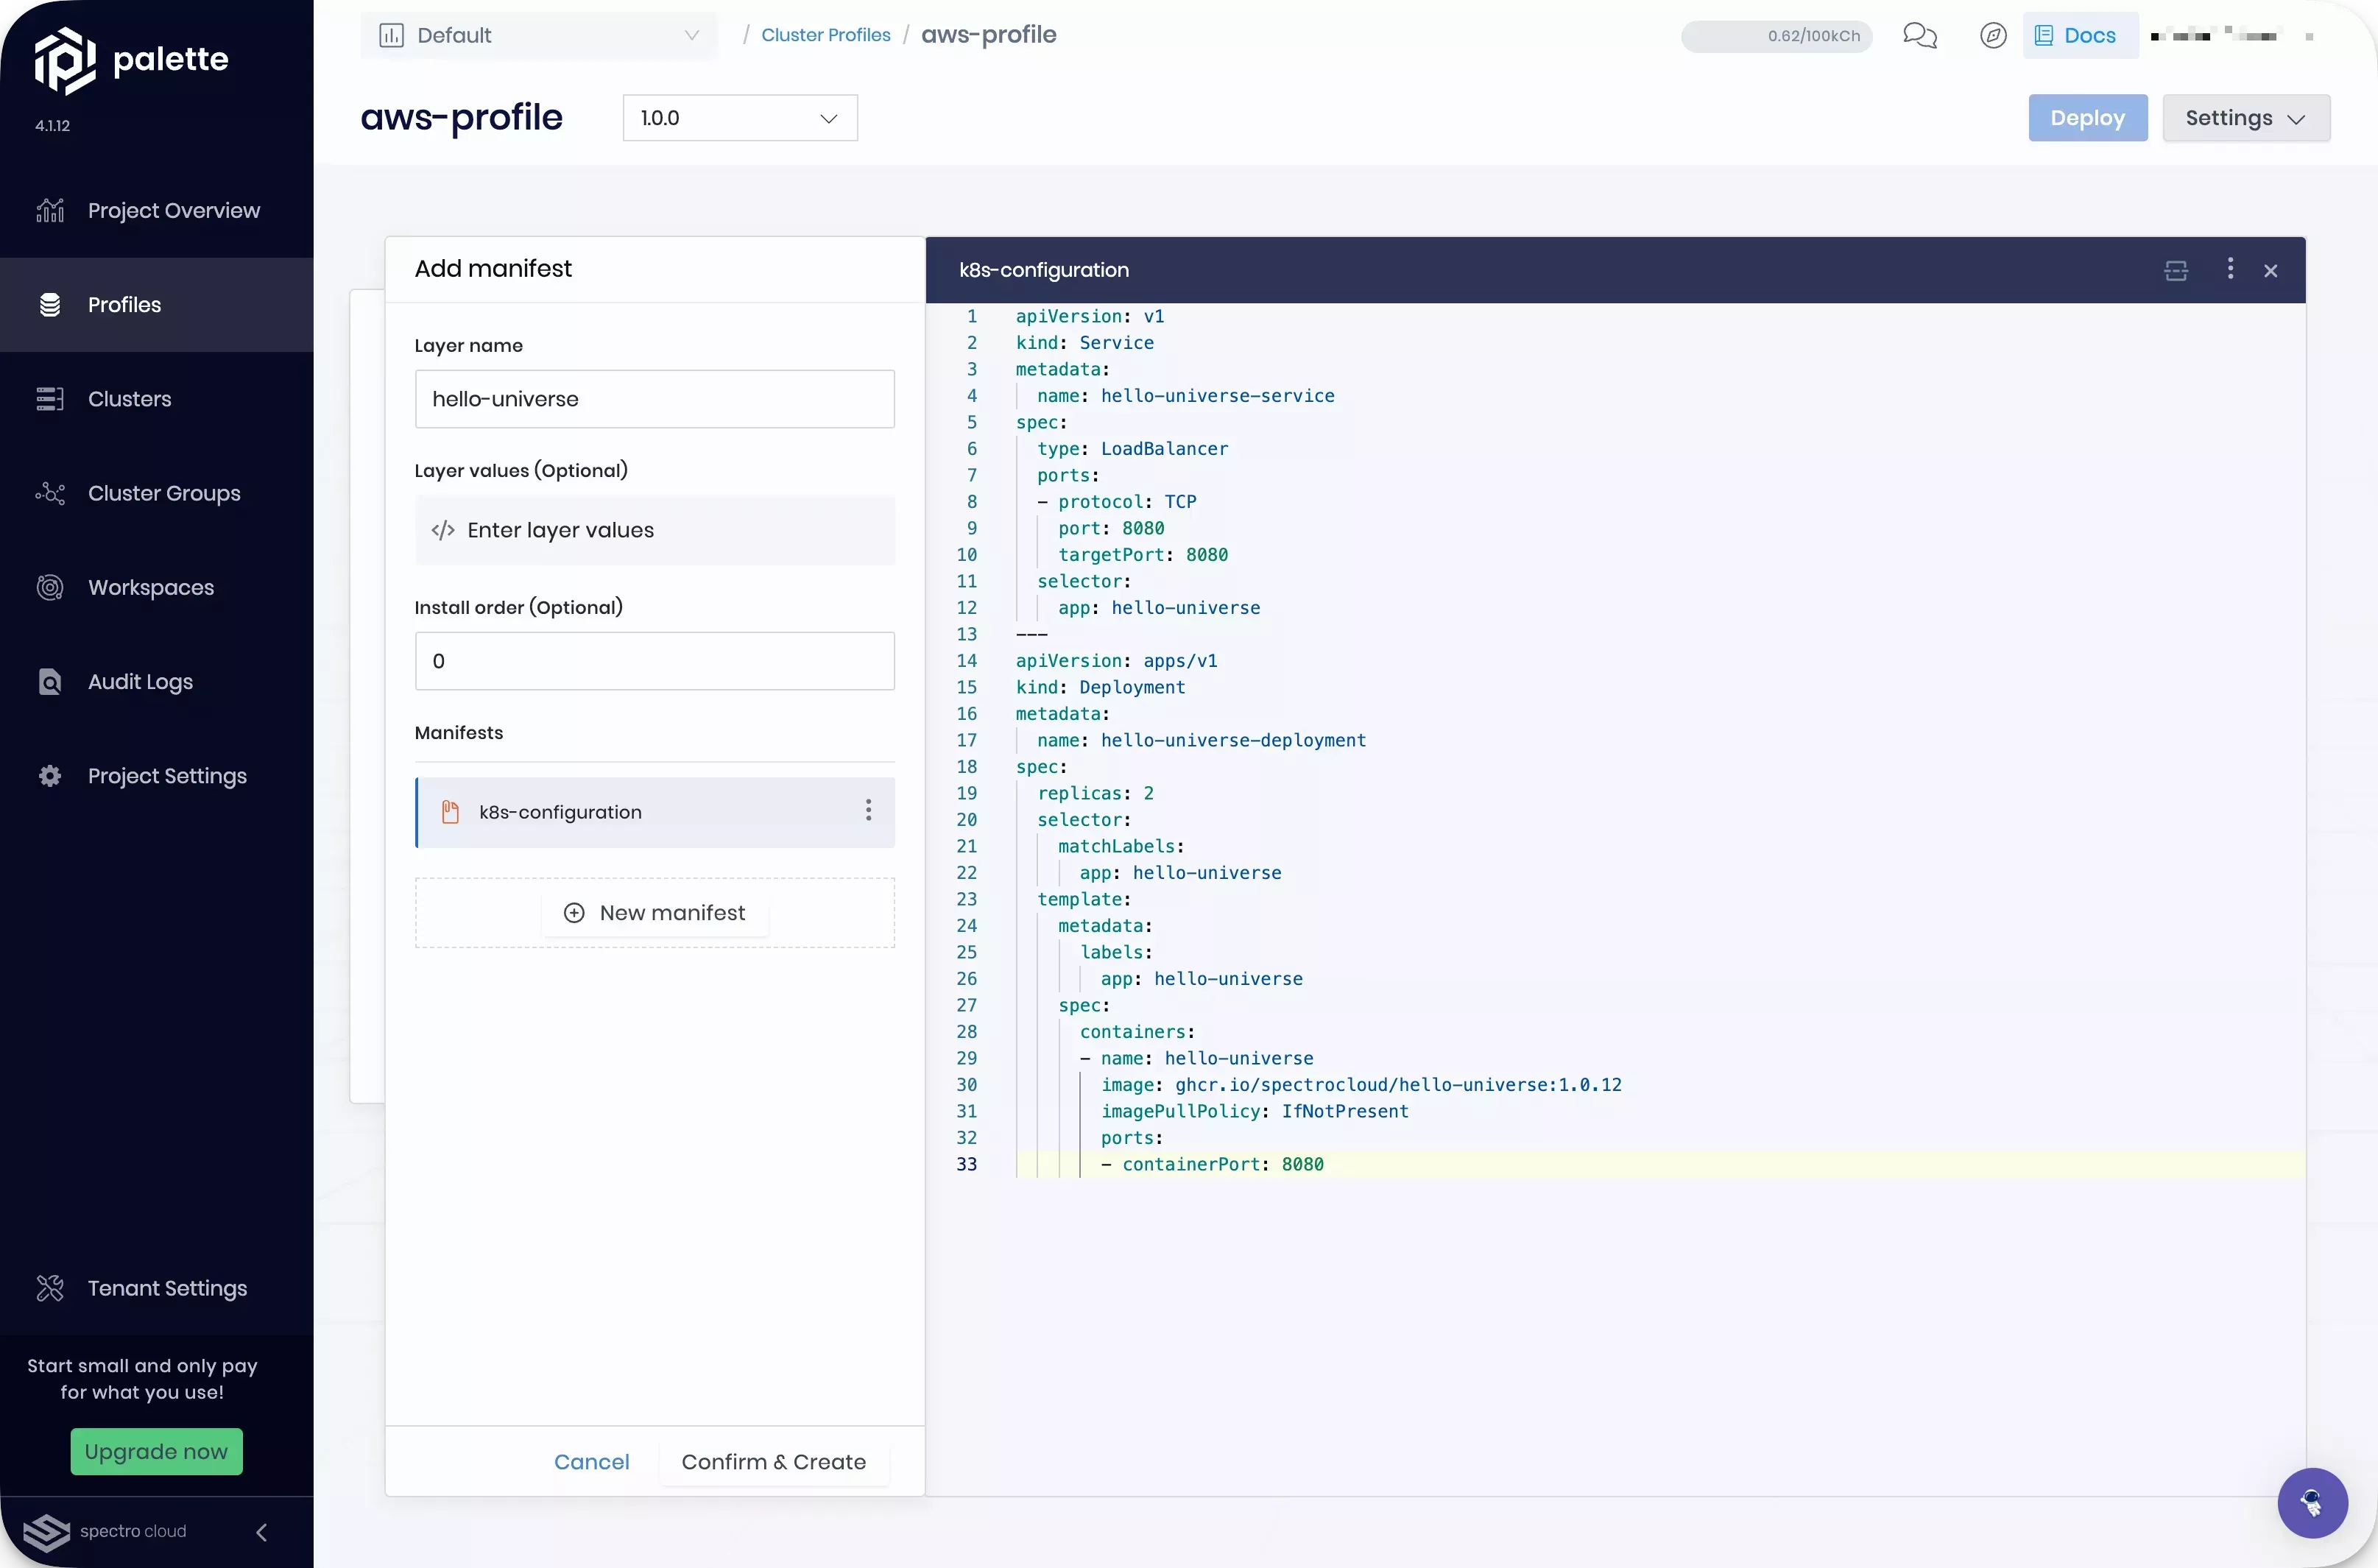
The manifest defines a replica set for the application to simulate a distributed environment with a web application deployed to Kubernetes. The application is assigned a load balancer. Using a load balancer, you can expose a single access point and distribute the workload to both containers.
Click on Confirm & Create to save the manifest. Click on Save Changes to save this new layer to the cluster profile.
Deployment
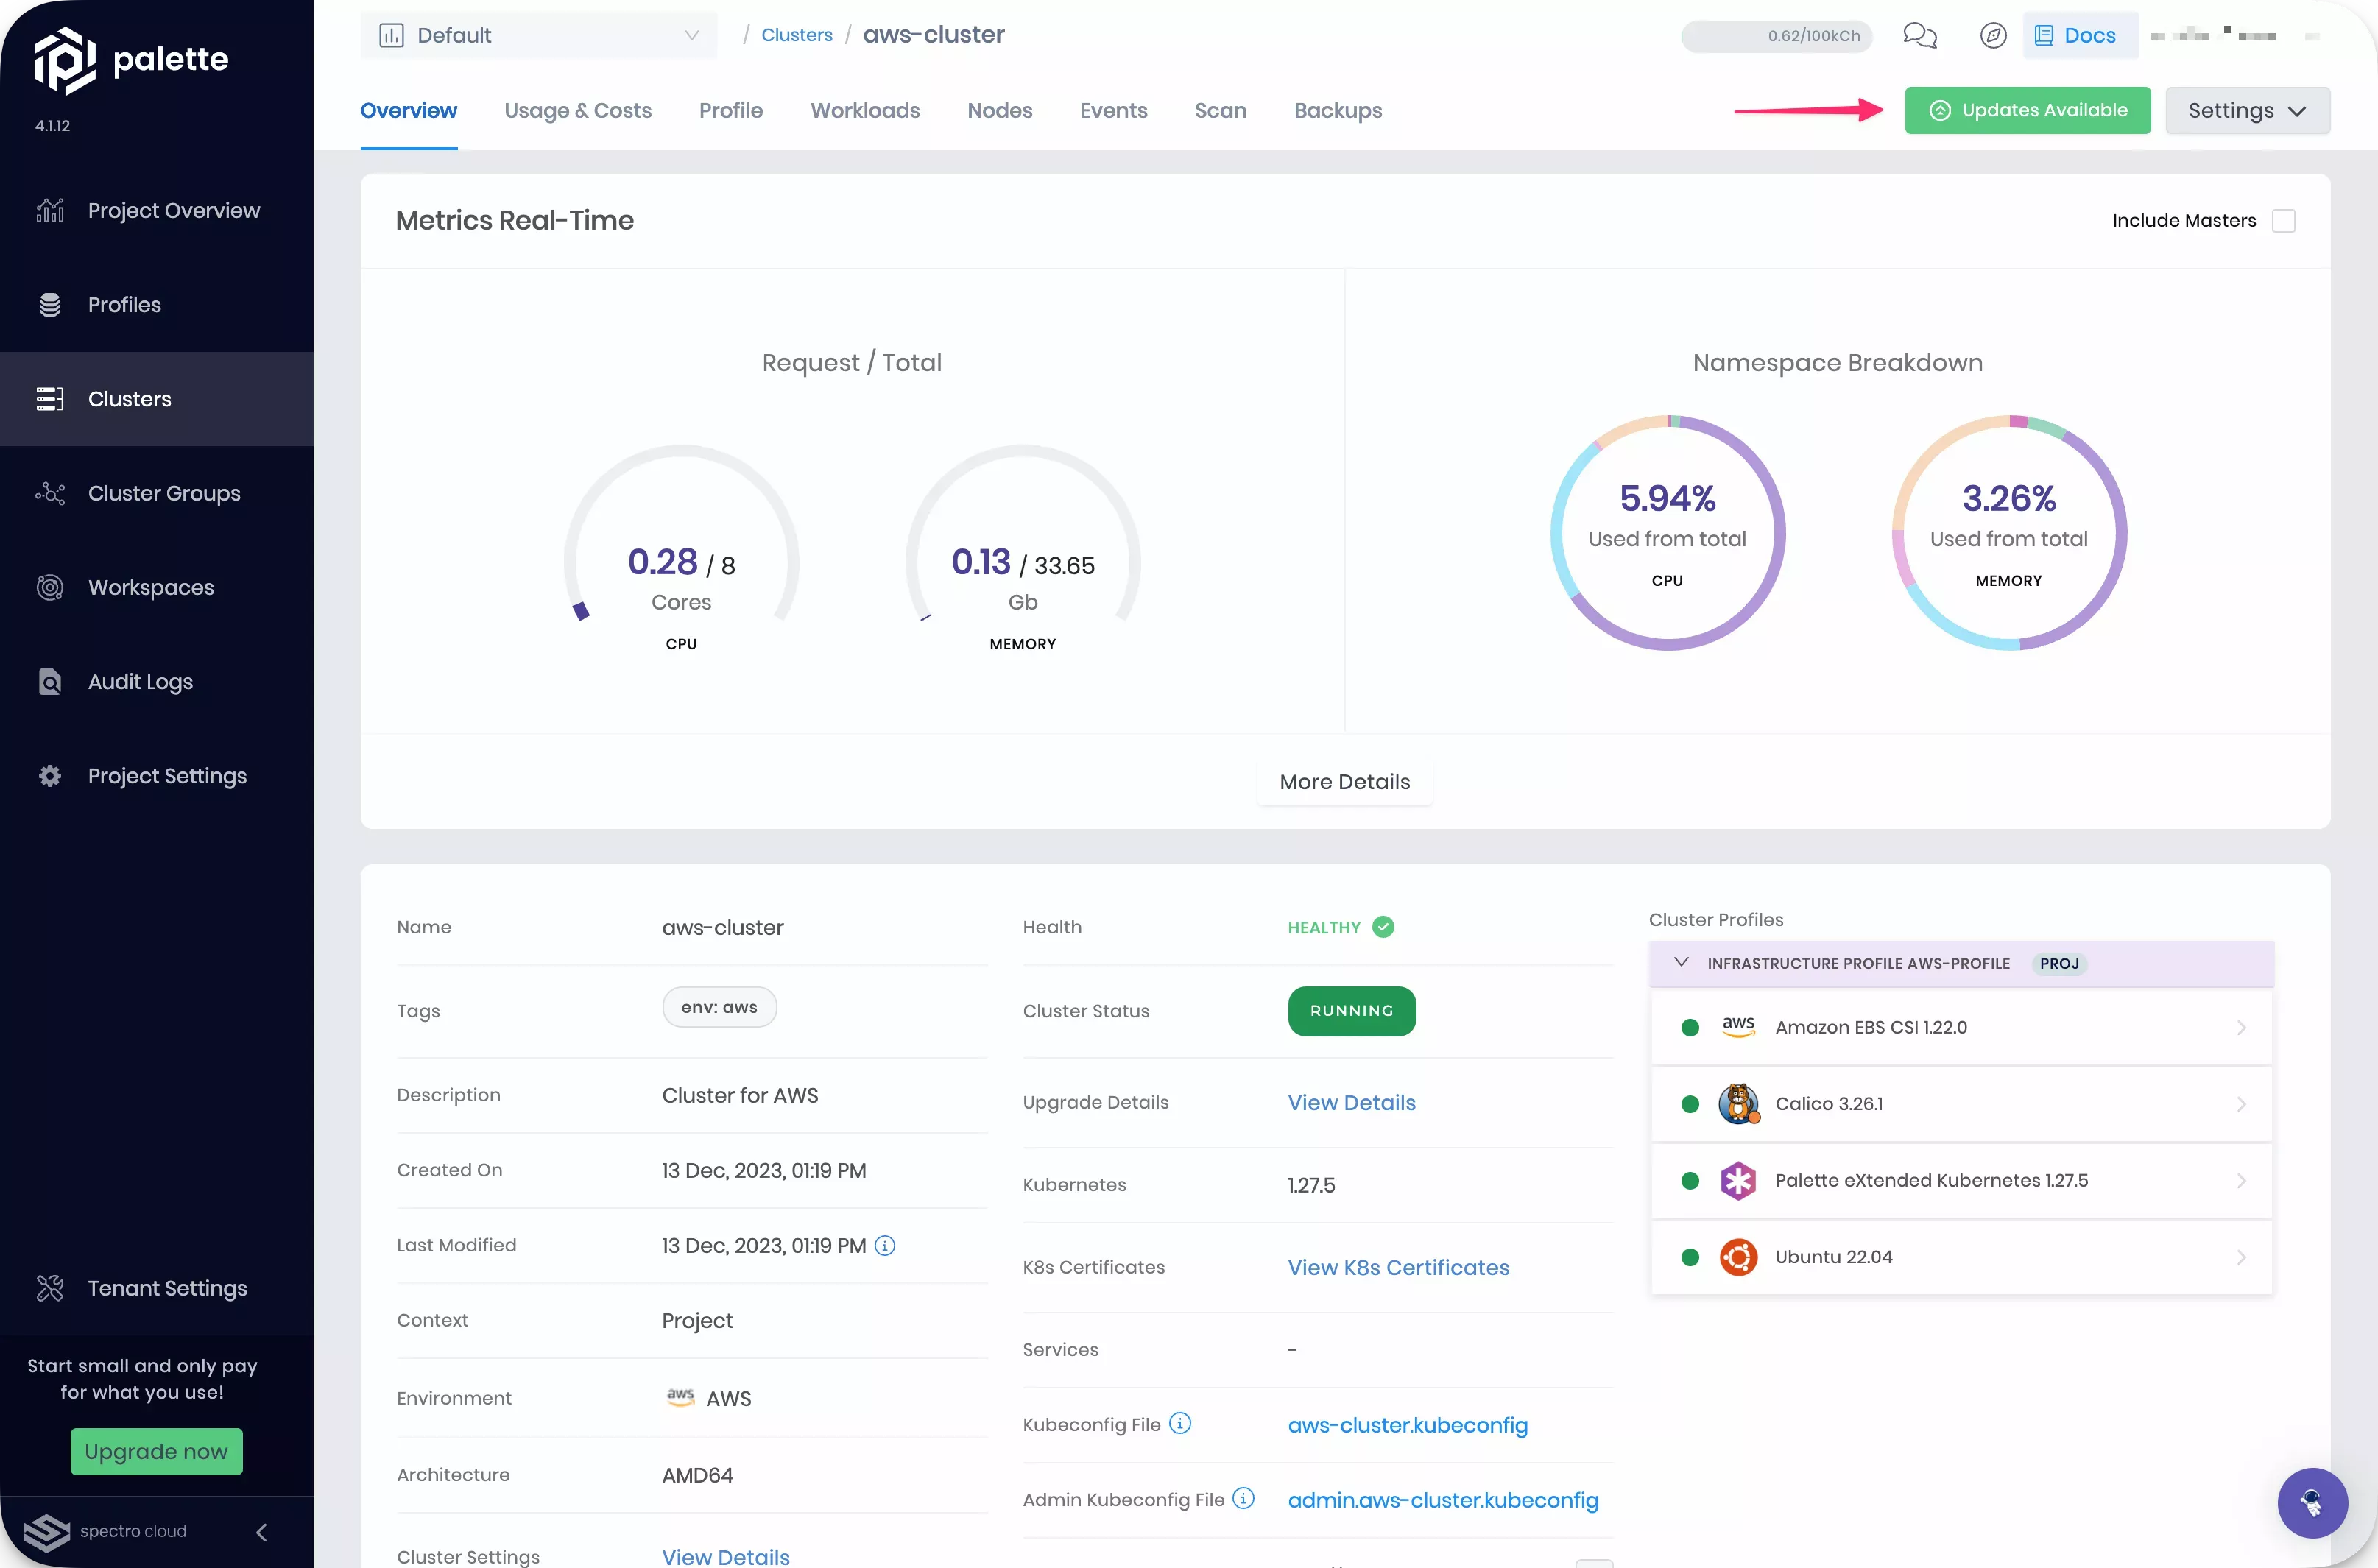
Navigate to the left Main Menu and select Clusters. Click on the host cluster you deployed to open its details page.
On the top right-hand corner is a blue button Updates Available. Click on the button to review the available updates.
Compare the new changes against the previous cluster profile definition. The only difference is the addition of a manifest that will deploy the Hello Universe application.
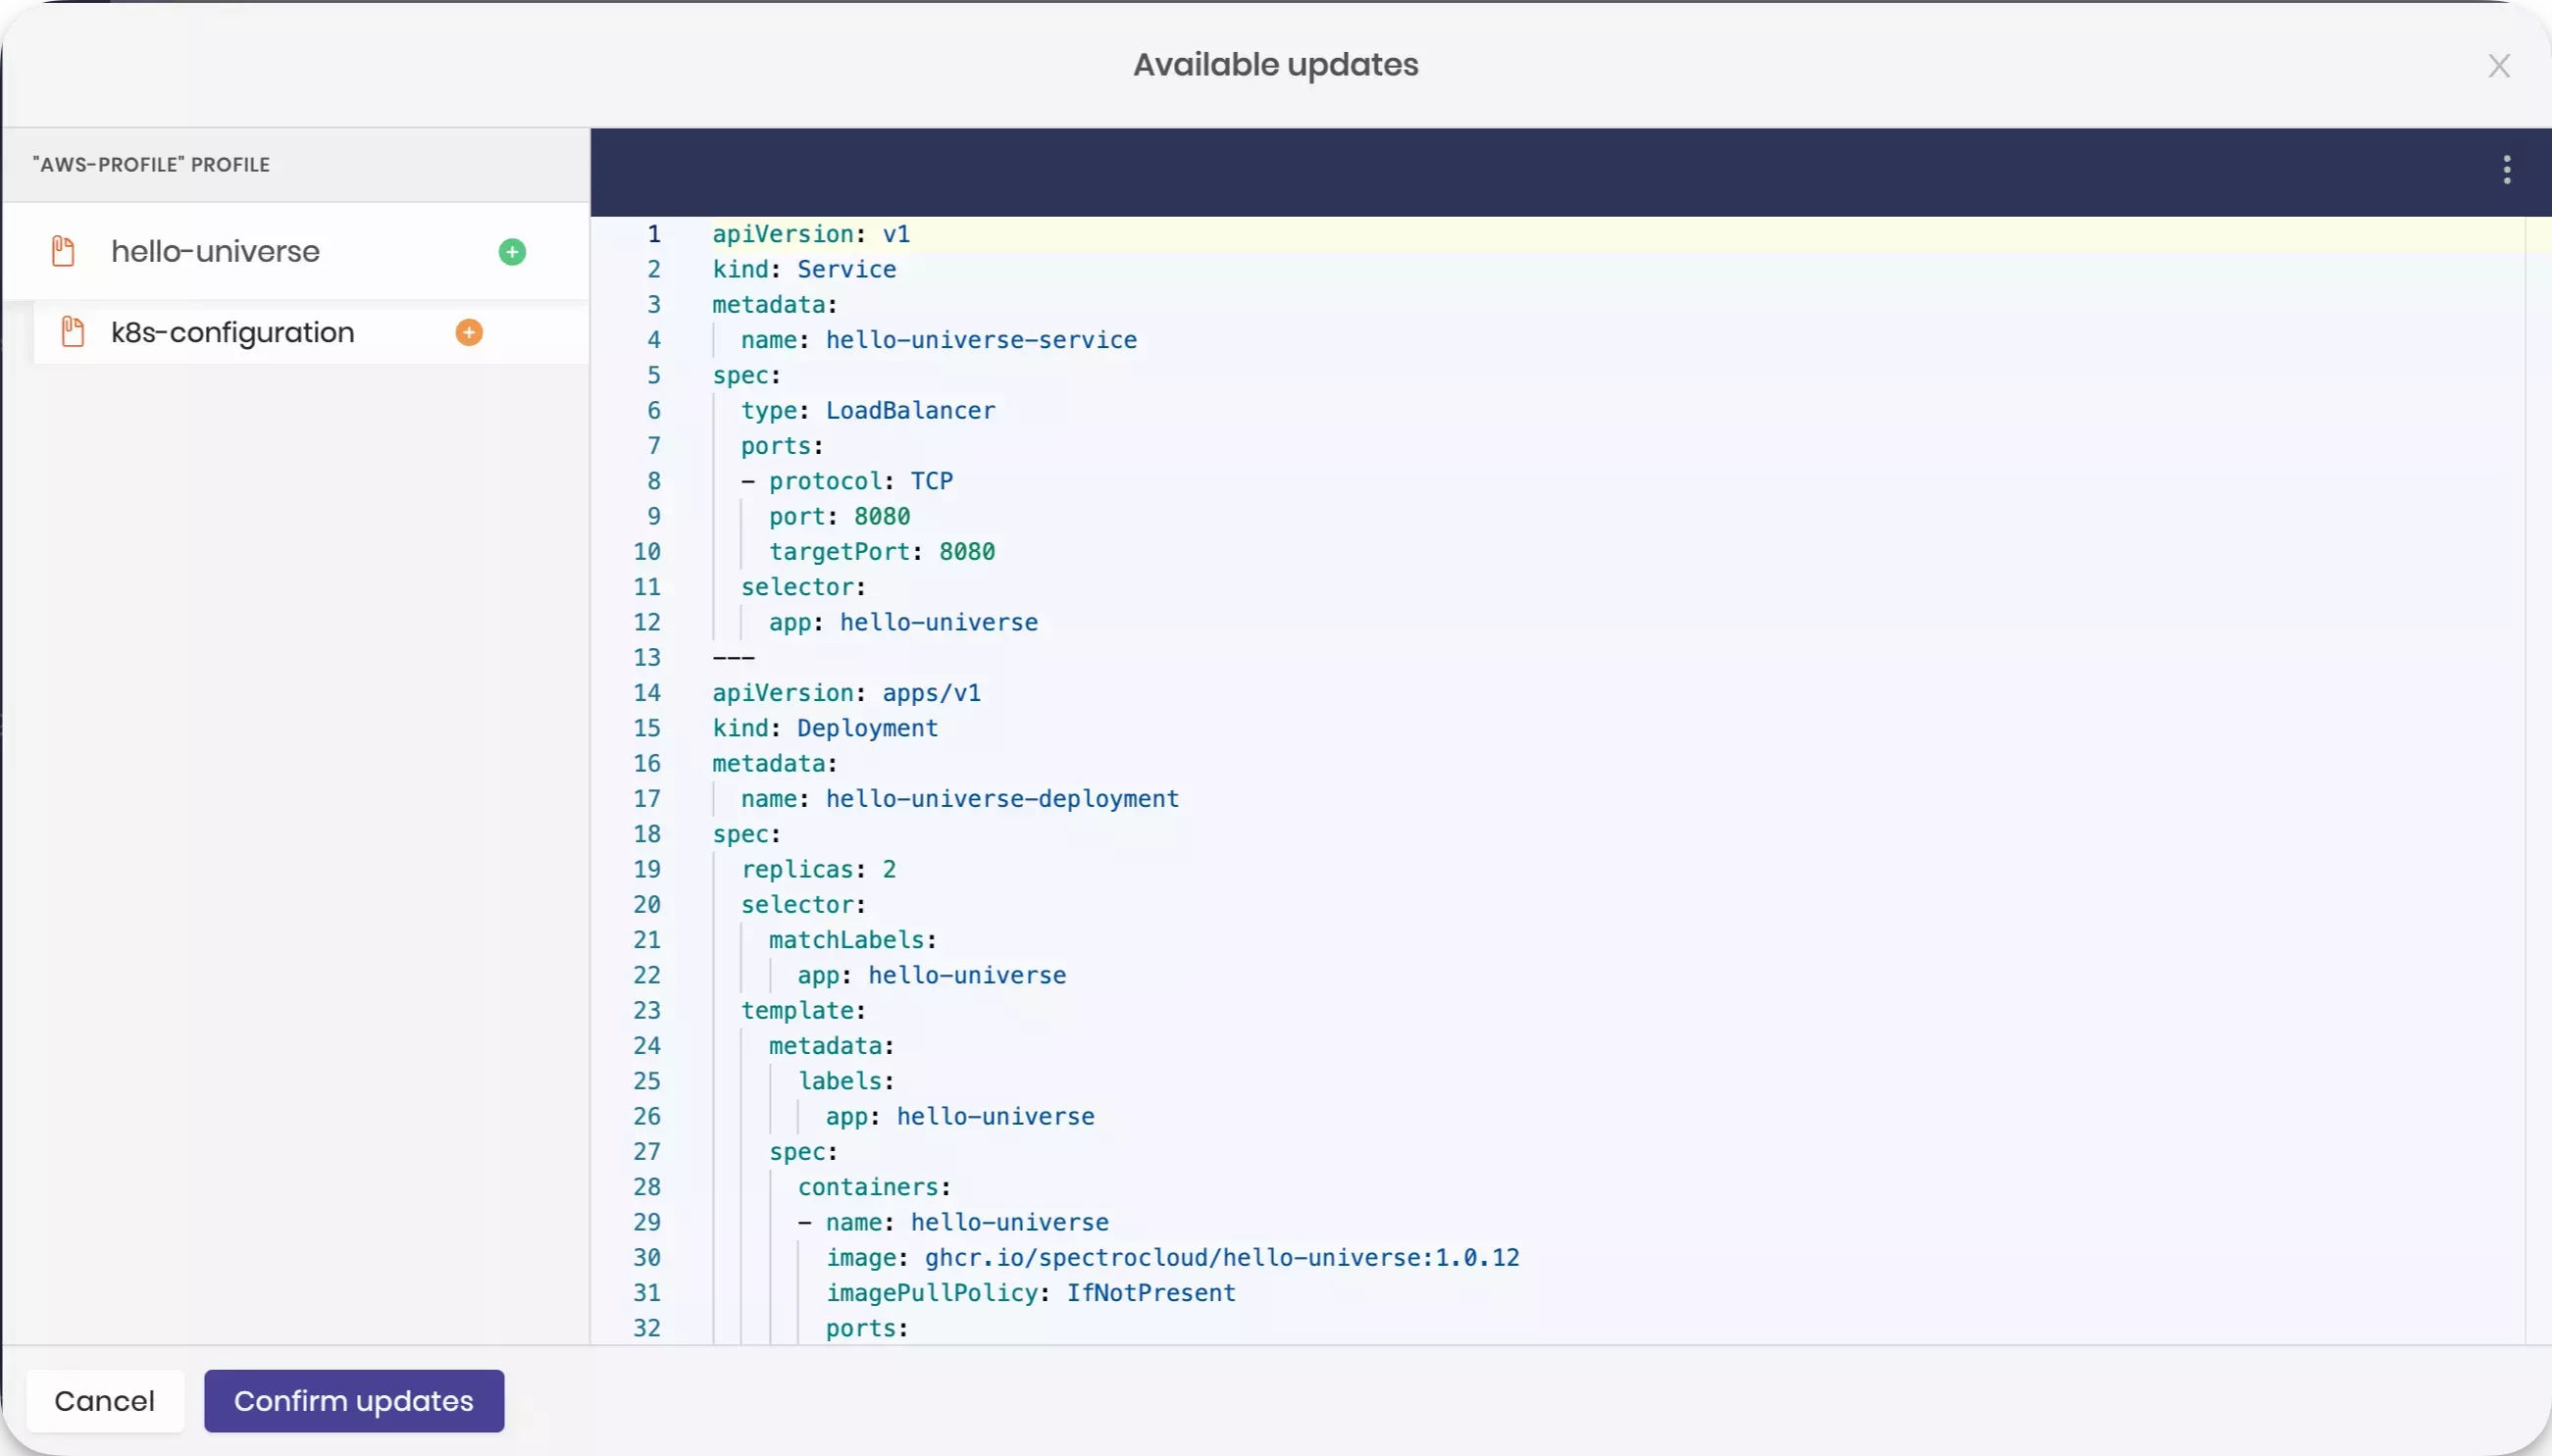
Click on Confirm updates to apply the updates to the host cluster. Depending on the scope of the change this may take a few moments.
Verify the Application
Navigate to the cluster's details page and verify you are in the Overview tab. When the application is deployed and ready for network traffic, indicated in the Services field, Palette exposes the service URL. Click on the URL for port :8080 to access the Hello Universe application.
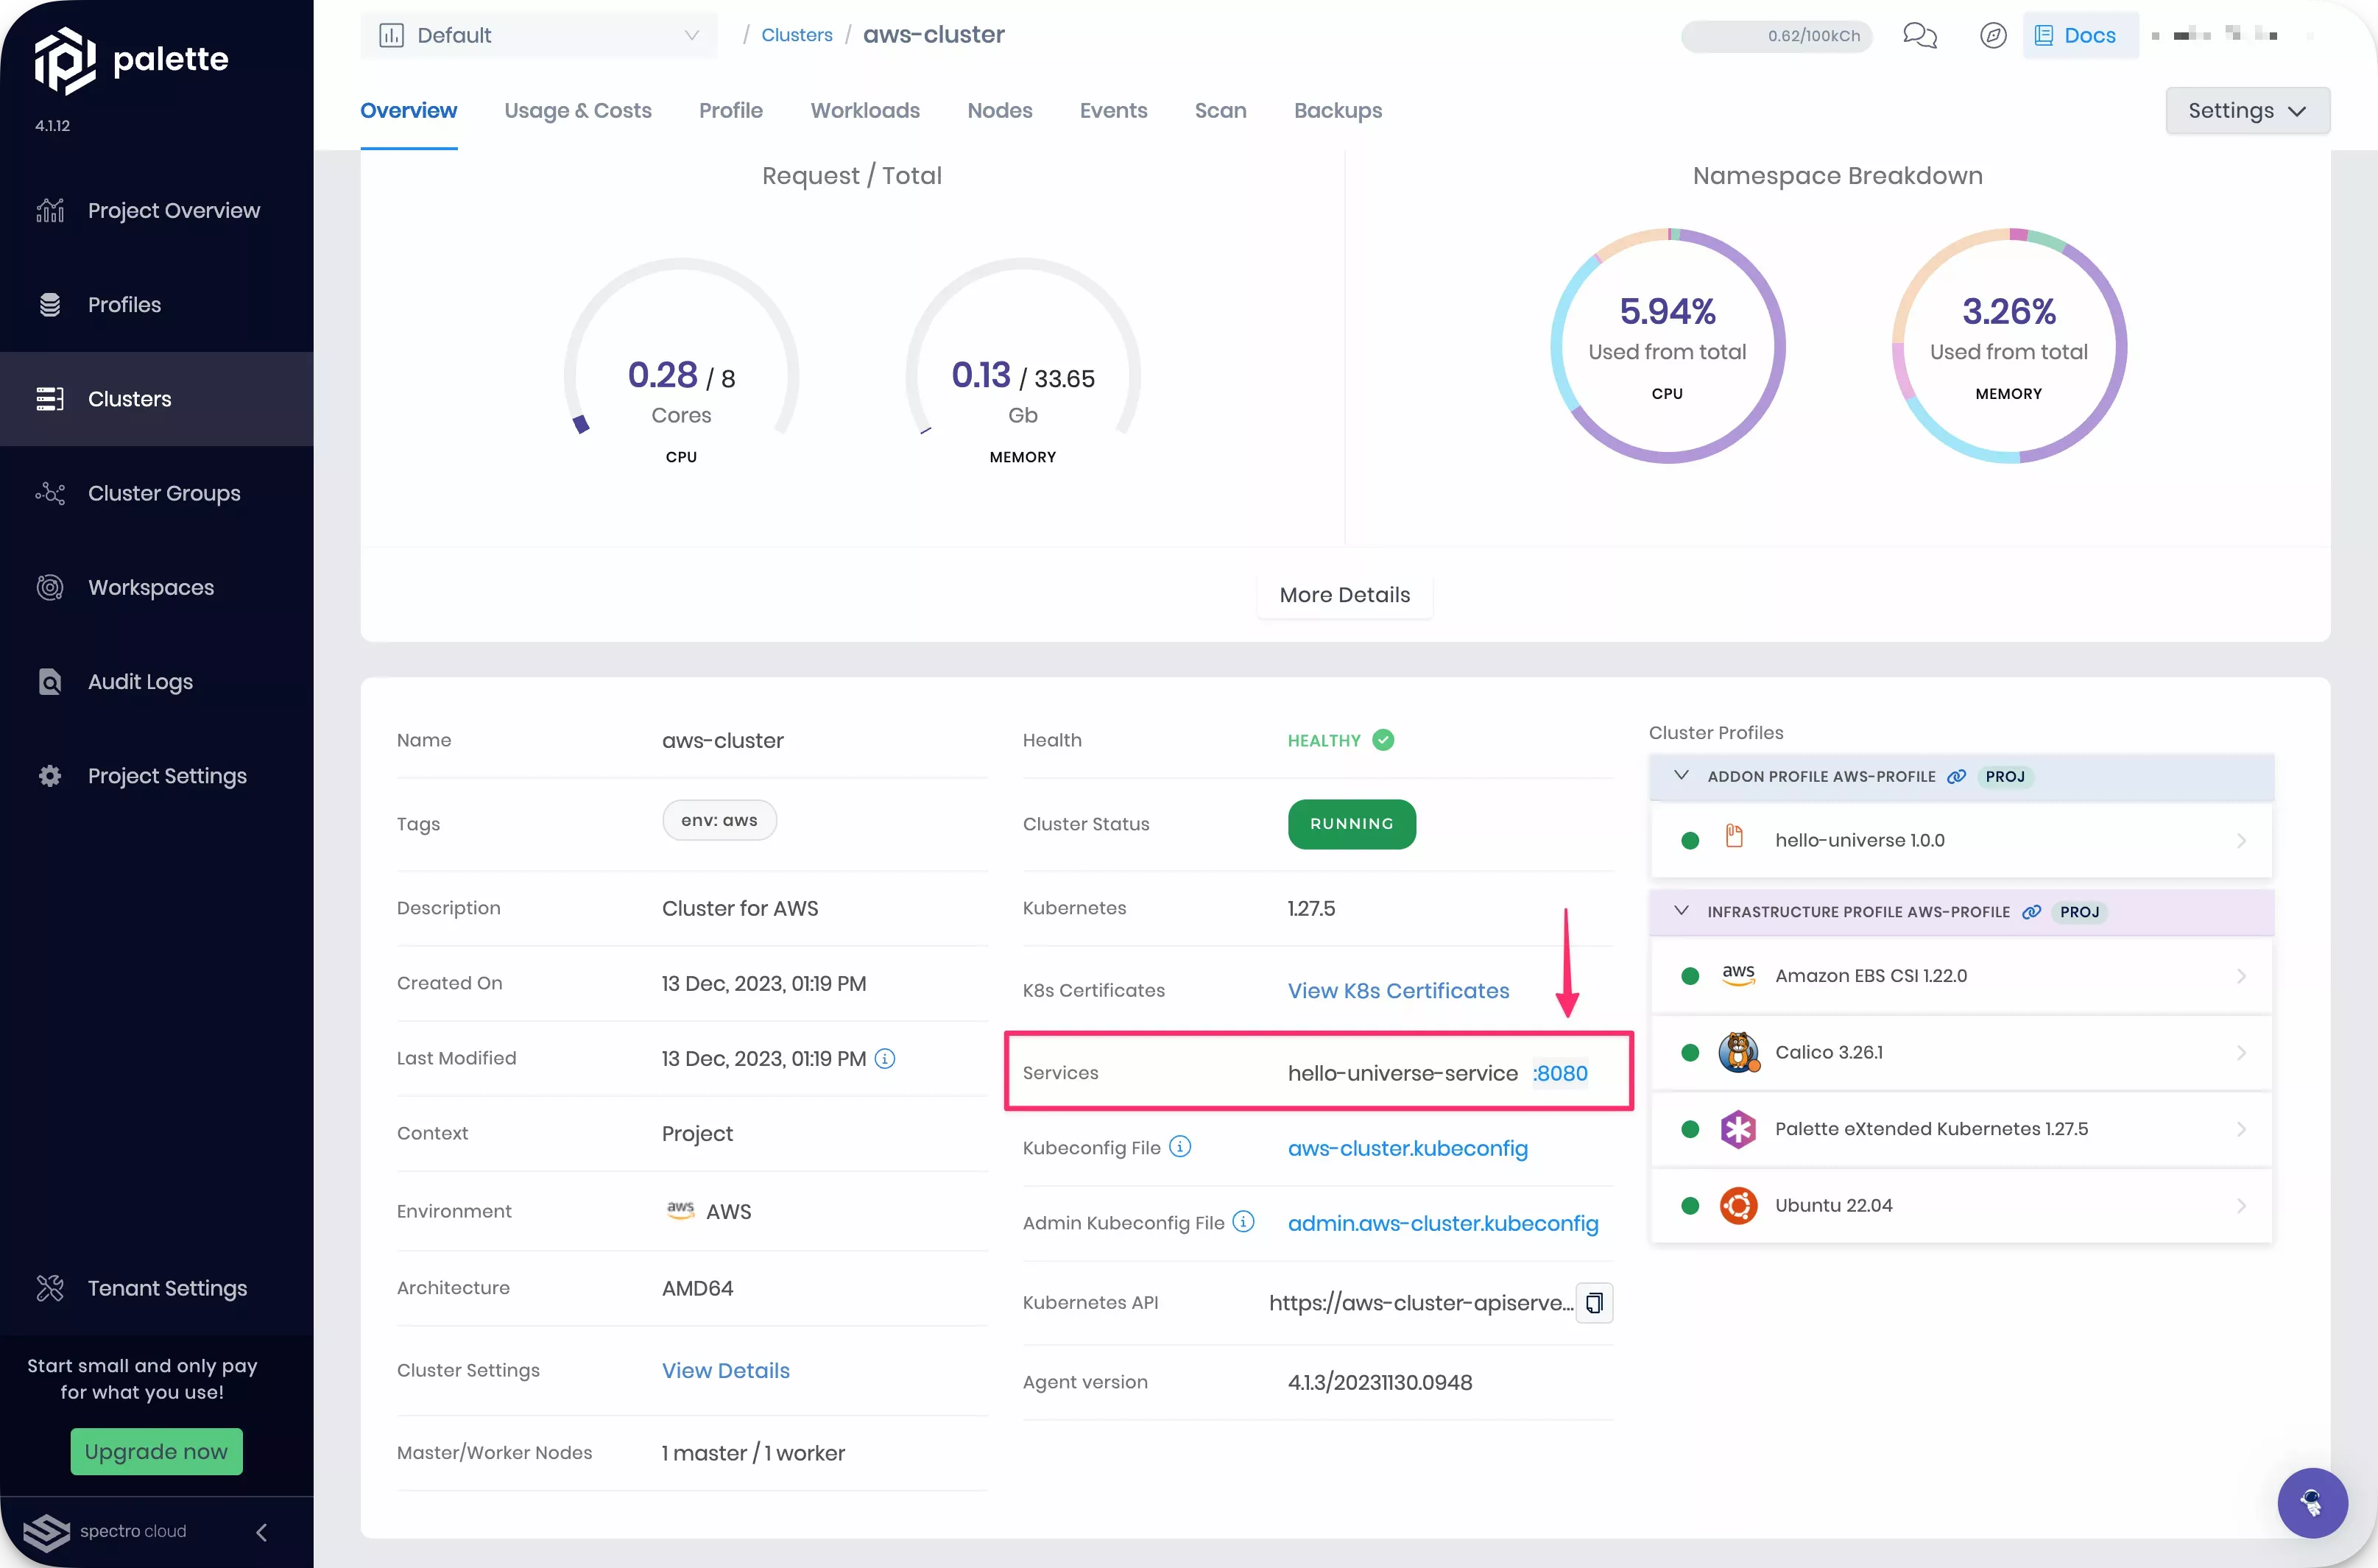
It can take up to three minutes for DNS to properly resolve the public load balancer URL. We recommend waiting a few moments before clicking on the service URL to prevent the browser from caching an unresolved DNS request.
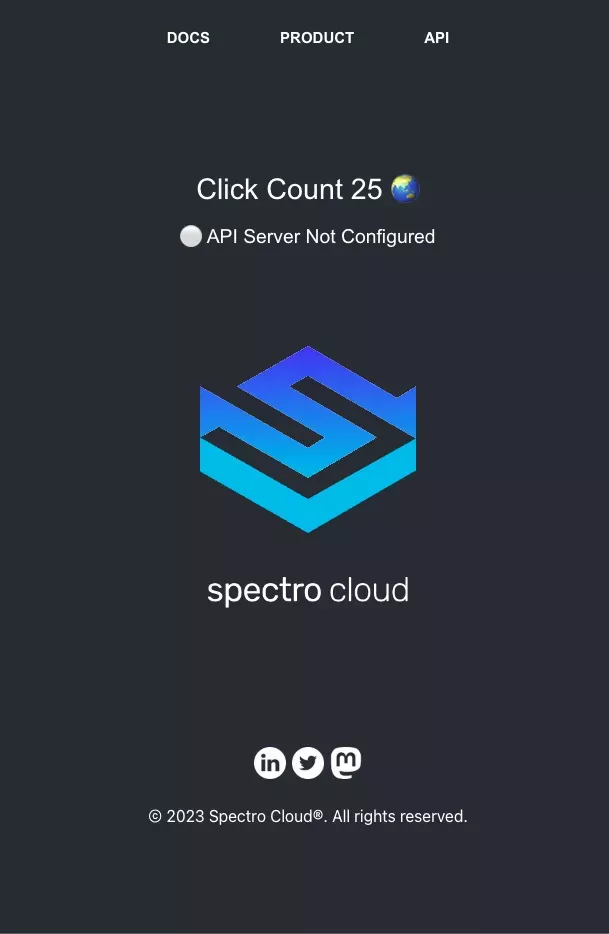
Welcome to Hello Universe, a demo application to help you learn more about Palette and its features. Feel free to click on the logo to increase the counter and for a fun image change.
You have deployed your first application to a cluster managed by Palette. Your first application is a single container application with no upstream dependencies.
Cleanup
Use the following steps to remove all the resources you created for the tutorial.
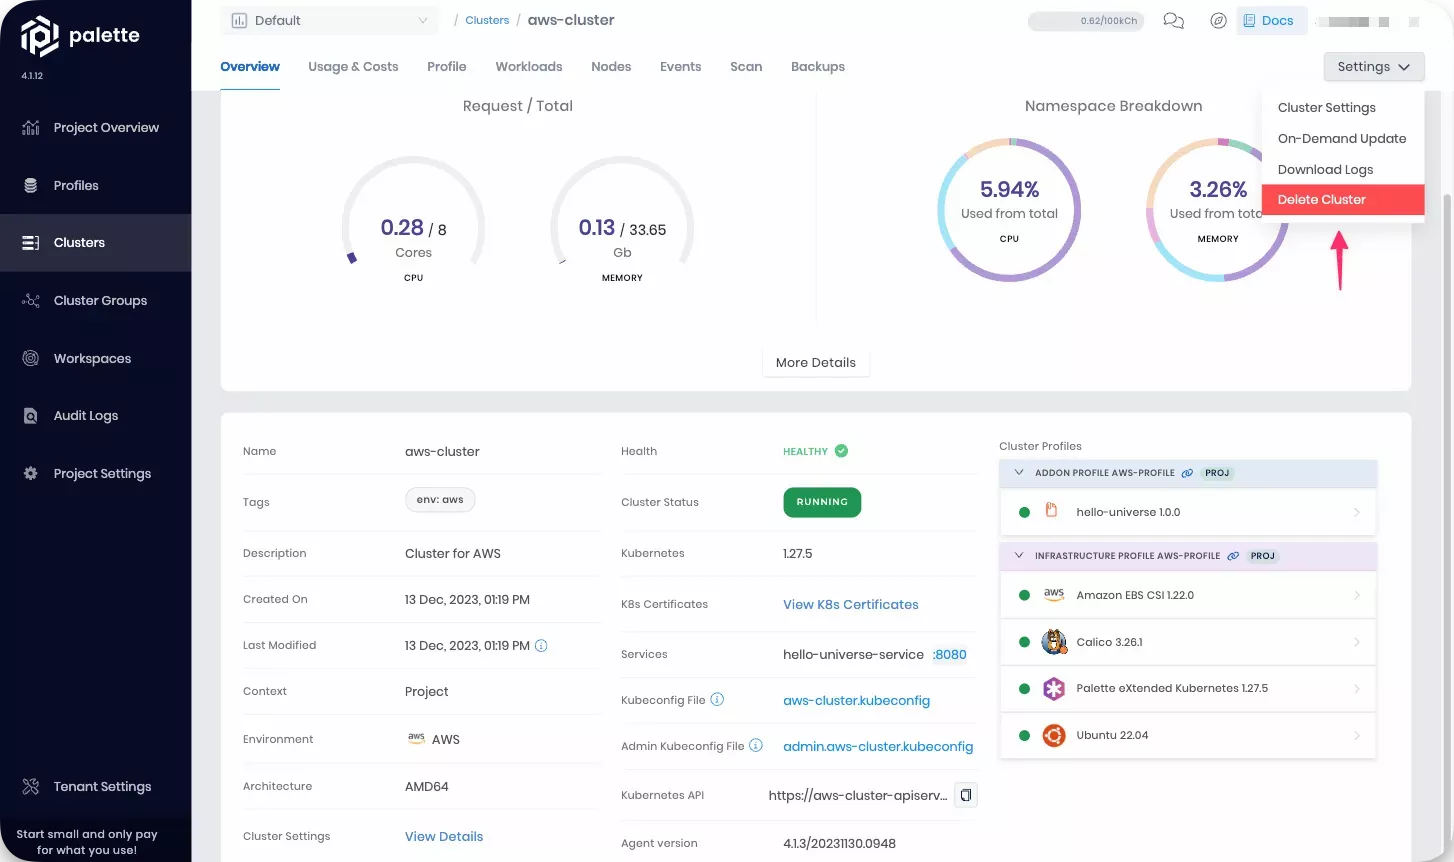
To remove the cluster, navigate to the left Main Menu and click on Clusters. Select the cluster you want to delete to access its details page.
Click on Settings to expand the menu, and select Delete Cluster.
You will be prompted to type in the cluster name to confirm the delete action. Type in the cluster name to proceed with the delete step. The deletion process takes several minutes to complete.
If a cluster remains in the delete phase for over 15 minutes, it becomes eligible for a force delete. To trigger a force delete, navigate to the cluster’s details page, click on Settings, then select Force Delete Cluster. Palette automatically removes clusters stuck in the cluster deletion phase for over 24 hours.
Once the cluster is deleted, navigate to the left Main Menu and click on Profiles. Find the cluster profile you created and click on the three-dot Menu to display the Delete button. Select Delete and confirm the selection to remove the cluster profile.
Terraform Workflow
The Spectro Cloud Terraform provider enables you to create and manage Palette resources in a codified manner by leveraging Infrastructure as Code (IaC). Some notable reasons why you would want to utilize IaC are:
-
The ability to automate infrastructure.
-
Improved collaboration in making infrastructure changes.
-
Self-documentation of infrastructure through code.
-
Allows tracking all infrastructure in a single source of truth.
If want to become more familiar with Terraform, we recommend you check out the Terraform learning resources from HashiCorp.
Prerequisites
To complete this tutorial, you will need the following items
- Basic knowledge of containers.
- Docker Desktop, Podman or another container management tool.
- Create a Cloud account from one of the following providers.
- Register the cloud account with Palette. Use the following resource for additional guidance.
Set Up Local Environment
You can clone the tutorials repository locally or follow along by downloading a Docker image that contains the tutorial code and all dependencies.
If you choose to clone the repository instead of using the tutorial container make sure you have Terraform v1.4.0 or greater installed.
- Docker
- Podman
- Git
Ensure Docker Desktop on your local machine is available. Use the following command and ensure you receive an output displaying the version number.
docker version
Download the tutorial image to your local machine.
docker pull ghcr.io/spectrocloud/tutorials:1.1.7
Next, start the container, and open a bash session into it.
docker run --name tutorialContainer --interactive --tty ghcr.io/spectrocloud/tutorials:1.1.7 bash
Navigate to the tutorial code.
cd /terraform/iaas-cluster-deployment-tf
If you are not running a Linux operating system, create and start the Podman Machine in your local environment. Otherwise, skip this step.
podman machine init
podman machine start
Use the following command and ensure you receive an output displaying the installation information.
podman info
Download the tutorial image to your local machine.
podman pull ghcr.io/spectrocloud/tutorials:1.1.7
Next, start the container, and open a bash session into it.
podman run --name tutorialContainer --interactive --tty ghcr.io/spectrocloud/tutorials:1.1.7 bash
Navigate to the tutorial code.
cd /terraform/iaas-cluster-deployment-tf
Open a terminal window and download the tutorial code from GitHub.
git@github.com:spectrocloud/tutorials.git
Change the directory to the tutorial folder.
cd tutorials/
Check out the following git tag.
git checkout v1.1.7
Change the directory to the tutorial code.
cd terraform/iaas-cluster-deployment-tf/
Create an API Key
Before you can get started with the Terraform code, you need a Spectro Cloud API key.
To create an API key, log in to Palette and click on the user User Menu and select My API Keys.
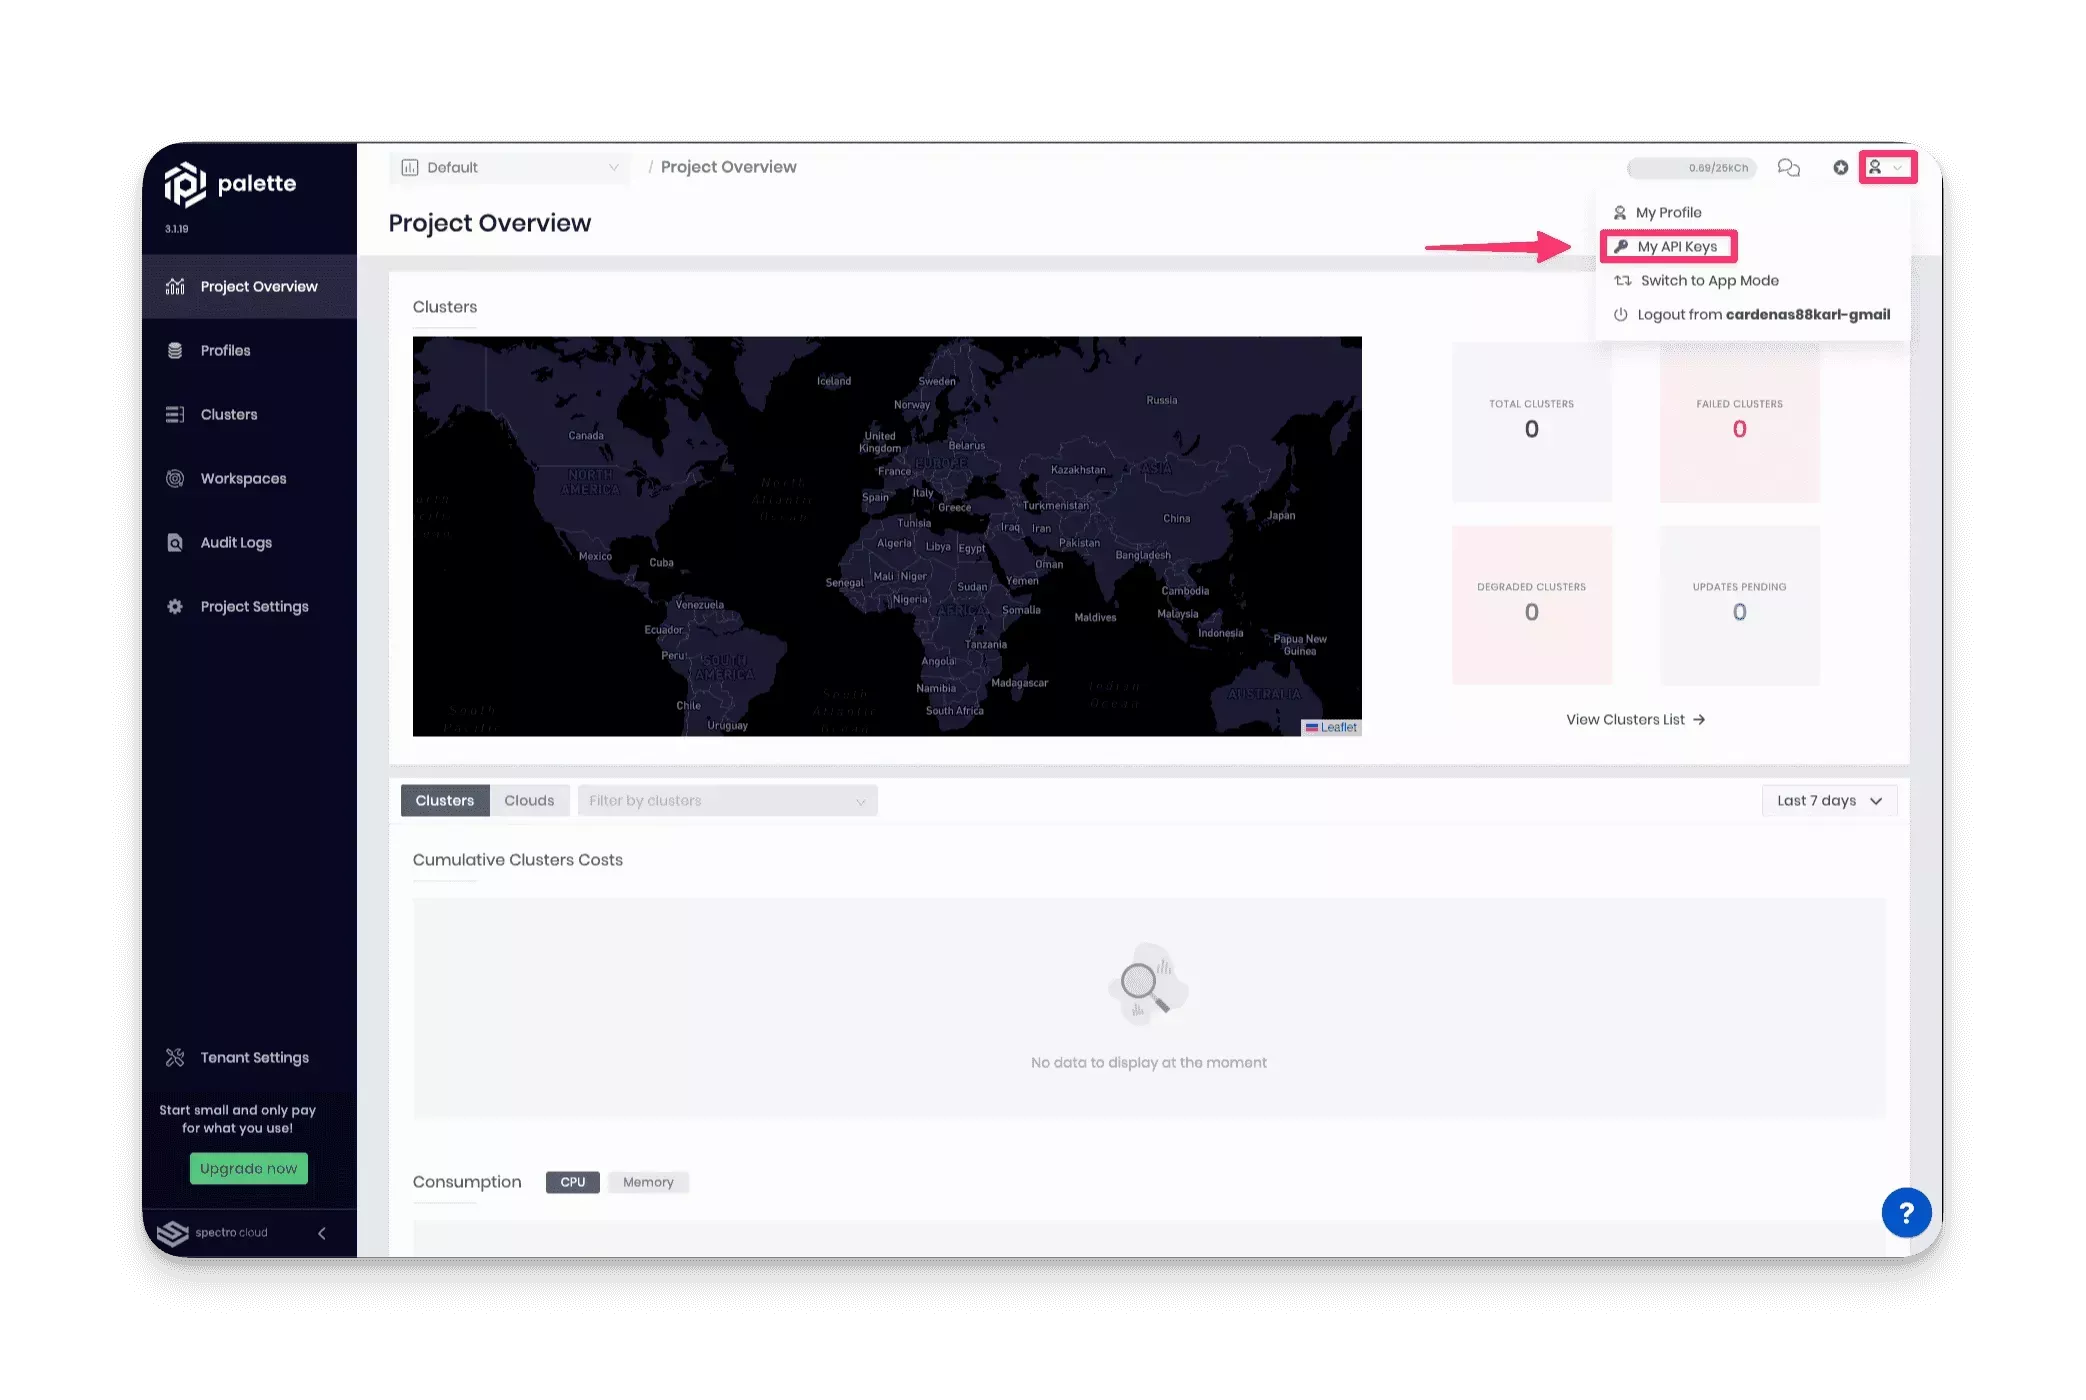
Next, click on Add New API Key. Fill out the required input field, API Key Name, and the Expiration Date. Click on Confirm to create the API key. Copy the key value to your clipboard, as you will use it shortly.
In your terminal session, issue the following command to export the API key as an environment variable.
export SPECTROCLOUD_APIKEY=YourAPIKeyHere
The Spectro Cloud Terraform provider requires credentials to interact with the Palette API. The Spectro Cloud Terraform provider will use the environment variable to authenticate with the Spectro Cloud API endpoint.
Resources Review
To help you get started with Terraform, the tutorial code is structured to support deploying a cluster to either Azure, GCP, or AWS. Before you deploy a host cluster to your target provider, take a few moments to review the following files in the folder structure.
-
providers.tf - This file contains the Terraform providers that are used to support the deployment of the cluster.
-
inputs.tf - This file contains all the Terraform variables for the deployment logic.
-
data.tf - This file contains all the query resources that perform read actions.
-
cluster_profiles.tf - This file contains the cluster profile definitions for each cloud provider.
-
cluster.tf - This file has all the required cluster configurations to deploy a host cluster to one of the cloud providers.
-
terraform.tfvars - Use this file to customize the deployment and target a specific cloud provider. This is the primary file you will modify.
-
outputs.tf - This file contains content that will be output in the terminal session upon a successful Terraform
applyaction.
The following section allows you to review the core Terraform resources more closely.
Provider
The provider.tf file contains the Terraform providers and their respective versions. The tutorial uses two
providers - the Spectro Cloud Terraform provider and the TLS Terraform provider. Note how the project name is specified
in the provider "spectrocloud" {} block. You can change the target project by changing the value specified in the
project_name parameter.
terraform {
  required_providers {
    spectrocloud = {
      version = ">= 0.13.1"
      source  = "spectrocloud/spectrocloud"
    }
    tls = {
      source  = "hashicorp/tls"
      version = "4.0.4"
    }
  }
}

provider "spectrocloud" {
  project_name = "Default"
}
The next file you should become familiar with is the cluster-profiles.tf file.
Cluster Profile�
The Spectro Cloud Terraform provider has several resources available for use. When creating a cluster profile, use
spectrocloud_cluster_profile. This resource can be used to customize all layers of a cluster profile. You can specify
all the different packs and versions to use and add a manifest or Helm chart.
In the cluster-profiles.tf file, the cluster profile resource is declared three times. Each instance of the resource
is for a specific cloud provider. Using the AWS cluster profile as an example, note how the cluster-profiles.tf file
uses pack {} blocks to specify each layer of the profile. The order in which you arrange contents of the pack {}
blocks plays an important role, as each layer maps to the core infrastructure in a cluster profile.
The first listed pack {} block must be the OS, followed by Kubernetes, the container network interface, and the
container storage interface. The first pack {} block in the list equates to the bottom layer of the cluster profile.
Ensure you define the bottom layer of the cluster profile - the OS layer - first in the list of pack {} blocks.
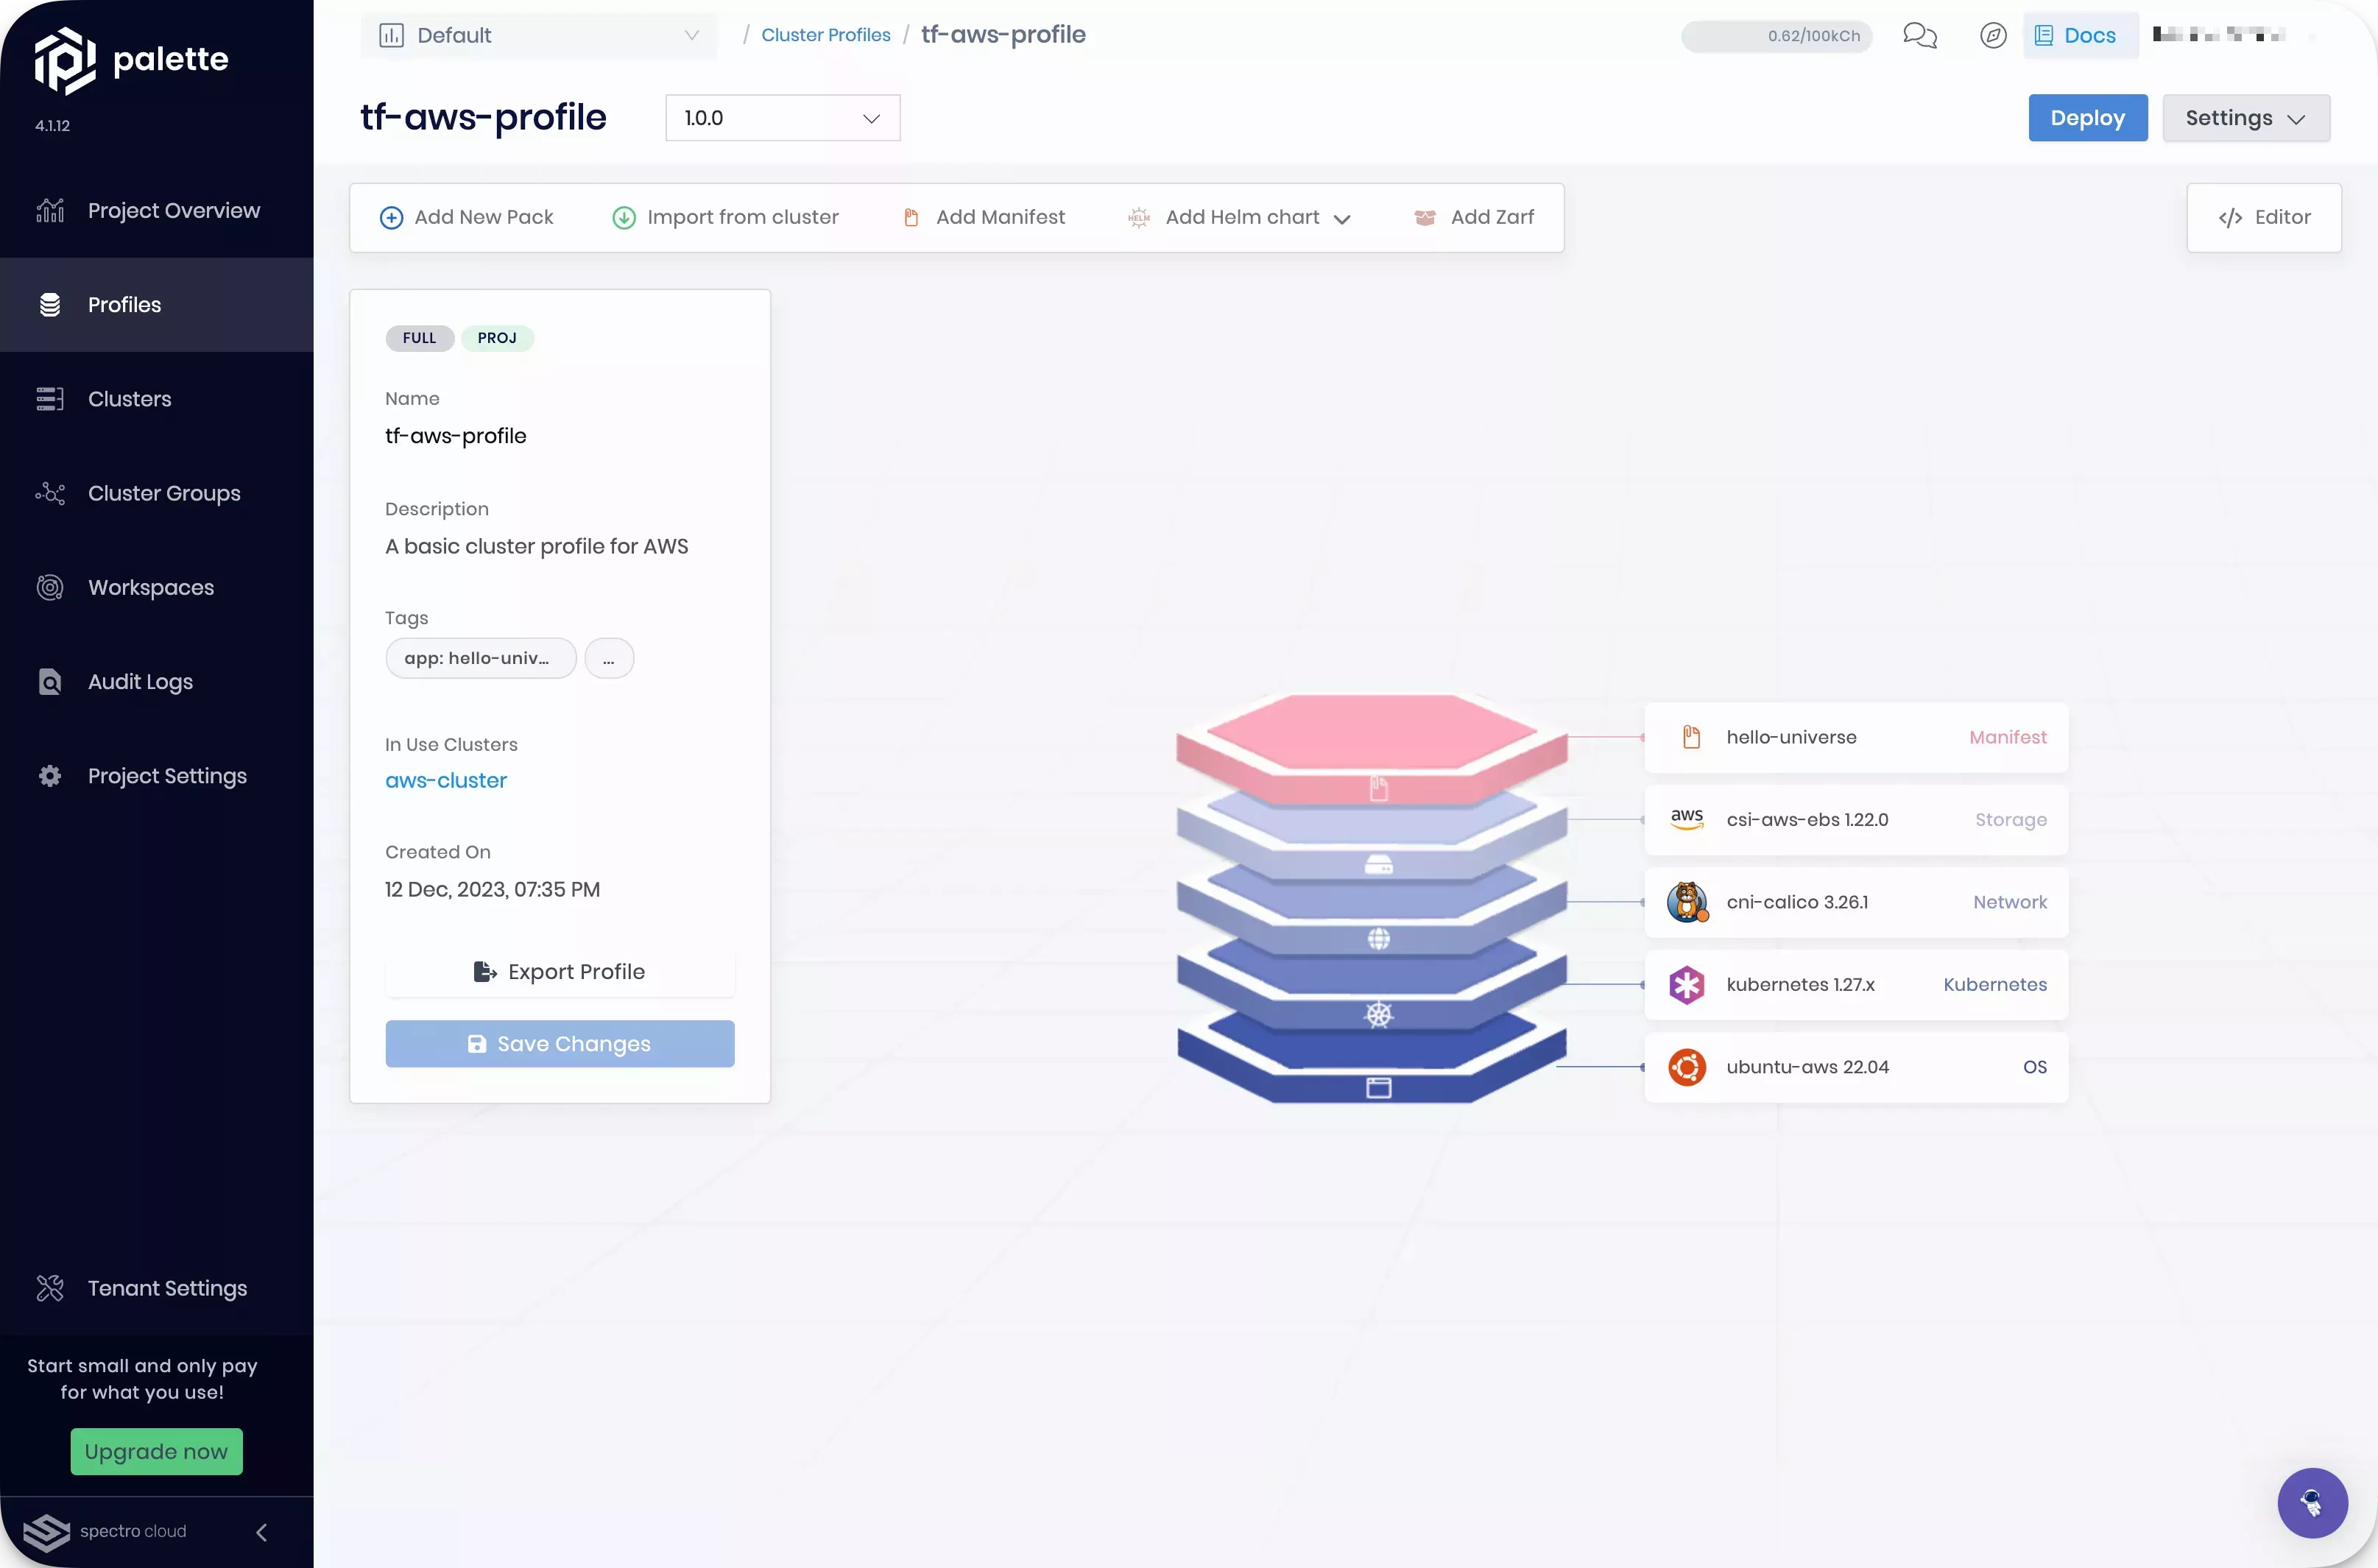
resource "spectrocloud_cluster_profile" "aws-profile" {
  name        = "tf-aws-profile"
  description = "A basic cluster profile for AWS"
  tags        = concat(var.tags, ["env:aws"])
  cloud       = "aws"
  type        = "cluster"

  pack {
    name   = data.spectrocloud_pack.aws_ubuntu.name
    tag    = data.spectrocloud_pack.aws_ubuntu.version
    uid    = data.spectrocloud_pack.aws_ubuntu.id
    values = data.spectrocloud_pack.aws_ubuntu.values
  }

  pack {
    name   = data.spectrocloud_pack.aws_k8s.name
    tag    = data.spectrocloud_pack.aws_k8s.version
    uid    = data.spectrocloud_pack.aws_k8s.id
    values = data.spectrocloud_pack.aws_k8s.values
  }

  pack {
    name   = data.spectrocloud_pack.aws_cni.name
    tag    = data.spectrocloud_pack.aws_cni.version
    uid    = data.spectrocloud_pack.aws_cni.id
    values = data.spectrocloud_pack.aws_cni.values
  }

  pack {
    name   = data.spectrocloud_pack.aws_csi.name
    tag    = data.spectrocloud_pack.aws_csi.version
    uid    = data.spectrocloud_pack.aws_csi.id
    values = data.spectrocloud_pack.aws_csi.values
  }

  pack {
    name   = "hello-universe"
    type   = "manifest"
    tag    = "1.0.0"
    values = ""
    manifest {
      name    = "hello-universe"
      content = file("manifests/hello-universe.yaml")
    }
  }
}
The last pack {} block contains a manifest file with all the Kubernetes configurations for the
Hello Universe application. Including the application in the profile
ensures the application is installed during cluster deployment. If you wonder what all the data resources are for, head
to the next section to review them.
Data Resources
You may have noticed that each pack {} block contains references to a data resource.
  pack {
    name   = data.spectrocloud_pack.aws_csi.name
    tag    = data.spectrocloud_pack.aws_csi.version
    uid    = data.spectrocloud_pack.aws_csi.id
    values = data.spectrocloud_pack.aws_csi.values
  }
Data resources are used to perform read actions in
Terraform. The Spectro Cloud Terraform provider exposes several data resources to help you make your Terraform code more
dynamic. The data resource used in the cluster profile is spectrocloud_pack. This resource enables you to query
Palette for information about a specific pack. You can get information about the pack using the data resource such as
unique ID, registry ID, available versions, and the pack's YAML values.
Below is the data resource used to query Palette for information about the Kubernetes pack for version 1.27.5.
data "spectrocloud_pack" "aws_k8s" {
  name    = "kubernetes"
  version = "1.27.5"
}
Using the data resource, you avoid manually typing in the parameter values required by the cluster profile's pack {}
block.
Cluster
The clusters.tf file contains the definitions for deploying a host cluster to one of the cloud providers. To create a host cluster, you must use a cluster resource for the cloud provider you are targeting.
In this tutorial, the following Terraform cluster resources are used.
| Terraform Resource | Platform |
|---|---|
spectrocloud_cluster_aws | AWS |
spectrocloud_cluster_azure | Azure |
spectrocloud_cluster_gcp | GCP |
Using the spectrocloud_cluster_azure resource in this tutorial as an example, note how the resource accepts a set of
parameters. When deploying a cluster, you can change the same parameters in the Palette user interface (UI). You can
learn more about each parameter by reviewing the resource documentation page hosted in the Terraform registry.
resource "spectrocloud_cluster_azure" "cluster" {
  name             = "azure-cluster"
  tags             = concat(var.tags, ["env:azure"])
  cloud_account_id = data.spectrocloud_cloudaccount_azure.account[0].id

  cloud_config {
    subscription_id = var.azure_subscription_id
    resource_group  = var.azure_resource_group
    region          = var.azure-region
    ssh_key         = tls_private_key.tutorial_ssh_key[0].public_key_openssh
  }

  cluster_profile {
    id = spectrocloud_cluster_profile.azure-profile[0].id
  }

  machine_pool {
    control_plane           = true
    control_plane_as_worker = true
    name                    = "control-plane-pool"
    count                   = var.azure_control_plane_nodes.count
    instance_type           = var.azure_control_plane_nodes.instance_type
    azs                     = var.azure_control_plane_nodes.azs
    is_system_node_pool     = var.azure_control_plane_nodes.is_system_node_pool
    disk {
      size_gb = var.azure_control_plane_nodes.disk_size_gb
      type    = "Standard_LRS"
    }
  }

  machine_pool {
    name                = "worker-basic"
    count               = var.azure_worker_nodes.count
    instance_type       = var.azure_worker_nodes.instance_type
    azs                 = var.azure_worker_nodes.azs
    is_system_node_pool = var.azure_worker_nodes.is_system_node_pool
  }

  timeouts {
    create = "30m"
    delete = "15m"
  }
}
Deploy Cluster
To deploy a cluster using Terraform, you must first modify the terraform.tfvars file. Open the terraform.tfvars file in the editor of your choice, and locate the cloud provider you will use to deploy a host cluster.
To simplify the process, we added a toggle variable in the Terraform template, that you can use to select the deployment
environment. Each cloud provider has a section in the template that contains all the variables you must populate.
Variables to populate are identified with REPLACE_ME.
In the example AWS section below, you would change deploy-aws = false to deploy-aws = true to deploy to AWS.
Additionally, you would replace all the variables with a value REPLACE_ME. You can also update the values for nodes in
the control plane pool or worker pool.
###########################
# AWS Deployment Settings
############################
deploy-aws = false # Set to true to deploy to AWS

aws-cloud-account-name = "REPLACE_ME"
aws-region             = "REPLACE_ME"
aws-key-pair-name      = "REPLACE_ME"

aws_control_plane_nodes = {
  count              = "1"
  control_plane      = true
  instance_type      = "m4.2xlarge"
  disk_size_gb       = "60"
  availability_zones = ["REPLACE_ME"] # If you want to deploy to multiple AZs, add them here
}

aws_worker_nodes = {
  count              = "1"
  control_plane      = false
  instance_type      = "m4.2xlarge"
  disk_size_gb       = "60"
  availability_zones = ["REPLACE_ME"] # If you want to deploy to multiple AZs, add them here
}
When you are done making the required changes, issue the following command to initialize Terraform.
terraform init
Next, issue the plan command to preview the changes.
terraform plan
Output:
Plan: 2 to add, 0 to change, 0 to destroy.
If you change the desired cloud provider's toggle variable to true, you will receive an output message that two new
resources will be created. The two resources are your cluster profile and the host cluster.
To deploy all the resources, use the apply command.
terraform apply -auto-approve
Verify the Profile
To check out the cluster profile creation in Palette, log in to Palette, and from
the left Main Menu click on Profiles. Locate the cluster profile with the name pattern
tf-[cloud provier]-profile. Click on the cluster profile to review its details, such as layers, packs, and versions.
Verify the Cluster
You can also check the cluster creation process by navigating to the left Main Menu and selecting Clusters.
Select your cluster to review its details page, which contains the status, cluster profile, event logs, and more.
The cluster deployment may take several minutes depending on the cloud provider, node count, node sizes used, and the cluster profile. You can learn more about the deployment progress by reviewing the event log. Click on the Events tab to check the event log.
While you wait for the cluster deployment process to complete, feel free to check out the following video where we discuss the growing pains of using Kubernetes and how Palette can help you address these pain points.
Validate
When the cluster deploys, you can access the Hello Universe application. From the cluster's Overview page, click on the URL for port :8080 next to the hello-universe-service in the Services row. This URL will take you to the application landing page.
It can take up to three minutes for DNS to properly resolve the public load balancer URL. We recommend waiting a few moments before clicking on the service URL to prevent the browser from caching an unresolved DNS request.
Welcome to Hello Universe, a demo application to help you learn more about Palette and its features. Feel free to click on the logo to increase the counter and for a fun image change.
You have deployed your first application to a cluster managed by Palette through Terraform. Your first application is a single container application with no upstream dependencies.
Cleanup
Use the following steps to clean up the resources you created for the tutorial. Use the destroy command to remove all
the resources you created through Terraform.
terraform destroy --auto-approve
Output:
Destroy complete! Resources: 2 destroyed.
If a cluster remains in the delete phase for over 15 minutes, it becomes eligible for force delete. To trigger a force delete, navigate to the cluster’s details page and click on Settings. Click on Force Delete Cluster to delete the cluster. Palette automatically removes clusters stuck in the cluster deletion phase for over 24 hours.
If you are using the tutorial container and want to exit the container, type exit in your terminal session and press
the Enter key. Next, issue the following command to stop the container.
- Docker
- Podman
docker stop tutorialContainer && \
docker rmi --force ghcr.io/spectrocloud/tutorials:1.1.7
podman stop tutorialContainer && \
podman rmi --force ghcr.io/spectrocloud/tutorials:1.1.7
Wrap-up
In this tutorial, you created a cluster profile, which is a template that contains the core layers required to deploy a host cluster. You then deployed a host cluster onto your preferred cloud service provider. After the cluster deployed, you updated the profile by adding the Hello Universe application and applied the updates to the host cluster.
Palette assures consistency across cluster deployments through cluster profiles. Palette also enables you to quickly deploy applications to a Kubernetes environment with little or no prior Kubernetes knowledge. In a matter of minutes, you were able to provision a new Kubernetes cluster and deploy an application.
We encourage you to check out the Deploy an Application using Palette Dev Engine tutorial to learn more about Palette. Palette Dev Engine can help you deploy applications more quickly through the usage of virtual clusters. Feel free to check out the reference links below to learn more about Palette.