Deploy App Workloads with a PCG
Palette Private Cloud Gateway (PCG) is a crucial infrastructure support component that acts as a bridge between your private cloud environment or data center and Palette.
A PCG is required in environments lacking direct network access to Palette. For example, many infrastructure environments reside within private networks that restrict external connections, preventing internal devices and resources from reaching Palette directly.
Upon installation, the PCG initiates a connection from inside the private network to Palette, serving as an endpoint for Palette to communicate with the infrastructure environment. The PCG continuously polls Palette for instructions to either deploy or delete Kubernetes clusters within the environment. This connection uses a secure communication channel that is encrypted using the Transport Layer Security (TLS) protocol. Once a cluster is deployed, the PCG is no longer involved in the communication between Palette and the deployed cluster. The cluster then communicates directly with Palette through the Palette agent available within each cluster, which originates all network requests outbound toward Palette. Refer to the PCG Architecture section for more information.
A PCG comprises a cluster of nodes and can be deployed using two methods. The first method uses the Palette CLI to deploy a PCG in one of the three supported infrastructure environments; MAAS, OpenStack, or VMware vSphere. The other method manually deploys a PCG onto an existing Kubernetes cluster.
In this tutorial, you will deploy a VMware PCG using Palette CLI. Next, you will learn how to deploy a VMware cluster with a sample Kubernetes application called Hello Universe, utilizing either the Palette dashboard or Terraform.
The following diagram illustrates the components that will be deployed in this tutorial and how they communicate with each other.

Prerequisites
To complete this tutorial, you will need the following prerequisites in place.
-
A Palette account with tenant admin access.
-
A Palette API key. Refer to the Create API Key page for instructions on how to create an API key.
-
A VMware vSphere user account with the required permissions.
-
A Linux x86-64 machine with access to a terminal and Internet, as well as connection to both Palette and VMware vSphere.
-
An SSH key pair. Use the Create and Upload an SSH Key guide to learn how to create an SSH key and upload it to Palette.
-
The following IP address requirements must be met in your VMware vSphere environment:
- One IP address available for the single-node PCG deployment. Refer to the PCG Sizing section for more information on sizing.
- One IP address reserved for cluster repave operations.
- One IP address for the Virtual IP (VIP).
- DNS must be able to resolve the domain
api.spectrocloud.com. - NTP server must be reachable from the PCG.
-
The following minimum resources must be available in your VMware vSphere environment:
- CPU: 4 cores.
- Memory: 4 GiB.
- Storage: 60 GiB.
infoIn production environments, we recommend deploying a three-node PCG, each node with 8 cores of CPU, 8 GiB of memory, and 100 GiB of storage.
-
Ensure the following software is installed and available on your Linux machine.
- Palette CLI.
- Docker.
- Kind.
- Git.
- Terraform CLI v1.4.0 or greater, if you choose to follow along with the Terraform workflow.
Authenticate with Palette
The initial step to deploy a PCG using Palette CLI involves authenticating with your Palette environment using the
palette login command.
In your terminal, execute the following command.
palette login
Once issued, you will be prompted for several parameters to complete the authentication. The table below outlines the required parameters along with the values that will be utilized in this tutorial. If a parameter is specific to your environment and Palette account, such as your Palette API key, ensure to input the value according to your environment. Check out the Deploy a PCG to VMware vSphere guide for more information. option.
| Parameter | Value | Environment-Specific |
|---|---|---|
| Spectro Cloud Console | https://console.spectrocloud.com. If using a self-hosted instance of Palette, enter the URL for that instance. | No |
| Allow Insecure Connection | Y. Enabling this option bypasses x509 CA verification. In production environments, enter Y if you are using a self-hosted Palette or VerteX instance with self-signed TLS certificates and need to provide a file path to the instance CA. Otherwise, enter N. | No |
| Spectro Cloud API Key | Enter your Palette API Key. | Yes |
| Spectro Cloud Organization | Select your Palette Organization name. | Yes |
| Spectro Cloud Project | None (TenantAdmin) | No |
| Acknowledge | Accept the login banner message. Login banner messages are only displayed if the tenant admin enabled a login banner. | Yes |
After accepting the login banner message, you will receive the following output confirming you have successfully authenticated with Palette.
Welcome to Spectro Cloud Palette
The video below demonstrates Palette's authentication process. Ensure you utilize values specific to your environment, such as the correct Palette URL. Contact your Palette administrator for the correct URL if you use a self-hosted Palette or VerteX instance.
Deploy a PCG with Palette CLI
After authenticating with Palette, you can proceed with the PCG creation process. Issue the command below to start the PCG installation.
palette pcg install
The palette pcg install command will prompt you for information regarding your PCG cluster, vSphere environment, and
resource configurations. The following tables display the required parameters along with the values that will be used in
this tutorial. Enter the provided values when prompted. If a parameter is specific to your environment, such as your
vSphere endpoint, enter the corresponding value according to your environment. For detailed information about each
parameter, refer to the Deploy a PCG to VMware vSphere guide.
The PCG to be deployed in this tutorial is intended for educational purposes only and is not recommended for production environments.
-
PCG General Information
Configure the PCG general information, including the Cloud Type and Private Cloud Gateway Name, as shown in the table below.
Parameter Value Environment-Specific Management Plane Type PaletteNo Enable Ubuntu Pro (required for production) NNo Select an image registry type DefaultNo Cloud Type VMware vSphereNo Private Cloud Gateway Name gateway-tutorialNo Share PCG Cloud Account across platform Projects YNo -
Environment Configuration
Enter the environment configuration information, such as the Pod CIDR and Service IP Range according to the table below.
Parameter Value Environment-Specific HTTPS Proxy Skip. No HTTP Proxy Skip. No Pod CIDR 172.16.0.0/20. The pod IP addresses should be unique and not overlap with any machine IPs in the environment.No Service IP Range 10.155.0.0/24. The service IP addresses should be unique and not overlap with any machine IPs in the environment.No -
vSphere Account Information
Enter the information specific to your vSphere account.
Parameter Value Environment-Specific vSphere Endpoint Your vSphere endpoint. You can specify a Full Qualified Domain Name (FQDN) or an IP address. Make sure you specify the endpoint without the HTTP scheme https://orhttp://. Example:vcenter.mycompany.com.Yes vSphere Username Your vSphere account username. Yes vSphere Password Your vSphere account password. Yes Allow Insecure Connection (Bypass x509 Verification) Y. Enabling this option bypasses x509 CA verification. In production environments, enterNif using a custom registry with self-signed SSL certificates. Otherwise, enterY.No -
vSphere Cluster Configuration
Enter the PCG cluster configuration information. For example, specify the vSphere Resource Pool to be targeted by the PCG cluster.
Parameter Value Environment-Specific Datacenter The vSphere data center to target when deploying the PCG cluster. Yes Folder The vSphere folder to target when deploying the PCG cluster. Yes Network The port group to which the PCG cluster will be connected. Yes Resource Pool The vSphere resource pool to target when deploying the PCG cluster. Yes Cluster The vSphere compute cluster to use for the PCG deployment. Yes Select specific Datastore or use a VM Storage Policy DatastoreNo Datastore The vSphere datastore to use for the PCG deployment. Yes Add another Fault Domain NNo NTP Servers Skip. No SSH Public Keys Provide a public OpenSSH key to be used to connect to the PCG cluster. Yes -
PCG Cluster Size
This tutorial will deploy a one-node PCG with dynamic IP placement (DDNS). If needed, you can convert a single-node PCG to a multi-node PCG to provide additional capacity. Refer to the Increase PCG Node Count guide for more information.
Parameter Value Environment-Specific Number of Nodes 1No Placement Type DDNSNo Search domains Comma-separated list of DNS search domains. For example, spectrocloud.dev.Yes -
Cluster Settings
Set the parameter Patch OS on boot to
N, meaning the OS of the PCG hosts will not be patched on the first boot.Parameter Value Environment-Specific Patch OS on boot NNo -
vSphere Machine Configuration
Set the size of the PCG as small (S) as this PCG will not be used in production environments.
Parameter Value Environment-Specific S 4 CPU, 4 GB of Memory, and 60 GB of StorageNo -
Node Affinity Configuration Information
Set Node Affinity to
N, indicating no affinity between Palette pods and control plane nodes.Parameter Value Environment-Specific Node Affinity NNo
After answering the prompts of the pcg install command, a new PCG configuration file is generated, and its location is
displayed on the console.
==== PCG config saved ==== Location: /home/ubuntu/.palette/pcg/pcg-20240313152521/pcg.yaml
Next, Palette CLI will create a local kind cluster that will be used to bootstrap the PCG cluster deployment in your VMware environment. Once installed, the PCG registers itself with Palette and creates a VMware cloud account with the same name as the PCG.
The following recording demonstrates the pcg install command with the --config-only flag. When using this flag, a
reusable configuration file named pcg.yaml is created under the path .palette/pcg. You can then utilize this
file to install a PCG with predefined values using the command pcg install with the --config-file flag. Refer to the
Palette CLI PCG Command page for further information about the command.
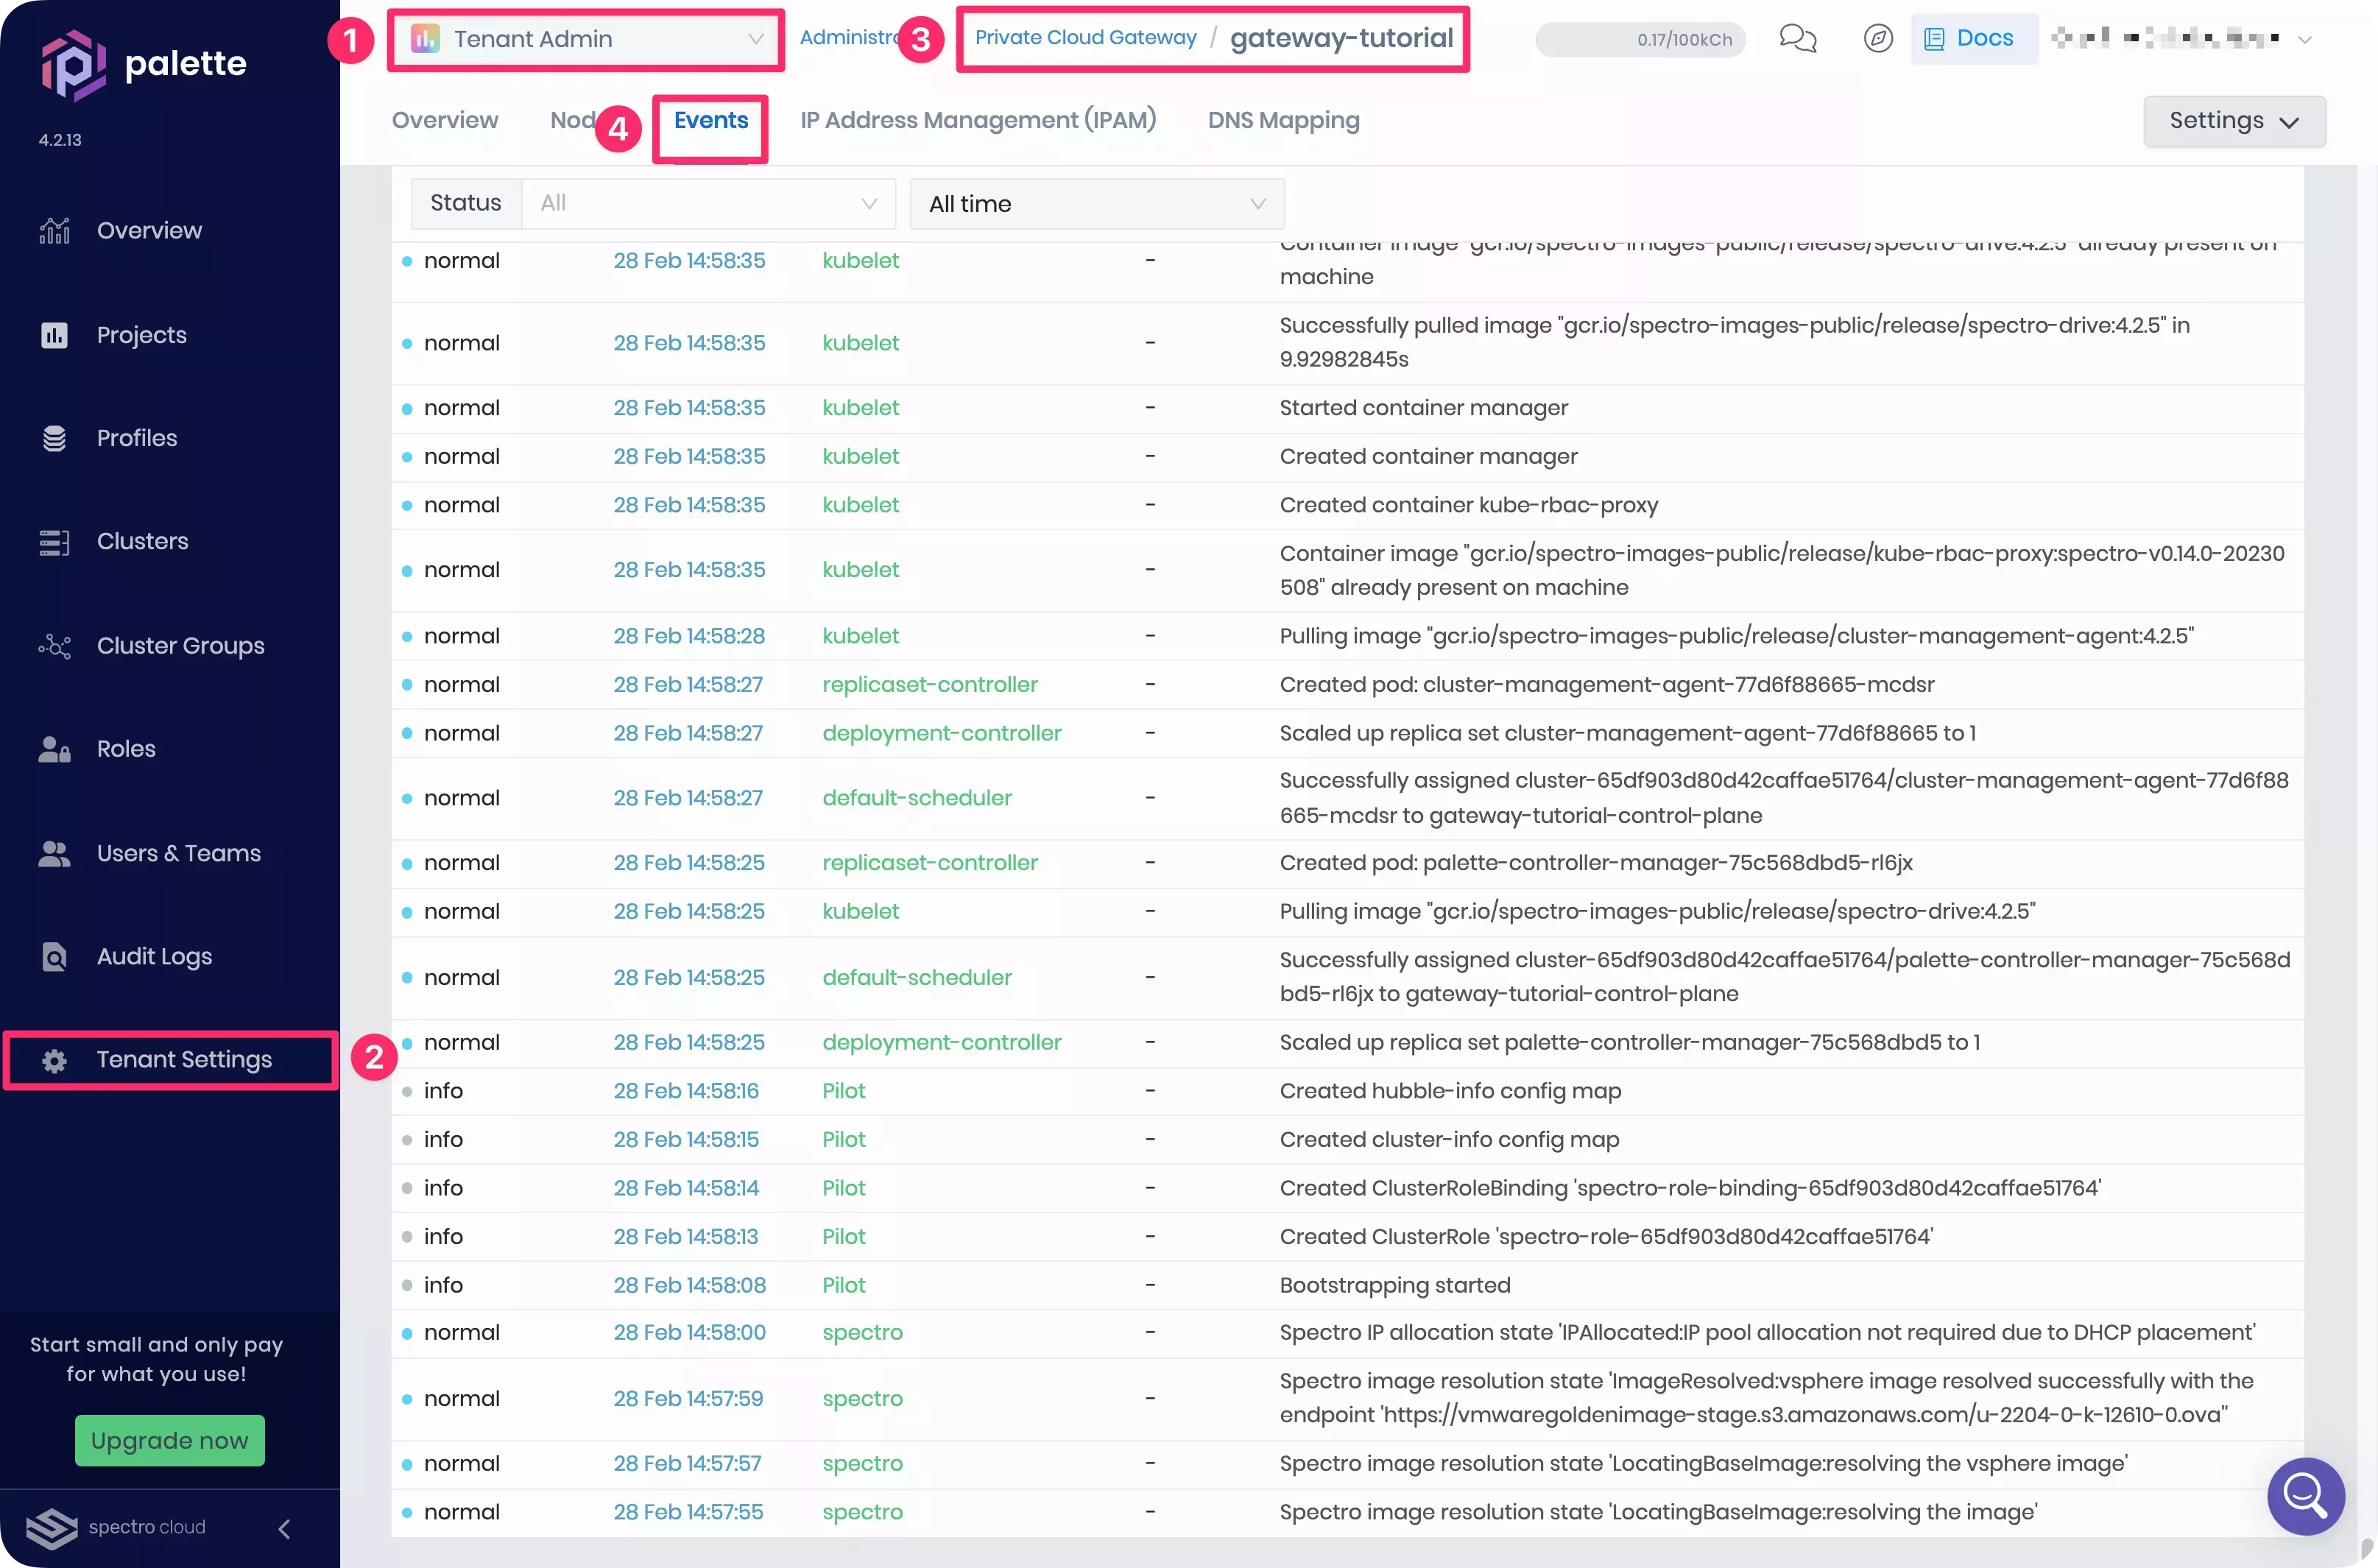
You can monitor the PCG cluster creation by logging into Palette and switching to the Tenant Admin scope. Next, click on Tenant Settings from the left Main Menu and select Private Cloud Gateways. Then, click on the PCG cluster you just created and check the deployment progress under the Events tab.
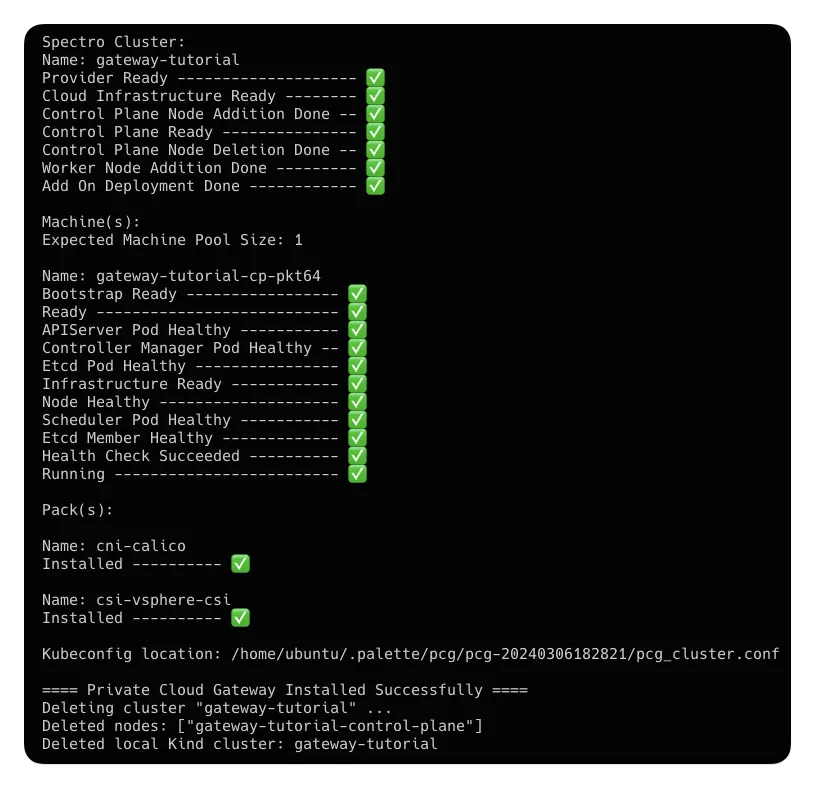
You can also track the PCG deployment progress from your terminal. Depending on the PCG size and infrastructure environment, the deployment might take up to 30 minutes. Upon completion, the local kind cluster is automatically deleted from your machine.
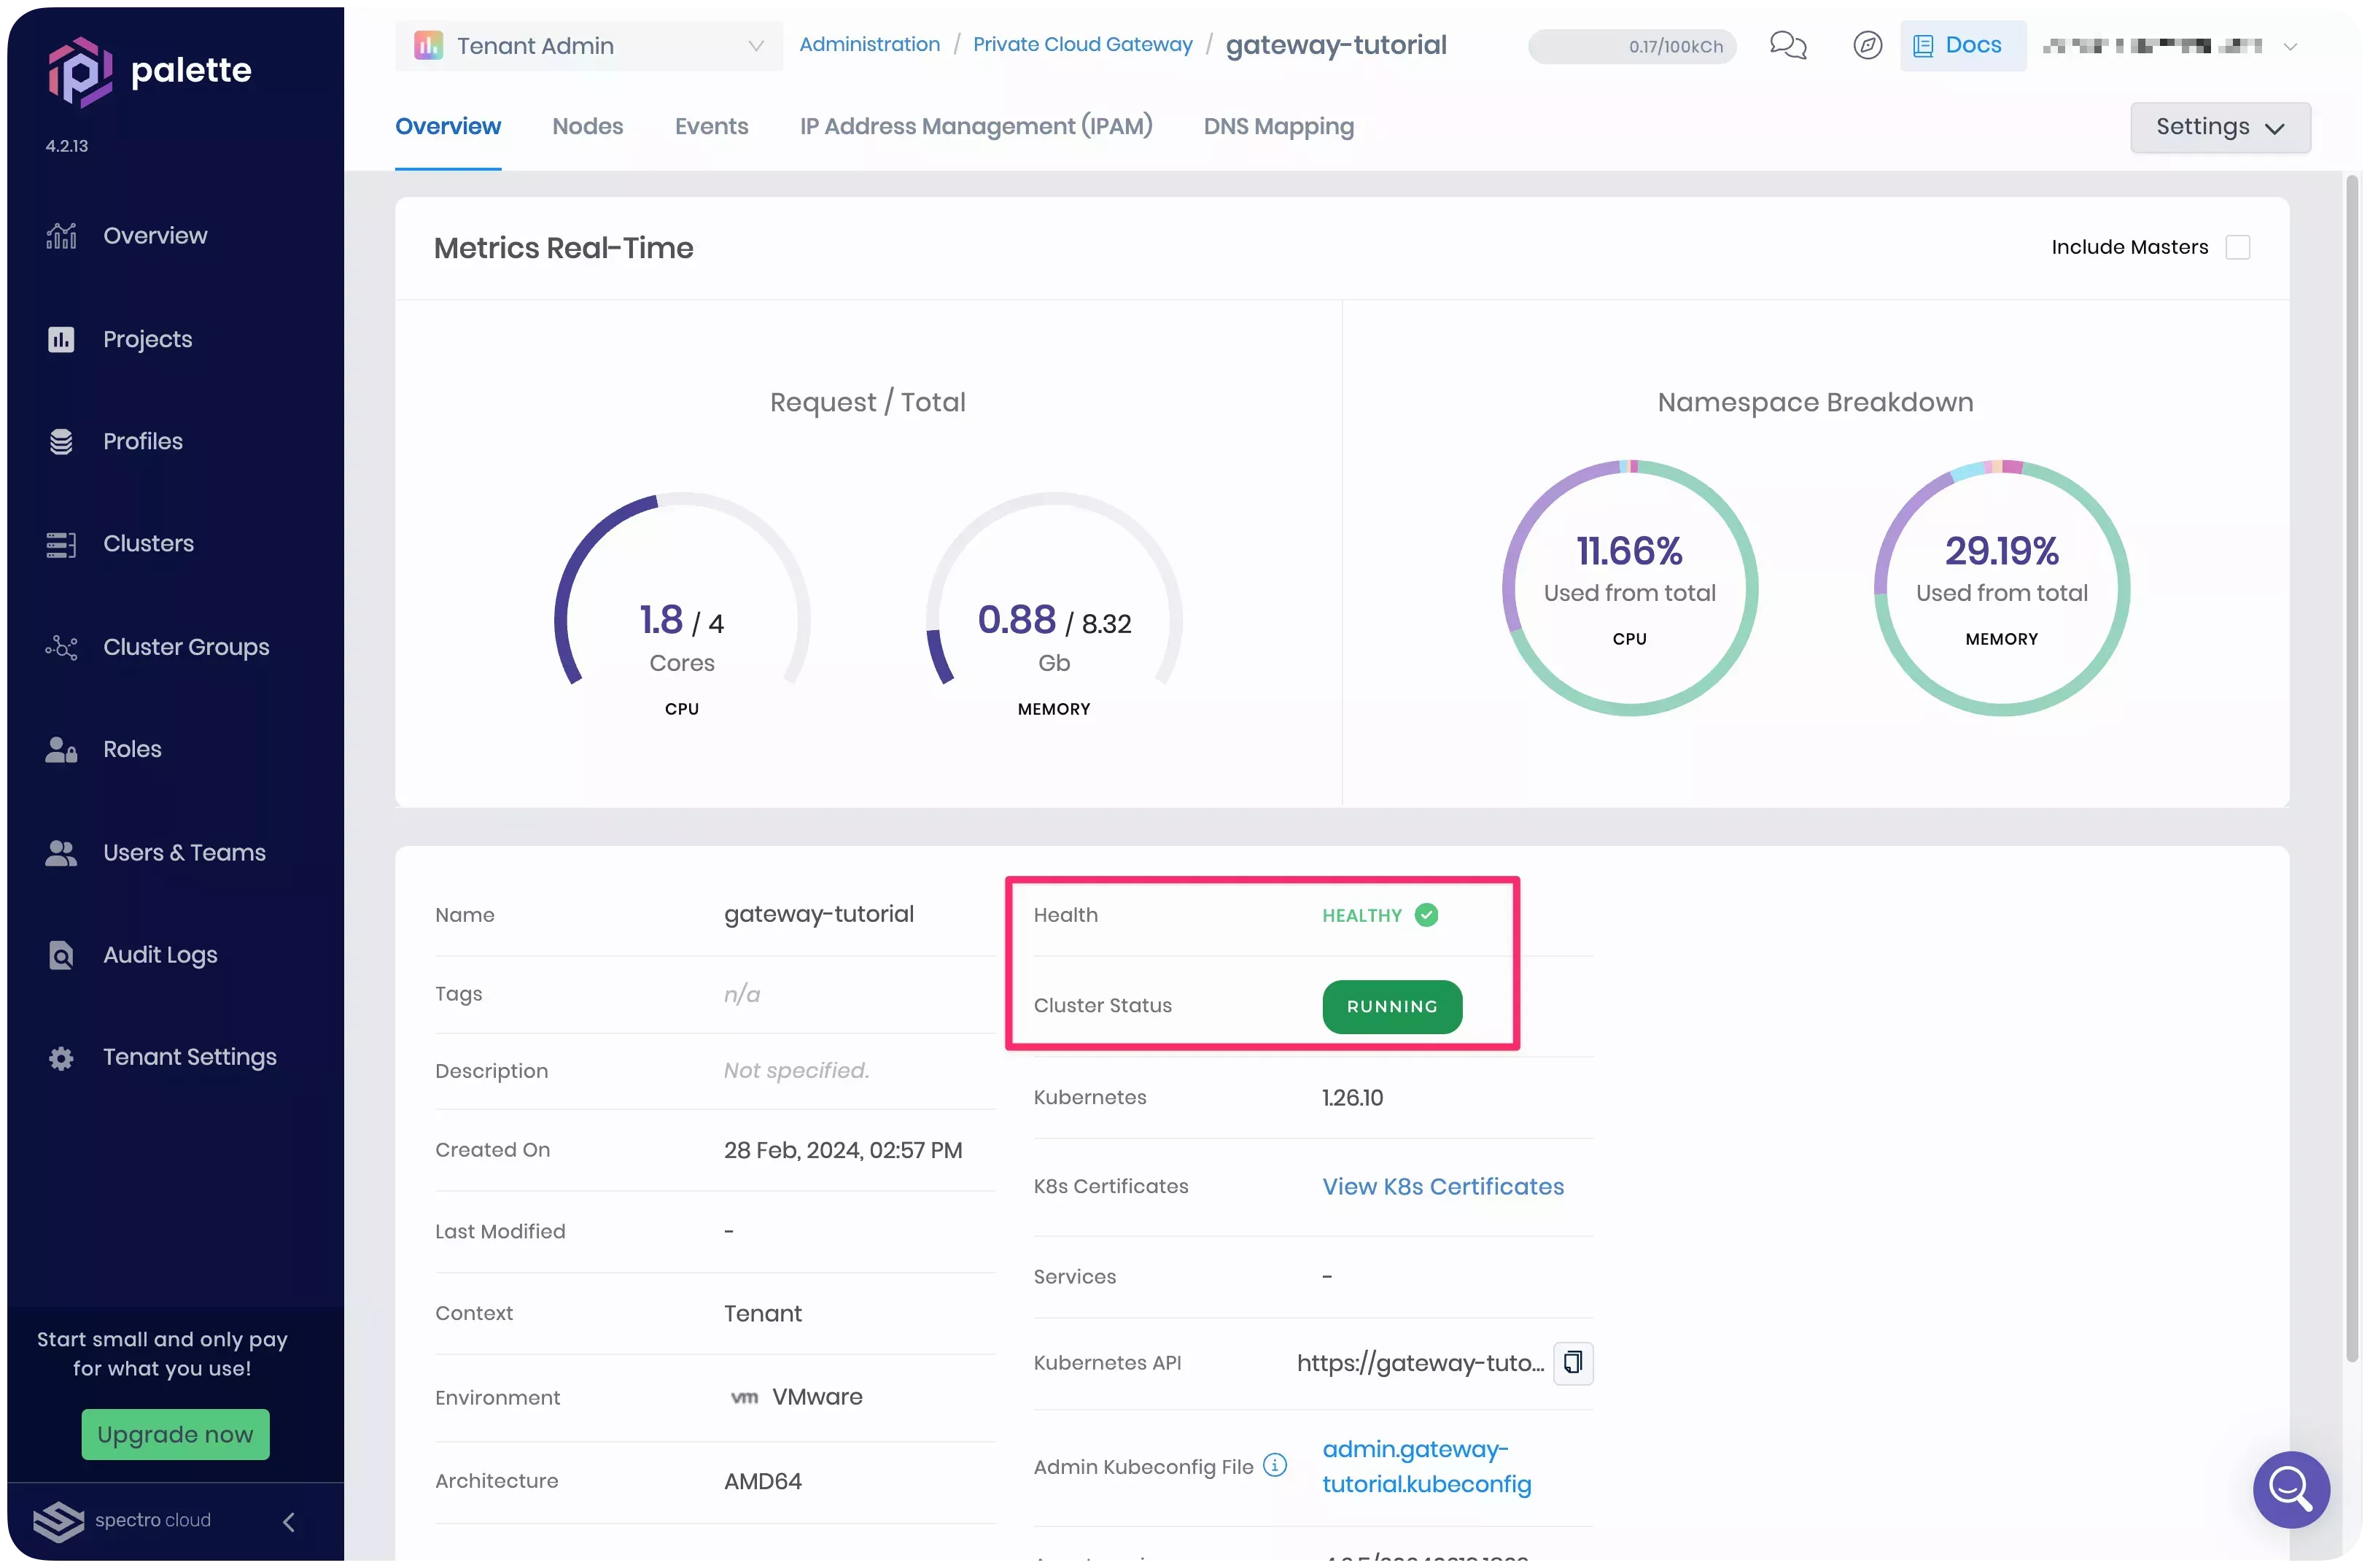
Next, log in to Palette as a tenant admin. Navigate to the left Main Menu and select Tenant Settings. Click on Private Cloud Gateways from the Tenant Settings Menu and select the PCG you just created. Ensure that the PCG cluster status is Running and Healthy before proceeding.
Create a Cluster Profile and Deploy a Cluster
Once you have successfully deployed the PCG, proceed to create a cluster profile with the Hello Universe application and use it to deploy a VMware cluster. You can use the Palette dashboard or Terraform.
- UI Workflow
- Terraform Workflow
Create a Cluster Profile
Log in to Palette and select Profiles from the left Main Menu to access the cluster profile page. Click on the Add Cluster Profile button and follow the wizard to create a new cluster profile.
Basic Information
Complete the Basic Information section with the values provided below.
| Field | Value |
|---|---|
| Name | pcg-tutorial-profile |
| Version | 1.0.0 |
| Description | Cluster profile as part of the Deploy App Workloads with a PCG tutorial. |
| Type | Full |
| Tags | spectro-cloud-education, app:hello-universe, terraform_managed:false, repository:spectrocloud:tutorials, tutorial:DEPLOY_APP_WORKLOADS_WITH_A_PCG |
Click on Next to continue.
Cloud Type
In the Cloud Type section, select VMware as the infrastructure provider, then click Next to proceed.
Profile Layers
Add the following core infrastructure layers displayed to your profile.
| Pack Name | Version | Layer |
|---|---|---|
| ubuntu-vsphere LTS | 22.4.x | Operating System |
| kubernetes | 1.28.x | Kubernetes |
| cni-calico | 3.26.x | Network |
| csi-vsphere-csi | 3.0.x | Storage |
After adding each layer, click on the Next Layer button. Once the storage layer is added, click Confirm to complete the core infrastructure stack.
Next, click on the Add New Pack button to include add-on layers to your cluster profile.
Add the MetalLB (Helm) pack to your profile. The MetalLB pack provides a load-balancer implementation for your Kubernetes cluster, as VMware does not offer a load balancer solution natively. The load balancer is required to help the LoadBalancer service specified in the Hello Universe application manifest obtain an IP address, so that you can access the application from your browser.
| Pack Name | Version | Layer |
|---|---|---|
| lb-metallb-helm | 0.13.x | Load Balancer |
Now, under Pack Details, click on Values and replace the predefined 192.168.10.0/24 IP CIDR listed below the
addresses line with a valid IP address or IP range from your VMware environment to be assigned to your load
balancer. Next, click Confirm & Create to add the MetalLB pack.

Finally, click again on the Add New Pack button to add the Hello Universe pack.
| Pack Name | Version | Layer |
|---|---|---|
| hello-universe | 1.1.x | App Service |
Click on the Confirm & Create button and then click Next.
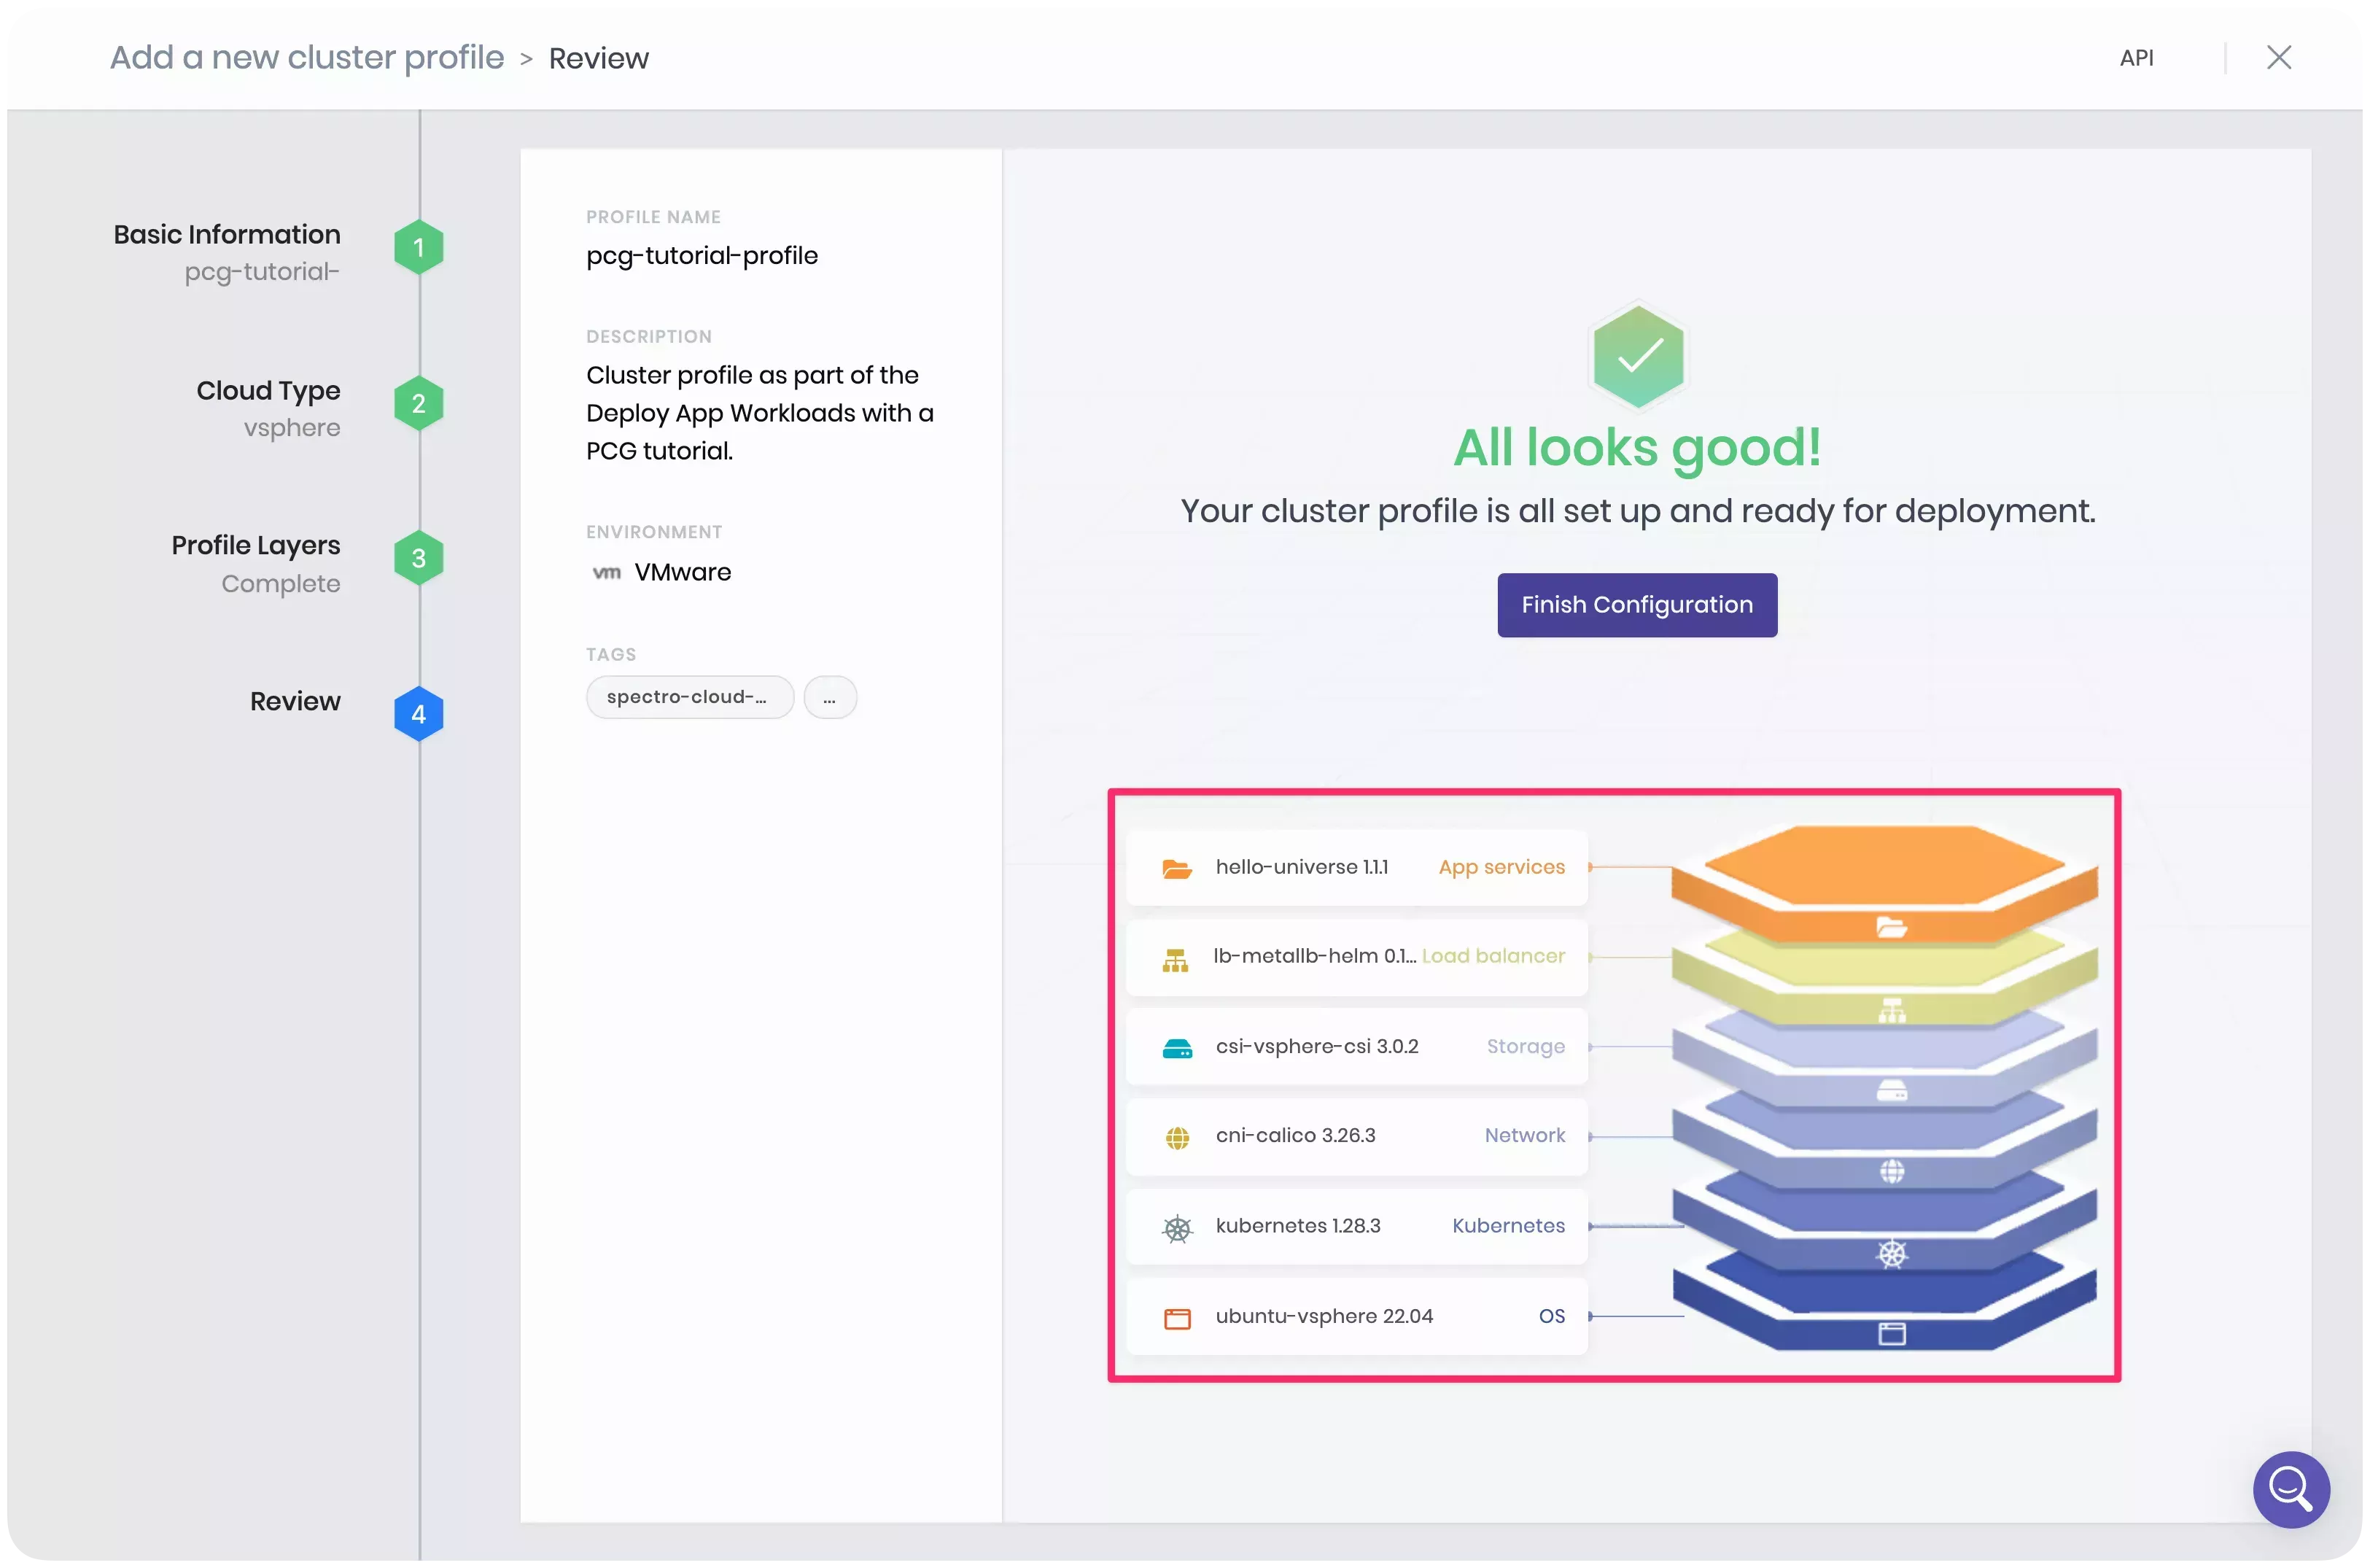
Review
Review the selected cluster layers and configurations. Click on Finish Configuration to complete the cluster profile creation.
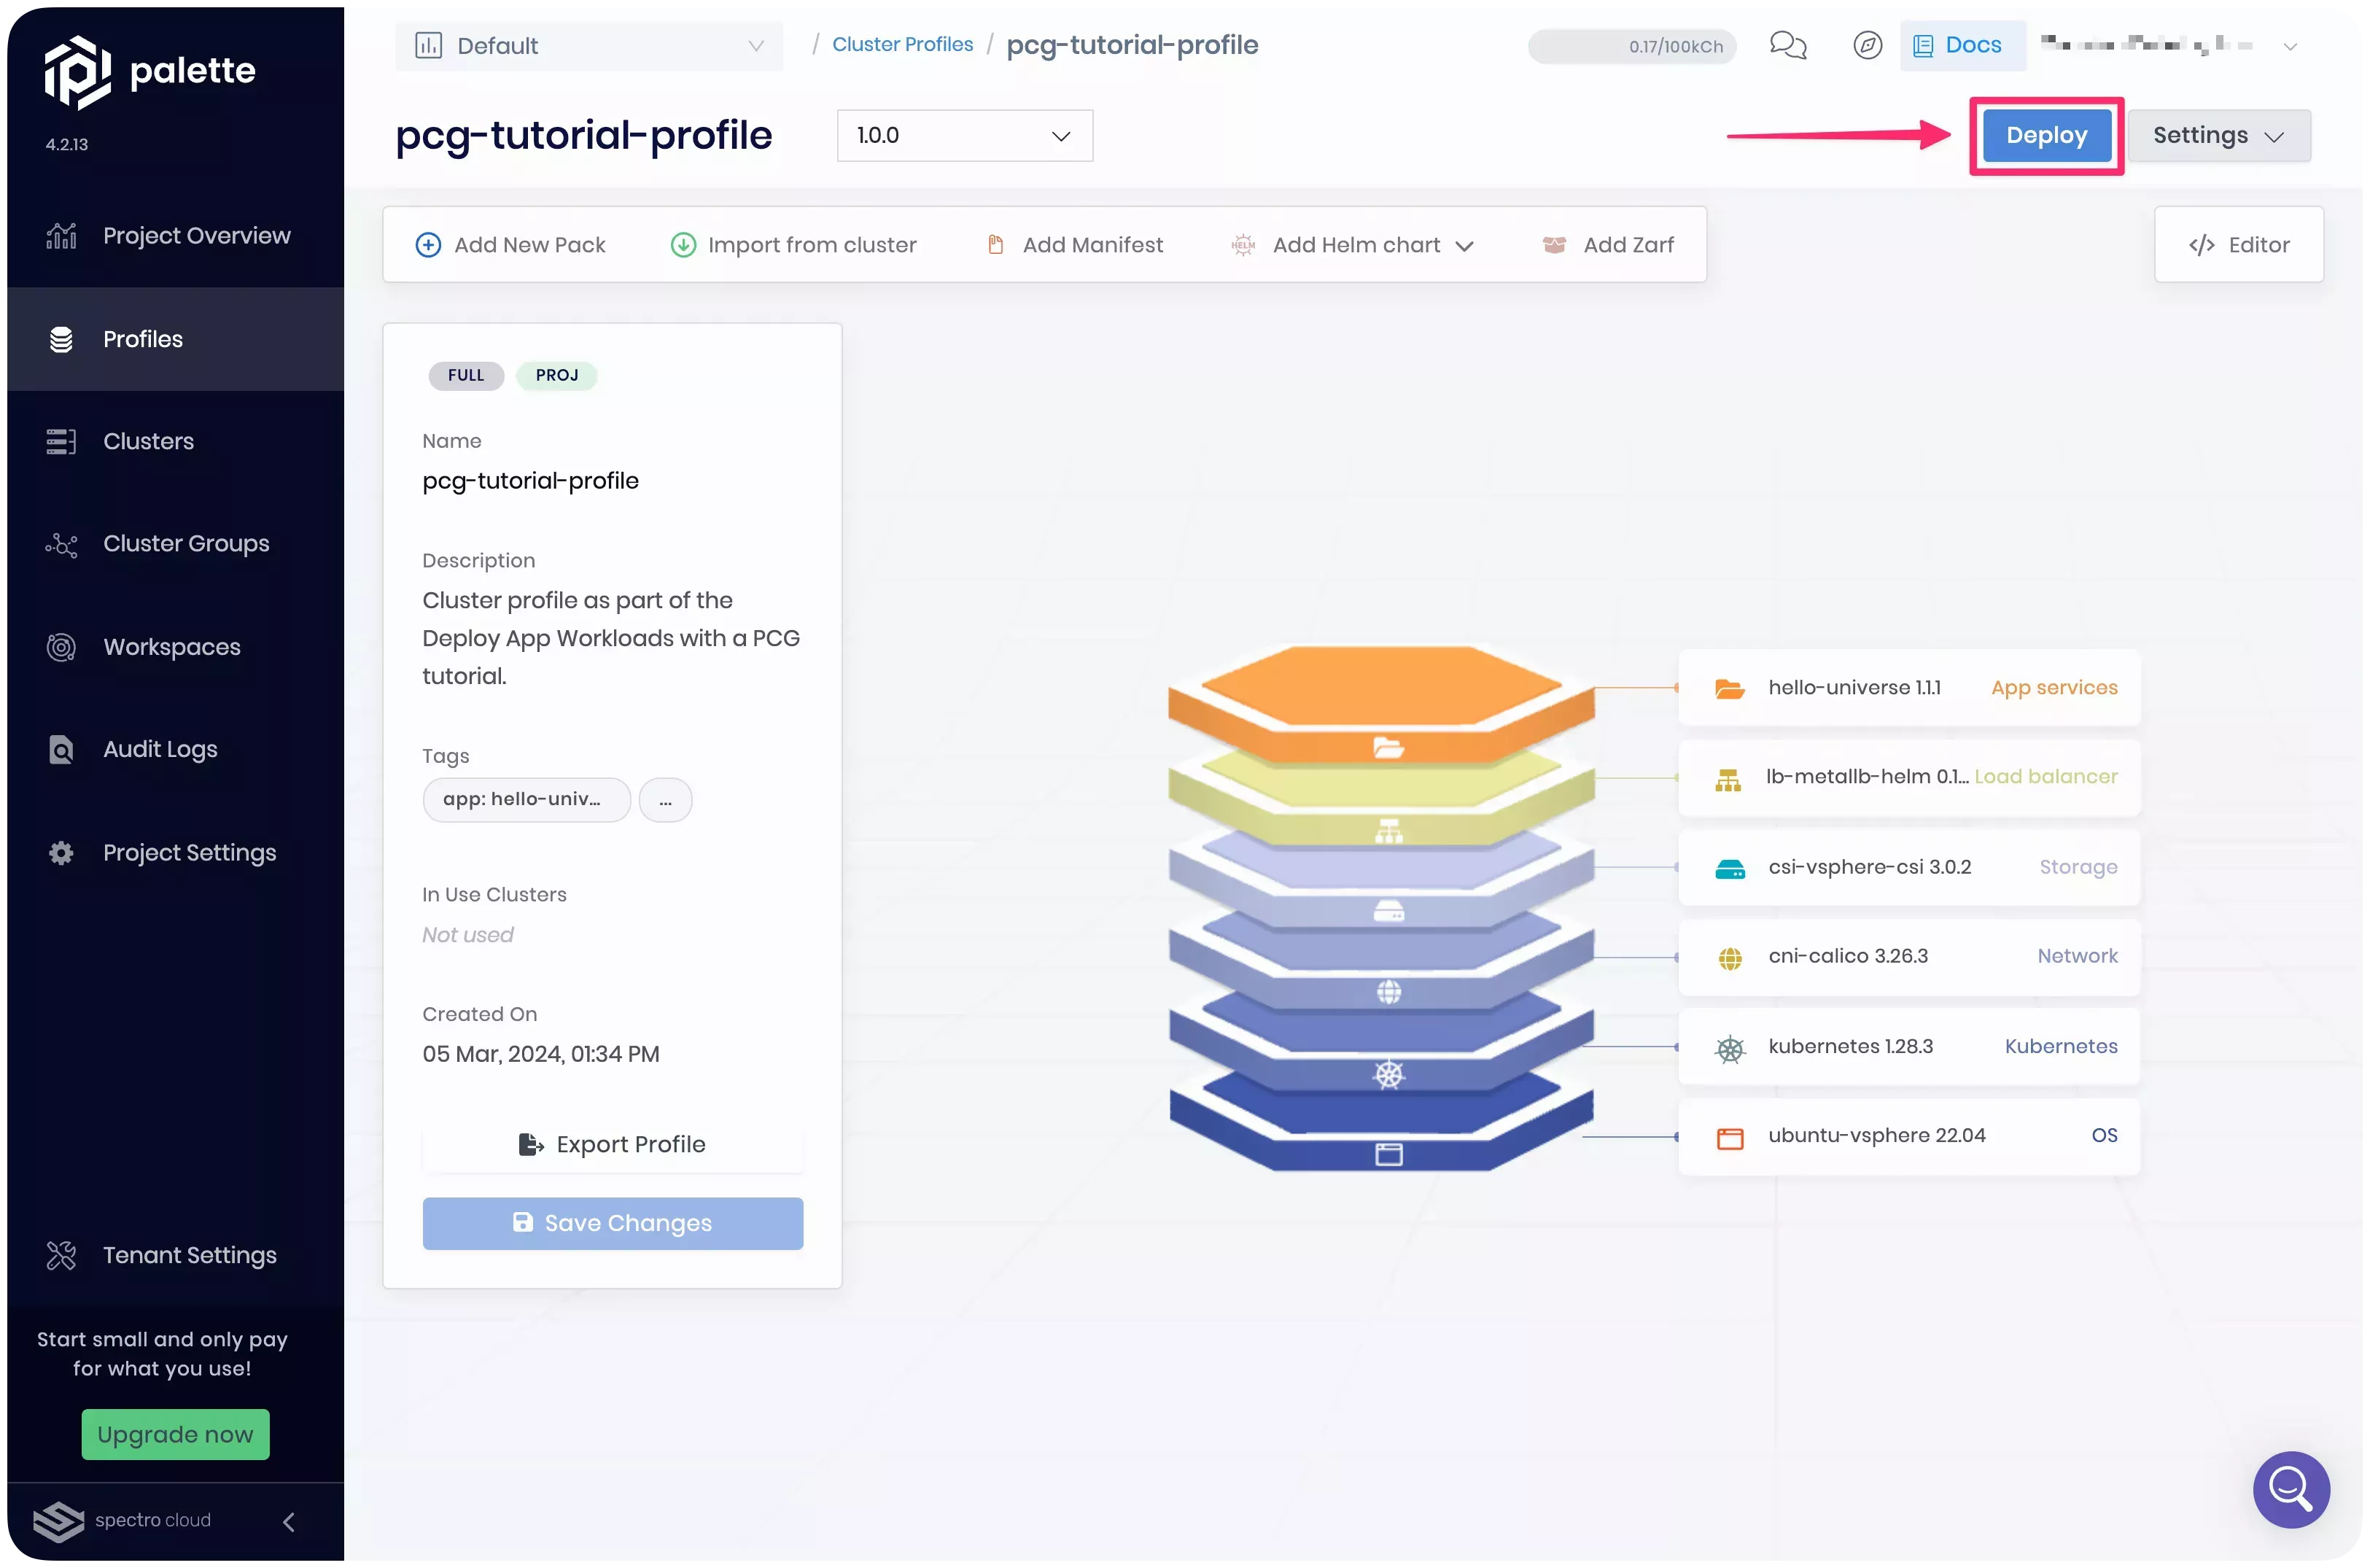
Deploy a VMware Cluster
Navigate to the left Main Menu and select Profiles. Locate and click on the cluster profile you previously created. Next, click on the Deploy button and confirm by clicking OK to start the cluster deployment using the selected cluster profile.
Basic Information
Ensure the following values are set for the Basic Information section.
| Field | Value |
|---|---|
| Cluster name | pcg-tutorial-cluster |
| Description | Cluster as part of the Deploy App Workloads with a PCG tutorial. |
| Tags | spectro-cloud-education, app:hello-universe, terraform_managed:false, repository:spectrocloud:tutorials, tutorial:DEPLOY_APP_WORKLOADS_WITH_A_PCG |
| Type of cluster | Datacenter |
| Cloud Account | Select the VMware cloud account that was registered with Palette during the PCG creation. The cloud account has the same name as the PCG. In this tutorial, the cloud account is called gateway-tutorial. |
Parameters
The Parameters section displays all the layers in the cluster profile and allows you to modify profile configurations if needed. Proceed by clicking Next.
Cluster Configuration
In the Cluster Config section, provide specific information about your VMware vSphere environment. First, select the Datacenter and Deployment Folder where the cluster nodes will be launched. Next, select the Image Template Folder to which the Spectro templates are imported, and choose DHCP as the Network Type. Finally, provide the SSH key for accessing the cluster nodes. Proceed by clicking Next to advance to the Nodes Configuration section.
Nodes Configuration
Provide the details for the nodes of the control plane and worker pools.
| Field | Control Plane Pool | Worker Pool |
|---|---|---|
| Node pool name | control-plane-pool | worker-pool |
| Number of nodes in the pool | 1 | 1 |
| Allow worker capability | No | Not applicable |
| Enable Autoscaler | Not applicable | No |
| Rolling update | Not applicable | Expand First |
Keep the Cloud Configuration settings the same for both pools, with CPU set to 4 cores, memory allocated at 8 GB, and disk space at 60 GB. Next, populate the Compute cluster, Resource Pool, Datastore, and Network fields according to your VMware vSphere environment. Click Next to proceed.
Settings
The Settings section offers advanced options for OS patching, scheduled scans, scheduled backups, and cluster role binding. Utilize the default values, and click on the Validate button.
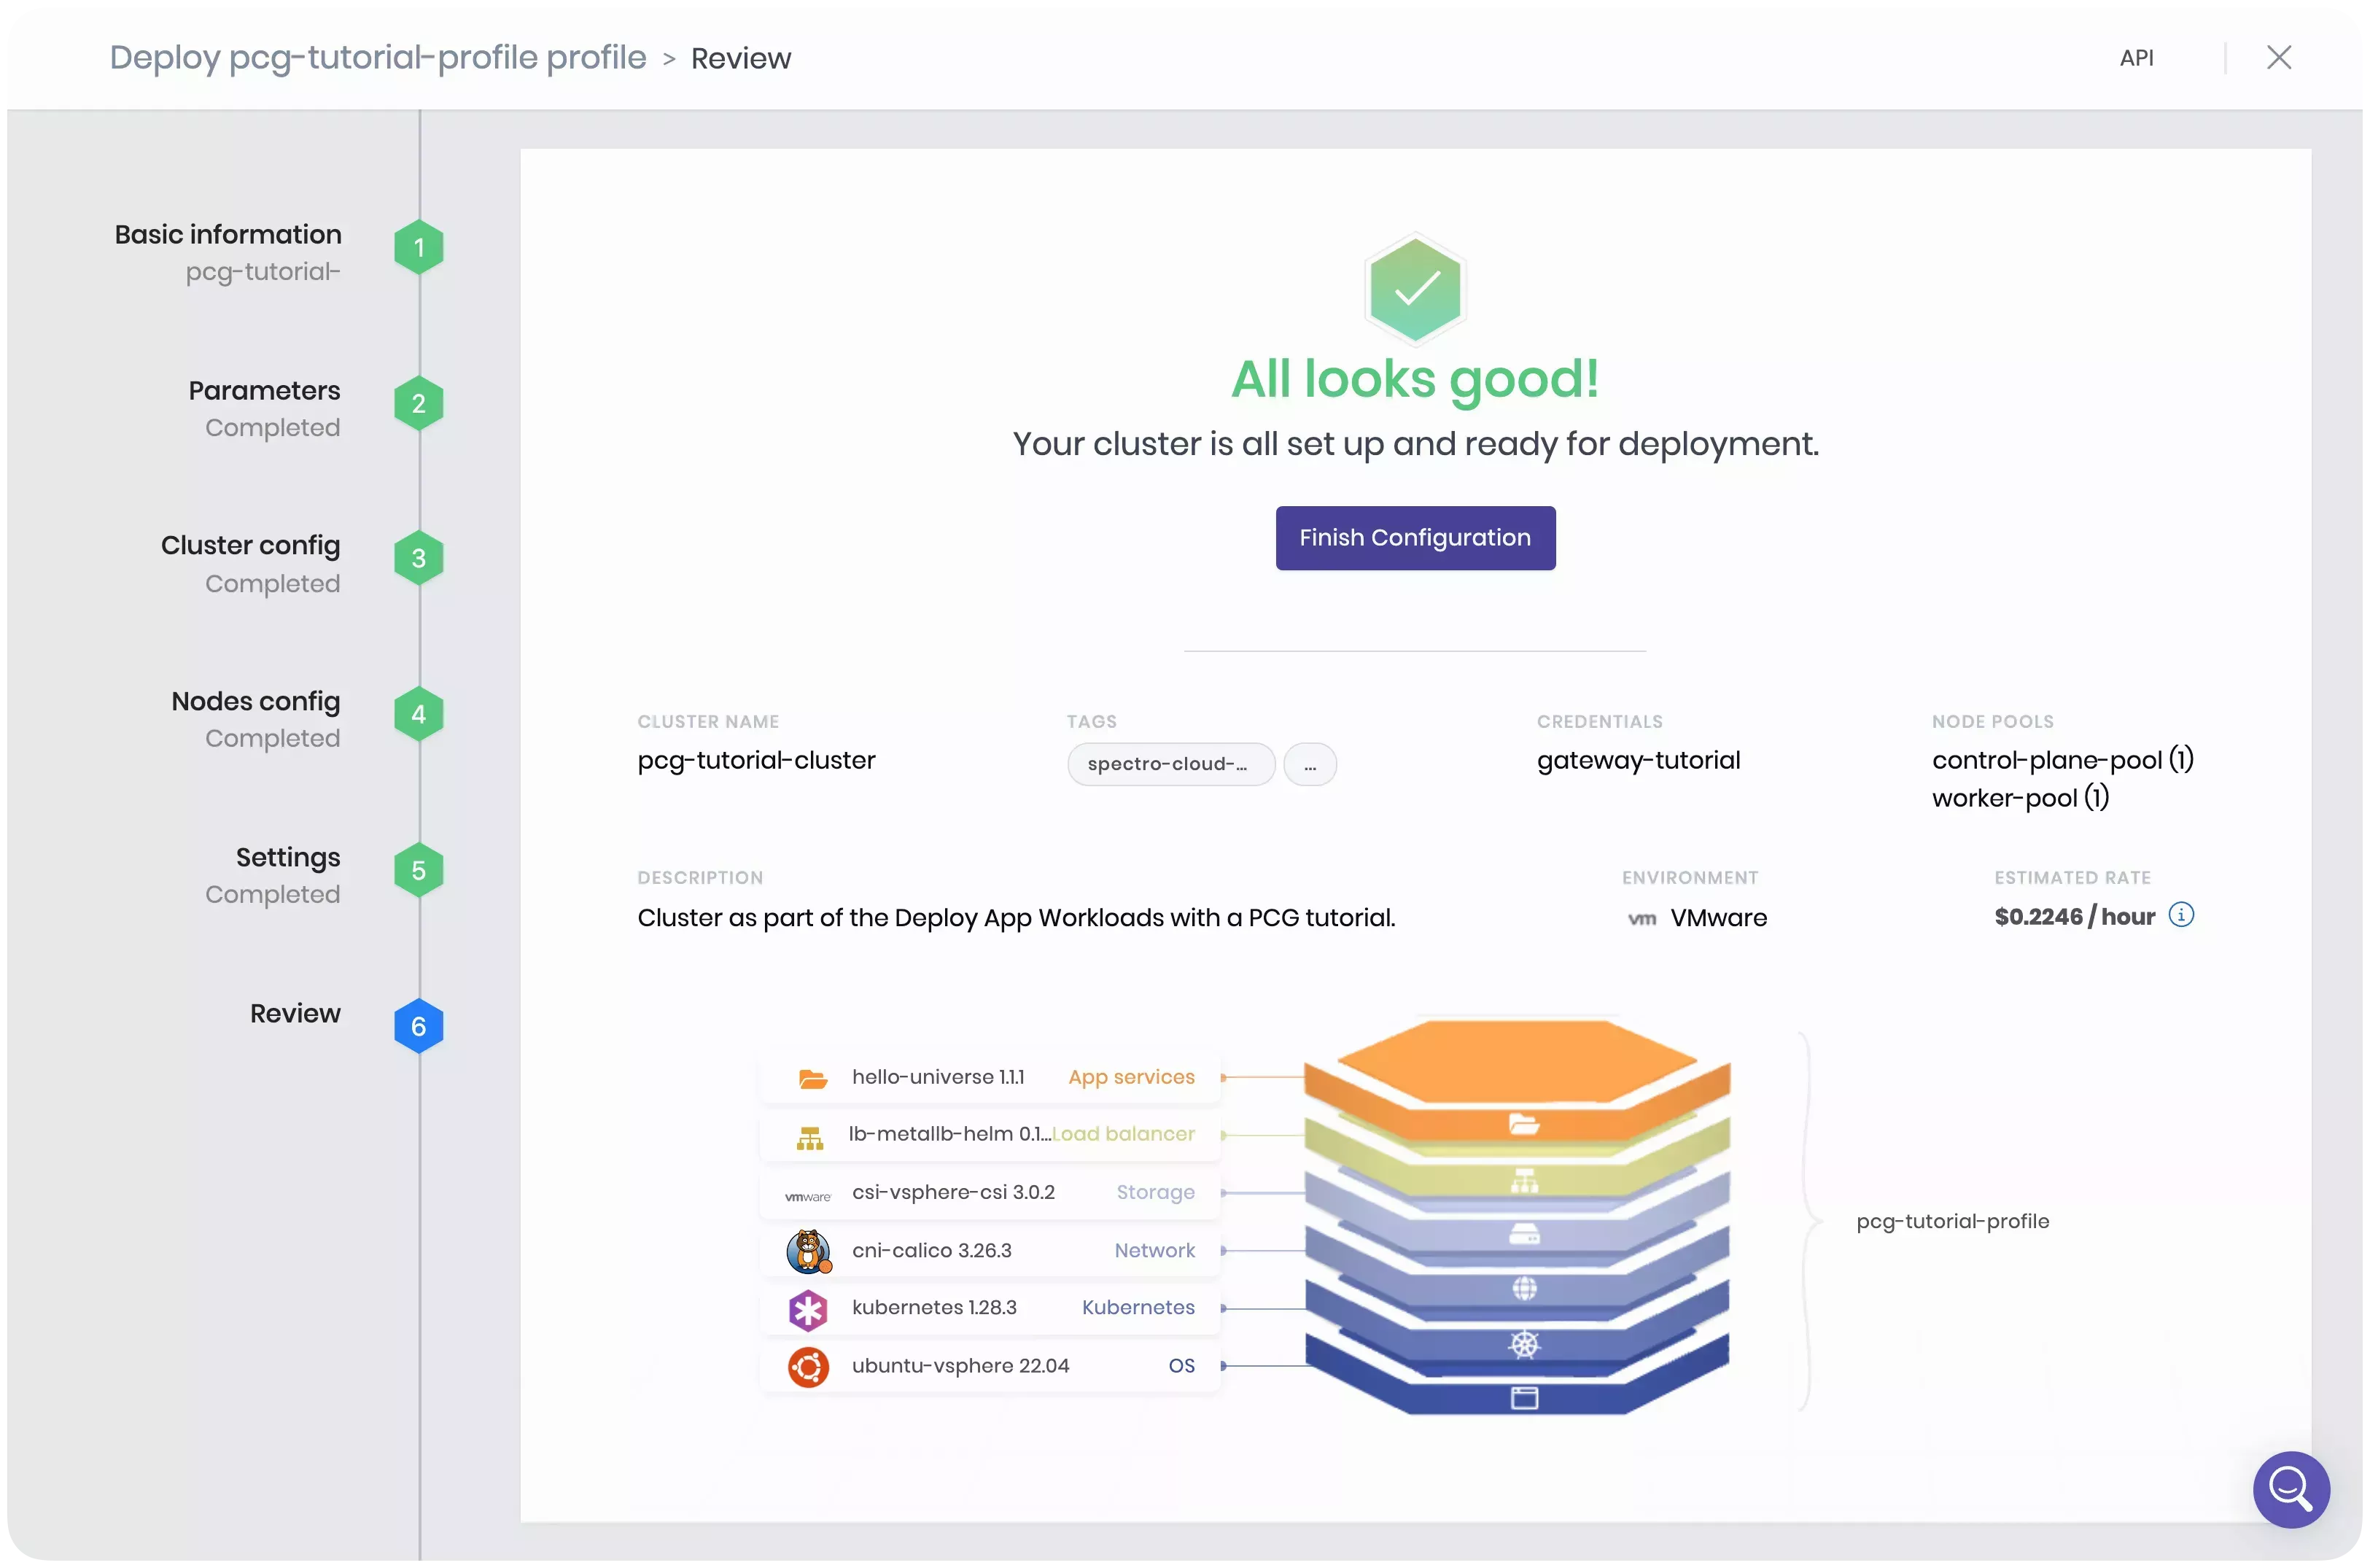
Review
The Review section allows you to review the cluster configuration before deploying the cluster. Click on Finish Configuration to start the cluster deployment, which may take up to 20 minutes.
Now, navigate to the left Main Menu and click on Clusters. While the deployment is in progress, Palette displays the cluster status as Provisioning. You can view detailed cluster information, including deployment status and event logs, by selecting your cluster.

Set Up the Tutorial Environment
Open a terminal window and clone the Spectro Cloud Tutorials repository from GitHub using the command below.
git clone https://github.com/spectrocloud/tutorials.git
Navigate to the /terraform/vmware-cluster-deployment-tf directory, which contains the Terraform code for this tutorial.
cd terraform/vmware-cluster-deployment-tf
Next, copy your Palette API key and export it as an environment variable with the command below. Replace
YourAPIKeyHere with your API key.
export SPECTROCLOUD_APIKEY=YourAPIKeyHere
Create a Cluster Profile and Deploy a VMware Cluster
Before proceeding, we recommend that you explore all the Terraform files present in the directory. Below is a high-level overview of each file.
-
profile.tf - Configuration for the
spectrocloud_cluster_profileresource. The following layers will be added to the profile.Pack Name Version Layer ubuntu-vsphere LTS 22.4.x Operating System kubernetes 1.28.x Kubernetes cni-calico 3.26.x Network csi-vsphere-csi 3.0.x Storage lb-metallb-helm 0.13.x Load Balancer hello-universe 1.1.x App Service The MetalLB pack provides a load-balancer implementation for your Kubernetes cluster, as VMware does not offer a load balancer solution natively. The load balancer is required to help the LoadBalancer service specified in the Hello Universe application manifest obtain an IP address, so that you can access the application on your browser.
-
cluster.tf - Configuration for the
spectrocloud_cluster_vsphereresource. -
data.tf - Configuration for the resources to retrieve data from Palette dynamically.
-
inputs.tf - Variables used in the tutorial, such as the PCG name, SSH key, and vSphere endpoint.
-
outputs.tf - Output variables that display information to the terminal once the resources are created. For example, upon cluster deployment, the location of the SSH key and the command to SSH into your cluster nodes are displayed in the terminal.
-
provider.tf - Terraform providers configuration.
-
ssh-key.tf - Resources to generate an SSH key pair in case the user does not provide one.
-
ippool.tf - This file contains the resources required for static IP placement deployments. You will note that the resource
spectrocloud_privatecloudgateway_ippoolis currently commented out as this tutorial uses dynamic IP placement. -
terraform.tfvars - Variable definitions required for the cluster deployment.
Open the terraform.tfvars file in the editor of your choice and provide the values for the variables according to the table below.
| Variable Name | Description | Required |
|---|---|---|
metallb_ip | Provide a valid IP address or IP range from your VMware environment to be assigned to your load balancer. | Yes |
pcg_name | Provide the name of the PCG that will be used to deploy the VMware cluster. | Yes |
datacenter_name | Provide the name of the vSphere data center to target when deploying the VMware cluster. | Yes |
folder_name | Provide the name of the vSphere folder to target when deploying the VMware cluster. | Yes |
search_domain | Provide the name of the network search domain of your vSphere environment. For example, spectrocloud.dev. | Yes |
vsphere_cluster | Provide the vSphere compute cluster to use for the VMware cluster deployment. | Yes |
datastore_name | Provide the vSphere datastore name to use for the VMware cluster deployment. | Yes |
network_name | Provide the vSphere network name to use for the VMware cluster deployment. | Yes |
resource_pool_name | Provide the vSphere resource pool to target when deploying the VMware cluster. | Yes |
ssh_key | Provide the path to your public SSH key. If not provided, a new key pair will be created. | No |
ssh_key_private | Provide the path to your private SSH key. If not provided, a new key pair will be created. | No |
When you are ready making the required changes, initialize Terraform with the command presented below.
terraform init
The init command will download the plugins and providers defined in the provider.tf file.
Next, issue the terraform plan command to preview the resources that Terraform will create.
terraform plan
The output displays the resources that Terraform will create in an actual implementation, including the cluster profile, VMware vSphere cluster, and a new SSH key pair unless an existing key pair was specified.
# Output condensed for readability
Plan: 5 to add, 0 to change, 0 to destroy.
Issue the terraform apply command to deploy the resources to your VMware vSphere environment.
terraform apply -auto-approve
It can take up to 20 minutes to complete the cluster deployment process. Once completed, the following output will be displayed.
# Output condensed for readability
Apply complete! Resources: 5 added, 0 to changed, 0 to destroyed.
Log in to Palette, navigate to the left Main Menu, and click on Clusters. While the deployment is in progress, Palette displays the cluster status as Provisioning.
You can select the pcg-tutorial-cluster to explore deployment status and event logs.
Validate
Once the cluster creation process has finished, log in to Palette, navigate to the left Main Menu, and click on Clusters. Select the pcg-tutorial-cluster to display the cluster's Overview page. Once the cluster status displays Running and Healthy, you can access the application through the exposed service URL along with the displayed port number.
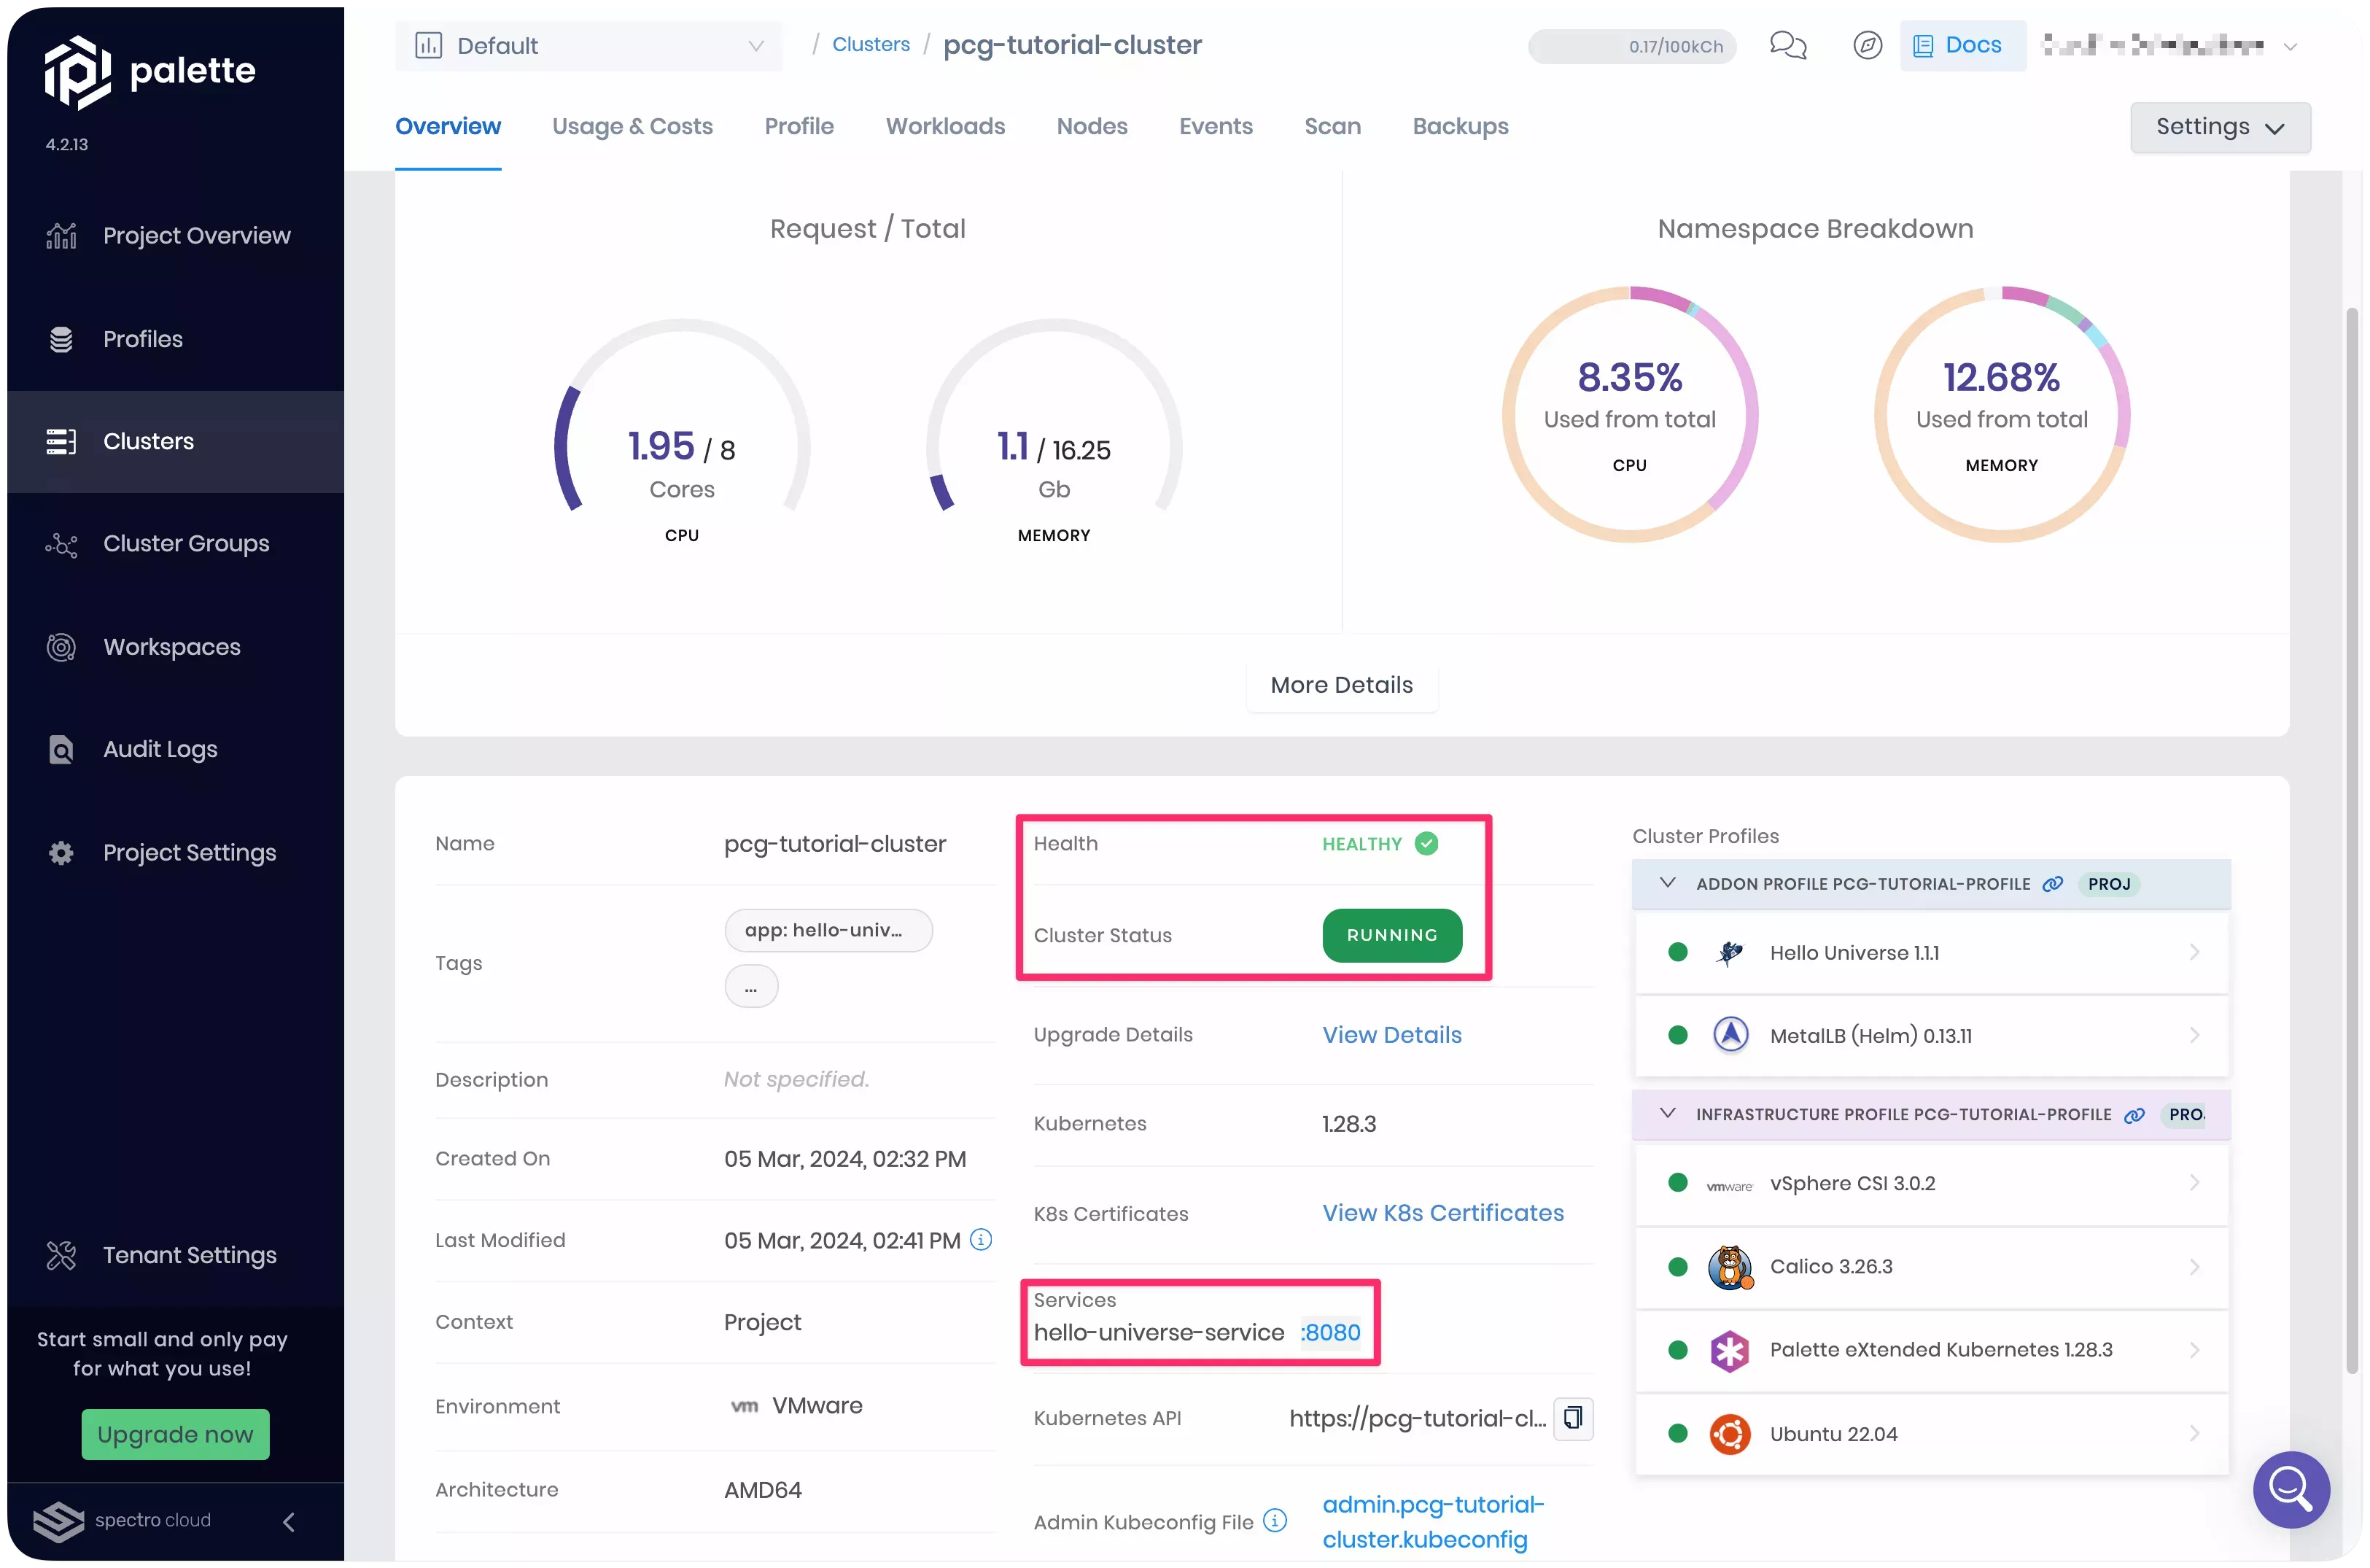
Click on the URL for port :8080 to access the Hello Universe application landing page.
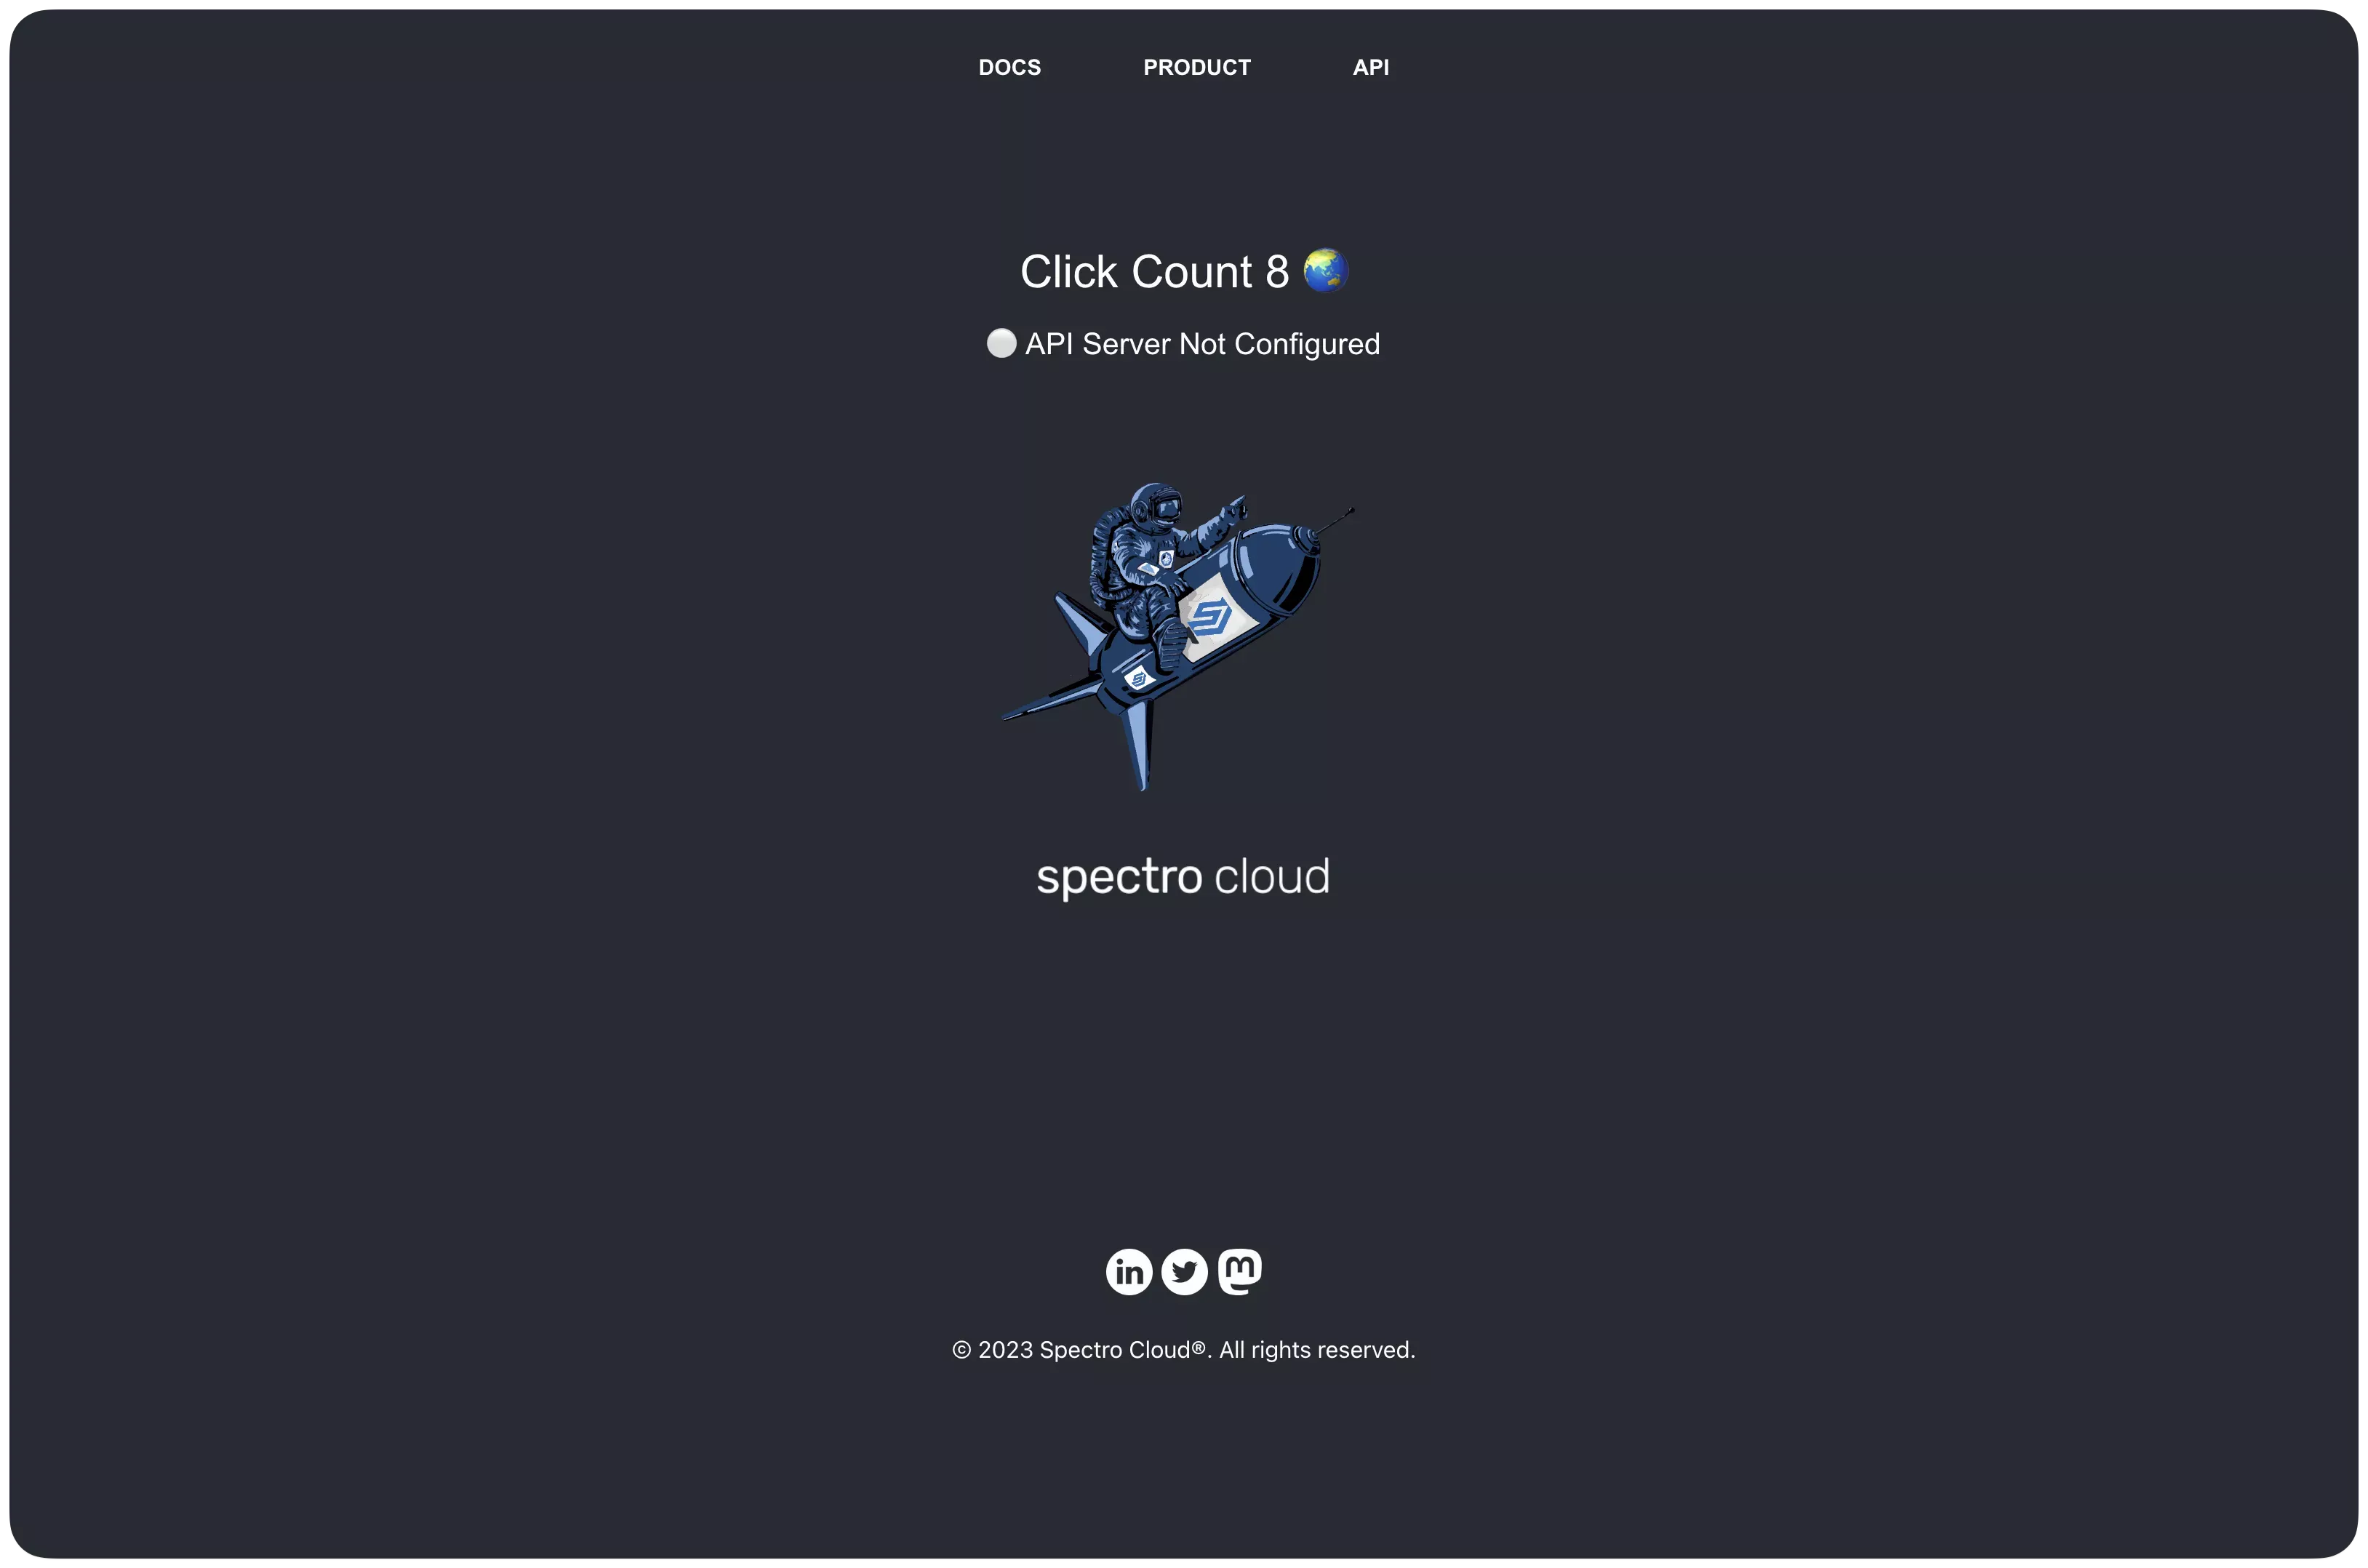
Once you have completed the steps and accessed the application, you have successfully deployed your first application to a VMware cluster managed by Palette.
Clean Up
The following steps will guide you to clean up your environment after completing the tutorial. Follow the steps below to delete the PCG, the cluster profile, and the VMware cluster.
Delete the Cluster Profile and Cluster
- UI Workflow
- Terraform Workflow
In Palette, navigate to the left Main Menu, click on Clusters and select the pcg-tutorial-cluster to access
its details page. Next, click on the Settings button to expand the drop-down Menu, then select the Delete
Cluster. Confirm the deletion by entering the cluster name when prompted.
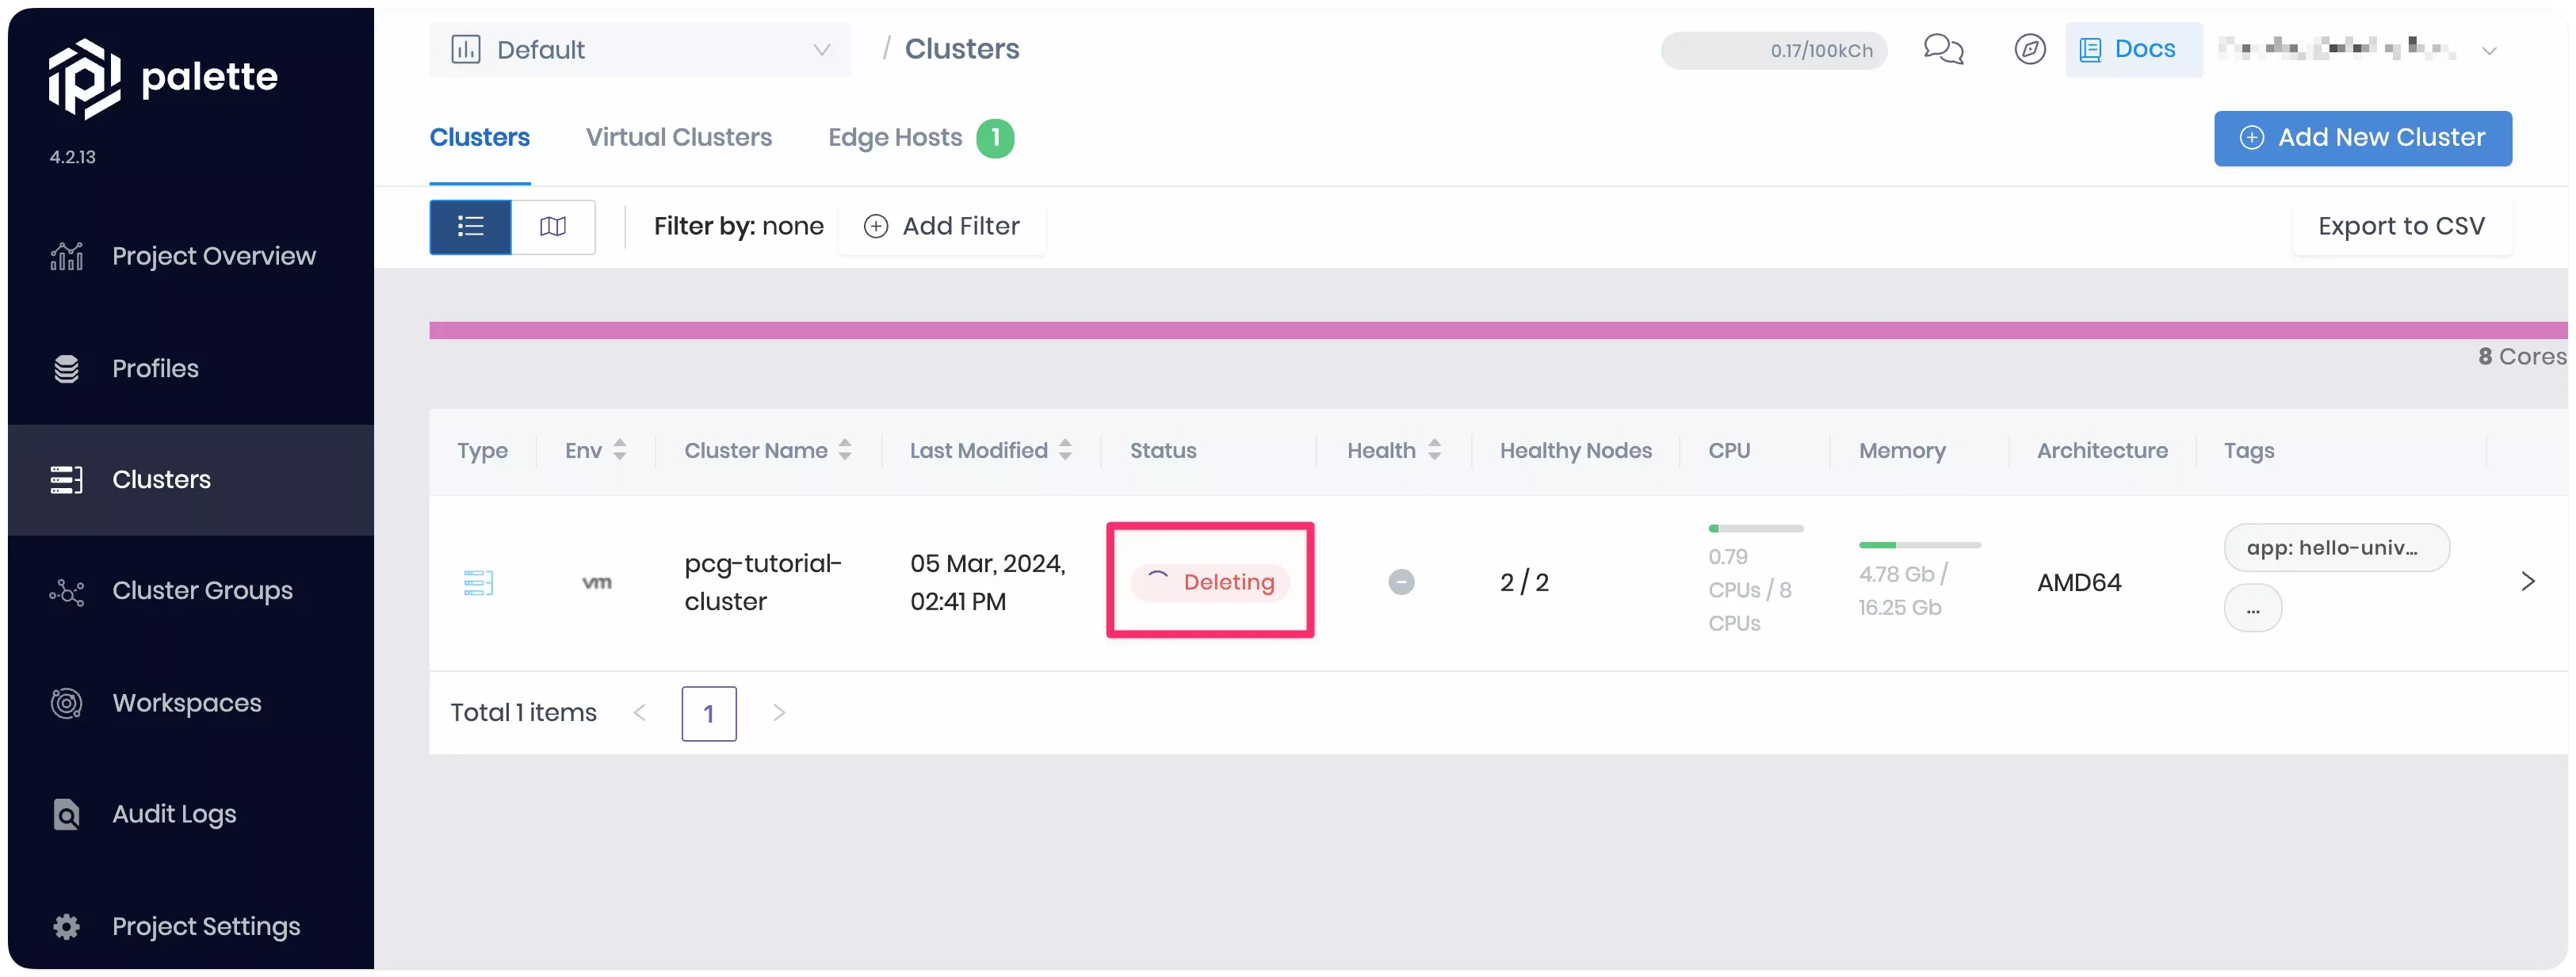
The cluster status will change to Deleting, and the deletion process may take up to 15 minutes.
Once the cluster is deleted, proceed to delete the cluster profile. On the left Main Menu, click on Profiles,
and select the profile pcg-tutorial-profile. Next, click on the three-dot Menu, select Delete, and confirm the
selection to remove the cluster profile.
In your terminal, issue the terraform destroy command within the /terraform/vmware-cluster-deployment-tf directory
to remove all the resources that were created by Terraform.
terraform destroy --auto-approve
Deleting the resources may take up to 15 minutes. Upon completion, you should receive an output similar to the provided below.
# Output condensed for readability
Destroy complete! Resources: 5 destroyed.
Delete the PCG
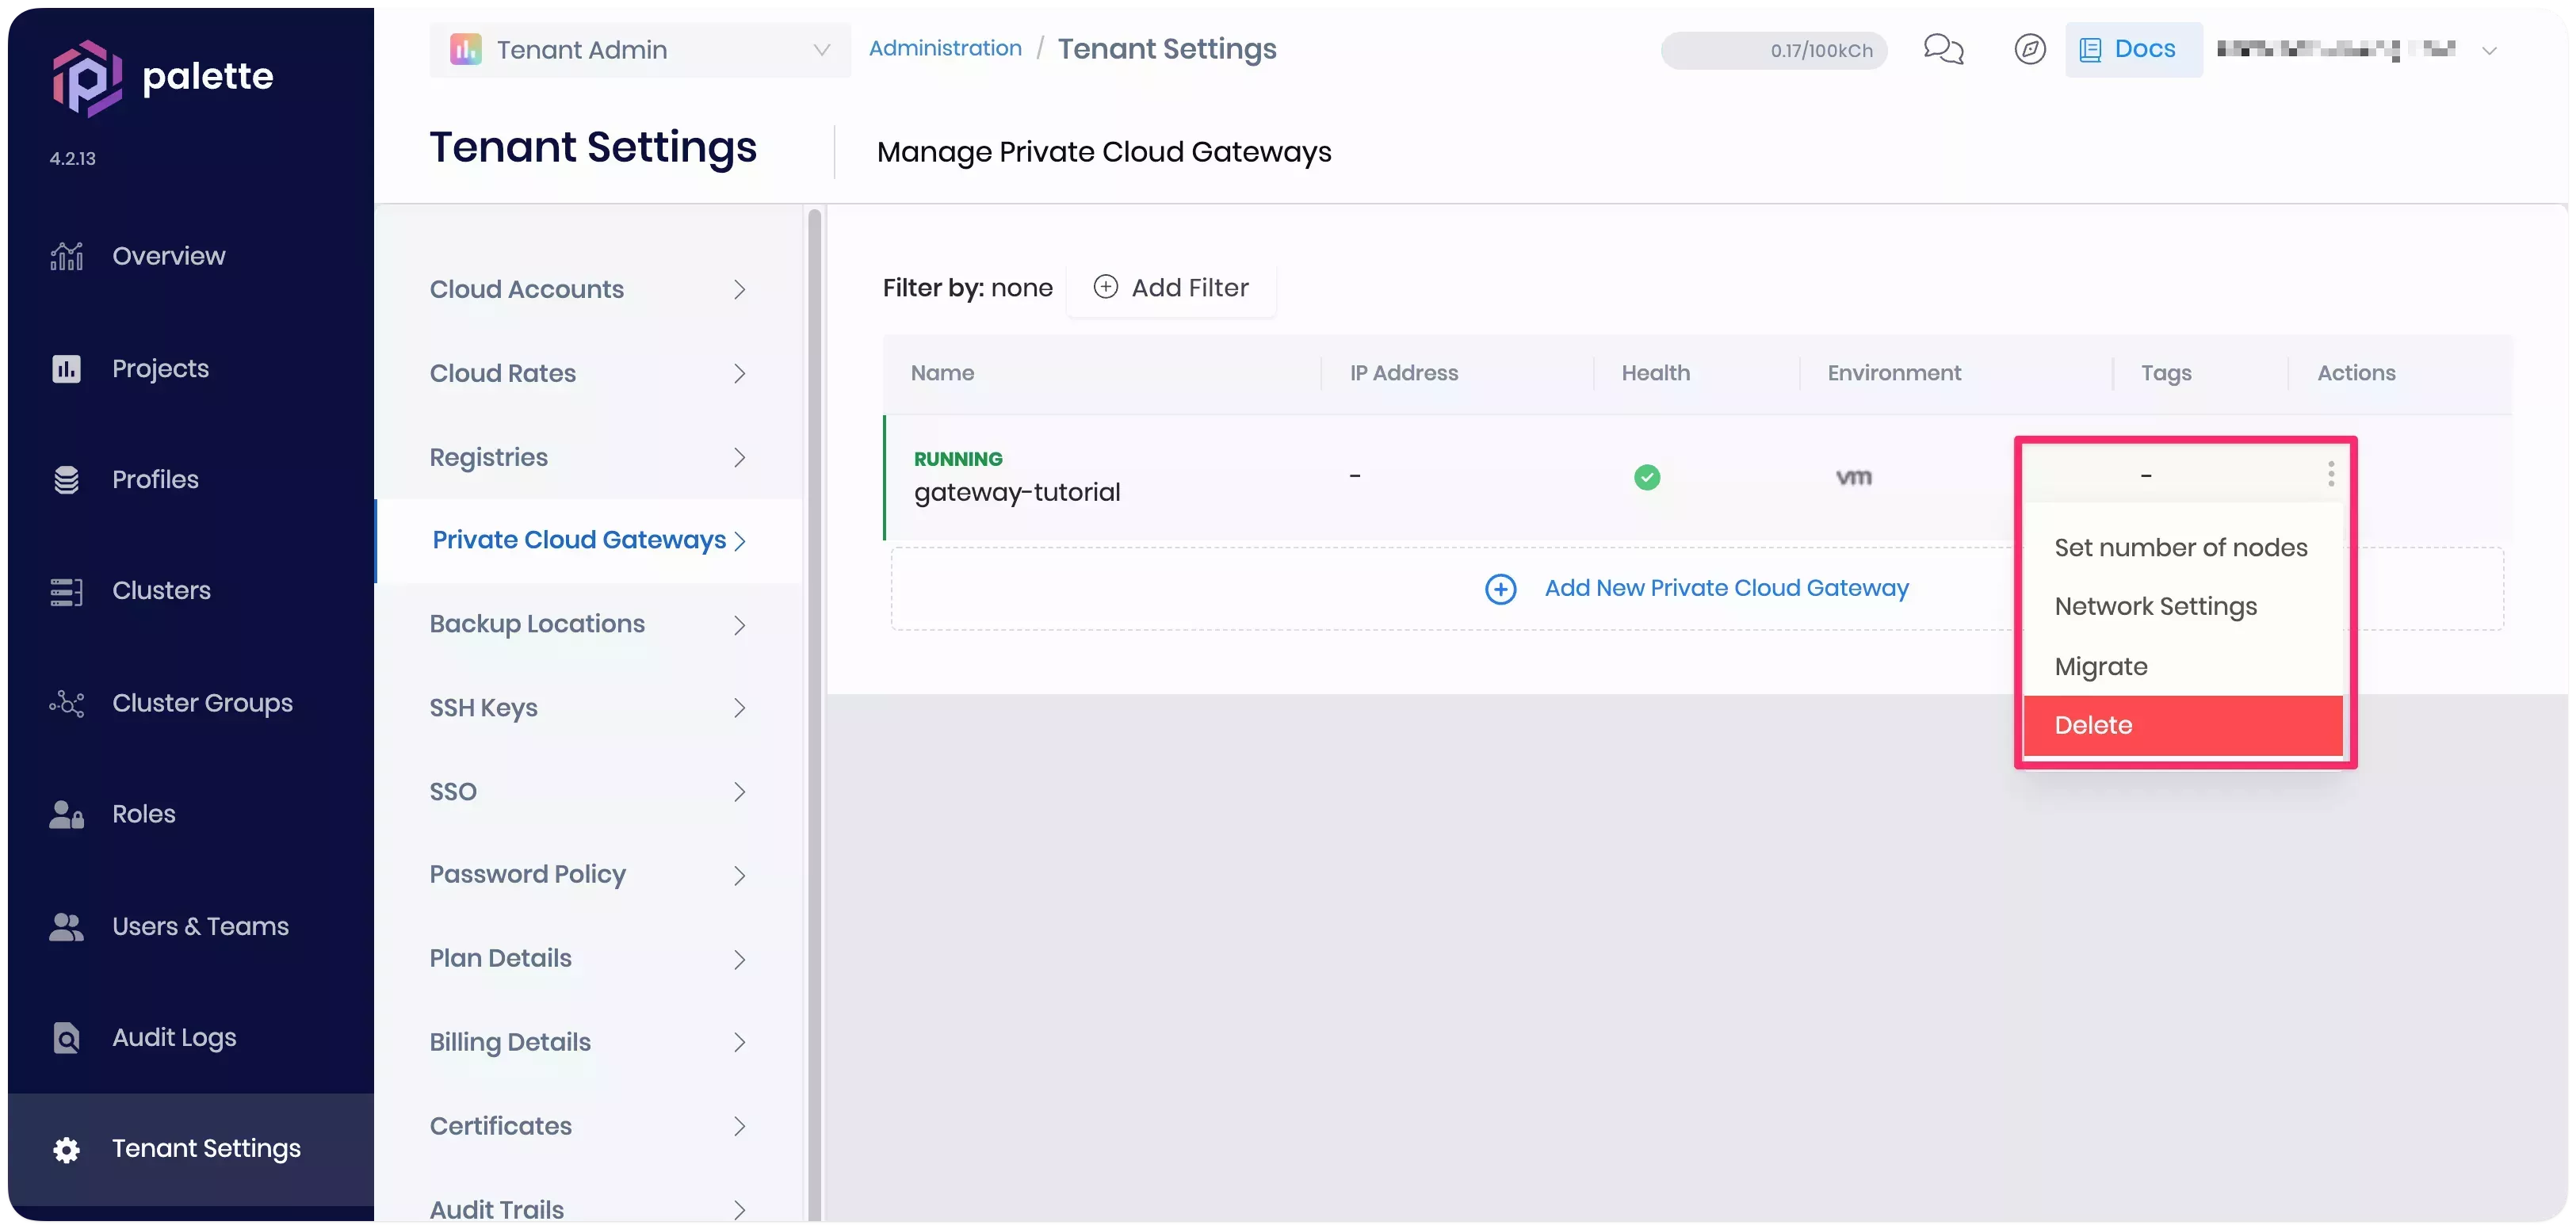
After deleting your VMware cluster and cluster profile, proceed with the PCG deletion. Log in to Palette as a tenant admin, navigate to the left Main Menu and select Tenant Settings. Next, from the Tenant Settings Menu, click on Private Cloud Gateways. Identify the PCG you want to delete, click on the Three-Dot Menu at the end of the PCG row, and select Delete. Click OK to confirm the PCG deletion.
Palette will delete the PCG and the Palette services deployed on the PCG node. However, the underlying infrastructure resources, such as the virtual machine, must be removed manually from VMware vSphere.
Log in to your VMware vSphere server and select the VM representing the PCG node named gateway-tutorial-cp. Click on
the Three-Dot Actions button, select Power, and Power Off to power off the machine. Once the machine is
powered off, click on the Three-Dot Actions button again and select Delete from Disk to remove the machine from
your VMware vSphere environment.

Wrap-Up
In this tutorial, you learned how to deploy a VMware PCG using the Palette CLI. Then, you used the PCG to support the deployment of a Kubernetes cluster with a sample application to your VMware vSphere environment. Next, you accessed the Hello Universe application landing page through the exposed service URL.
A PCG is a powerful component that enables Palette to communicate with private clouds or data center environments residing in restricted networks that don't allow inbound connections from external sources. The PCG acts as an endpoint and continuously polls Palette for instructions. With a PCG, you can deploy Palette clusters and support their lifecycle in environments like VMware vSphere without the need to configure complex firewall rules or expose public endpoints.
We encourage you to check out the reference resources below to learn more about PCGs.