RHEL and Konvoy
This guide provides instructions for building a custom image using Red Hat Linux Enterprise (RHEL) with Konvoy. The guide assumes that you have a basic understanding of VMware vSphere, RHEL and Konvoy.
You will use the Konvoy image builder project to build the custom RHEL image with Konvoy. The custom image will be used to deploy a Kubernetes cluster on VMware vSphere.
Prerequisites
Carefully review the prerequisites and follow the steps in the order provided to build and use a custom RHEL with Konvoy. Make sure you have met all the prerequisites before you begin.
-
A x86_64 Linux VM with the following resources:
- 4 CPU
- 8 GB of RAM
- 50 GB of free disk space
-
The Linux VM must have connectivity to the internet and the VMware vSphere environment.
-
The following software must be installed on the Linux VM:
- Docker Engine version 25.0.0 or later.
- HashiCorp Packer version 1.10.1 or later.
- tar or similar tool to extract tarballs.
- wget or similar tool, such as curl to download files from the internet.
-
A valid RHEL subscription. You will need to provide the username and password for the subscription during the build process.
-
VMware vSphere template for RHEL 8.8 or later. The Konvoy image builder will use this template to create the custom RHEL with Konvoy image.
Click to learn more about VMware vSphere RHEL templates
You can download RHEL 8.8 or later ISO files from the Red Hat Developer Portal. The ISO can be uploaded to your vSphere Datastore and be used to deploy a VM. Deploy the VM and reference the ISO you uploaded to your Datastore as the input for the CD/DVD Drive.

After the VM is deployed, and you have completed the RHEL installation, verify you can SSH into the VM. If you can SSH and log in to the VM, you can use it as a template for the Konvoy image builder. Save the VM as a template in vSphere. Reference the template in the Konvoy image builder configuration file.
Configure the RHEL VM with the correct users and credentials before creating a VM template of it. Consider adding the
following configuration to the /etc/sudoers file so that the root user and the admin and sudo groups can issue
commands as root without entering a password.
root ALL=(ALL:ALL) ALL
%admin ALL=(ALL) ALL
%sudo ALL=(ALL) ALL
Defaults        !authenticate
#Defaults   !visiblepw
-
SSH credentials to the RHEL template you are specifying in the Konvoy image builder configuration file.
warningReach out to your VMware administrator if you need assistance with creating the VMware vSphere template. It's critical you configure the RHEL template correctly to ensure the Konvoy image builder can the template to create the custom RHEL with Konvoy image.
Build Image
The Konvoy image builder supports generating standard or FIPS-compliant Konvoy images. Select the appropriate tab for instructions on how to build the custom RHEL with Konvoy image.
- Standard
- FIPS
-
Open a terminal session in your Linux VM and create a new directory for the Konvoy image builder project.
mkdir --parents ~/builder
cd ~/builder -
Download the Konvoy builder release artifact from the GitHub releases page. In this guide, version 2.8.5 is used.
wget https://github.com/mesosphere/konvoy-image-builder/releases/download/v2.8.5/konvoy-image-bundle-v2.8.5_linux_amd64.tar.gz -
Extract the downloaded tarball and navigate to the builder directory.
tar --extract --file  konvoy-image-bundle-v2.8.5_linux_amd64.tar.gz --directory builder && \
cd builder -
Export your vSphere and RHEL credentials as environment variables. Replace the placeholders with your credentials. Issue the following commands to set these values in your terminal session.
export VSPHERE_SERVER=your-vsphere-server-IP
export VSPHERE_USERNAME=your-vsphere-username
export VSPHERE_PASSWORD=your-vsphere-password
export RHSM_USER=your-redhat-email
export RHSM_PASS=your-redhat-password
export ANSIBLE_SUDO_PASS=admin -
Modify the Packer configuration file for the version of RHEL you want to use. The RHEL configuration files are located in the images/rhel directory. In this guide, RHEL 8.8 is used. Use the following command to modify the file. You can use
vior any other text editor to modify the file.vi images/ova/rhel-88.yaml -
Replace the following placeholders in the RHEL configuration file with your vSphere and RHEL template information.
Parameter Description packer.clusterThe name of the vSphere cluster to deploy the Packer VM. packer.datacenterThe name of the vSphere Datacenter to deploy the Packer VM. packer.datastoreThe name of the vSphere datastore to deploy the Packer VM. packer.folderThe name of the vSphere folder to deploy the Packer VM. packer.networkThe name of the vSphere network to deploy the Packer VM. packer.insecure_connectionSet to trueif you are using a self-signed certificate for the vCenter endpoint.packer.resource_poolThe name of the vSphere resource pool to deploy the Packer VM. packer.templateThe name of the RHEL template in vSphere that you created using the ISO file of the RHEL version you want to use. packer.ssh_usernameThe username to SSH into the Packer VM. Specify the username you used to log in to the RHEL VM before converting it to a template. packer.ssh_passwordThe password to SSH into the Packer VM. Specify the password you used to log in to the RHEL VM before converting it to a template. Example RHEL configuration file
The parameters that need to be replaced are highlighted in the example configuration file below.
---
download_images: true
build_name: "rhel-88"
packer_builder_type: "vsphere"
guestinfo_datasource_slug: "https://raw.githubusercontent.com/vmware/cloud-init-vmware-guestinfo"
guestinfo_datasource_ref: "v1.4.0"
guestinfo_datasource_script: "{{guestinfo_datasource_slug}}/{{guestinfo_datasource_ref}}/install.sh"
packer:
  cluster: "Cluster2"
  datacenter: "Datacenter"
  datastore: "example-datastore"
  folder: "internal"
  insecure_connection: "true"
  network: "DEV-NETWORK"
  resource_pool: "rp-dev"
  template: "internal/rhel"
  vsphere_guest_os_type: "rhel8_64Guest"
  guest_os_type: "rhel8-64"
  # goss params
  distribution: "RHEL"
  distribution_version: "8.8"
  ssh_username: "**********"
  ssh_password: "*********"
  linked_clone: false
  ansible_sudo_pass: "********"
  use_sudo: false
  NOPASSWD: ALL
# ssh_private_key_file = "" # can be exported as environment variable 'SSH_PRIVATE_KEY_FILE'
# ssh_agent_auth: false # is set to true, ssh_password and ssh_private_key will be ignored -
Review the images/common.yaml file and modify the file if necessary. The common.yaml file is where you specify the Kubernetes version. Refer to the Konvoy pack reference page to learn about supported Konvoy versions.
---
kubernetes_version: "1.27.6"
download_images: true
packer:
  goss_arch: amd64
  goss_entry_file: goss/goss.yaml
  goss_format: json
  goss_format_options: pretty
  goss_inspect_mode: false
  goss_tests_dir: goss
  goss_url:
  goss_vars_file: ansible/group_vars/all/system.yaml
goss_version: 0.3.16 -
Start the Packer build process by issuing the following command.
./konvoy-image build images/ova/rhel-88.yaml --extra-vars ansible_sudo_pass="admin"The build process will take some time to complete. Once the build process is complete, you will have a custom RHEL with Konvoy image located in the vSphere datastore folder you specified in the Packer configuration file. Take note of the image ID.
==> vsphere-clone.kib_image: Convert VM into template...
vsphere-clone.kib_image: Closing sessions ....
==> vsphere-clone.kib_image: Running post-processor: packer-manifest (type manifest)
==> vsphere-clone.kib_image: Running post-processor:  (type shell-local)
==> vsphere-clone.kib_image (shell-local): Running local shell script: /tmp/packer-shell591621042
Build 'vsphere-clone.kib_image' finished after 13 minutes 50 seconds.

==> Wait completed after 13 minutes 50 seconds

==> Builds finished. The artifacts of successful builds are:
--> vsphere-clone.kib_image: konvoy-rhel-88-1.27.6-20240229212552
--> vsphere-clone.kib_image: konvoy-rhel-88-1.27.6-20240229212552
--> vsphere-clone.kib_image: konvoy-rhel-88-1.27.6-20240229212552
-
Open a terminal session in your Linux VM and create a new directory for the Konvoy image builder project.
mkdir --parents ~/builder
cd ~/builder -
Download the Konvoy builder release artifact from the GitHub releases page.
wget https://github.com/mesosphere/konvoy-image-builder/releases/download/v2.8.5/konvoy-image-bundle-v2.8.5_linux_amd64.tar.gz -
Extract the downloaded tarball and navigate to the builder directory.
tar --extract --file  konvoy-image-bundle-v2.8.5_linux_amd64.tar.gz --directory builder && \
cd builder -
Export your vSphere and RHEL credentials as environment variables. Replace the placeholders with your credentials.
export VSPHERE_SERVER=your-vsphere-server-IP
export VSPHERE_USERNAME=your-vsphere-username
export VSPHERE_PASSWORD=your-vsphere-password
export RHSM_USER=your-redhat-email
export RHSM_PASS=your-redhat-password
export ANSIBLE_SUDO_PASS=admin -
Modify the Packer configuration file for the version of RHEL you want to use. The RHEL configuration files are located in the images/rhel directory. In this guide, RHEL 8.8 is used. Use the following command to modify the file. You can use
vior any other text editor to modify the file.vi images/ova/rhel-88.yaml -
Replace the following placeholders in the RHEL configuration file with your vSphere and RHEL template information.
Parameter Description packer.clusterThe name of the vSphere cluster to deploy the Packer VM. packer.datacenterThe name of the vSphere Datacenter to deploy the Packer VM. packer.datastoreThe name of the vSphere datastore to deploy the Packer VM. packer.folderThe name of the vSphere folder to deploy the Packer VM. packer.networkThe name of the vSphere network to deploy the Packer VM. packer.insecure_connectionSet to trueif you are using a self-signed certificate for the vCenter endpoint.packer.resource_poolThe name of the vSphere resource pool to deploy the Packer VM. packer.templateThe name of the RHEL template in vSphere that you created using the ISO file of the RHEL version you want to use. packer.ssh_usernameThe username to SSH into the Packer VM. Specify the username you used to log in to the RHEL VM before converting it to a template. packer.ssh_passwordThe password to SSH into the Packer VM. Specify the password you used to log in to the RHEL VM before converting it to a template. Example RHEL configuration file
The parameters that need to be replaced are highlighted in the example configuration file below.
---
download_images: true
build_name: "rhel-88"
packer_builder_type: "vsphere"
guestinfo_datasource_slug: "https://raw.githubusercontent.com/vmware/cloud-init-vmware-guestinfo"
guestinfo_datasource_ref: "v1.4.0"
guestinfo_datasource_script: "{{guestinfo_datasource_slug}}/{{guestinfo_datasource_ref}}/install.sh"
packer:
  cluster: "Cluster2"
  datacenter: "Datacenter"
  datastore: "example-datastore"
  folder: "internal"
  insecure_connection: "true"
  network: "DEV-NETWORK"
  resource_pool: "rp-dev"
  template: "internal/rhel"
  vsphere_guest_os_type: "rhel8_64Guest"
  guest_os_type: "rhel8-64"
  # goss params
  distribution: "RHEL"
  distribution_version: "8.8"
  ssh_username: "**********"
  ssh_password: "*********"
  linked_clone: false
  ansible_sudo_pass: "********"
  use_sudo: false
  NOPASSWD: ALL
# ssh_private_key_file = "" # can be exported as environment variable 'SSH_PRIVATE_KEY_FILE'
# ssh_agent_auth: false # is set to true, ssh_password and ssh_private_key will be ignored -
Review the images/common.yaml file and modify the file if necessary. The common.yaml file is where you specify the Kubernetes version. Refer to theKonvoy pack reference page to learn about supported Konvoy versions.
---
kubernetes_version: "1.27.6"
download_images: true
packer:
  goss_arch: amd64
  goss_entry_file: goss/goss.yaml
  goss_format: json
  goss_format_options: pretty
  goss_inspect_mode: false
  goss_tests_dir: goss
  goss_url:
  goss_vars_file: ansible/group_vars/all/system.yaml
goss_version: 0.3.16 -
Update ansible/roles/fips/tasks/redhat-8.yaml to address potential timeout issues. Add the following lines to the
ansible.builtin.reboottask.ansible.builtin.reboot:
post_reboot_delay: 120
pre_reboot_delay: 30
connect_timeout: 120Complete FIPS configuration file
- name: "redhat 8 fips: ensure fips_enabled is 1"
lineinfile:
dest: /proc/sys/crypto/fips_enabled
line: "1"
state: present
become: yes
check_mode: yes
register: sysfips
- name: "redhat 8 fips: run fips enable command"
command: fips-mode-setup --enable
when:
- sysfips is changed
- name: "redhat 8 fips: reboot to pick up fips changes"
ansible.builtin.reboot:
  post_reboot_delay: 120
  pre_reboot_delay: 30
  connect_timeout: 120
when:
- sysfips is changedtipAdditional FIPS configuration can be found in the overrides/fips.yaml and overrides/fips-configure.yaml files.
-
Start the Packer build process by issuing the following command.
./konvoy-image build images/ova/rhel-88.yaml \
--extra-vars ansible_sudo_pass="admin" \
--overrides=overrides/fips.yaml \
--overrides=overrides/fips-configure.yaml
The build process will take some time to complete. Once the build process is complete, you will have a FIPS compliant custom RHEL with Konvoy image located in the vSphere datastore folder you specified in the Packer configuration file. Take note of the image ID.
==> vsphere-clone.kib_image: Convert VM into template...
vsphere-clone.kib_image: Closing sessions ...
==> vsphere-clone.kib_image: Running post-processor: packer-manifest (type manifest)
==> vsphere-clone.kib_image: Running post-processor:  (type shell-local)
==> vsphere-clone.kib_image (shell-local): Running local shell script: /tmp/packer-shell2158067181
Build 'vsphere-clone.kib_image' finished after 18 minutes 44 seconds.

==> Wait completed after 18 minutes 44 seconds

==> Builds finished. The artifacts of successful builds are:
--> vsphere-clone.kib_image: konvoy-rhel-88-fips-kernel-1.27.6+fips.0-20240301141207
--> vsphere-clone.kib_image: konvoy-rhel-88-fips-kernel-1.27.6+fips.0-20240301141207
--> vsphere-clone.kib_image: konvoy-rhel-88-fips-kernel-1.27.6+fips.0-20240301141207
Validate
-
Log in to the vSphere web client and navigate to the datastore folder where the custom RHEL with Konvoy image is located. Verify that the image is present in the folder.
-
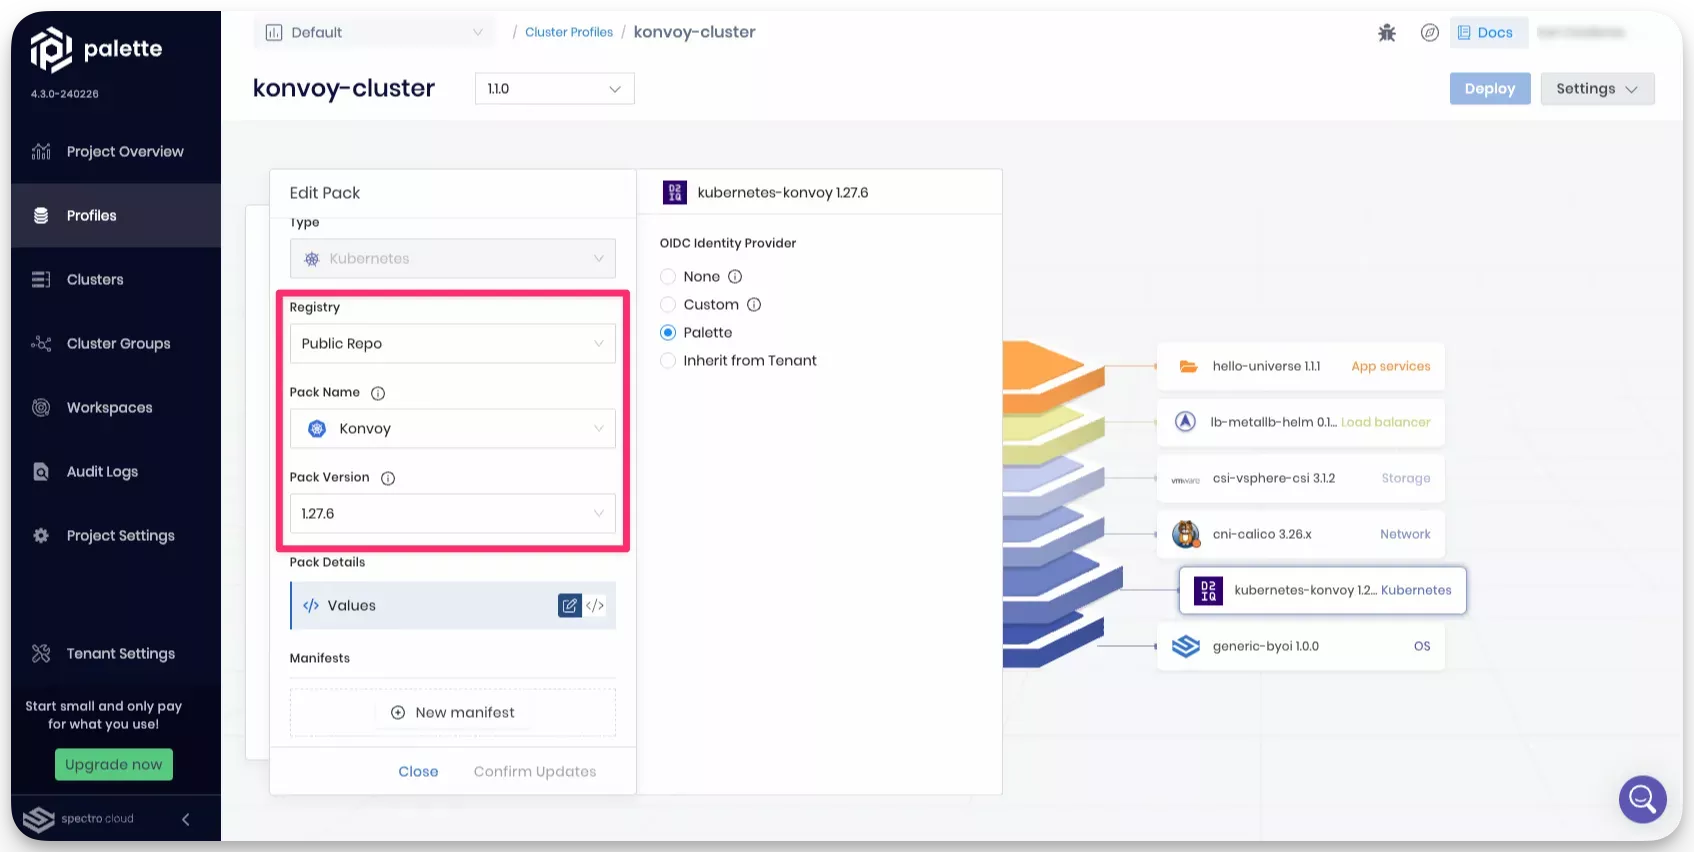
Create a cluster profile and use the BYOOS pack to reference the custom RHEL with Konvoy image. Specify the path to the custom RHEL with Konvoy image in the pack's YAML file. Refer to Usage with Cluster Profile section for more details.
-
Deploy a cluster using the cluster profile you created.
Usage with Cluster Profile
To use the custom RHEL with Konvoy image, create a cluster profile and use the BYOOS pack to reference the custom RHEL with Konvoy image. Specify the vSphere path to the custom RHEL with Konvoy image in the pack's YAML file. The following example YAML content demonstrates how to use the custom RHEL with Konvoy image in a cluster profile.
pack:
  osImageOverride: "/Datacenter/vm/internal/rhel/konvoy-rhel-88-1.27.6-20240229212552"
  osName: "konvoy-rhel-vmware"
  osVersion: "8.8"
When selecting the Kubernetes distribution and version, pick Konvoy as the Kubernetes distribution and the version of Kubernetes you specified in the Packer configuration file.
Make sure you select the same version of Konvoy as specified in the Packer configuration file images/common.yaml.