Create Images with Image Builder
You can create and deploy custom images to most infrastructure providers using various tools. Many infrastructure providers have tools that you can use to create custom images for the platform, such as AWS EC2 Image Builder for AWS or Azure VM Image Builder for Azure. You can also use platform agnostic tools, such as HashiCorp Packer, or something more tailored to Kubernetes, such as the Kubernetes Image Builder (KIB) project.
Kubernetes Image Builder
KIB is a project designed to help users create images for various platforms. The project is a consolidation of multiple tools that together work to create an artifact, or in simpler terms, a custom image.
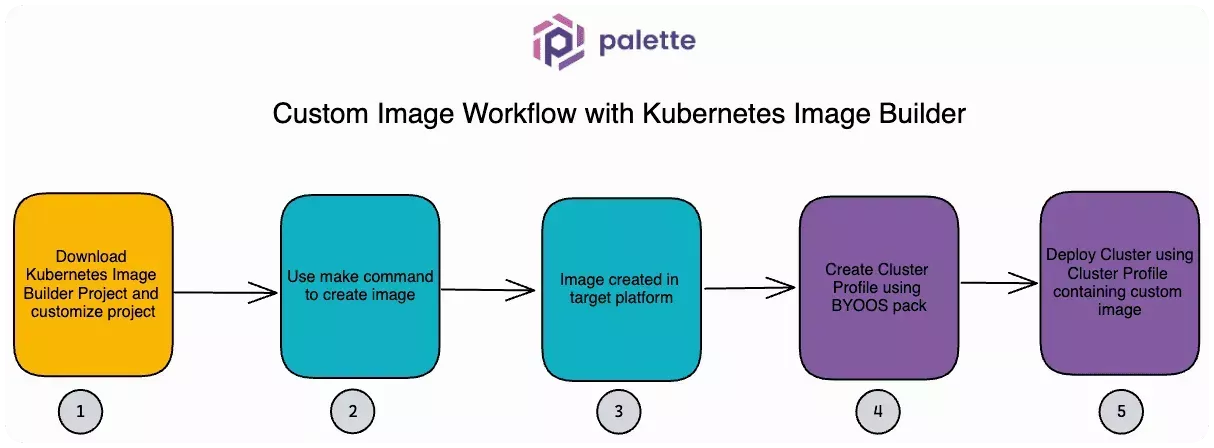
You can use the custom images created by KIB with Palette, assuming the infrastructure provider is supported in Palette. Use the following diagram to understand how you can use KIB to create custom images that you can use with Palette.
-
Download the KIB project and configure the image builder's packer.json file.
-
Use the
makecommand to create a custom image containing a specific Operating System (OS) version and flavor. -
The custom image is created and distributed to the target regions you specified in the packer.json file.
-
Create a cluster profile that points to your custom image.
-
Deploy a host cluster using your cluster profile that contains the custom image.
This guide will teach you how to use KIB to create images for your infrastructure provider so that you can use the custom images in a Palette cluster profile.
Prerequisites
-
Palette v3.4.0 or greater.
-
Git v2.39.1 or greater.
-
Access credentials to the target infrastructure provider. KBI, through the help of Packer, deploys a compute instance to the target environment during the image creation process.
-
The cloud provider you choose may have different requirements. Review the KIB documentation for your provider to learn more about the provider prerequisites.
-
HashiCorp Packer installed v1.8.6 or greater.
To use a commercial OS, you must provide the license before starting the image creation process.
Create an Image
The following steps guide you through creating your image. You will create a custom Red Hat Enterprise Linux (RHEL) image for Amazon Web Services (AWS). RHEL is a commercial product, so you will need license subscription credentials, but you can use the same steps for a non-RHEL image. The critical point to take away in this guide is using KIB to create the image.
-
Clone the KIB repository.
- HTTPS
- SSH
git clone https://github.com/kubernetes-sigs/image-builder.gitgit clone git@github.com:kubernetes-sigs/image-builder.git -
Switch the directory into the image builder folder.
cd image-builder/images/capi -
Open up the image builder documentation site in your web browser, and review the steps to build an image for your specific infrastructure provider.
-
If you are using a commercial OS such as RHEL, set the required environment variables per the KIB documentation. For RHEL, the following environment variables are required. Replace the placeholder values with your actual credentials.
export RHSM_USER=REPLACE_ME
export RHSM_PASS=REPLACE_ME
If you want to debug the Packer compute instance in case of an error, set the following environment variable. The Packer flag will allow you to remote connect to the instance versus Packer's default behavior of terminating the instance.
export PACKER_FLAGS=-on-error=ask -
Navigate to the packer folder and open the folder for the target infrastructure provider. Review the packer.json file. Make the desired configuration changes, such as the Kubernetes version, cloud credentials, network settings, instance size, image regions, and more. You must make changes in the file's
variablessection. The following example shows a condensed version of thevariablesobject."variables": {
...
"ami_groups": "",
"ami_regions": "us-east-1, us-west-2",
"ami_users": "",
"ansible_common_vars": "",
"ansible_extra_vars": "",
"ansible_scp_extra_args": "",
"ansible_user_vars": "",
"aws_access_key": "",
"aws_profile": "",
"aws_region": "us-east-1",
"aws_secret_key": "",
"aws_security_group_ids": "",
"aws_session_token": "",
"build_timestamp": "{{timestamp}}",
"builder_instance_type": "m5.xlarge",
....
},infoThe file packer.json contains many variables you can use to customize the image. We recommend you review the KIB documentation for your provider as it explains each variable.
-
Set the credentials for your infrastructure provider. Each infrastructure provider supports different methods for providing credentials to Packer. You can review each infrastructure provider's authentication section by visiting the Packer plugins site and selecting your provider on the left Main Menu.
-
Next, find the
makecommand for your provider. You can use the following command to get a list of available RHEL options. Replace thegrepfilter with your target provider.
make | grep rhelOutput:
build-ami-rhel-8                     Builds RHEL-8 AMI
build-azure-sig-rhel-8               Builds RHEL 8 Azure managed image in Shared Image Gallery
build-azure-vhd-rhel-8               Builds RHEL 8 VHD image for Azure
build-node-ova-local-rhel-7          Builds RHEL 7 Node OVA w local hypervisor
build-node-ova-local-rhel-8          Builds RHEL 8 Node OVA w local hypervisor
... -
Issue the
makecommand that aligns with your target provider. In this example,build-ami-rhel-8is the correct command for an RHEL AWS AMI creation.
make build-ami-rhel-8Output:
amazon-ebs.{{user `build_name`}}: output will be in this color.

==> amazon-ebs.{{user `build_name`}}: Prevalidating any provided VPC information
==> amazon-ebs.{{user `build_name`}}: Prevalidating AMI Name: capa-ami-rhel-8-v1.24.11-1683320234
    amazon-ebs.{{user `build_name`}}: Found Image ID: ami-0186f9012927dfa39
==> amazon-ebs.{{user `build_name`}}: Creating temporary keypair: packer_64556dab-95d3-33e6-bede-f49b6ae430cb
==> amazon-ebs.{{user `build_name`}}: Creating temporary security group for this instance: packer_64556dae-fb5a-3c7d-2106-1c8960c6d60e
==> amazon-ebs.{{user `build_name`}}: Authorizing access to port 22 from [0.0.0.0/0] in the temporary security groups...
==> amazon-ebs.{{user `build_name`}}: Launching a source AWS instance...
    amazon-ebs.{{user `build_name`}}: Instance ID: i-06a8bf22b66abc698
.... -
When the build process completes, note the image ID.
 Build 'amazon-ebs.{{user `build_name`}}' finished after 22 minutes 29 seconds.

 ==> Wait completed after 22 minutes 29 seconds

 ==> Builds finished. The artifacts of successful builds are:
 --> amazon-ebs.{{user `build_name`}}: AMIs were created:
 us-east-1: ami-0f4804aff4cf9c5a2

 --> amazon-ebs.{{user `build_name`}}: AMIs were created:
us-east-1: ami-0f4804aff4cf9c5a2 -
Log in to Palette.
-
Navigate to the left Main Menu and select Profiles.
-
Click on the Add Cluster Profile button.
-
Fill out the input fields for Name, Description, Type and Tags. Select Full as the profile type, and click Next.
-
Select your infrastructure provider. This example uses AWS.
-
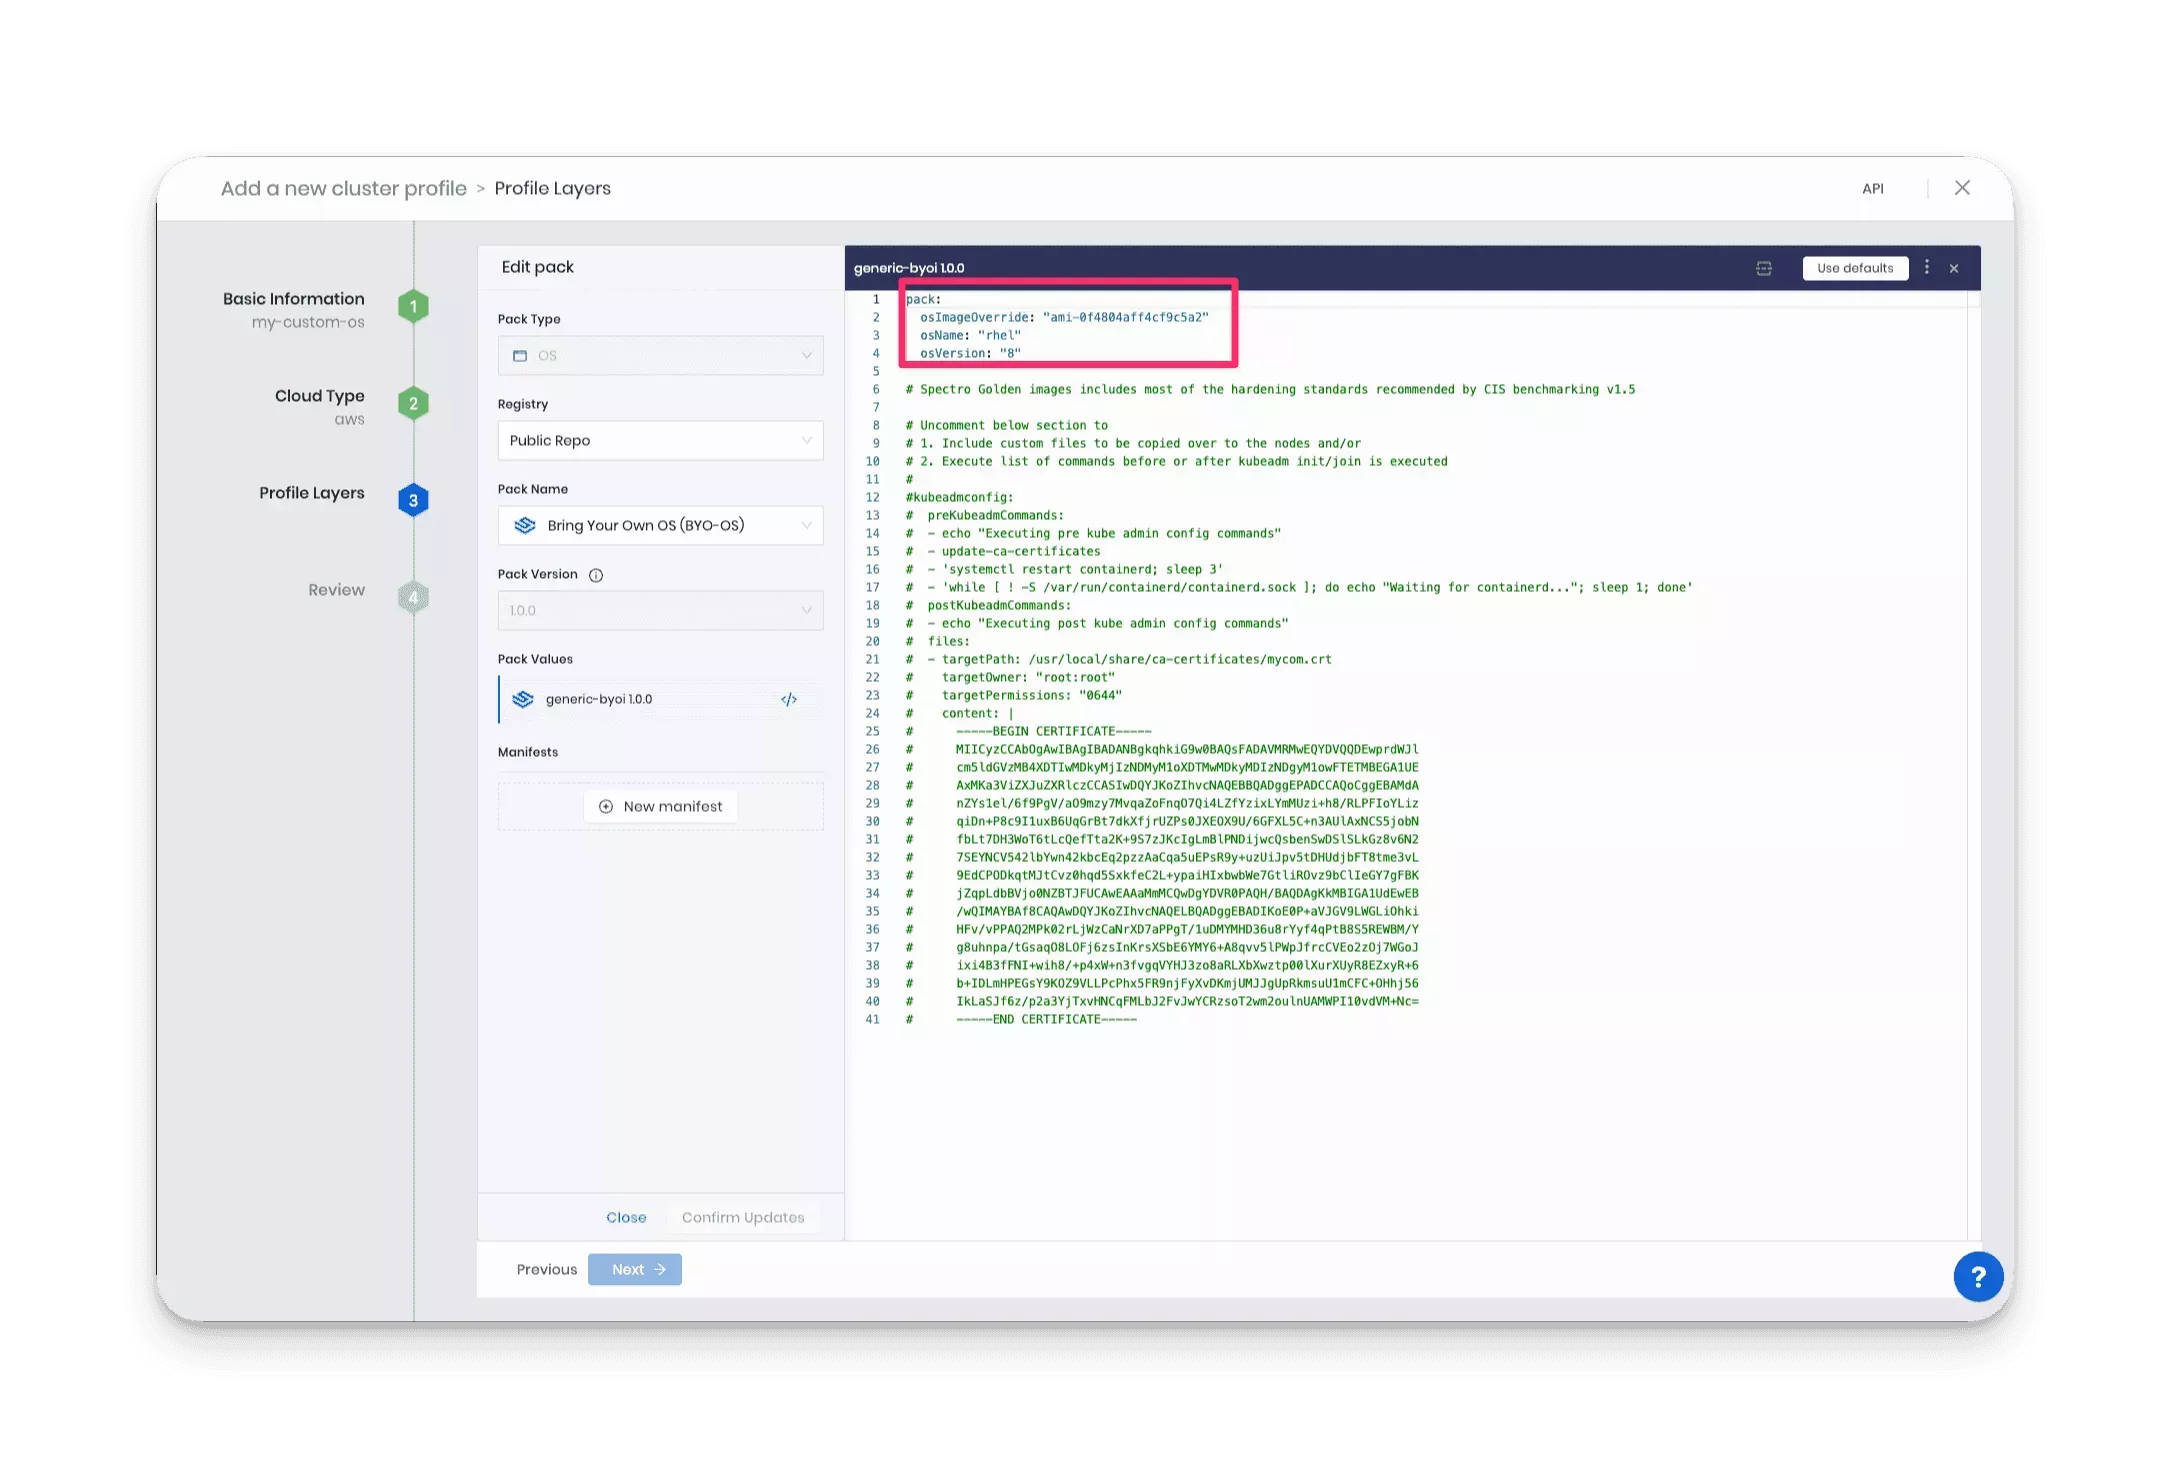
Select the BYOOS pack. Use the following information to find the BYOOS pack.
- Pack Type: OS
- Registry: Public Repo
- Pack Name: Bring Your Own OS (BYOOS)
- Pack Version: 1.0.x or higher
-
Update the pack YAML to point to your custom image. You can use the tag values that Packer assigns to the image to help you identify the correct value to provide. In the example output below, the tag values
distribution_versionanddistributionare used to determine the correct values for the YAML.==> amazon-ebs.{{user `build_name`}}: Creating AMI tags
amazon-ebs.{{user `build_name`}}: Adding tag: "build_date": "2023-05-10T17:19:37Z"
amazon-ebs.{{user `build_name`}}: Adding tag: "build_timestamp": "1683739177"
amazon-ebs.{{user `build_name`}}: Adding tag: "kubernetes_cni_version": "v1.2.0"
amazon-ebs.{{user `build_name`}}: Adding tag: "source_ami": ""
amazon-ebs.{{user `build_name`}}: Adding tag: "containerd_version": "1.6.20"
amazon-ebs.{{user `build_name`}}: Adding tag: "distribution_release": "Enterprise"
+ amazon-ebs.{{user `build_name`}}: Adding tag: "distribution": "rhel"
amazon-ebs.{{user `build_name`}}: Adding tag: "image_builder_version": ""
amazon-ebs.{{user `build_name`}}: Adding tag: "kubernetes_version": "v1.24.11"
+ amazon-ebs.{{user `build_name`}}: Adding tag: "distribution_version": "8In this example, the YAML is updated to point to the RHEL image created earlier. Use the table below to learn more about each variable.
Parameter Description Type osImageOverrideThe ID of the image to use as the base OS layer. This is the image ID as assigned in the infrastructure environment it belongs to. Example: ami-0f4804aff4cf9c5a2.string osNameThe name of the OS distribution. Example: rhel.string osVersionThe version of the OS distribution. Example: 8string pack:
osImageOverride: "ami-0f4804aff4cf9c5a2"
osName: "rhel"
osVersion: "8"
-
Click on Next layer to add the Kubernetes layer.
-
Select the desired Kubernetes distribution and version. Click on the </> button to display the YAML editor.
-
Complete the remainder of the cluster profile creation wizard by selecting the next cluster profile layers.
You now have a cluster profile that uses the custom image you created using the Kubernetes Image Builder project.
When deploying a host cluster, choosing the appropriate cloud provider and region where the image was distributed is critical to successfully launching a cluster using a custom image in the cluster profile. Failure to do so may result in Palette's inability to launch a cluster.
Validate
Use the following steps to validate your custom image is working correctly.
-
Deploy a compute instance in the respective infrastructure provider using your custom image. Review the compute instance logs to learn more about any issues you may encounter.
-
Next, deploy a host cluster using the cluster profile you created that contains the custom image. Verify the cluster is deployed correctly and without any issues. If you encounter any problems, review the cluster's event log to gain more details about the issue. Check out the Deploy a Cluster tutorial for additional guidance on deploying a host cluster.