Environment Setup
This guide helps you to prepare your airgap environment for Palette VerteX installation.
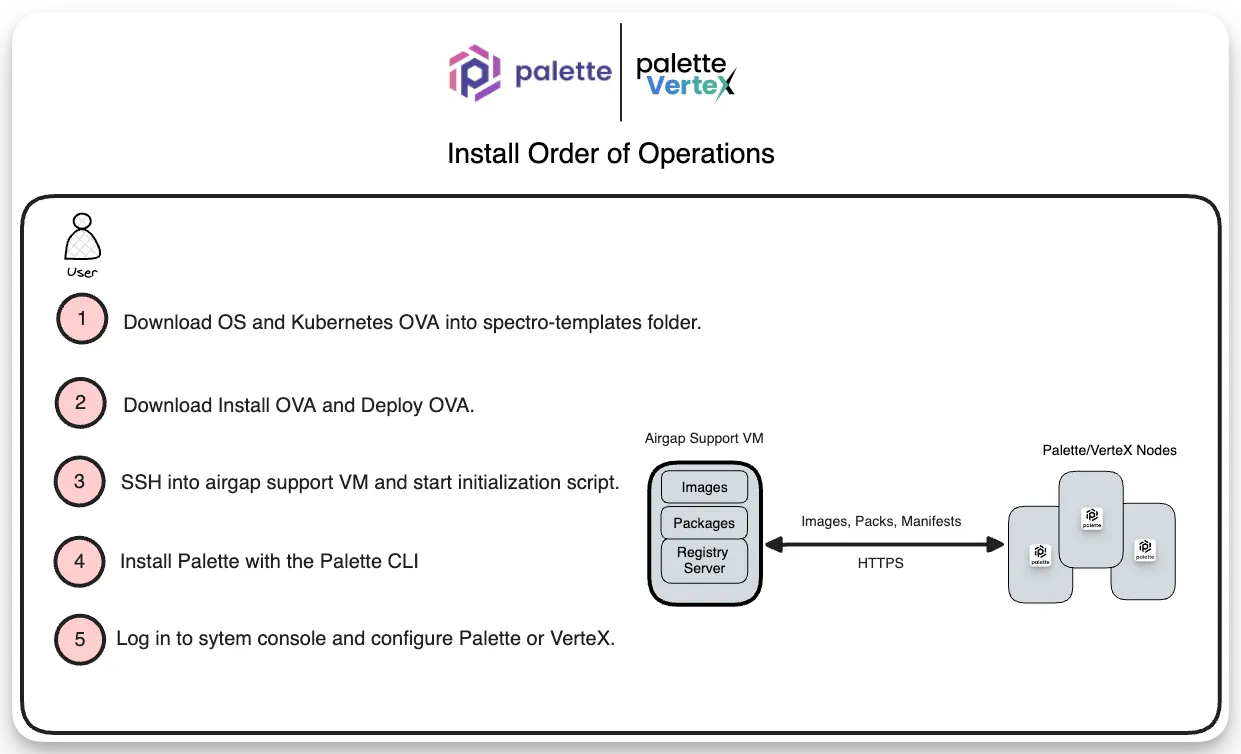
The following diagram offers a general overview of the steps you will complete to prepare your airgap environment for VerteX.
Prerequisites
-
Download the following OVAs:
- The VerteX installation OVA.
- The installation OVA that deploys and initializes the airgap support VM.
- An OVA with the operating system and Kubernetes distribution required for the VerteX nodes.
For sensitive environments, you can download the OVAs to a system with internet access and then transfer them to your airgap environment.
-
The airgap support VM requires the following resources:
-
6 CPU
-
8 GB of Memory
-
120 GB of disk space available for the airgap support VM.
-
-
The airgap support VM requires connectivity to your VMware vSphere environment.
-
Configure the Dynamic Host Configuration Protocol (DHCP) to access the airgap support VM via SSH. You can disable DHCP or modify the IP address after deploying the airgap support VM.
-
Review the required vSphere permissions and ensure you've created the proper custom roles and zone tags. Zone tagging enables dynamic storage allocation across fault domains when provisioning workloads that require persistent storage. Refer to Zone Tagging for information.
Self-hosted VerteX installations provide a system Private Cloud Gateway (PCG) out-of-the-box and typically do not require a separate, user-installed PCG. However, you can deploy additional PCG instances to support provisioning into remote data centers without a direct incoming connection to VerteX. To learn how to install a PCG on VMware, check out the VMware guide.
Prepare for Airgap Installation
Complete the following steps to prepare your airgap environment for VerteX installation.
The default container runtime for OVAs is Podman, not Docker.
-
Log in to your vCenter environment.
-
Create a vSphere VM and Template folder named
spectro-templates. Ensure you can access this folder with the user account you plan to use when deploying the VerteX installation. -
Right-click on your cluster or resource group and select Deploy OVF Template.
-
In the Deploy OVF Template wizard, enter the following URL to import the Operating System (OS) and Kubernetes distribution OVA required for the installation.
https://vmwaregoldenimage-console.s3.us-east-2.amazonaws.com/u-2204-0-k-12711-0.ovaPlace the OVA in the spectro-templates folder. Append the
r_prefix, and remove the.ovasuffix when assigning its name and target location. For example, the final output should look liker_u-2204-0-k-12711-0. This naming convention is required for the installation process to identify the OVA. Refer to the Supplement Packs page for a list of additional OS OVAs.You can terminate the deployment after the OVA is available in the
spectro-templatesfolder. Refer to the Deploy an OVF or OVA Template guide for more information about deploying an OVA in vCenter.warningIf you encounter an error message during the OVA deployment stating unable to retrieve manifest or certificate, refer to this known issue from VMware's knowledge base for guidance on how to resolve the issue.
-
Next, deploy the airgap installation OVA by using the Deploy OVF Template wizard again in vSphere. Insert the VerteX install OVA URL in the URL field. The URL is provided to you by your Palette support representative. Click on Next to continue.
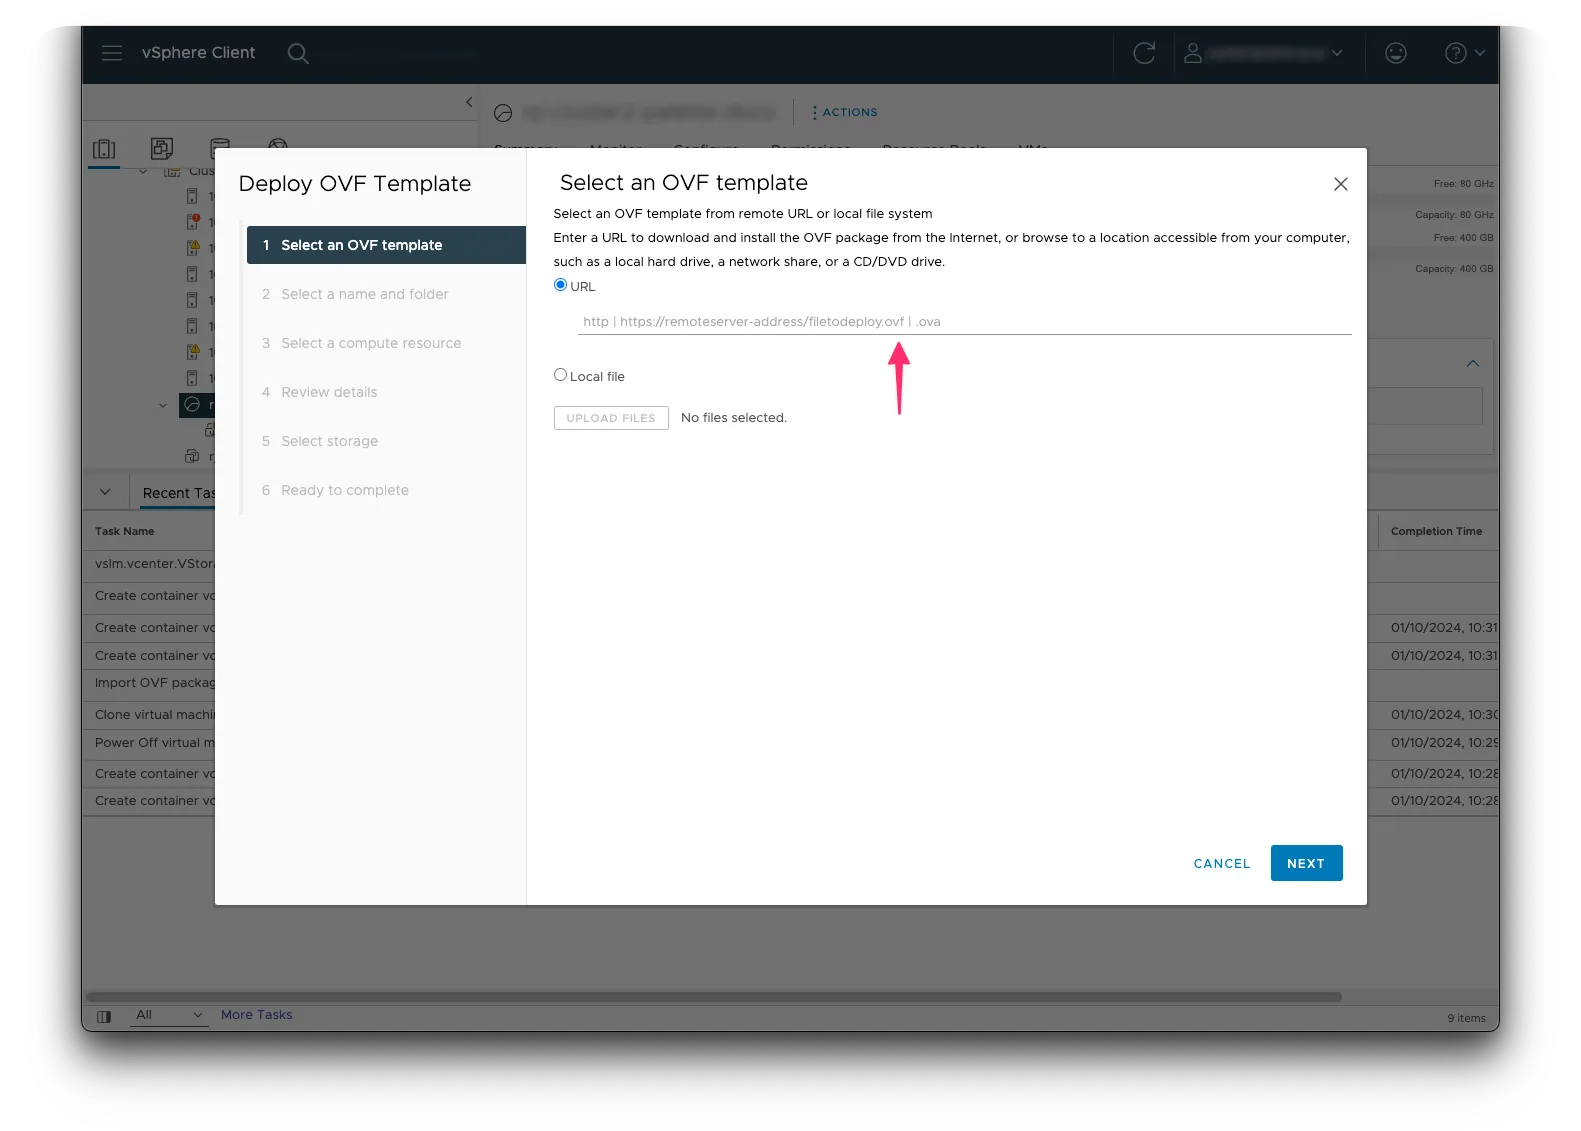
-
Assign a name to the virtual machine and select a target location. Click on Next to continue.
-
Select a compute resource and click on Next to continue.
-
Review the details and click on Ignore All to dismiss any warning messages. The OVA contains a self-signed certificate, which causes vSphere to issue a warning. Click on Next to continue.
-
Select the storage location and click on Next to continue.
-
Select the network and click on Next to continue.
-
The last step is to customize the template. Review the table below to learn more about each field. Click on Next after you have completed the customization to continue.
Parameter Description Required Encoded user-data Enter the base64 encoded user-data for additional boot-up customization. You can leave this field empty. No SSH Public Keys Provide the SSH public keys for the user account you will use to access the airgap support VM. You need to provide at least one SSH public key to access the instance. Yes Default User's password Enter the password for the user account you will use to access the airgap support VM. You will be asked to change this password the first time you log in through SSH. Yes A Unique Instance ID for this instance Enter a unique instance ID for the airgap support VM. The default value is id-ovf.Yes Hostname Enter a hostname for the airgap support VM. For example, vertex.example.com. The default value isubuntuguest.Yes Url to seed instance data from You can specify a URL to seed instance data from. You can leave this value empty. No -
Review the details and click on Finish to deploy the airgap support VM.
-
It takes a while for the airgap support VM to deploy, approximately 45 min or more depending on your internet connection. The download of the OVA takes up majority of the time. The image is over 30 GB and contains all the dependencies required to deploy a VerteX. Once the deployment is complete, the airgap support VM is displayed in the vSphere inventory. The VM will be powered off. Power on the VM to continue.
-
SSH into the airgap support VM. Use the following command to SSH into the VM. Replace the IP address below with the IP address or hostname of the airgap support VM. The default user account is
ubuntu. Replace the path to the private SSH key and the IP address with the IP address or domain name of the airgap support VM.ssh -identity_file /path/to/private/key ubuntu@vertex.example.com -
Change the password for the
ubuntuuser account. You will be prompted to change the password the first time you log in through SSH. The new password must meet the following requirements:- At least 14 characters long
- Palindromes are not allowed
- At least 1 uppercase letter
- At least 1 lowercase letter
- At least 1 number
- At least 1 special character
-
Once you change the password, the SSH session will be terminated. SSH back into the airgap support VM with the new password.
infoYou may receive a warning stating the new password is already used. You can ignore this message and SSH back into the airgap support VM with the new password.
Password has been already used. Choose another.
passwd: Have exhausted maximum number of retries for service
passwd: password unchanged
Connection to vertex.example.com closed. -
If you want to assign a static IP address to the airgap support VM, you can do so now. Click on the box below to expand the instructions. Otherwise, proceed to the next step.
Assign a static IP address
Create an empty file to disable cloud-init from overriding the new network configurations you will add.
sudo touch /etc/cloud/cloud-init.disabled
Issue the following command to update cloud-init. Select VMware from the wizard Menu when prompted. The command will disable cloud-init from managing the network configuration.
sudo dpkg-reconfigure cloud-init
Next, create a file to configure the network settings.
sudo vi /etc/netplan/01-netcfg.yaml
Modify the file to look like the example below. Replace the IP address, gateway, and DNS server with your network settings. Save the file and exit the text editor.
network:
  version: 2
  renderer: networkd
  ethernets:
    ens192:
      dhcp4: false
      addresses:
        - 10.1.1.0/18
      gateway4: 2.2.2.2
      nameservers:
          addresses: [1.1.1.1]
If you are working in Vim, press i to enter insert mode in the text editor. Press esc to exit insert mode. Type
:wq to save the file and exit the text editor.
Issue the following command to apply the changes.
sudo netplan apply
-
Switch to the
rootuser account. You will need to use therootuser account to complete the remaining steps.sudo --login -
Start the airgap initialization process by issuing the following command. The script requires the hostname or IP address of the airgap support VM. Choose the preferred method for your environment. Be aware that the script will generate a self-signed certificate for the value you provide.
- Domain Name
- IP Address
/bin/airgap-setup.sh vertex.example.comThe output of the script will look similar to the example below.
Setting up SSL Certs
Setting up Harbor


Details:
-------
Spectro Cloud Repository
Location: https://vertex.example.com:8443
UserName: ********
Password: ********
CA certificate filepath: /opt/spectro/ssl/server.crt

Pack OCI Registry
Endpoint: https://vertex.example.com
Base Content Path: spectro-packs
CA certificate Filepath: /opt/spectro/ssl/server.crt
Username: ********
Password: ********

Image OCI Registry
Endpoint: https://vertex.example.com
Base Content Path: spectro-images
CA certificate Filepath: /opt/spectro/ssl/server.crt
Username: ********
Password: ********
/bin/airgap-setup.sh 10.10.1.1The output of the script will look similar to the example below.
Setting up SSL Certs
Setting up Harbor

Details:
-------
Spectro Cloud Repository
Location: 10.10.1.1:8443
UserName: ********
Password: ********
CA certificate filepath: /opt/spectro/ssl/server.crt

Pack OCI Registry
Endpoint: 10.10.1.1
Base Content Path: spectro-packs
CA certificate Filepath: /opt/spectro/ssl/server.crt
Username: ********
Password: ********

Image OCI Registry
Endpoint: 10.10.1.1
Base Content Path: spectro-images
CA certificate Filepath: /opt/spectro/ssl/server.crt
Username: ********
Password: ******** -
The output of the script contains credentials and values you will need when completing the installation with the Palette CLI. If you need to review this information in the future, invoke the script again.
-
Review the Additional Packs page and identify any additional packs you want to add to your OCI registry. By default, the installation includes only the minimum required packs. You can also add additional packs after the installation is complete.
You have now completed the preparation steps for an airgap installation. Check out the Validate section to ensure the airgap setup process is completed successfully. After you validate the airgap setup process completion, review the Next Steps.
Do not power off the airgap support VM. The airgap support VM is required for VerteX to function properly and must remain available at all time. If for some reason the airgap support VM is powered off, power the VM back on and restart the required services by navigating to the /opt/spectro/harbor directory and issuing the following command.
sudo docker compose up --detach
Validate
Use the following steps to validate that you've successfully completed the airgap setup process.
-
SSH into to the airgap support VM.
-
Switch to the
rootuser account.sudo --login -
Issue the following command to validate that you've successfully completed the airgap setup process. Replace the hostname or IP address with the hostname or IP address of the airgap support VM.
bin/airgap-setup.sh vertex.example.com -
Verify you have the values and credentials in the output.
Setting up SSL Certs
Setting up Harbor


Details:
-------
Spectro Cloud Repository
Location: https://vertex.example.com:8443
UserName: ********
Password: ********
CA certificate filepath: /opt/spectro/ssl/server.crt

Pack OCI Registry
Endpoint: https://vertex.example.com
Base Content Path: spectro-packs
CA certificate Filepath: /opt/spectro/ssl/server.crt
Username: ********
Password: ********

Image OCI Registry
Endpoint: https://vertex.example.com
Base Content Path: spectro-images
CA certificate Filepath: /opt/spectro/ssl/server.crt
Username: ********
Password: ********
Next Steps
You are now ready to deploy the airgap VerteX installation with the Palette CLI. As a root user, when you are ready to proceed with the install, issue the Palette CLI command below to start the installation. The Palette CLI is already installed in the airgap support VM and ready to use.
palette ec install
Complete all the Palette CLI steps outlined in the Install VerteX guide from the airgap support VM.
The table below maps the airgap script output values to their respective Palette CLI prompts and example values. The example values are for reference only.
| Output Value | Palette CLI Prompt | Example Value |
|---|---|---|
| Spectro Cloud Repository Location | SCAR Location | https://vertex.example.com:8443 or 10.10.1.1:8443 |
| CA certificate filepath | SCAR CA certificate filepath | /opt/spectro/ssl/server.crt |
| OCI Registry | Registry Type | OCI |
| Pack OCI Registry | Registry Endpoint | https://vertex.example.com or 10.10.1.1 |
| CA certificate Filepath | Registry CA certificate filepath | /opt/spectro/ssl/server.crt |
| Image OCI Registry | Registry Endpoint | https://vertex.example.com or 10.10.1.1 |
| CA certificate Filepath | Registry CA certificate filepath | /opt/spectro/ssl/server.crt |
When prompted for Allow Insecure Connection (Bypass x509 Verification)?, enter n to continue and specify the
server certificate filepath from the script output.