VM Migration Assistant Additional Configuration
Overview Settings
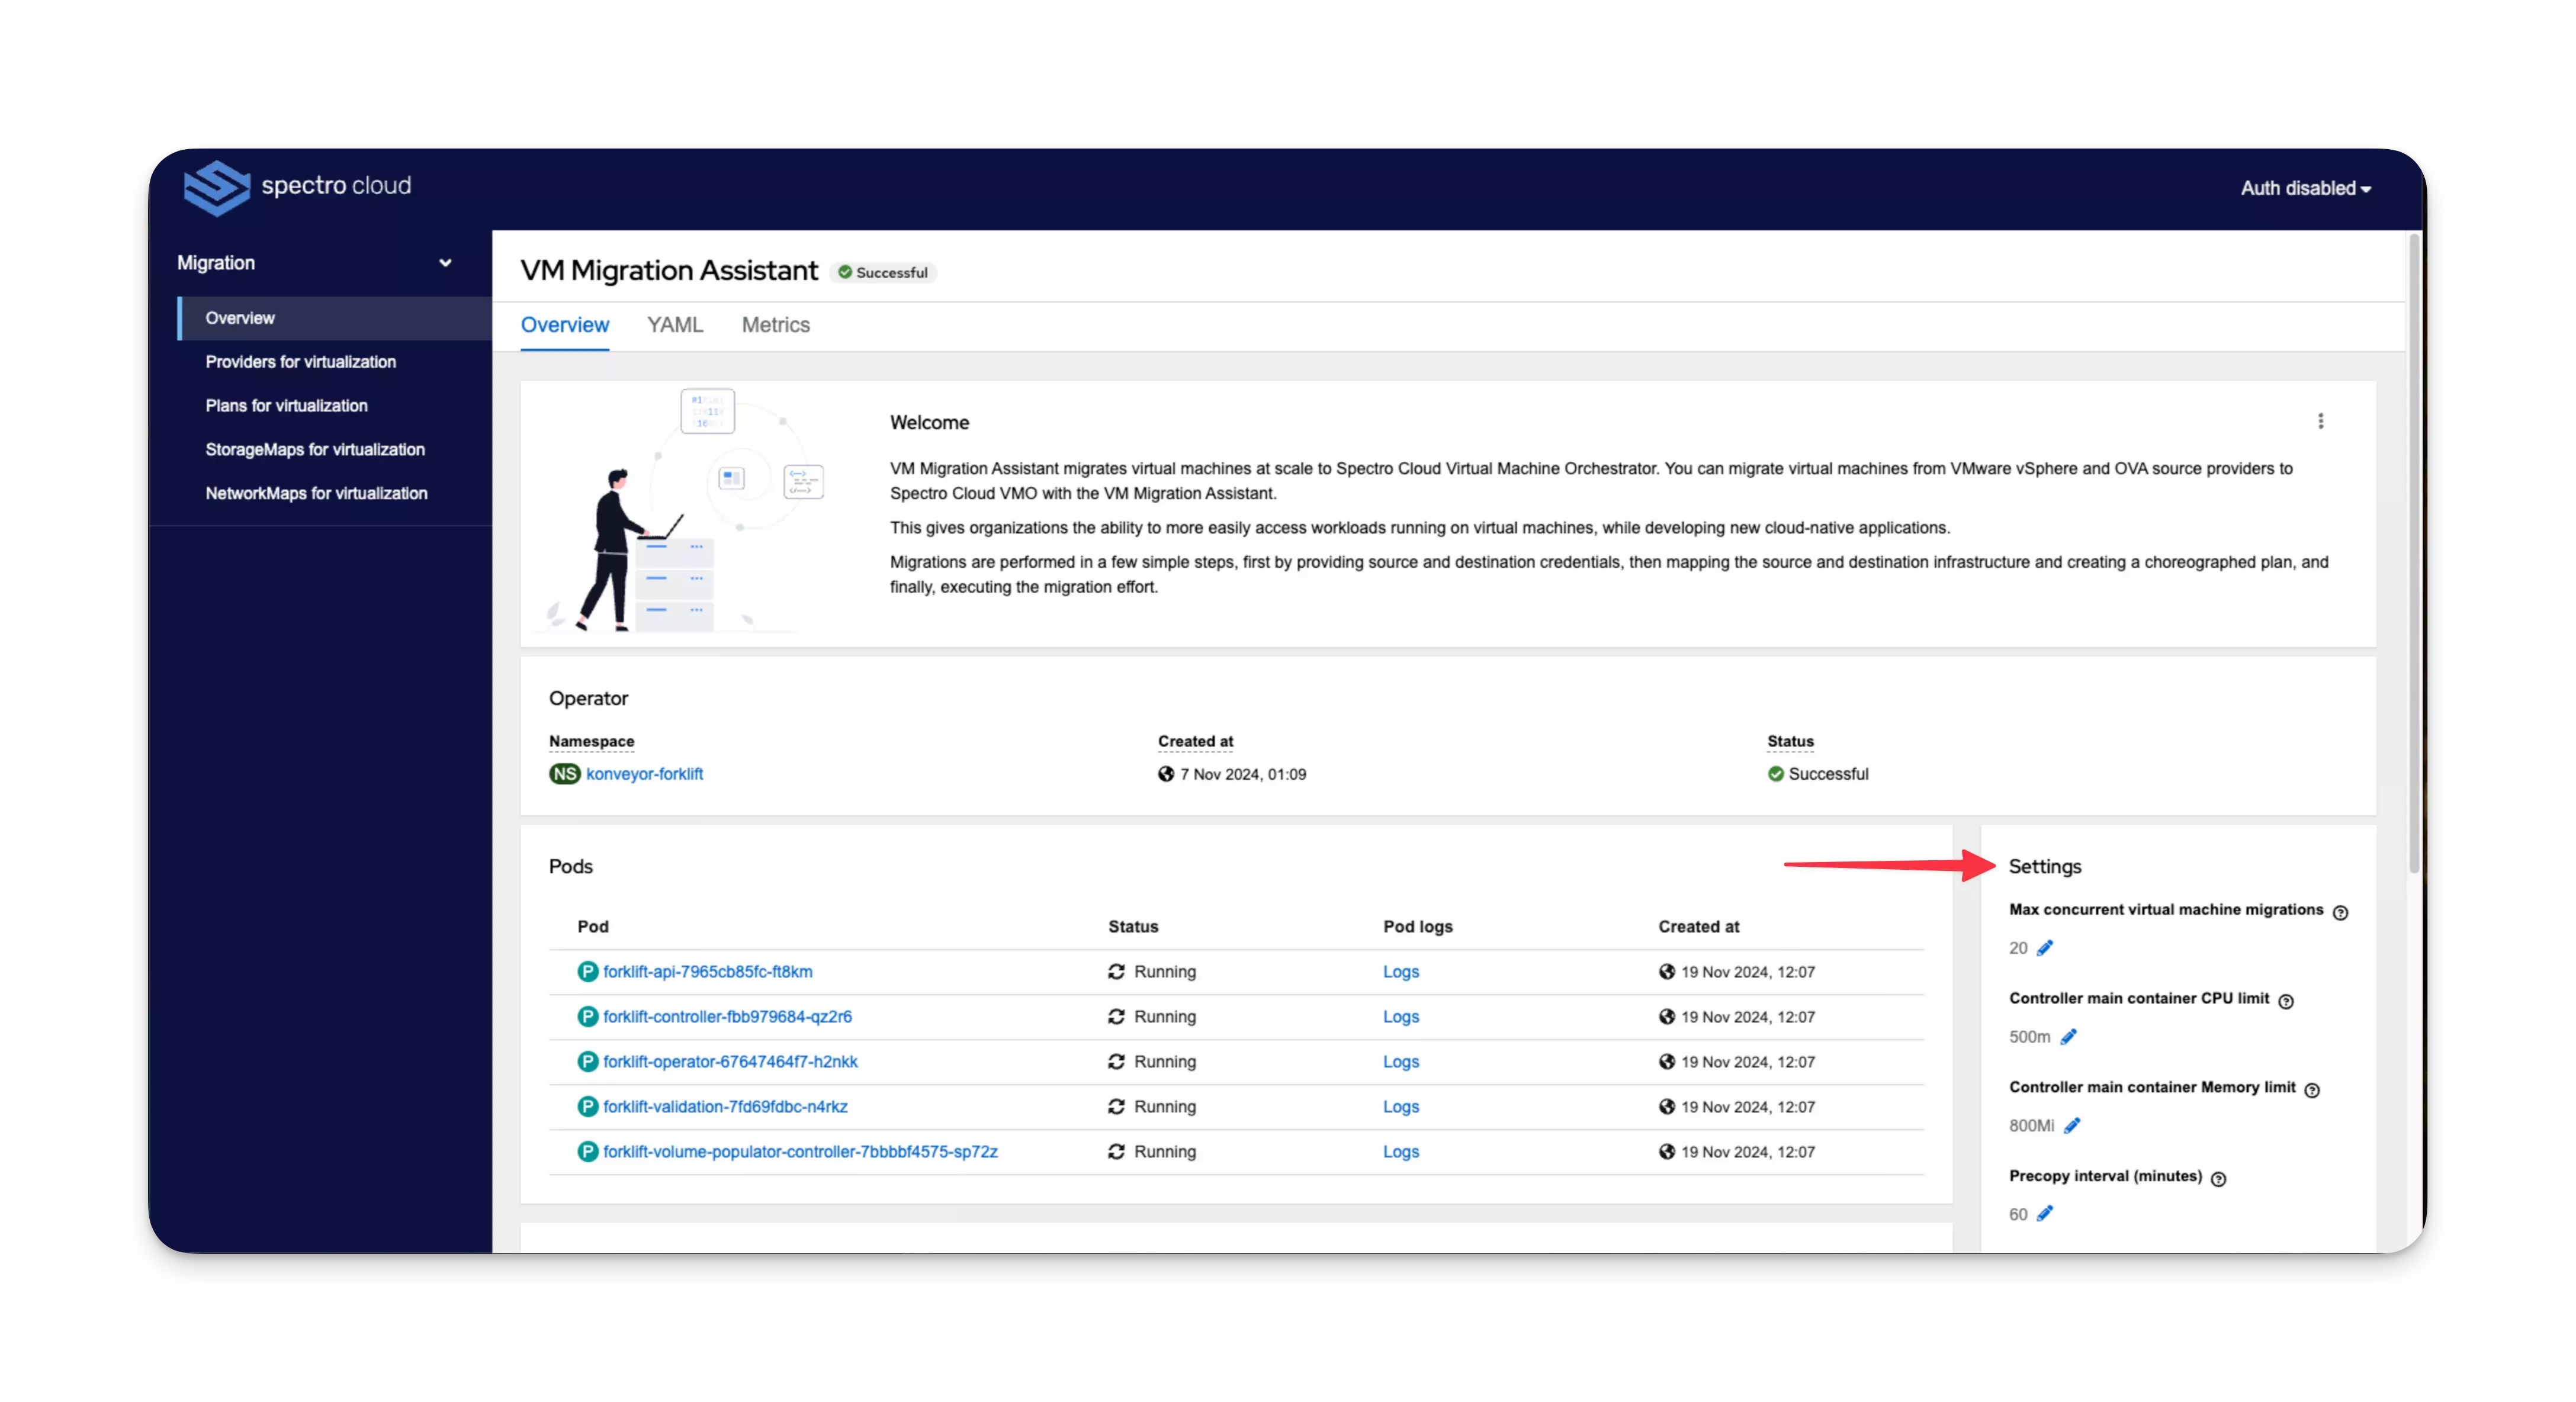
Navigate to your overview settings by clicking Overview on the left Main Menu.
Overview Tab
The Overview tab has configurable settings for the migration controller. These parameters define the resource allocation, performance tuning, and operational settings for efficiently managing virtual machine migrations.

Configure Migration Controller
The configurable parameters are described in the following table.
| Parameter | Description | Default Value |
|---|---|---|
| Max concurrent virtual machine migrations | The maximum number of VMs that can be migrated simultaneously. Consider the available system resources and network bandwidth, as too many concurrent migrations can overload the system and cause slower speeds or congestion. Start with a lower value and gradually increase it to find the optimal balance. Migration plans can enter an Unknown state if you have selected to migrate more VMs than this setting allows. Refer to Scenario - Virtual Machine (VM) Migrations Plans in Unknown State in our troubleshooting section for details of this scenario. | 20 |
| Controller main container CPU limit | The CPU limit (in milliCPU) allocated to the main container in the controller pod. | 500m |
| Controller main container Memory limit | The Memory limit (in mebibytes) allocated to the main container in the controller pod. | 800Mi |
| Precopy interval (minutes) | (Only applicable to warm migrations) The interval time at which a new snapshot is requested prior to initiating a warm migration. The optimal choice depends on various factors such as network bandwidth and the rate of data changes. For example, VMs with heavy write workloads benefit from shorter intervals. | 60 |
| Snapshot polling interval (seconds) | (Only applicable to warm migrations) The frequency at which the migration controller checks for changes or updates in snapshots during the migration process. Shorter frequencies may reduce the overall migration time, but will also increase resource usage. | 10 |
Perform the following steps to change a setting.
- Click the pencil icon next to each value.
- Adjust the value in the pop-up window.
- Click Save after making changes.
YAML Tab
The YAML tab displays a YAML editor for the VM Migration Assistant resource.
View and edit the Custom Resource for the VM Migration Assistant on this tab.
Metrics Tab
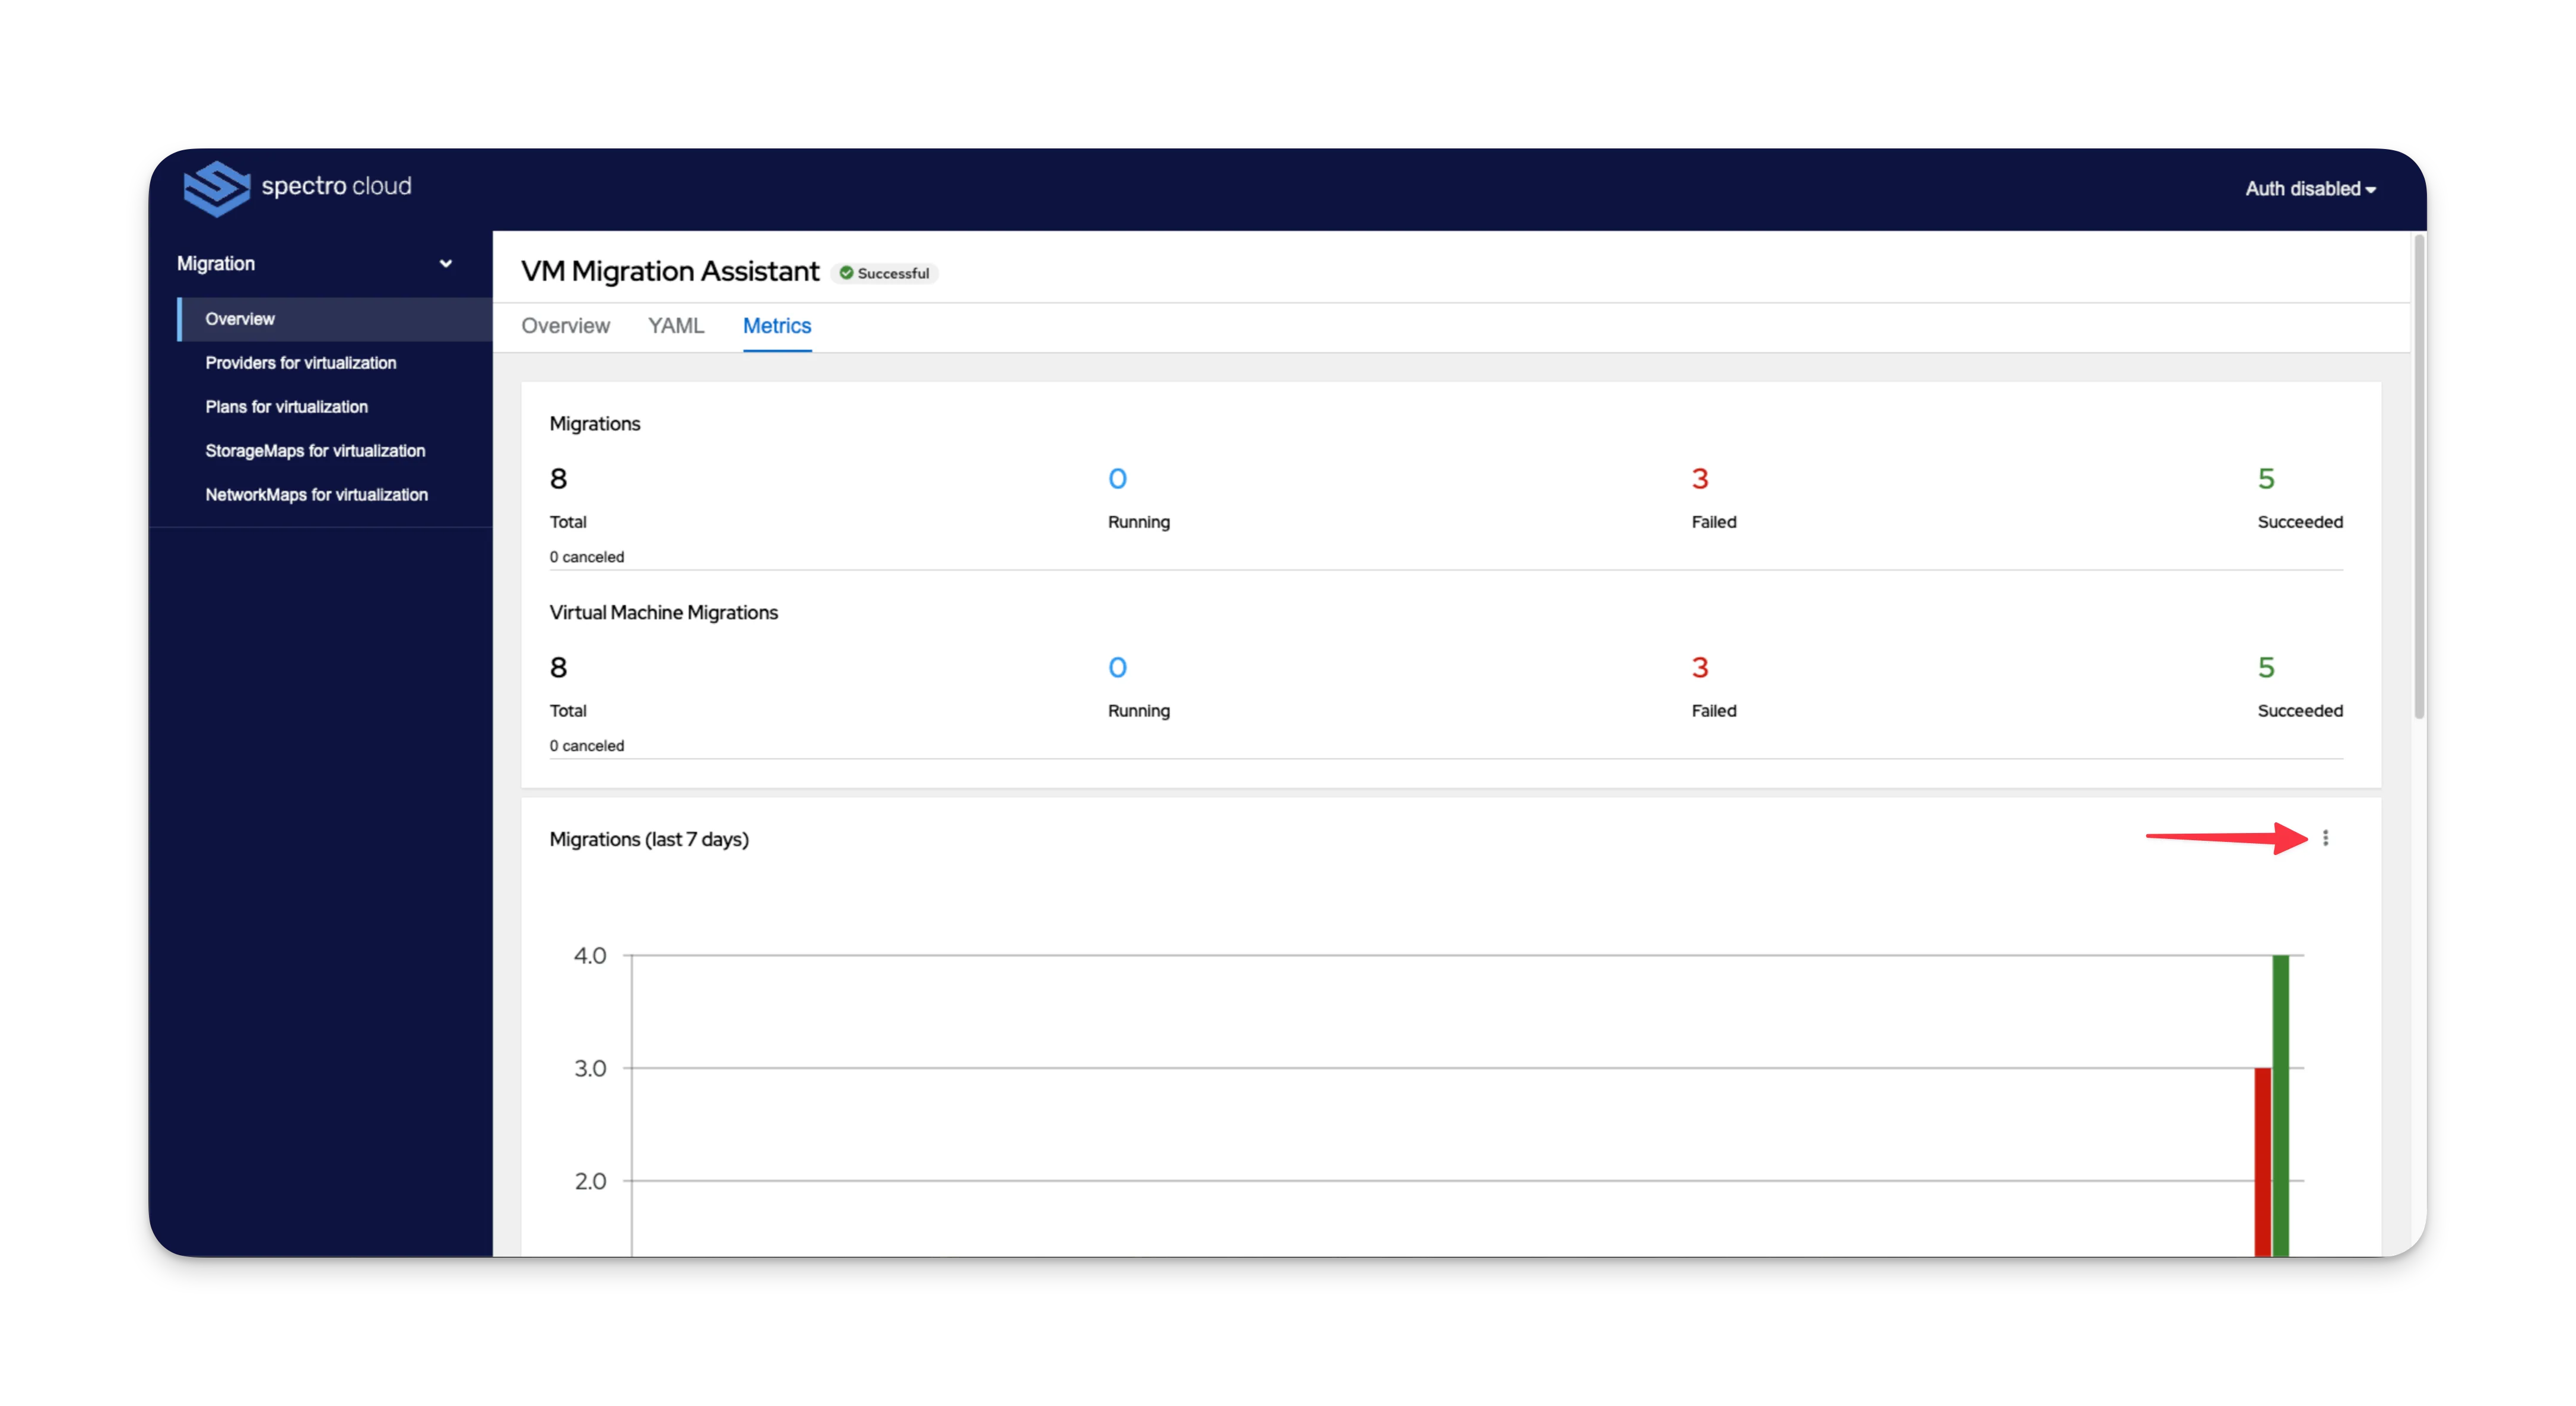
The Metrics tab displays your migration metrics.
Perform the following steps to change the time period displayed for the Migrations and Virtual Machine Migrations graphs.
-
Click the three-dot Menu at the top-right of each graph.

-
Select from 7 days, 31 days, or 24 hours. The graph updates after selection.
Provider Settings
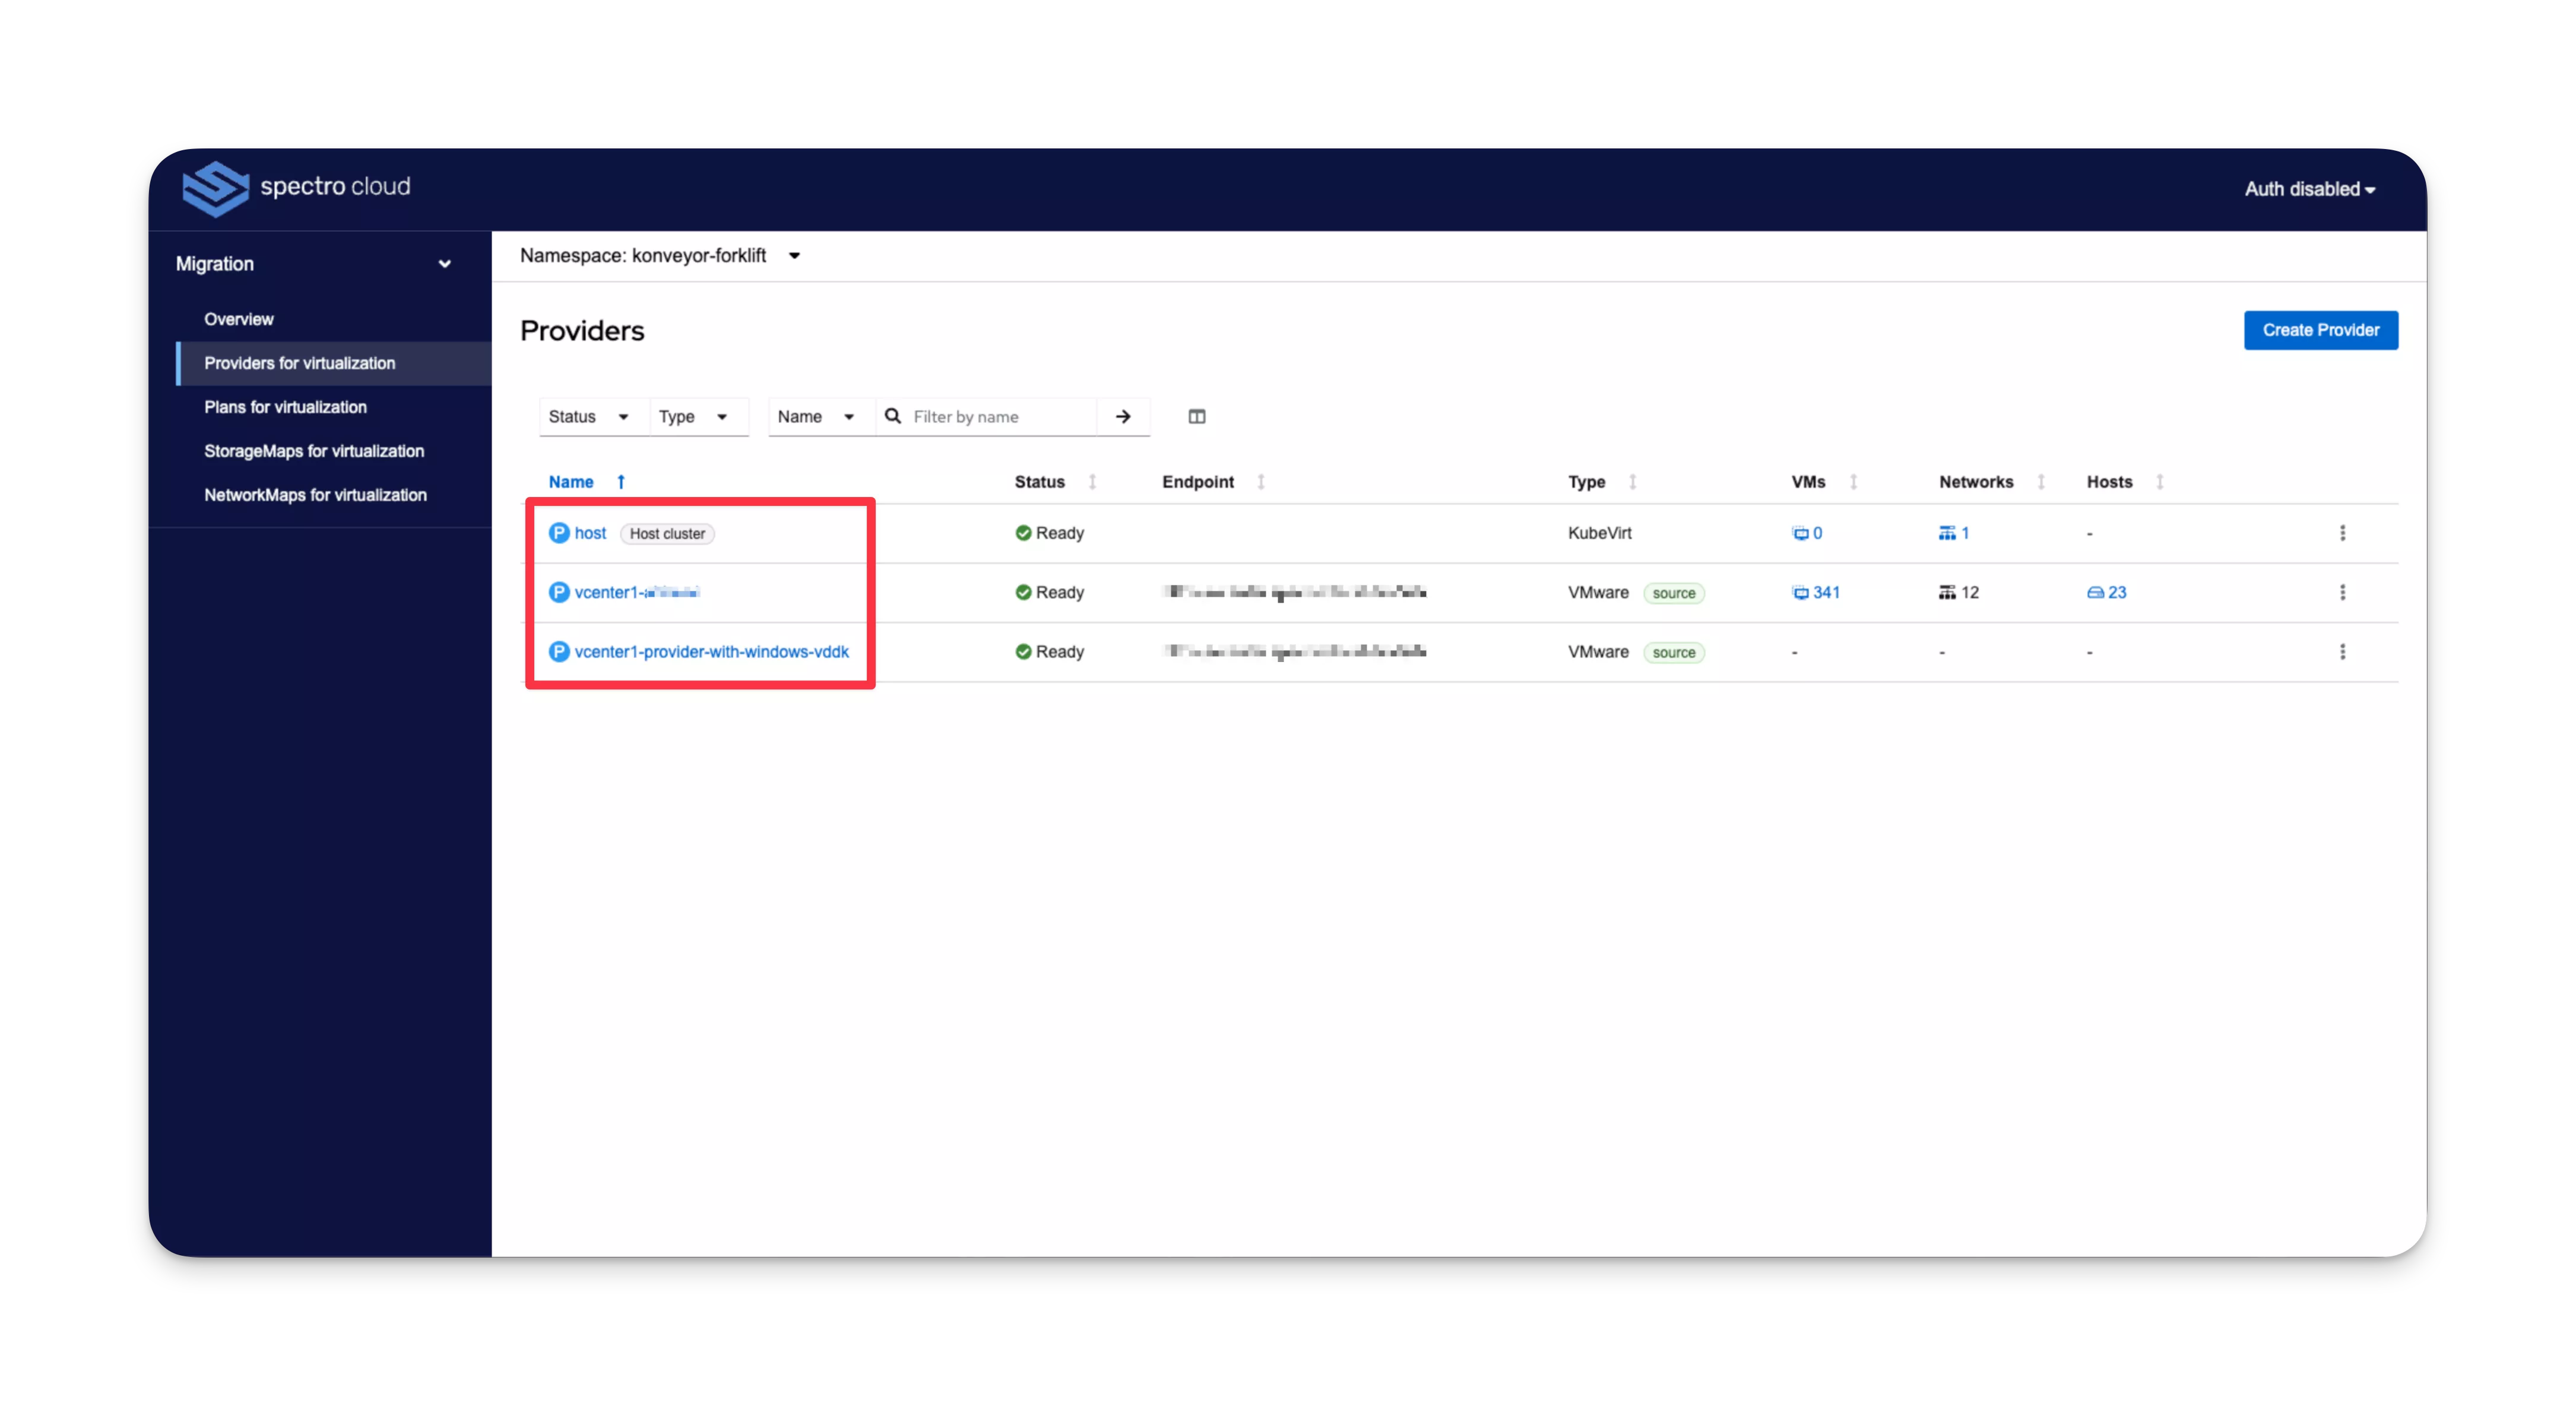
Navigate to your providers by clicking Providers for virtualization on the left Main Menu.
Click on a provider name to view the provider settings.

Details Tab
The Details tab has configurable settings for the provider.
Configure Provider Details
Source Provider
The configurable settings are described in the following table. These were originally defined when you performed the steps in Create Source Providers.
| Setting | Description |
|---|---|
| URL | Your vSphere / ESXi API endpoint for the software development kit (SDK). You can specify a Full Qualified Domain Name (FQDN) or an IP address. For example, https://vcenter.mycompany.com/sdk. |
| External web UI link | Your vSphere / ESXi UI endpoint. You can specify a Full Qualified Domain Name (FQDN) or an IP address. For example, https://vcenter.mycompany.com/ui. |
| Convert Disk | When enabled, disk conversion is handled using virt-v2v. For example, if you're migrating from VMware to Virtual Machine Orchestrator (VMO), virt-v2v can convert Virtual Machine Disk (VMDK) to raw or QEMU copy-on-write version 2 (qcow2) formats that are optimal for the target environment. |
| VDDK init image | Provide the registry URL to the VMware Virtual Disk Development Kit (VDDK) image. Specify the value without the HTTP scheme https:// or http://. For example, docker.io/myorganization/vddk:v8.0.3. |
Perform the following steps to change a setting.
- Click the pencil icon next to each value.
- Adjust the value in the pop-up window.
- Click Save after making changes.
Host Cluster
The configurable settings are described in the following table. These are automatically defined when the VM Migration Assistant is installed on your VMO cluster.
| Setting | Description |
|---|---|
| Default Transfer Network | Select a default migration network. If no network is selected, the pod network is used by default. |
Perform the following steps to change a setting.
- Click the pencil icon next to each value.
- Adjust the value in the pop-up window.
- Click Save after making changes.
YAML Tab
The YAML tab displays a YAML editor for the provider resource.
View and edit the Custom Resource for the provider on this tab.
Credentials Tab
The Credentials tab has configurable settings for the provider credentials.
Configure Provider Credentials
The configurable settings are described in the following table. These were originally defined when you performed the steps in Create Source Providers.
| Setting | Description |
|---|---|
| Username | Your vSphere / ESXi account username. For example, user@vsphere.local. |
| Password | Your vSphere / ESXi account password. |
| Skip certificate validation | Enabling this option bypasses x509 CA verification. In production environments, do not enable if you are using a custom registry with self-signed SSL certificates, as the certificate can be provided in the next setting. |
| CA certificate | Upload or drag and drop the CA certificate for your vSphere / ESXi. You can also use the Fetch certificate from URL option if your CA certificate is not third party or self-managed. |
Perform the following steps to change a setting.
- Click on Edit credentials.
- Update the value for each setting that you want to change.
- Click Update credentials after making changes.
Virtual Machines Tab
The Virtual Machines tab displays a table of virtual machines from the provider.
You can initiate migrations from this tab by selecting VMs and clicking on Create migration plan. Refer to Create Migration Plans for guidance.
Hosts Tab
The Hosts tab displays a table of hosts from the provider. This tab is not visible on host clusters.
You can configure the migration network for each listed host in the table.
Using the default management network for migration can lead to poor performance. Disk transfer operations may saturate may saturate network bandwidth, which could affect communication between vCenter and ESXi hosts.
A dedicated migration network can improve performance and reduce risks to the VMware environment.
Configure Provider Host Network
-
For each host that you want to configure, click the checkbox next to the hosts' name.
-
Click on Select migration network.
-
The configurable settings are described in the following table.
Setting Description Network Select the migration network to use from the drop-down Menu. ESXi host admin username Specify the ESXi host admin username. For example, root.ESXi host admin password Specify the ESXi host admin password. -
After making changes, click Save.
Networks Tab
The Networks tab displays a table of NetworkAttachmentDefinitions from the cluster. This tab is only visible on host clusters.
You can select a default migration network for the cluster to improve disk transfer performance. If no network is selected, the pod network is used by default, which may not be optimal.
Configure Default Transfer Network for Host Cluster
- Click on Set default transfer network.
- Select a network name from the drop-down Menu.
- After making changes, click Save.
Plan Settings
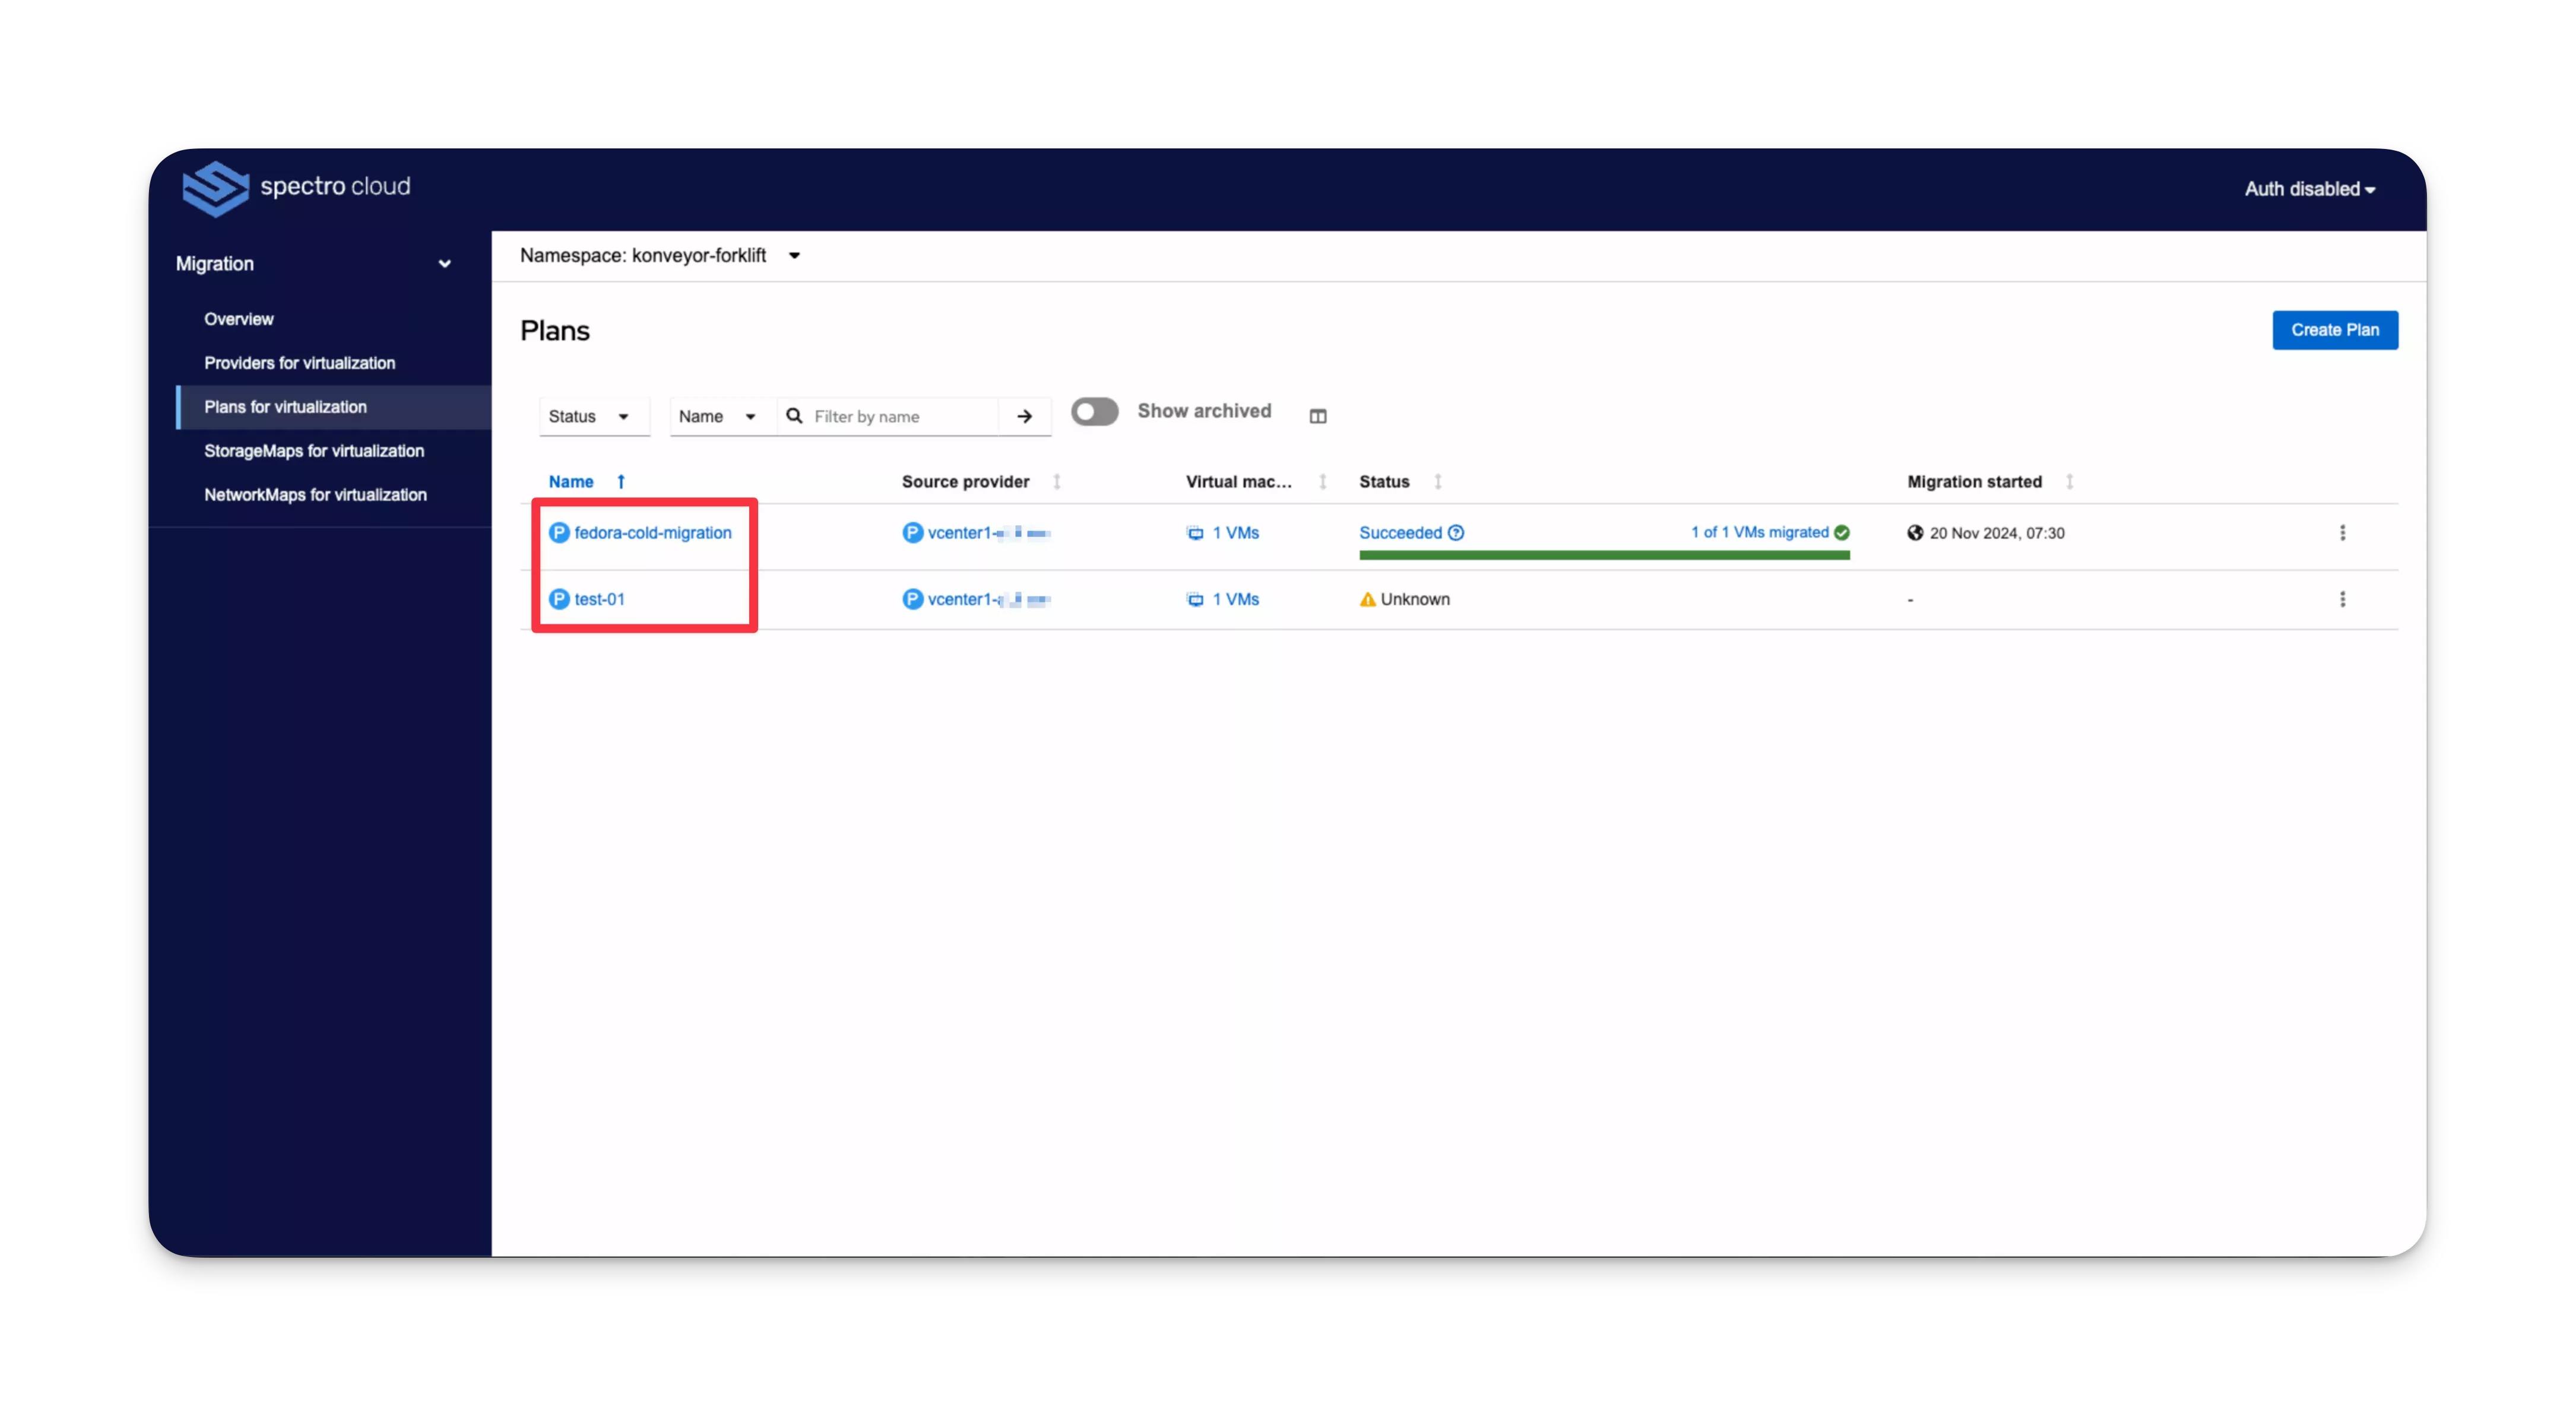
Navigate to your plans by clicking Plans for virtualization on the left Main Menu.
Click on a plan name to view the plan settings.

Details Tab
The Details tab has configurable settings for the plan.
Configure Plan Details
The configurable settings are described in the following table. Some of these were originally defined when you performed the steps in Create Migration Plans.
| Setting | Description |
|---|---|
| Warm migration | Choose whether this will be a warm or cold migration. A cold migration is when VMs are shut down at the start of migration. A warm migration is when VMs are shut down during the final switchover. |
| Target namespace | The target namespace is where the migrated VMs will be located on your VMO cluster. |
| Disk decryption passphrases | Provide a list of passphrases for LUKS-encrypted devices on the VMs you intend to migrate. |
| Transfer Network | Change the migration transfer network for this plan. If a migration transfer network is defined for the source provider and exists in the target namespace, it is used by default. Otherwise, the pod network is used. |
| Preserve static IPs | Choose whether to preserve the static IPs of the VMs migrated from vSphere. |
| Root device | Choose the root filesystem to convert. By default, the first root device is chosen in multi-boot systems. You can specify a root device (for example, /dev/sda1) for multi-boot systems, but if it is not detected as a root device, the migration will fail. |
Perform the following steps to change a setting.
- Click the pencil icon next to each value.
- Adjust the value in the pop-up window.
- Click Save after making changes.
YAML Tab
The YAML tab displays a YAML editor for the plan resource.
View and edit the Custom Resource for the plan on this tab.
Virtual Machines Tab
The Virtual Machines tab displays a table of VMs from the migration plan.
You can view the status of your VM migrations in the Pipeline status column for each VM.
Remove VMs from Plan
Perform the following steps to remove VMs from your plan. You can only remove VMs from a plan if the plan has not yet been started.
-
Click the checkbox next to each VM that you want to remove from the plan.
-
Click on Remove virtual machines.
-
Click Delete in the pop-up window.
infoIf you only have one VM remaining in your plan, delete the plan instead, as deleting all VMs from a plan is not allowed.
Resources Tab
The Resources tab displays the calculated resources of your VMs from the migration plan.
Mappings tab
The Mappings tab displays the network and storage mappings for the migration plan.
Configure Plan Mappings
The configurable settings are described in the following table. These were originally defined when you performed the steps in Create Migration Plans.
| Setting | Description | Example |
|---|---|---|
| Network map | The source provider to target provider network map. Adjust the mapping, or leave the default mapping in place. | VM Network / Pod Networking |
| Storage map | The source provider to target provider storage map. Adjust the mapping, or leave the default mapping in place. | vsanDatastore / spectro-storage-class |
Perform the following steps to change a setting.
- Click on Edit mappings.
- Click on the drop-down Menu for each map and select a different option from the list.
- Click Update mappings after making changes.
Hooks Tab
The Hooks tab displays the migration hooks for the migration plan.
Configure Plan Hooks
Perform the following steps to enable a hook.
-
Click on Enable hook toggle for either Pre migration hook or Post migration hook.
-
The configurable settings are described in the following table.
Setting Description Hook runner image If enabling a pre or post migration hook, provide registry URL to the hook-runner or custom image. Make sure you specify the registry URL without the HTTP scheme https://orhttp://. For example,quay.io/konveyor/hook-runner.Ansible playbook You can optionally provide an Ansible playbook for the hook. You can only specify a playbook if you are using a hook-runner image. -
Click Update hooks after making changes.
Storage Maps
Navigate to your storage maps by clicking StorageMaps for virtualization on the left Main Menu. A storage map defines the mapping of source storage domains to target storage classes or datastores, ensuring VM disks are correctly placed in the destination environment.
Storage maps are visible on the StorageMaps for virtualization page once you have created a migration plan. Click on a storage plan name to view the its details.
Network Maps
Navigate to your network maps by clicking NetworkMaps for virtualization on the left Main Menu. A network map defines the mapping of source networks to target networks, ensuring VM network interfaces are correctly connected in the destination environment.
Network maps are visible on the NetworkMaps for virtualization page once you have created a migration plan. Click on a network plan name to view the its details.