VM Overcommitment and Memory Optimization
Virtual Machine Orchestrator (VMO) enables higher VM density on existing infrastructure by leveraging memory overcommit and CPU optimization techniques, per-VM optimizations, and kernel-level memory deduplication. These methods allow operators to run more VMs per host while reducing physical infrastructure costs.
To help achieve higher density and resource optimization, there are several features you can use.
This page applies to clusters and VMs created using PaletteAI VM Launchpad. For clusters and VMs created with VMO Pack using the Virtual Machine Orchestrator pack, refer to our VMO Pack Overcommit and Memory Optimization guide.
Optimization Features
VMO provides memory optimization at two levels:
- Cluster level - Memory overcommit, Kernel Same-Page Merging (KSM), and CPU pinning control how physical resources are shared across all VMs.
- Individual VM level - Guest memory tuning and headless mode reduce per-VM overhead.
| Feature | Scope | Advantages | Disadvantages |
|---|---|---|---|
| Memory overcommit | Cluster | Increases VM density by reclaiming unused reserved memory. | Risks resource contention under peak load. |
| Kernel Same-Page Merging (KSM) | Cluster | Reduces memory consumption by merging duplicate pages across similar VMs. | Adds CPU overhead from continuous page scanning. |
| CPU pinning | Cluster | Eliminates unpredictable latency by dedicating cores to specific workloads. | Removes pinned cores from the shared scheduling pool. |
| Headless mode | VM | Frees up wasted memory on unused graphical devices. | Disables Virtual Network Computing (VNC) console access to the VM. |
| Guest memory tuning | VM | Allows guests to use more memory than formally reserved by Kubernetes. | Exposes the guest to memory pressure under contention. |
Memory Overcommit
Memory is typically the first resource constrained in VM-dense environments. Memory overcommit allows allocating more virtual memory to VMs than physically exists on a host. For example, if you have a host with 64 GB of memory and you allocate 96 GB of memory to the VMs running on that host, you are overcommitting by 32 GB. This works because most VMs do not use peak memory simultaneously, and most virtualization platforms have internal memory optimizations in place to minimize contention between the VMs.
Overcommit strategies can increase VM density per host, reduce hardware costs, and improve overall resource utilization. However, memory overcommitment introduces trade-offs, including potential resource contention, and requires workload awareness and regular monitoring.
Traditional Memory Handling
Virtualization platforms use different techniques to manage memory pressure:
-
Memory ballooning - Enables a hypervisor to dynamically reclaim unused memory from VMs through a guest driver. The guest OS releases unneeded memory and leverages its local swap file, which can introduce latency.
-
Memory tiering (NVMe storage) - Migrates inactive data to faster storage to free memory. This is transparent to VMs and requires platforms such as vSphere 9.
Memory tiering has different names depending on the virtualization platform. It may be called memory overcommit acceleration, swap-to-fast storage, or persistent/storage-class memory.
VMO Memory Handling
VMO is built on KubeVirt, which runs VMs as Kubernetes pods. Memory for VMs is controlled through Kubernetes requests and limits. Because of this architecture, there is no native VM-level dynamic memory reclamation. Additionally, KubeVirt does not support balloon drivers.
Instead, VMO provides memory optimization through cluster-wide overcommit ratios, per-VM guest memory tuning, and KSM.
Cluster-Level Memory Settings
The following settings apply to every VM on the cluster and are configured through the VMO pack values.
| Setting | Description | Default | Impact |
|---|---|---|---|
cpuAllocationRatio | Controls ratio of vCPUs to physical CPUs. | 10:1 | Higher ratios allow more VMs per host at the cost of potential CPU contention. |
memoryOvercommit | Sets the percentage of memory overcommit cluster-wide. | 100% | Values >100% enable overcommit percentage per host. |
In the example below, the cpuAllocationRatio is set to 12 VMs per physical CPU, and memoryOvercommit is configured
for 1.5x of the physical RAM per host.
additionalDevConfig:
  cpuAllocationRatio: 12
  memoryOvercommit: 150
Per-VM Guest Memory Settings
You can apply per-VM memory settings to individual VMs or to a VM template so that all VMs provisioned from the template inherit consistent optimization settings.
spec:
  terminationGracePeriodSeconds: 30
  domain:
    resources:
      overcommitGuestOverhead: true
      requests:
        memory: 1024M
YAML Configuration
| Setting | Description |
|---|---|
overcommitGuestOverhead | Instructs KubeVirt not to charge the VM's memory request for hypervisor overhead (typically ~100–200 MB per VM). Allows tighter resource packing. |
memory.guest and requests.memory | The VM's guest OS can use more RAM than Kubernetes has reserved for the pod, at the operator's discretion. |
The following is an example of per-VM memory configuration. In this example, Kubernetes reserves 4 Gi for the pod, but the guest OS sees 6 Gi of available memory.
spec:
  domain:
    resources:
      requests:
        memory: 4Gi
      limits:
        memory: 4Gi
    memory:
      guest: 6Gi
UI Configuration (Headless Mode)
Enabling headless mode removes the virtual graphics device from a VM, saving 16 MB of memory per VM. This also disables VNC console access, so it is appropriate only for server workloads that do not require a graphical console.
You can enable headless mode through the VMO UI when creating or editing a VM.

Kernel Same-Page Merging (KSM)
KSM is a Linux kernel feature that allows deduplication of infrequently updated memory pages across VMs and merges those to free memory. This is especially effective when multiple VMs run the same OS image with the same application behavior. However, this feature can result in additional CPU overhead from memory scanning.
Configure KSM
You can configure KSM to run on all nodes or on specific nodes. When you enable this feature, virt-handler enables KSM
and labels the nodes with kubevirt.io/ksm-enabled=true so workloads can discover and schedule onto KSM-enabled nodes.
The setting is for additionalConfig and not additionalDevConfig.
Use the following YAML in your VMO pack to enable KSM on all nodes.
additionalConfig:
  ksmConfiguration:
    nodeLabelSelector: {}
Use the following YAML in your VMO pack to enable KSM on specific nodes.
additionalConfig:
  ksmConfiguration:
    nodeLabelSelector:
      matchLabels:
        node-role.kubernetes.io/worker: ""
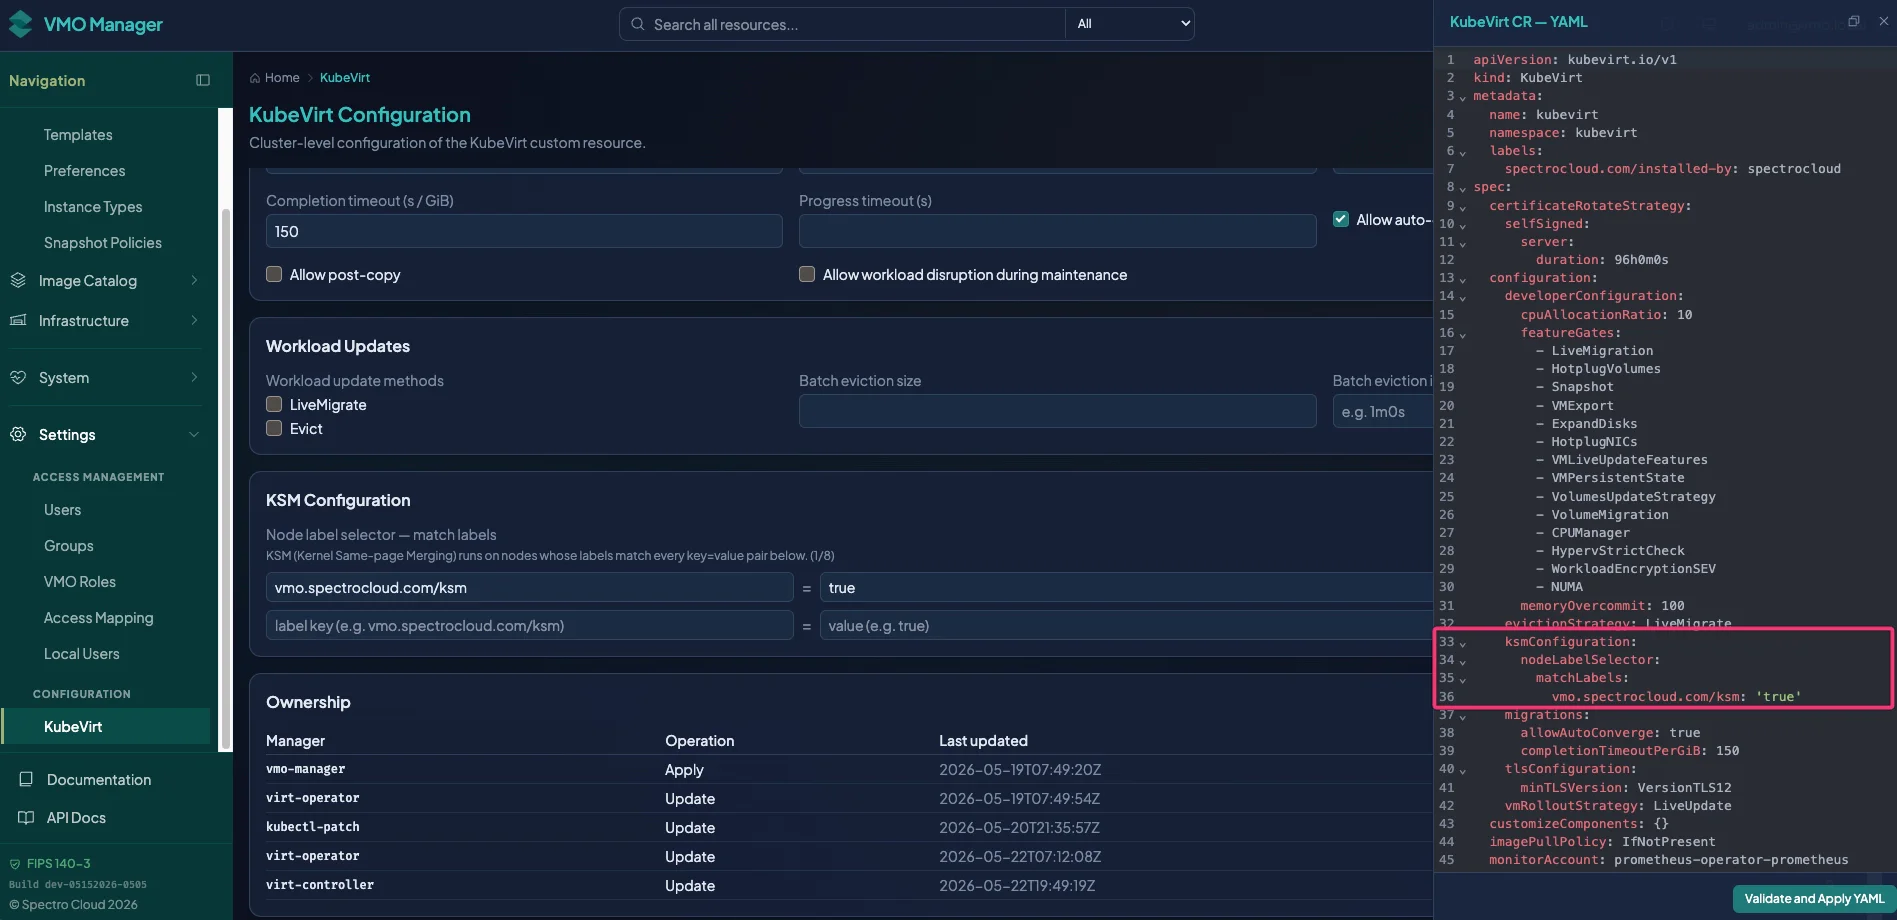
Removing ksmConfiguration from the VMO pack disables KSM only on nodes managed by KubeVirt. Nodes where KSM was
enabled externally remain unchanged and must be managed manually.
CPU Pinning (Performance Optimization)
CPU pinning (also known as CPU affinity) is the technique of dedicating one or more host physical CPU cores to a specific workload, preventing the OS scheduler from migrating that workload. This eliminates the performance-degrading effects of context switching, cache misses, and resource contention.
In a virtualized KubeVirt environment, this is achieved by integrating the Virtual Machine Instance (VMI) specification with the underlying host resource management provided by the Kubelet. The goal is to provide host-level performance characteristics to the VM. To implement CPU pinning, you must adjust the following components:
Adjust the Kubelet
The Kubelet on the host node must be configured to enable static, exclusive resource allocation. This sets the foundation for a Guaranteed Quality-of-Service (QoS) environment.
| Setting | Value | Impact |
|---|---|---|
cpu-manager-policy | static | Enables the CPU Manager to reserve exclusive CPU cores for Guaranteed QoS pods. |
cpu-manager-policy-options | full-pcpus-only=true | Ensures that only full physical cores are allocated, preventing allocation of individual hyper-threads from the same core to different workloads, thereby maintaining cache isolation. |
memory-manager-policy | static | Enables memory alignment with the dedicated CPU resources (NUMA affinity). |
topology-manager-policy | single-numa-node | Forces all resources (CPU, memory, devices) required by a pod/VMI to be allocated from a single NUMA node to minimize inter-node latency. |
topology-manager-scope | pod | Applies the single-numa-node policy at the VMI (pod) level. |
reserved-memory | 0:memory=<reservedMemory>Mi | Defines a configurable reserved memory region on a specific NUMA node (for example, node 0) for the OS and Kubelet operations, protecting system stability. |
Enable KubeVirt Feature Gates
The KubeVirt operator configuration must explicitly enable
feature gates that allow the virtualization
layer to interact with the Kubelet's advanced resource managers. Specifically, enable NUMA and CPUManager.
Virtual Machine Instance (VMI) Specification
The VirtualMachineInstance manifest defines the exact CPU topology and resource requirements that trigger the CPU
pinning mechanism. To achieve Guaranteed QoS and enable pinning, the VMI resources.requests values for CPU and memory
must be the same as the CPU and memory values listed in resources.limits. In addition, the host node must have
sufficient free, unreserved CPU and memory resources on a single NUMA node to satisfy the VMI requirements.
apiVersion: kubevirt.io/v1
kind: VirtualMachineInstance
spec:
  domain:
    cpu:
      dedicatedCpuPlacement: true
      numa:
        guestMappingPassthrough: {}
      model: host-passthrough
      cores: 2
      sockets: 1
      threads: 1
    memory:
      hugepages:
        pageSize: 2Mi
    resources:
      limits:
        cpu: 3
        memory: 8Gi
      requests:
        cpu: 3
        memory: 8Gi
.....
Node Memory Reservation
Each node in a VM Launchpad cluster reserves part of its memory for host services, so VMs cannot use the full memory of the node. The memory that VMs and other pods can request is the node's allocatable memory, which is lower than its total memory. Kubernetes places a VM only on a node that has enough allocatable memory left after the memory requests of the pods that already run on it.
Some values differ between FIPS appliances, which use the FIPS Piraeus variant, and non-FIPS appliances, which use the Non-FIPS Piraeus or Non-FIPS Portworx variant. Refer to Install VM Launchpad for the variants.
The following table lists the memory that each node sets aside. Host services and the eviction threshold lower the allocatable memory of the node. The etcd and Kubernetes API server memory requests use part of the allocatable memory of each control plane node.
| Reservation | Applies To | Memory | Effect |
|---|---|---|---|
| Host services, such as containerd, the Kubelet, and Portworx on Portworx appliances | Every node | About 3 GiB | Lowers allocatable memory |
| Eviction threshold | Every node on non-FIPS appliances | 1 GiB | Lowers allocatable memory |
| etcd memory request | Control plane nodes | 1 GiB | Uses allocatable memory |
| Kubernetes API server memory request | Control plane nodes | 2 GiB | Uses allocatable memory |
Without these reservations, a large VM can take the memory that the control plane needs, and the node can become
NotReady. If a VM does not start because no node has enough allocatable memory, refer to
Scenario - Large VM Stays Pending with Insufficient Memory.
Check Node Memory Before You Upgrade
When you upgrade an existing appliance from a version earlier than 4.10.25, the upgrade changes how much memory each node can give to pods:
-
On non-FIPS appliances, the allocatable memory of each node drops by about 4 GiB, and its allocatable ephemeral storage drops by 10 GiB. The Kubelet restarts once on each node.
-
On all appliances, each control plane node gains 3 GiB of etcd and Kubernetes API server memory requests. The etcd and API server pods restart once on each control plane node.
A non-FIPS node that already uses more memory than its new allocatable memory can reject or evict pods when the Kubelet restarts. On FIPS appliances, allocatable memory does not change, but each control plane node still needs room for the new memory requests.
Before you upgrade, check each node. You need kubectl access to the cluster. From the cluster Overview tab,
download the Kubeconfig file, and then set the KUBECONFIG
environment variable to point to it.
-
List the total memory, allocatable memory, and allocatable ephemeral storage of each node. Keep the output, because you compare it with the values after the upgrade.
kubectl get nodes --output custom-columns=NODE:.metadata.name,CAPACITY:.status.capacity.memory,ALLOCATABLE:.status.allocatable.memory,EPHEMERAL:.status.allocatable.ephemeral-storageExample OutputNODE CAPACITY ALLOCATABLE EPHEMERAL
cp-1 791164024Ki 791061624Ki 3015913437925
cp-2 791163884Ki 791061484Ki 464118175795
cp-3 792130500Ki 792028100Ki 3015913437925Kubernetes reports node memory with the
Kisuffix and might report ephemeral storage in bytes. 1 GiB is 1048576 Ki, or 1073741824 bytes. -
Check the memory that the pods on each node request.
for node in $(kubectl get nodes --output name); do
  echo "$node"
  kubectl describe "$node" | grep --after-context=6 "Allocated resources"
done
Confirm that each node passes the following check. The
ROLEScolumn ofkubectl get nodeslistscontrol-planefor each control plane node. If a node does not pass, stop or migrate VMs on the node before you upgrade.-
On non-FIPS appliances, the requested memory of each node, plus 3 GiB on control plane nodes, must fit within its allocatable memory from step 1 minus 4 GiB.
-
On FIPS appliances, the requested memory of each control plane node, plus 3 GiB, must fit within its allocatable memory from step 1.
-
-
Check the memory that the pods on each node use. Use SSH to sign in to the node with the account that you created when you installed VM Launchpad, and then read the memory usage of all pods.
cat /sys/fs/cgroup/kubepods.slice/memory.currentThe value is in bytes. Divide it by 1073741824 to convert it to GiB. The value must stay below the total memory of the node from step 1 minus 4 GiB. If it does not, stop or migrate VMs on the node before you upgrade.
-
Check the ephemeral storage that the pods on each node request. The output of step 2 lists it as
ephemeral-storageunderAllocated resources. The value must stay below the allocatable ephemeral storage of the node from step 1, minus 10 GiB on non-FIPS appliances.If the value does not stay below that limit, lower the ephemeral storage requests on the node before you upgrade. The check compares requests, not disk usage, so deleting files on the node does not help.
-
List the pods on the node and the ephemeral storage that each one requests.
kubectl get pods --all-namespaces --field-selector spec.nodeName=<node-name> --output custom-columns=NAMESPACE:.metadata.namespace,POD:.metadata.name,EPHEMERAL:.spec.containers[*].resources.requests.ephemeral-storageReplace
<node-name>with the name of the node. -
Cordon the node so that Kubernetes does not schedule new pods on it.
kubectl cordon <node-name> -
Move the pods with the largest requests to another node. Delete them so that Kubernetes schedules them on another node, or migrate the VMs that run in them. You can also lower their ephemeral storage requests.
-
If no other node has room, add disk to the node before you upgrade.
After the upgrade, confirm that the node accepts pods again. If
kubectl get nodeslists the node asSchedulingDisabled, runkubectl uncordon <node-name>. -
Verify Node Memory After You Upgrade
-
Confirm that every node reports a
Readystatus.kubectl get nodes -
(Non-FIPS appliances only) Confirm that the allocatable memory of each node is 4 GiB (4194304 Ki) below its total memory, and that its allocatable ephemeral storage dropped by about 10 GiB compared with the value that you listed in Check Node Memory Before You Upgrade.
kubectl get nodes --output custom-columns=NODE:.metadata.name,CAPACITY:.status.capacity.memory,ALLOCATABLE:.status.allocatable.memory,EPHEMERAL:.status.allocatable.ephemeral-storageExample OutputNODE CAPACITY ALLOCATABLE EPHEMERAL
cp-1 49280452Ki 45086148Ki 137887767511
cp-2 49280464Ki 45086160Ki 137887767511
cp-3 49280468Ki 45086164Ki 137887767511In this example, the allocatable memory of each node is 4194304 Ki below its capacity. Compare the difference between the two values rather than the values themselves, because the difference is the same on every node.
-
Confirm that the Kubelet restart did not reject or evict any pods, and that no container ran out of memory. Both commands print nothing when no pod is affected.
kubectl get pods --all-namespaces --field-selector=status.phase=Failed | grep --ignore-case --extended-regexp "OutOf|UnexpectedAdmission|Evicted"
kubectl get pods --all-namespaces --output jsonpath='{range .items[*]}{.metadata.namespace}{" "}{.metadata.name}{" "}{.status.containerStatuses[*].lastState.terminated.reason}{"\n"}{end}' | grep OOMKilled
A pod that failed before the upgrade can also appear in the output. To tell them apart, run
kubectl describe pod <pod-name> --namespace <namespace>and compare the times that it lists with the time of the upgrade. Replace<pod-name>and<namespace>with the values from the output.
Best Practices
Consider the following guidance when planning overcommit and optimization strategies:
-
Start conservatively - Begin with memory overcommit at 120–150% and increase gradually based on observed behavior.
-
Monitor for memory pressure - Watch for Out-Of-Memory (OOM) events and pod evictions. Overcommit without monitoring can cause cascading failures.
-
Use headless mode for server workloads - Saving 16 MB per VM compounds meaningfully at scale, and server workloads rarely need VNC access.
-
Enable KSM for homogeneous environments - KSM provides the highest benefit when many VMs share the same OS image and application stack.
-
Reserve CPU pinning for latency-sensitive workloads - Pinned CPUs are unavailable to other VMs, so use this only where predictable performance is a requirement.
-
Avoid overcommitting memory for real-time or database workloads - Applications with consistent high memory utilization do not benefit from overcommit and may experience instability.