Manage VMs
This guide covers the VM list page, VM actions, the VM detail page, and day-to-day operations in PaletteAI VM Launchpad. To provision new VMs, refer to Create a VM.
VM List Page
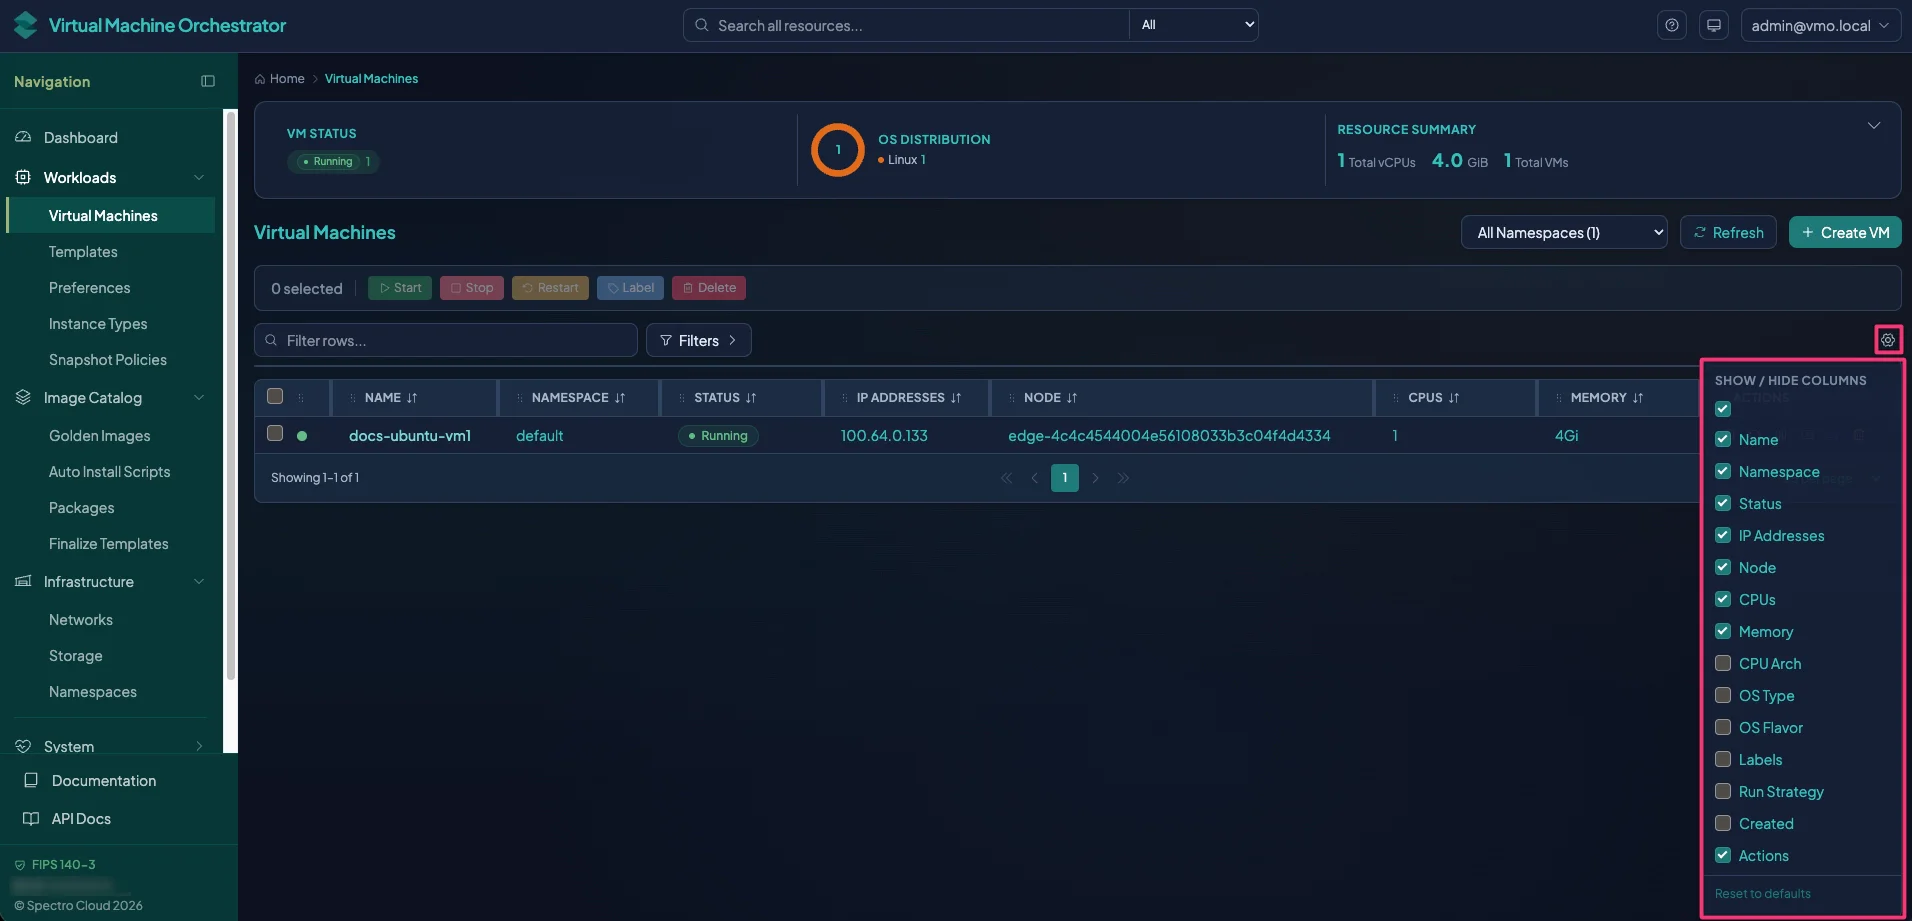
Navigate to Workloads > Virtual Machines (/vms) to view all virtual machines.
Default View
| Element | Description |
|---|---|
| All Namespaces | The list defaults to showing VMs across all namespaces you can access. For users with cluster-wide access (ClusterRoleBinding or VMO IAM role mapping), this means all managed namespaces. For OIDC users with namespace-scoped RoleBindings granted through Settings > Access Management, only VMs in their permitted namespaces appear. Use the namespace dropdown to filter further by a specific namespace or to view per-namespace counts. |
| Status Indicators | Each VM shows its status: Running, Stopped, Pending, Failed, or other KubeVirt states. The status reflects the Virtual Machine Instance (VMI) when the VM is running. |
| Columns | Name, namespace, status, node (when running), CPU, memory, run strategy, OS type, and other metadata. The Created column is available but hidden by default. Use the column visibility control to show or hide columns. |
Filter and Sort
- Use the filter bar to filter by status, namespace, node, run strategy, memory, OS type, and OS flavor.
- Select column headers to sort. The table supports multi-column sort in some views.
- Use the search box to find VMs by name or other attributes.
Actions from the List
From the VM list, you can perform the following actions.
| Action | Description |
|---|---|
| Start | Start a stopped VM. |
| Stop | Gracefully stop a running VM. |
| Force Stop | Immediately power off a running VM without a graceful shutdown. Requires confirmation and might cause data loss. |
| Restart | Restart a running VM. |
| Delete | Delete the VM and its owned DataVolumes (with confirmation). |
| Open Console | Open the VNC console in a new tab (when the VM is running). |
| Clone | Create a copy of the VM with a new name and namespace. |
| Create Template | Create a VmTemplate from the VM. |
Open a row's context menu to access more actions.
VM Actions
Start, Stop, Restart
| Action | Description |
|---|---|
| Start | Starts the VM. For VMs with runStrategy: Manual or runStrategy: Halted, this creates or resumes the VMI. |
| Stop | Stops the VM. Sends a graceful shutdown signal to the guest. Falls back to a runStrategy patch if the stop subresource is unavailable. |
| Restart | Stops and then starts the VM. The guest receives a reboot signal when the QEMU guest agent is installed. |
Stop and restart require the VM to be running. For VMs with runStrategy: Always, stop temporarily sets the strategy to
Halted.
Force Stop
Force Stop immediately powers off a running VM without a graceful shutdown, equivalent to pulling the power cord. It stops the VM with a zero grace period and removes the underlying VirtualMachineInstance, so the guest stops even when a graceful Stop is hung. Use Force Stop only when a graceful Stop does not shut the VM down.
Force Stop does not let the guest flush in-flight writes, so it might cause data loss. VM Launchpad requires a confirmation before it force stops a VM.
Pause and Unpause
| Action | Description |
|---|---|
| Pause | Suspends a running VM. The guest stops running, and VM Launchpad holds its CPU and memory state in memory. A paused VM continues to reserve its memory and compute. |
| Unpause | Resumes a paused VM from the point where it was suspended. |
Pause and Unpause let you briefly suspend a VM without writing its state to disk or stopping it.
Live Migration
Migrate live-migrates the VM to another node. The VM
continues running during migration with minimal downtime. Every disk backed by a PersistentVolumeClaim (PVC), including
hot-plugged volumes, must use the ReadWriteMany access mode. If any of these disks uses ReadWriteOnce or
ReadOnlyMany, VM Launchpad disables Migrate and displays the reason next to it. To create ReadWriteMany disks,
use a StorageClass that supports that access mode. Refer to
Create a StorageClass for the StorageClass options.
Migration status can be viewed in the VM detail page or via the migrations API.
Hot-Plug Volumes
| Action | Description |
|---|---|
| Add Volume | Attach a new volume to a running VM. The volume must be a DataVolume or PVC. The disk appears in the guest after attachment. |
| Remove Volume | Detach a volume from a running VM. The volume must support hot-unplug. Ensure the guest has unmounted the disk before removing. |
Hot-plug requires the HotplugVolumes or DeclarativeHotplugVolumes feature gate and appropriate storage
configuration. Refer to Feature Gate Considerations.
VNC Console
The VNC console provides a browser-based remote desktop to the VM.
Open the Console
- Ensure the VM is running.
- Select the VM you want to open a console on, and select Console from tab.
- A new tab opens with a noVNC-based viewer. You can interact with the VM as if at its keyboard.
Console Features
| Feature | Description |
|---|---|
| Paste | Paste text from your machine into the VM. If your browser does not grant clipboard access automatically, VM Launchpad displays a dialog where you can paste the text and select Send. |
| Ctrl+Alt+Del | Send the Ctrl+Alt+Del key combination to the VM. |
| Full Screen | Use the full-screen control for a larger view. |
| Reconnect | If the connection drops, refresh or reopen the console to reconnect. |
The VNC console requires the VM to be running and an interactive UI session. If the VM is stopped, start it first from the Overview tab or VM list. API-key-authenticated requests cannot open a VNC connection.
Paste Text into the Console
-
Copy text on your machine.
-
Select Paste in the console toolbar.
-
If your browser grants clipboard access, VM Launchpad types the text into the VM.
-
If the Paste Text dialog appears, paste the text into the dialog and select Send.
VM Detail Page
Select a VM name to open its detail page. The page includes Overview, Configuration, Console, Snapshots, Events, Diagnostics, and YAML tabs. The Console and Snapshots tabs appear only when your role grants the required VM operate or snapshot permissions.
Overview Tab
The Overview tab presents VM details on the left and resource metrics on the right. A toolbar at the top of the page provides the common VM operations.
| Field | Description |
|---|---|
| Name | The VM name. |
| Namespace | The namespace that contains the VM. |
| Status | Current VM and VMI status, such as Running or Stopped. |
| Node | The node where the VMI is running (when running). |
| IP Addresses | The IP addresses assigned to the VM. |
| Created | The date and time the VM was created. |
| Run Strategy | The VM run strategy, such as Always, RerunOnFailure, Manual, or Halted. |
| UID | The Kubernetes unique identifier (UID) for the VM. |
| Labels | Key-value labels applied to the VM, such as app.kubernetes.io/managed-by and kubevirt.io/vm. Select the edit icon to add or remove labels. |
| Annotations | Key-value annotations applied to the VM, such as the observed API versions and guest OS. Select the edit icon to add or remove annotations. |
| Conditions | KubeVirt status conditions for the VM, such as Ready, DataVolumesReady, LiveMigratable, and StorageLiveMigratable. |
| Metrics | CPU usage, memory usage, IOPS, I/O traffic, and network traffic charts when the cluster metrics pipeline is available. |
| Actions | The toolbar provides start, stop, restart, pause, open console, migrate, clone, save as template, and delete. Available actions depend on VM state and your permissions. |
Configuration Tab
The Configuration tab displays the full VM configuration as a read-only summary, grouped into sections. Select Edit Configuration to modify these settings through a form rather than raw YAML. Refer to Edit a VM for details.
| Section | Description |
|---|---|
| Compute | Instance type, CPU cores, CPU sockets, CPU threads, and memory. |
| General | Run strategy, machine type, firmware UUID, architecture, and preference. |
| Disks | Each disk with its name, type, bus, boot order, source, and size. Select Hot-plug Disk to attach a disk to a running VM. |
| Network Interfaces | Each interface with its name, model, type, network, MAC address, and IP addresses. Select Hot-plug Interface to attach a NIC to a running VM. |
| Cloud-Init | The user data and network data applied at first boot, or a note when none is configured. |
| Scheduling & Lifecycle | Eviction strategy, grace period, priority class, node selector, tolerations, and affinity rules. |
| Devices & Firmware | EFI boot, TPM, USB redirection, and passthrough device status. |
Console Tab
Quick access to the VNC console. Same as opening the console from the Overview tab.
Snapshots Tab
The Snapshots tab lets you attach an automated snapshot policy, take manual snapshots, and restore or delete existing snapshots.
In the Snapshot Policy section, attach a snapshot policy to take snapshots automatically on a schedule. Select a policy from the drop-down menu. The menu lists the snapshot policies created in your environment. If no policies are available, create one under Workloads > Snapshot Policies. Refer to Snapshot Policies for details.
In the VM Snapshots section, select Take Snapshot to capture the current state of the VM. A snapshot name is
optional; if you leave it empty, VM Launchpad auto-generates one, such as docs-ubuntu-vm1-snap-YYYY-MM-DD-HHmmss. Each
snapshot appears in the list with the following columns.
| Column | Description |
|---|---|
| Name | The snapshot name. |
| Source | How the snapshot was created, such as Manual or from a snapshot policy. |
| Created | The date and time the snapshot was taken. |
| Status | The snapshot status, such as Ready. |
| Last Restored | The date and time the snapshot was last restored, or a dash when it has not been restored. |
| Indications | Conditions captured with the snapshot, such as Online (taken while the VM was running) or NoGuestAgent (the QEMU guest agent was not available to quiesce the guest). |
| Actions | Restore the VM from the snapshot, or Delete the snapshot. |
Important Behaviors
- The VM does not need to be stopped to take a snapshot; online snapshots are supported.
- To restore a snapshot, the VM must be stopped first.
- Restoring overwrites the current VM state. Consider taking a new snapshot before you restore.
Events Tab
Review Kubernetes events associated with the VM and its VMI. Use this tab to diagnose scheduling, image pull, and startup issues.
Diagnostics Tab
Review guest-agent diagnostics for a running VM, such as operating system information, interfaces, and filesystems.
YAML Tab
View and edit the raw VirtualMachine manifest. Use Patch for targeted changes or Full Update to replace the
entire spec. Changes are applied immediately to the cluster.
Editing YAML files directly may result in an invalid or inconsistent state. Use the Configuration form when possible.
Edit a VM
Open the edit form from the Configuration tab by selecting Edit Configuration. The form mirrors the Configuration tab sections. Select Save Changes to apply your edits, or Cancel to discard them. To edit the raw manifest instead, use the YAML tab.
Changes are applied live when possible. Disks and NICs hot-plug onto a running VM, and an instance type change applies without a restart when the new CPU and memory fit within the hot-plug envelope. If a change exceeds the hot-plug envelope, the VM requires a restart for the change to take effect.
Edit Form Sections
The VM edit form groups settings into the following sections.
| Section | Description |
|---|---|
| Compute | Select a predefined instance type, or set CPU and memory manually. Changing the instance type updates both CPU and memory. |
| General | Run strategy and preference. |
| Disks | Add or remove disks. Select Add Disk to attach a disk. |
| Network Interfaces | Add or remove interfaces and set the model, type, and MAC address. Select Add Interface to attach a NIC. |
| Cloud-Init | Edit the user data and network data applied at first boot. |
| Scheduling & Lifecycle | Eviction strategy, grace period, priority class, node selector, tolerations, and affinity rules. |
| Devices | Enable USB redirection, confidential computing (SEV/TDX), TPM, and EFI boot, or add PCI or GPU passthrough devices. |
| Boot Order | Select the first boot device: Disk or Network (PXE). |
Changes are applied when you save. The VM may need to be restarted for some changes to take effect, such as CPU cores, memory, or firmware.
CPU Socket Changes (Directional Behavior)
CPU sockets are handled differently from CPU cores and threads.
| Change | Behavior |
|---|---|
| Increasing sockets on a running VM | VM Launchpad saves the spec and then triggers a live migration automatically. The VM keeps running; no restart is required. This works when KubeVirt's CPU hot-plug prerequisites are met (a maxSockets value at least as large as the new socket count, which VM Launchpad ensures on save). |
| Decreasing sockets | VM Launchpad saves the spec, but the new socket count only takes effect after a restart. The UI surfaces a banner and a toast reminding you to restart. |
| Unchanged sockets | Saves apply the patch with no side effects. Other compute-related edits (cores, threads, memory, firmware) still follow the standard "restart required" rule. |
The live migration on increase flow depends on the cluster supporting KubeVirt live migration, compatible storage, and a
VM evictionStrategy that allows migration. If live migration fails after the patch succeeds, the VM keeps the new
socket count in its spec. You can retry the migration with the Migrate action or restart the VM.
KubeVirt only hot-plugs CPU sockets when cpu.maxSockets was present on the VirtualMachineInstance when it started. VMs
created before VM Launchpad started injecting this default fail the auto-migration on their first socket increase.
Restart the VM once so the new maxSockets takes effect on the running instance. Later socket increases live migrate as
expected. In-UI edits also require the vmo:vm:operate permission to trigger the auto-migration. Users with Update but
not Operate permission receive a restart prompt instead.
Memory Hot-Plug
You can increase the memory of a running VM without a restart when the VM has Max Guest Memory set to a value greater than its current Guest Memory. VM Launchpad applies the additional memory to the running guest, up to the Max Guest Memory ceiling.
If Max Guest Memory is not configured, or you raise memory above that ceiling, the new memory takes effect only after you restart the VM. To configure the memory hot-plug ceiling on an instance type or preference, refer to Instance Types & Preferences.
Delete a VM
- Select Delete from the VM list or detail page.
- Confirm the deletion. The dialog may warn about owned resources, such as DataVolumes.
- The VM and its owned DataVolumes are deleted. DataVolumes that are not owned by the VM, such as shared golden images, are not deleted.
Deletion is irreversible. Ensure you have backups or snapshots if the data is important.
Guest Agent Diagnostics
When the QEMU guest agent is installed and running in the guest, VM Launchpad can query guest identity and other diagnostics.
Diagnose Endpoint
The Diagnose action (or /api/v1/vm/diagnose) returns the following information.
| Field | Description |
|---|---|
| Hostname | Guest hostname. |
| OS | Guest operating system info. |
| Agent Version | QEMU guest agent version when available. |
This helps verify that the guest agent is working and that the VM is correctly configured.
When the Guest Agent Is Missing
If the guest agent is not installed:
- VNC clipboard sync may not work.
- Some VM actions, such as graceful shutdown, may fall back to less graceful methods.
- Guest diagnostics are unavailable.
Enable Install QEMU Guest Agent in the VM creation wizard (Lifecycle step, Cloud-Init section) to auto-inject installation via cloud-init. For existing VMs, install the guest agent manually from the package repository or use an image that already includes it.