Create a VM
This guide walks through the VM creation wizard and batch creation options in PaletteAI VM Launchpad.
Overview
The VM creation wizard guides you through seven steps: Source, Compute, Storage, Network, Hardware, Lifecycle, and Review. The wizard supports creating VMs from templates, golden images, ISOs, or blank disks.
Use the Advanced button to open the YAML preview drawer. The preview updates live as you change selections in each step.
Prerequisites
-
A cluster created using the VM Launchpad. Refer to Install VM Launchpad for guidance.
-
Credentials to access the VM Launchpad UI hosted on your cluster. You can use either Keycloak OIDC credentials or local admin credentials configured during cluster creation.
Create a Virtual Machine
After you upload an OS ISO, create a golden image, or create a template, you can deploy a VM.
-
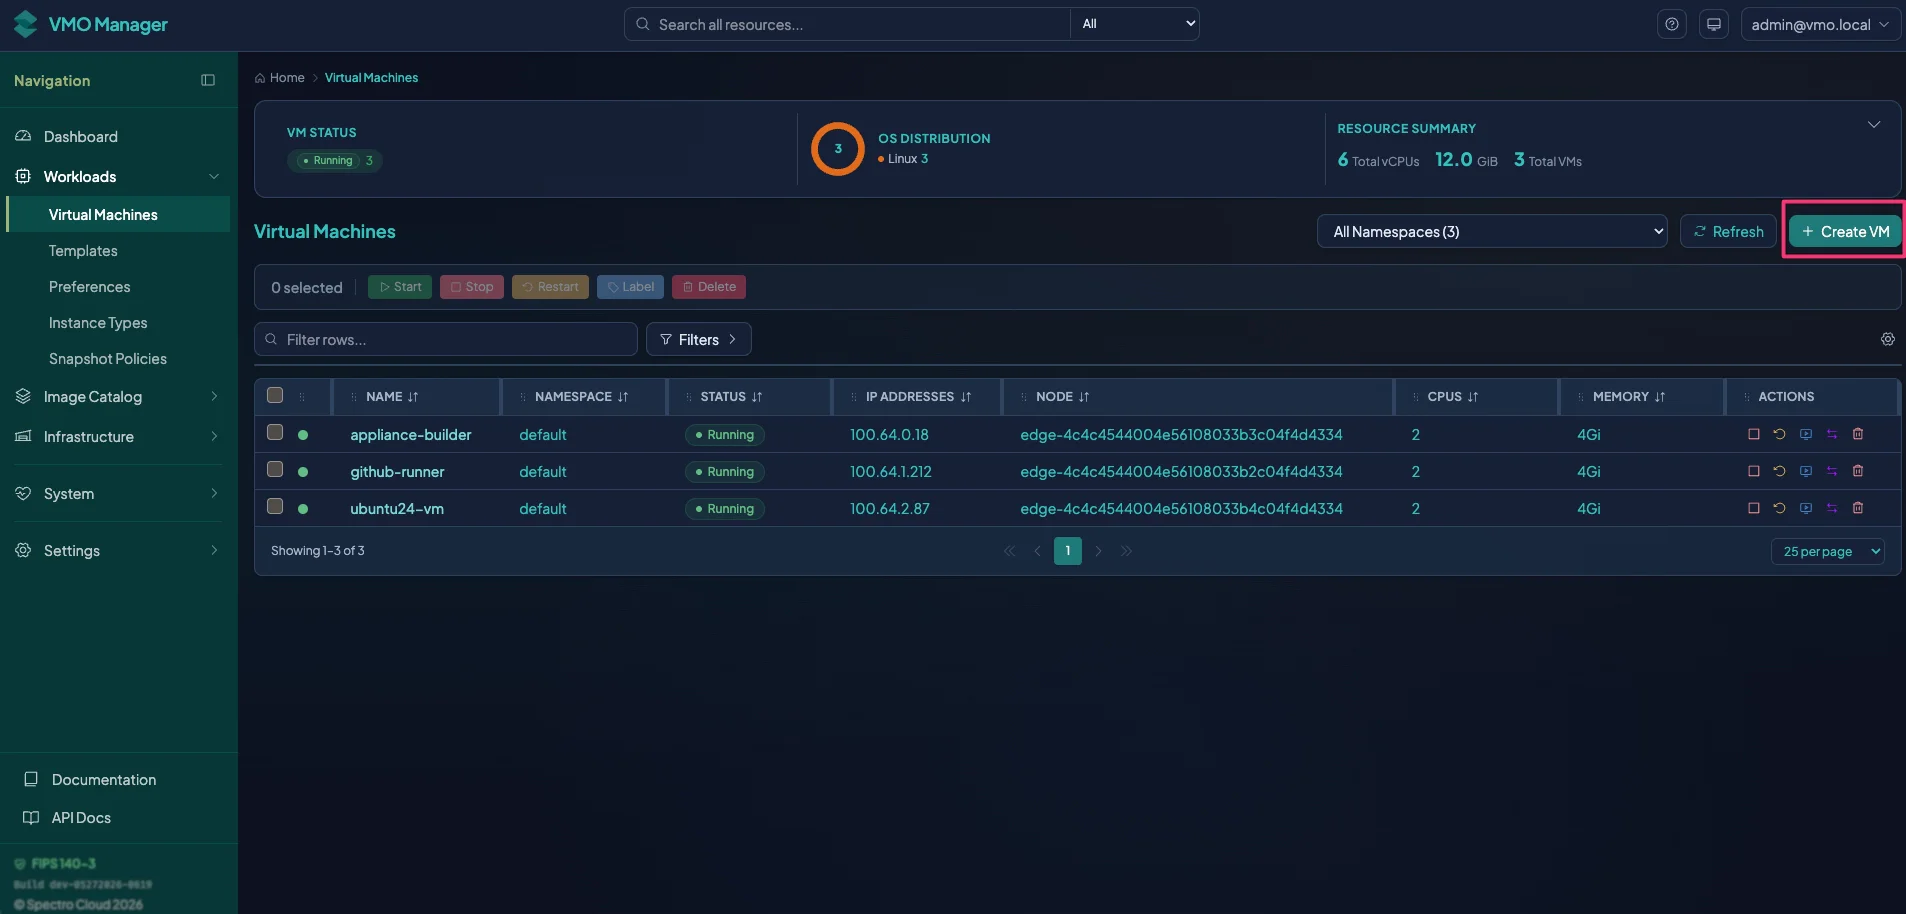
From the left main menu, select Workloads > Virtual Machines.
-
Select Create VM.
-
The Create Virtual Machine wizard opens. Complete the following fields on the Source wizard step.
Parameter Description Source Select the source for the VM: Template, Image/ISO, or Custom. OS Select Linux or Windows. Namespace Select the namespace that contains your ISO. Template If you select Template as the source, select an existing VmTemplateimage from the Template drop-down menu.Image/ISO If you select Image/ISO as the source, select an existing golden image, disk image, or OS ISO file from the Image/ISO drop-down menu. Custom If you select Custom, VM Launchpad creates a VM from scratch with no template, golden image, or ISO as its source. Configure the VM's compute, storage, and network settings manually in the following wizard steps. VM Name Enter a unique name for the VM. This field only accepts lowercase letters, numbers, and hyphens. The name must end with a letter or digit. infoYou can select a golden image from any namespace you can access, not only the namespace of the VM you are creating. VM Launchpad provisions the VM directly from the golden image through the Create VM flow, so you no longer need to create a template first to use a golden image across namespaces.
-
Configure any extra Source options for your VM. Select Next when you complete this page.
Parameter Description Batch Select Create multiple VMs. Under Count, enter the number of VMs to create. From the Naming drop-down menu, select the naming convention: name-1, name-2orname01, name02. Under Start #, enter the number where the naming convention begins.VM Preference In the Filter preferences field, enter the operating system family name, or select the operating system family from the available options. Linux distributions appear for Linux image/ISOs, and Windows preferences appear only for Windows image/ISOs. Refer to VM Preferences for details. Labels Enter key-value pair labels to add to your VM. Annotations Enter key-value pair Kubernetes annotations to add to your VM. Select Disable PCI Hole 64-bit when you use legacy operating systems, such as Windows XP or Windows 2003. VM Launchpad sets the kubevirt.io/disablePCIHole64: "true"annotation on the VMI template spec. Refer to Running legacy Windows versions for more information. -
On the Compute wizard step, select Instance Type to use predefined instance types, or select Custom to set CPU and memory resource options manually.
Mode Description Instance Type Select a predefined CPU and memory profile. The u1prefix indicates general-purpose types with balanced CPU and memory.Custom Set CPU and memory resources manually. Consider what the operating system and any applications running in the operating system need before you select custom values. For more about instance types, custom mode, and creating your own profiles, refer to Instance Types & Preferences.
warningIf you select an instance type during VM creation, you cannot change the CPU cores, CPU sockets, CPU threads, or memory individually. You can change the instance type after provisioning, but the new CPU and memory values do not take effect until you restart the VM.
If you select Custom, configure the following parameters.
Parameter Description CPU Cores Enter the number of vCPUs for the VM. This value is visible to the guest operating system. Memory Enter the amount of memory for the VM and select Gifor gigabytes orMifor megabytes.Run Strategy From the drop-down menu, select Always, RerunOnFailure, Manual, or Halted for the VM default power behavior. Resource Requests & Limits Optional. Control Kubernetes resource reservations for overcommit and QoS. Set memory requests lower than guest memory for overcommit. -
In the Scheduling section, select the eviction strategy for the VM.
Parameter Description Eviction Strategy From the drop-down menu, select LiveMigrate, LiveMigrateIfPossible, or None. Grace Period Enter the number of seconds to allow a VM to shut down cleanly before it is forcefully terminated. Priority Class Enter a priority class value. Kubernetes schedules VMs with a higher priority number before VMs with a lower priority number. Start Strategy From the drop-down menu, select Normal or Paused.
-
On the Storage wizard step, verify that a root disk is configured. The root disk is automatically populated from the ISO you selected in the Source step. Adjust the disk size in
GiorMi. When you create a VM from a template, this value overrides the template default value. -
Select the Storage Class from the drop-down menu.
-
(Optional) Add extra disks by selecting Add Disk, and add extra CD-ROMs by selecting Add CD-ROM.
-
Select the Boot Order for the VM. By default, Disk is selected. You can also boot from CD-ROM or Network. Then select Next.
-
On the Network wizard step, the VM has one interface assigned with the Pod Network (masquerade) mode by default. This option provides outbound connectivity through NAT. Select Add NIC to add extra NICs as needed, and select either Pod Network (masquerade) or Multus Network (bridge). You can create extra Network Attachment Definition (NAD) resources in Infrastructure > Networks.
Under DNS Settings, you can optionally define the Hostname and Subdomain for the VM.
When batch mode is enabled and you have bridge NICs, a Batch Static IP Assignment section appears. Enter IP/CIDR, gateway, and DNS for each VM. Use Fill Down to auto-increment IPs by incrementing the last octet (for example,
192.168.1.10/24→192.168.1.11/24,192.168.1.12/24). Then select Next.infoThe file server is available on the Pod Network (masquerade) network. If you need to install QEMU or other binaries, install them during the golden image build over the Pod Network (masquerade) network.
-
For Hardware (optional), configure any advanced hardware settings required for the VM. You can skip this step for basic VMs. Then select Next.
Display optional advanced hardware settings.
Category Setting Description Firmware UEFI / EFI Boot Enable UEFI instead of BIOS. Firmware Secure Boot Requires EFI. Enables SMM. Firmware Persistent EFI Variables Persist NVRAM. Requires the VMPersistentState feature gate. Firmware Machine Type Override the default machine type, such as q35.Firmware SMBIOS Optionally configure UUID and serial values. CPU Advanced CPU Model Select host-passthrough,host-model, or a named model, such asSkylake-ServerorEPYC-Rome.CPU Advanced Dedicated CPU Placement Pin vCPUs to physical cores. CPU Advanced NUMA Topology Passthrough Pass host NUMA topology to the guest. CPU Advanced CPU Features Add require, force, disable, or forbid rules for specific CPU features. Devices Virtio RNG Add a random number generator. Devices Tablet Input Add a USB input device for pointer precision. Devices Headless Create the VM without a graphics device. Devices Video Type Select VGA, Virtio, or Bochs. Devices TPM Device Add a Trusted Platform Module. Select Persistent TPM State to keep the TPM state in persistent storage. Devices USB Redirection Enable client passthrough. Requires KubeVirt 0.44 or later. Features ACPI and APIC Enable ACPI or APIC. VM Launchpad enables these settings by default. Features HyperV Enlightenments Configure Windows VM settings, such as relaxed, VAPIC, and spinlocks.Clock and Timers Clock Mode Select UTC or timezone. Clock and Timers Timers Configure PIT, RTC, HPET, or HyperV timers. Memory Hugepages Enable large memory pages and set the page size to 2Mi or 1Gi. Memory Overcommit Guest Overhead Exclude per-VM overhead from the memory request. Security Confidential Computing Select AMD SEV, SEV-SNP, or Intel TDX when supported by the cluster. Host Devices PCI or GPU passthrough Attach PCI or GPU devices discovered and registered in KubeVirt. Use Cluster Device Management if needed. warningOn FIPS-enabled clusters, do not enable UEFI / EFI Boot unless you also enable Secure Boot. The FIPS-hardened
virt-launcherimage ships only the Secure Boot signed OVMF firmware, so a VM that requests EFI with Secure Boot disabled fails to start with the errorEFI OVMF roms missing for booting in EFI mode with SecureBoot=false. Either enable Secure Boot, which requires a signed guest boot chain, or leave both settings disabled so that the VM uses BIOS.Persistent EFI Variables and Persistent TPM State require the
VMPersistentStatefeature gate. If the wizard displays Requires the VMPersistentState feature gate under either option, add the gate on the KubeVirt Configuration page.If you enable either option, KubeVirt stores that state on a PersistentVolumeClaim (PVC). Secure Boot alone does not need one. The StorageClass for the PVC must support the
Filesystemvolume mode. KubeVirt uses the first StorageClass that it finds in the following order:-
The StorageClass set in
spec.configuration.vmStateStorageClasson theKubeVirtresource. To set it, select Open YAML on the KubeVirt Configuration page. -
The StorageClass annotated with
storageclass.kubevirt.io/is-default-virt-class: "true". -
The cluster's default StorageClass.
If KubeVirt finds none of these StorageClasses, the VM does not start.
infoThe CPU Model drop-down menu lists only the models the cluster supports and preserves unsupported values rather than dropping them. Refer to CPU Model Field for details on dynamic discovery, caching, and the unavailable-model warnings.
-
-
On the Lifecycle page, configure snapshot policy and Cloud-Init settings.
The following table describes the snapshot policy options. Refer to Snapshot Policies for more information.
Display Snapshot Policy settings.
Setting Description Snapshot Policy Use None (no snapshot policy), or select a snapshot policy to attach to the VM after creation. Create Select Create to launch the Create Snapshot Policy mini-wizard. Display Name Enter the user-facing name for the snapshot policy. Resource Name Enter the Kubernetes resource name for the snapshot policy. Description Enter an optional description for the snapshot policy. Interval Select the automatic snapshot interval. Intervals range from every hour to every seven days. Max Retention Enter the number of snapshots to keep per VM. Shorter intervals and higher retention values can increase storage usage. infoSnapshot policies define automatic snapshot schedules, including interval, retention count, and time window. VMs created from a template inherit the template's snapshot policy annotation if one is set.
The following table describes the Cloud-Init options.
Display Cloud-Init settings.
Setting Description Data source indicator View the data source used by the VM. A ConfigDrive data source inherited from template badge appears when a template forces ConfigDrive. Install QEMU guest agent? Select Yes or No. This field is required before VM creation. Select Yes to install the guest agent through cloud-init. Use internal package repository Keep the internal VM Launchpad repository configured in the guest after the guest agent installation. This field appears only when guest agent installation is enabled. User Data Enter cloud-init user data with the Cloud-Init Editor. Linux cloud-init content typically begins with #cloud-config.Network Data Optionally enter Netplan v2 YAML for interfaces, static IPs, routes, and nameservers at first boot. If you assigned static bridge IPs in the Network step, VM Launchpad automatically generates and merges network data on submit. Use the Network Data field only for advanced overrides. warningIf you enable guest agent installation, upload the
qemu-guest-agentpackage for your operating system and architecture to the internal repository under Image Catalog > Packages before launching the VM. Otherwise, the agent installation fails. This reminder does not block VM creation.(Optional) Access the Cloud-Init Editor by selecting Cloud-Init Configuration under User Data. The editor supports the following user data input modes.
Display the Cloud-Init editor.
Mode Description Editor Type or paste the payload directly. Template Select a cloud-init config from the Auto-Install Scripts catalog. The list is filtered to cloud-init entries only because auto-install installer scripts have no effect on a VM that boots from an already-installed disk. Upload Load a .yamlor.txtfile from your machine.URL Fetch the payload from a reachable URL. Your browser performs the fetch. warningCloud-init runs only at first boot. Changes to user data or network data after the VM boots do not run again unless you issue the
cloud-init cleancommand and reboot. -
Select Finish to provision your VM.
Validate
-
From the left main menu of the VM Launchpad console, select Workloads > Virtual Machines.
-
Locate your VM in the list. The status column displays Provisioning during VM creation and changes to Running after the VM starts.
-
Select the VM to view its details, including IP address, the node the VM is running on, and metrics.
infoWhen the VM is running, you can change the CPU core count or CPU thread count, but you must restart the VM to apply the change. You can change the number of CPU sockets without restarting the VM, but this causes the VM to live migrate to another node in the cluster. You can also increase memory without a restart when the VM has Max Guest Memory set above its current memory. Refer to Manage VMs for details.
-
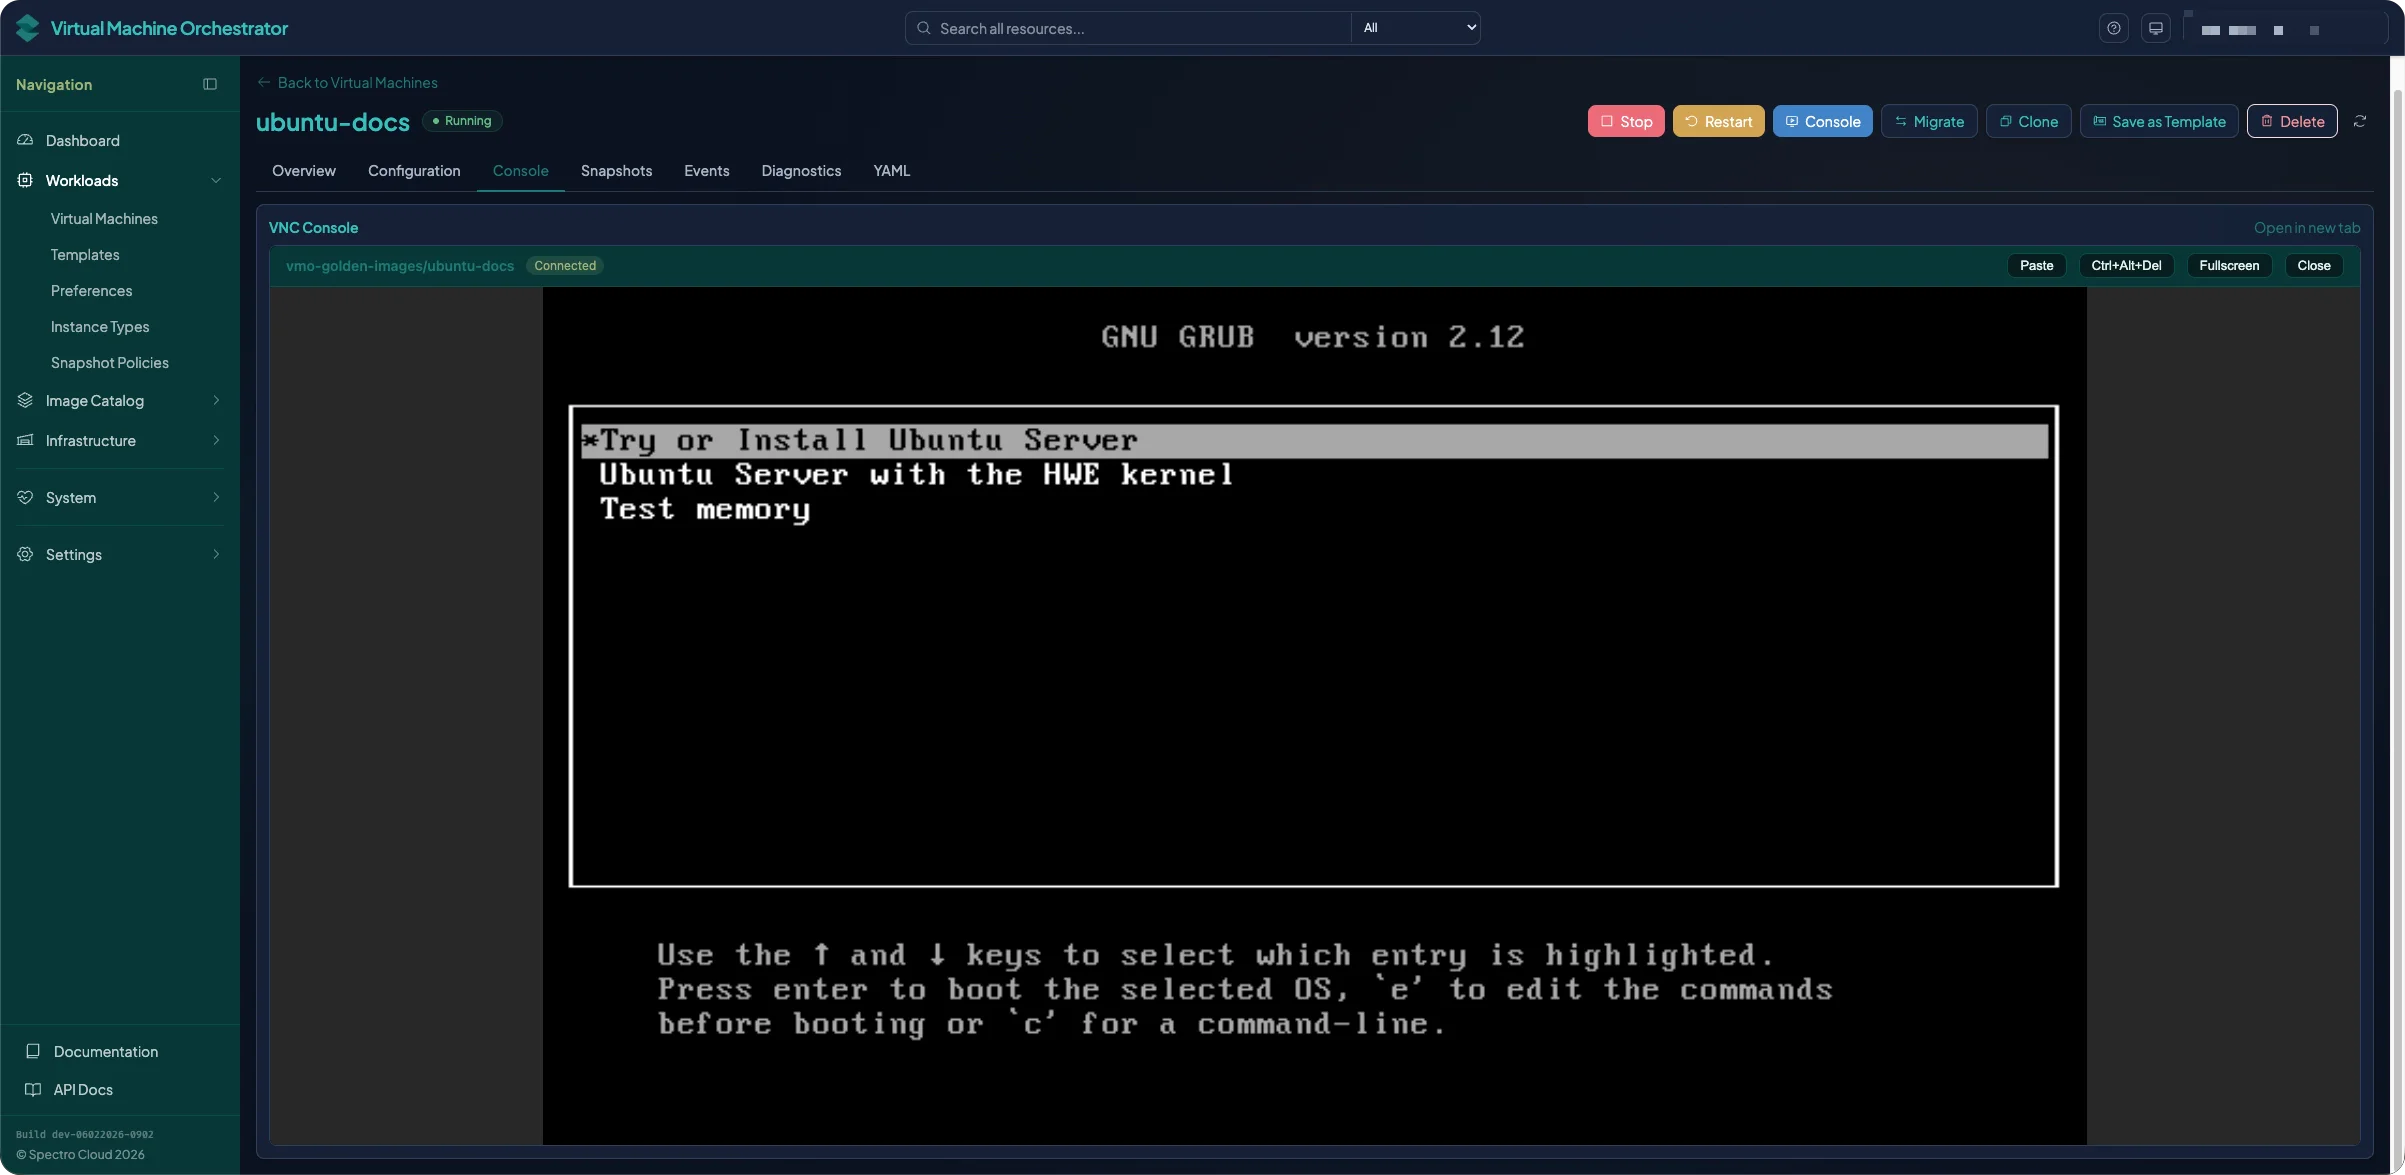
Select the Console tab to open a noVNC-based remote console. Use the console to interact with the VM keyboard.
Next Steps
After your VM is running, refer to Manage VMs for day-to-day operations, such as starting and stopping VMs, live migration, hot-plugging volumes, editing the VM, snapshots, and guest-agent diagnostics.