Create Edge Cluster Profile
Cluster profiles are declarative, full-stack models that Palette uses to provision, scale, and maintain Kubernetes clusters. They are composed of layers, which can be Kubernetes manifests, Helm charts, or packs. Packs are a collection of files and configurations deployed to a cluster to provide core infrastructure functionality or customize the cluster's behavior through add-on integrations.
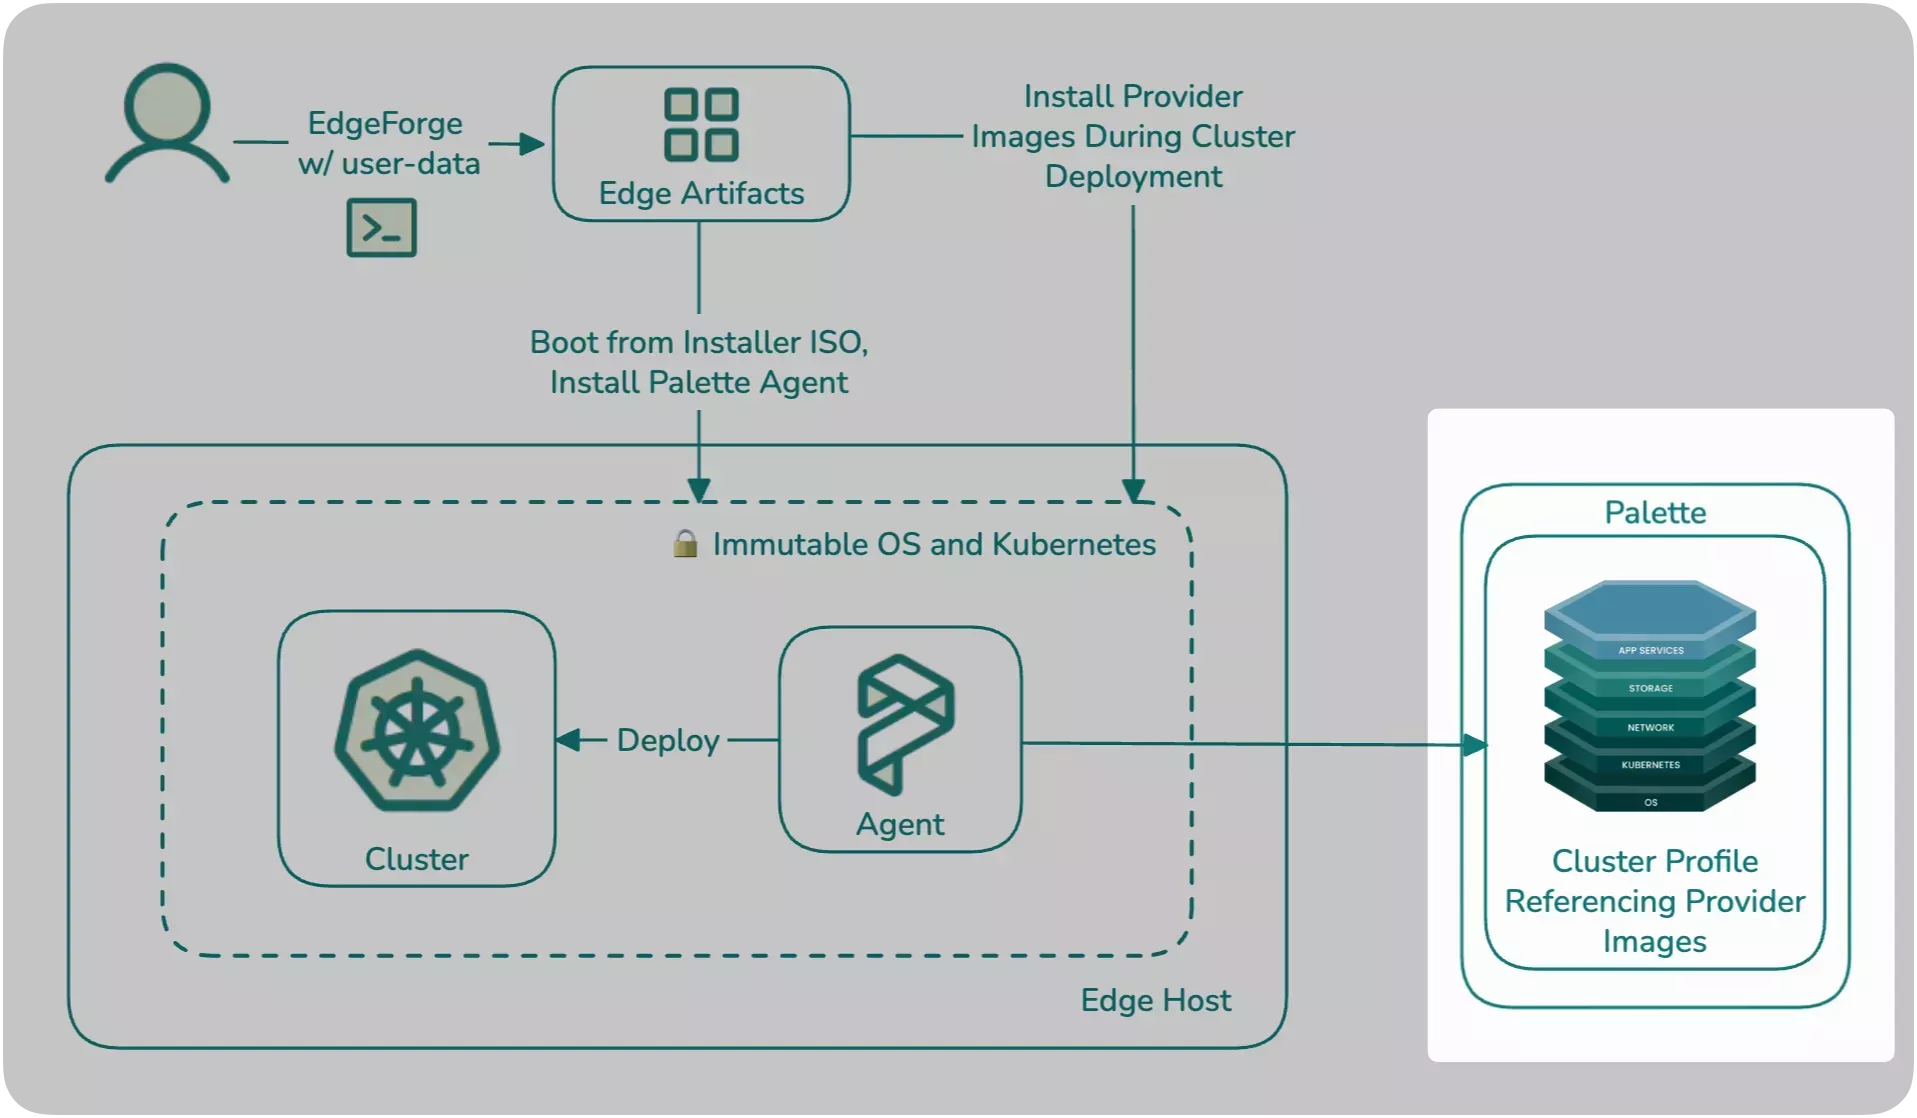
This tutorial teaches you how to create an Edge native cluster profile that includes the core infrastructure layers and a demo application that you can access on your browser. You will learn about cluster profile layers and how to reference the provider images that you built in the Build Edge Artifacts tutorial. After creating the cluster profile, you will proceed to the next tutorial, where you will use the installer ISO to bootstrap the Edge installation on your host and use it as a node for deploying your first Edge cluster.
Prerequisites
- You have completed the steps in the Build Edge Artifacts tutorial, including building the installer ISO and provider image, and pushing the provider image to a registry.
- A Palette account with tenant admin access.
- One available IP address on the same network as the Edge host for the MetalLB load balancer.
Create Cluster Profile
Log in to Palette and select Profiles from the left main menu. Click Add Cluster Profile to create your cluster profile.
Follow the wizard to create a new profile. In the Basic Information section, assign gs-profile as the name, and
provide a brief profile description. Set the type as Full and add the tag env:edge. You may leave the version
empty, but note that the version defaults to 1.0.0 if not specified. Click Next to continue.
The Cloud Type section allows you to choose the infrastructure provider for the cluster. Select Edge Native and click Next.
The Profile Layers section defines the packs that compose the profile.
Add the BYOS Edge OS pack to the OS layer. This pack enables you to use the custom image you built in the Build Edge Artifacts tutorial as the operating system for the cluster nodes.
| Pack Name | Version | Registry | Layer |
|---|---|---|---|
| BYOS Edge OS | 2.1.0 | Palette Registry | Operating System |
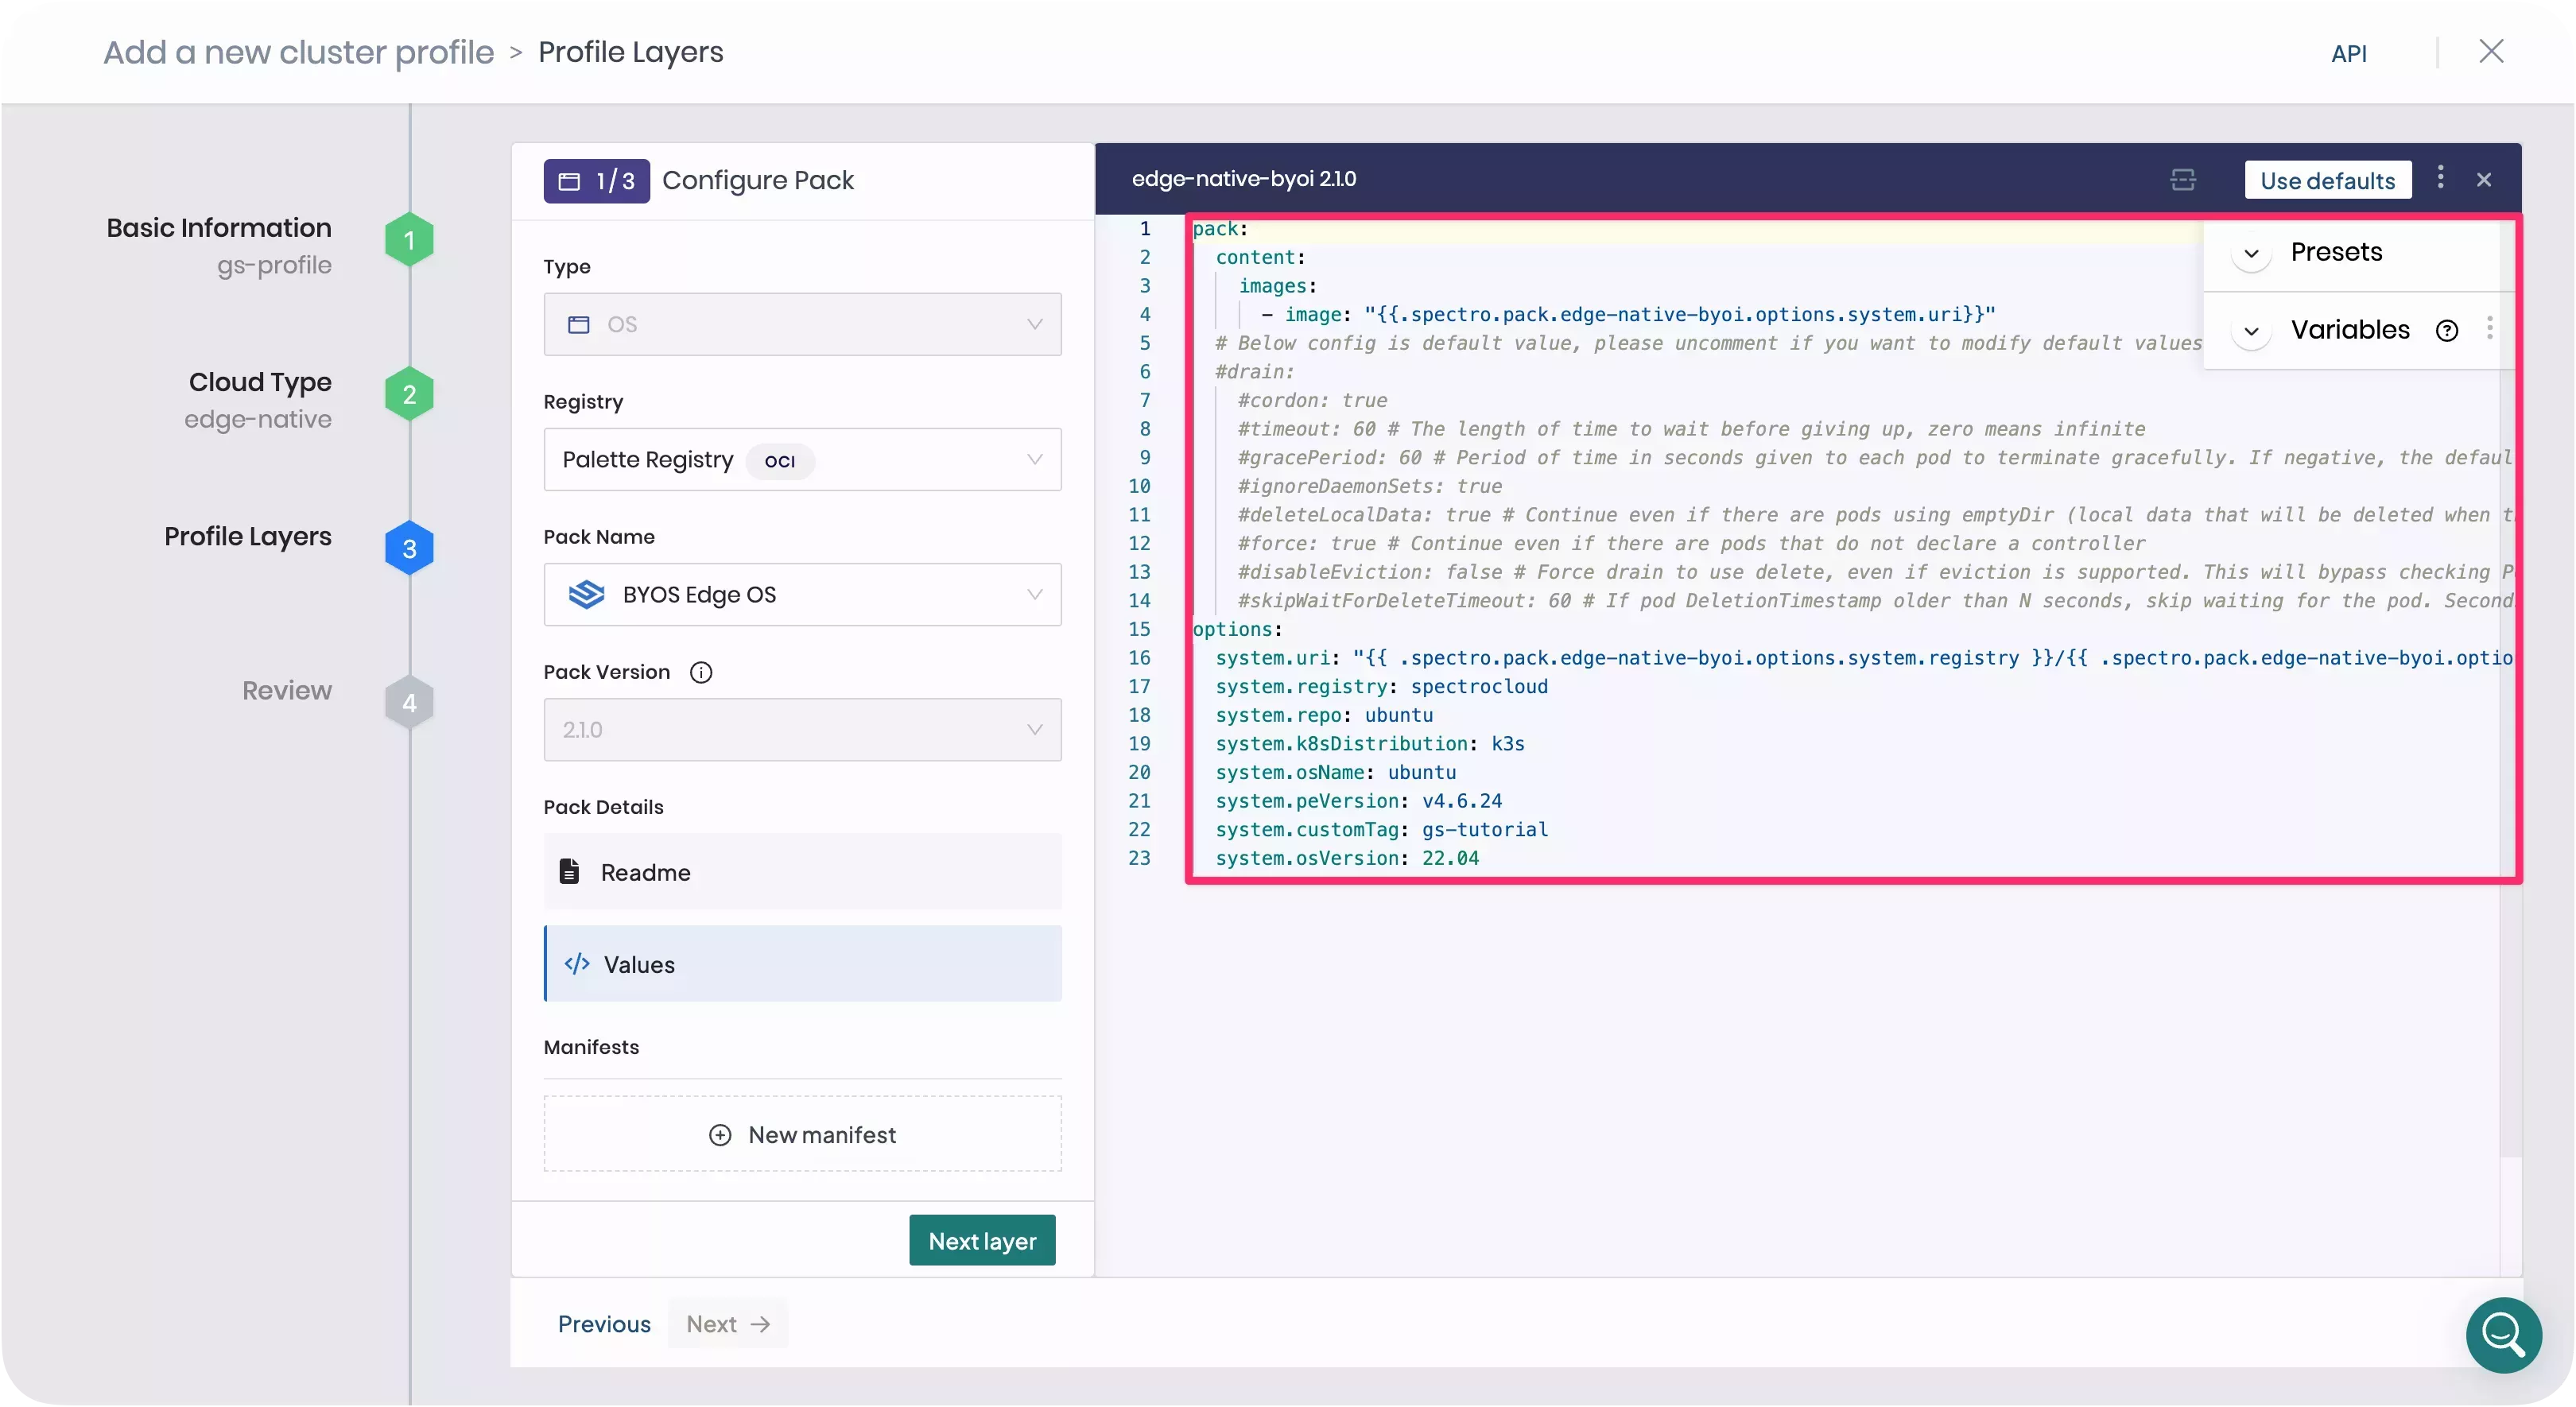
Under Pack Details, select Values to open the YAML editor. Replace the default layer manifest with the custom manifest generated in the Build Edge Artifacts tutorial. This makes the cluster pull the provider images from the image registry specified in the Build Edge Artifacts tutorial during deployment.
Alternatively, if you no longer have access to the manifest, you can manually fill in the options.system.uri parameter
with the address of the provider image you pushed to the registry. For example, the address used in this tutorial is
spectrocloud/ubuntu:k3s-1.32.3-v4.6.24-gs-tutorial.
The following image displays the OS layer with the custom manifest and registry credentials.
Click Next Layer to continue. Add the following Kubernetes layer to your cluster profile. Ensure the Kubernetes version matches the version used in the provider images.
| Pack Name | Version | Registry | Layer |
|---|---|---|---|
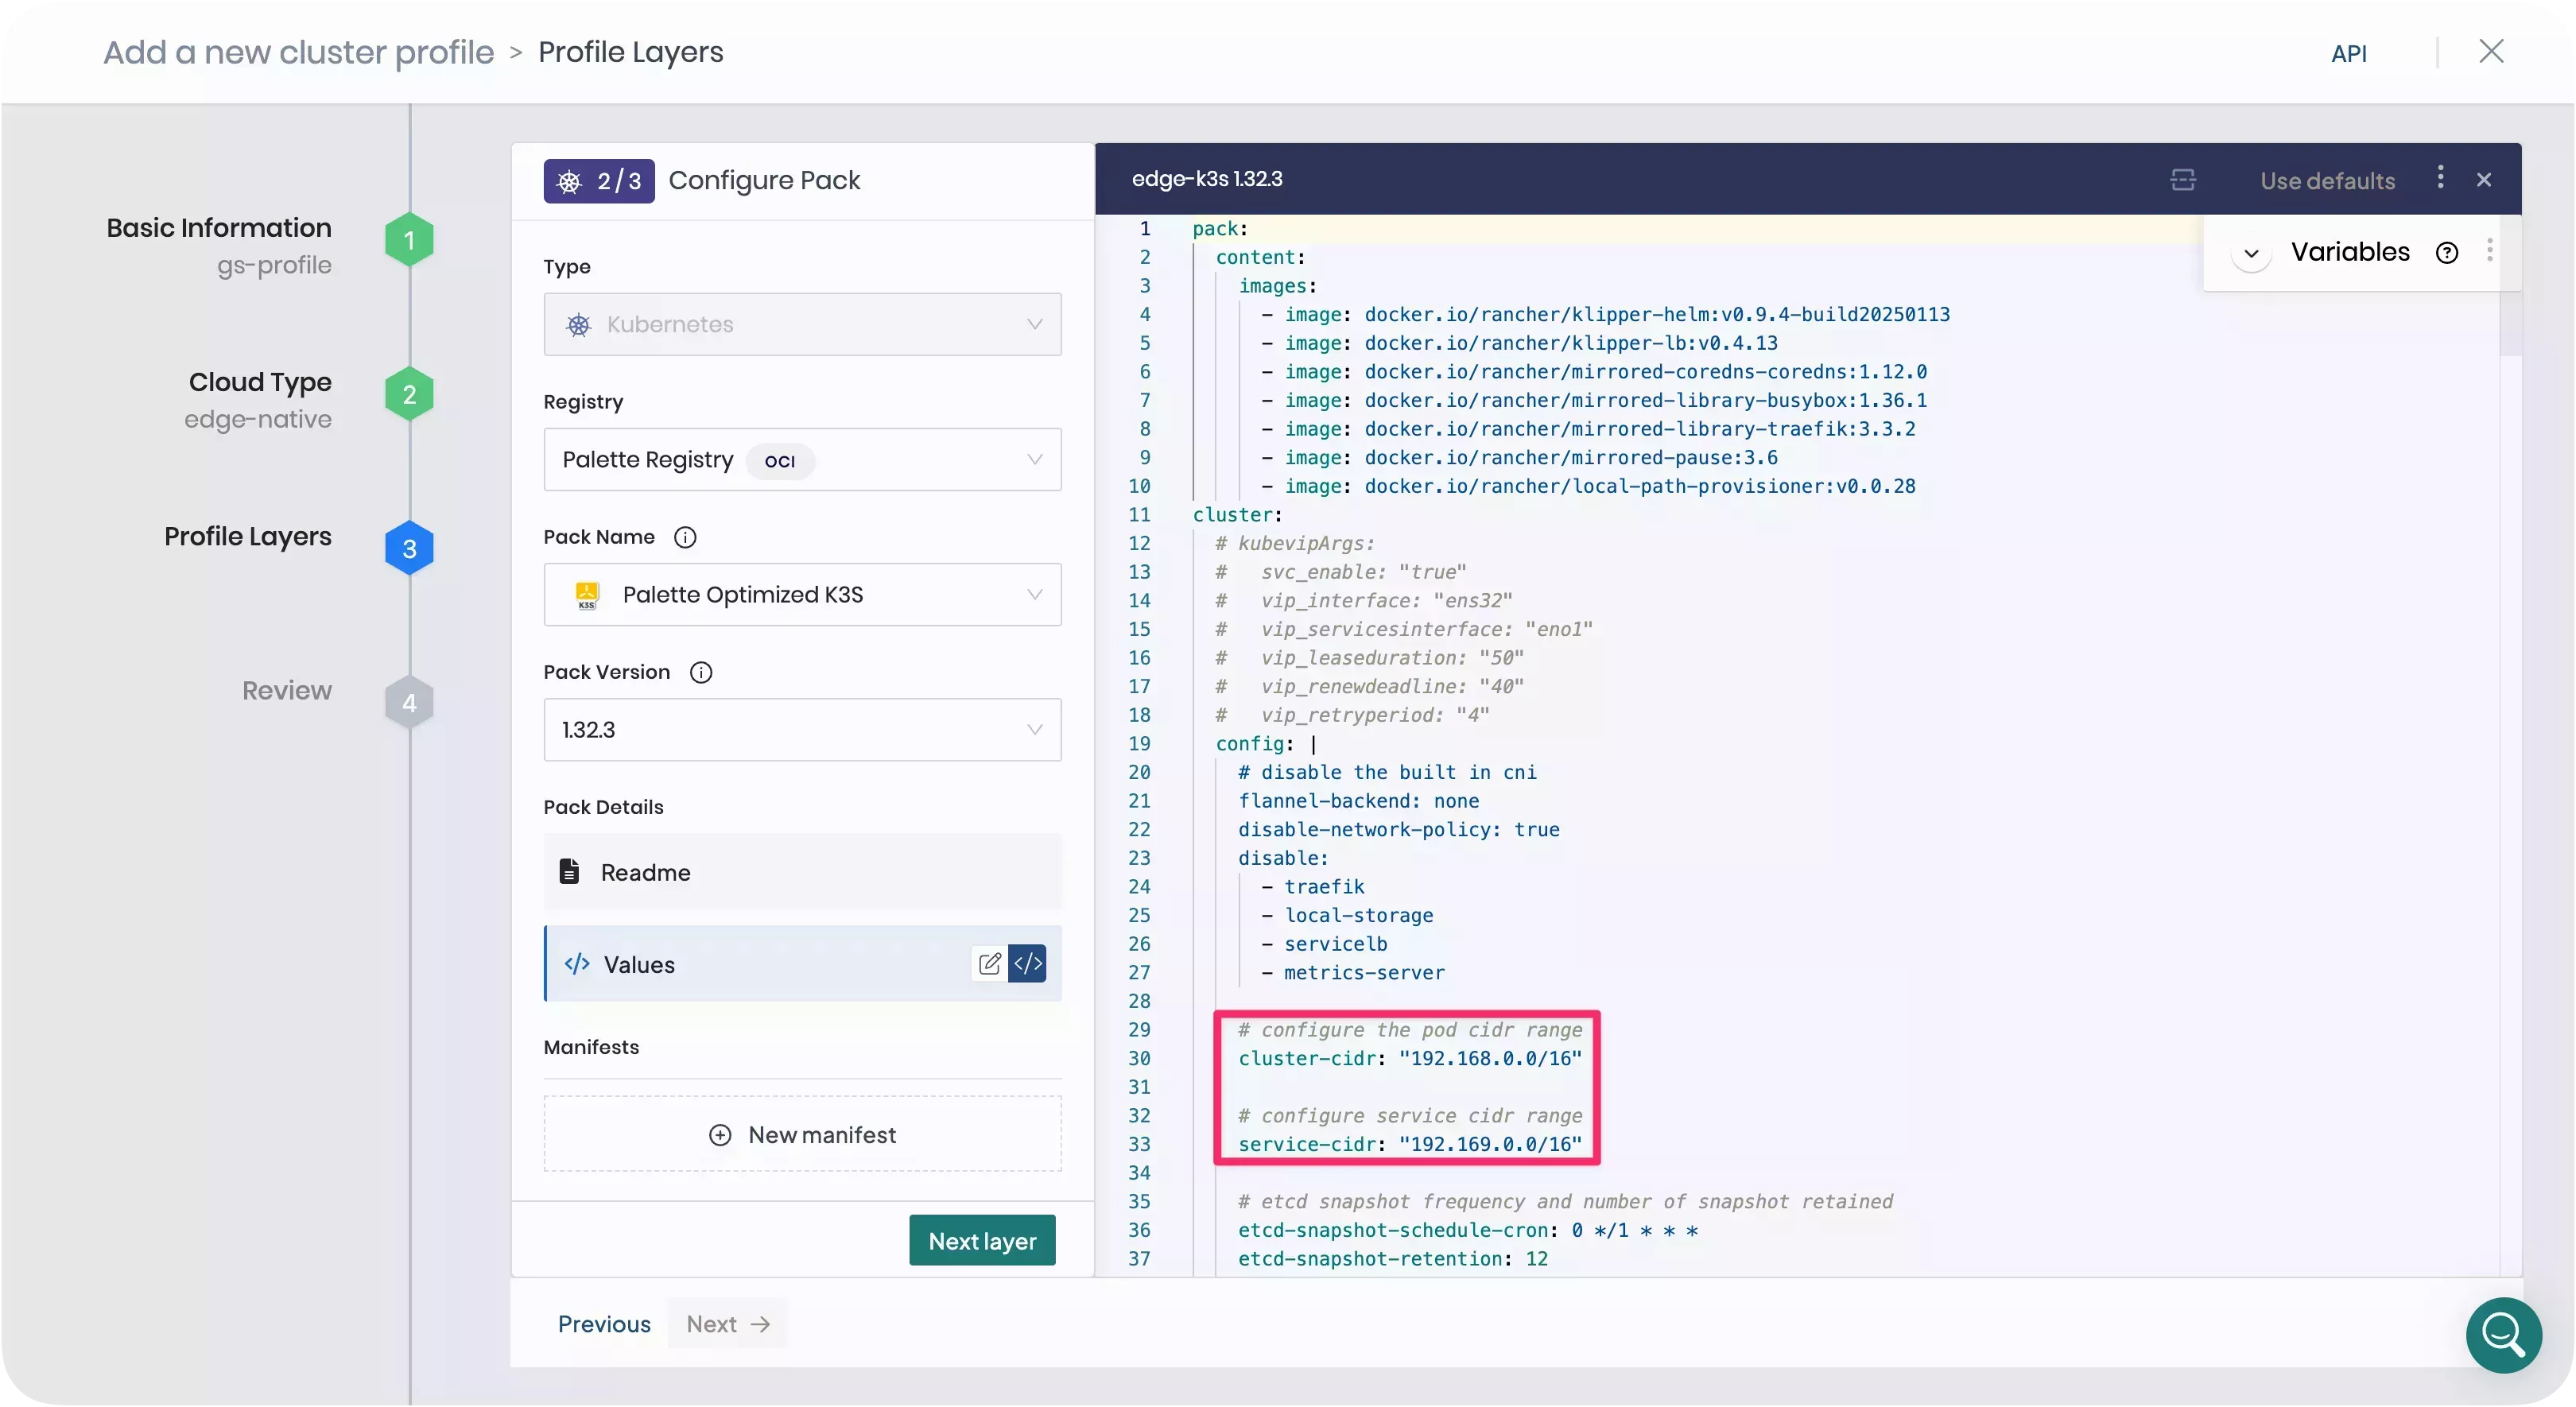
| Palette Optimized K3s | 1.32.3 | Palette Registry | Kubernetes |
Under Pack Details, select Values and replace the predefined cluster-cidr and service-cidr IP CIDRs if they
overlap with the host network. For example, you can set cluster-cidr to "100.64.0.0/18" and service-cidr to
"100.64.64.0/18". This prevents any routing conflicts in the internal pod networking.
Click Next Layer to add the network layer. This tutorial uses Cilium as the example network layer.
| Pack Name | Version | Registry | Layer |
|---|---|---|---|
| Cilium | 1.17.1 | Palette Registry | Network |
Click Confirm once you have completed adding all core layers.
The Edge cluster profile's core infrastructure layers do not include a Container Storage Interface (CSI) layer by default. If your application requires persistent storage, you must include a CSI pack. This tutorial's scope does not include a CSI pack.
Next, click Add New Pack to include the add-on layers. Search for MetalLB and add the following pack to your
cluster profile.
| Pack Name | Version | Registry | Layer |
|---|---|---|---|
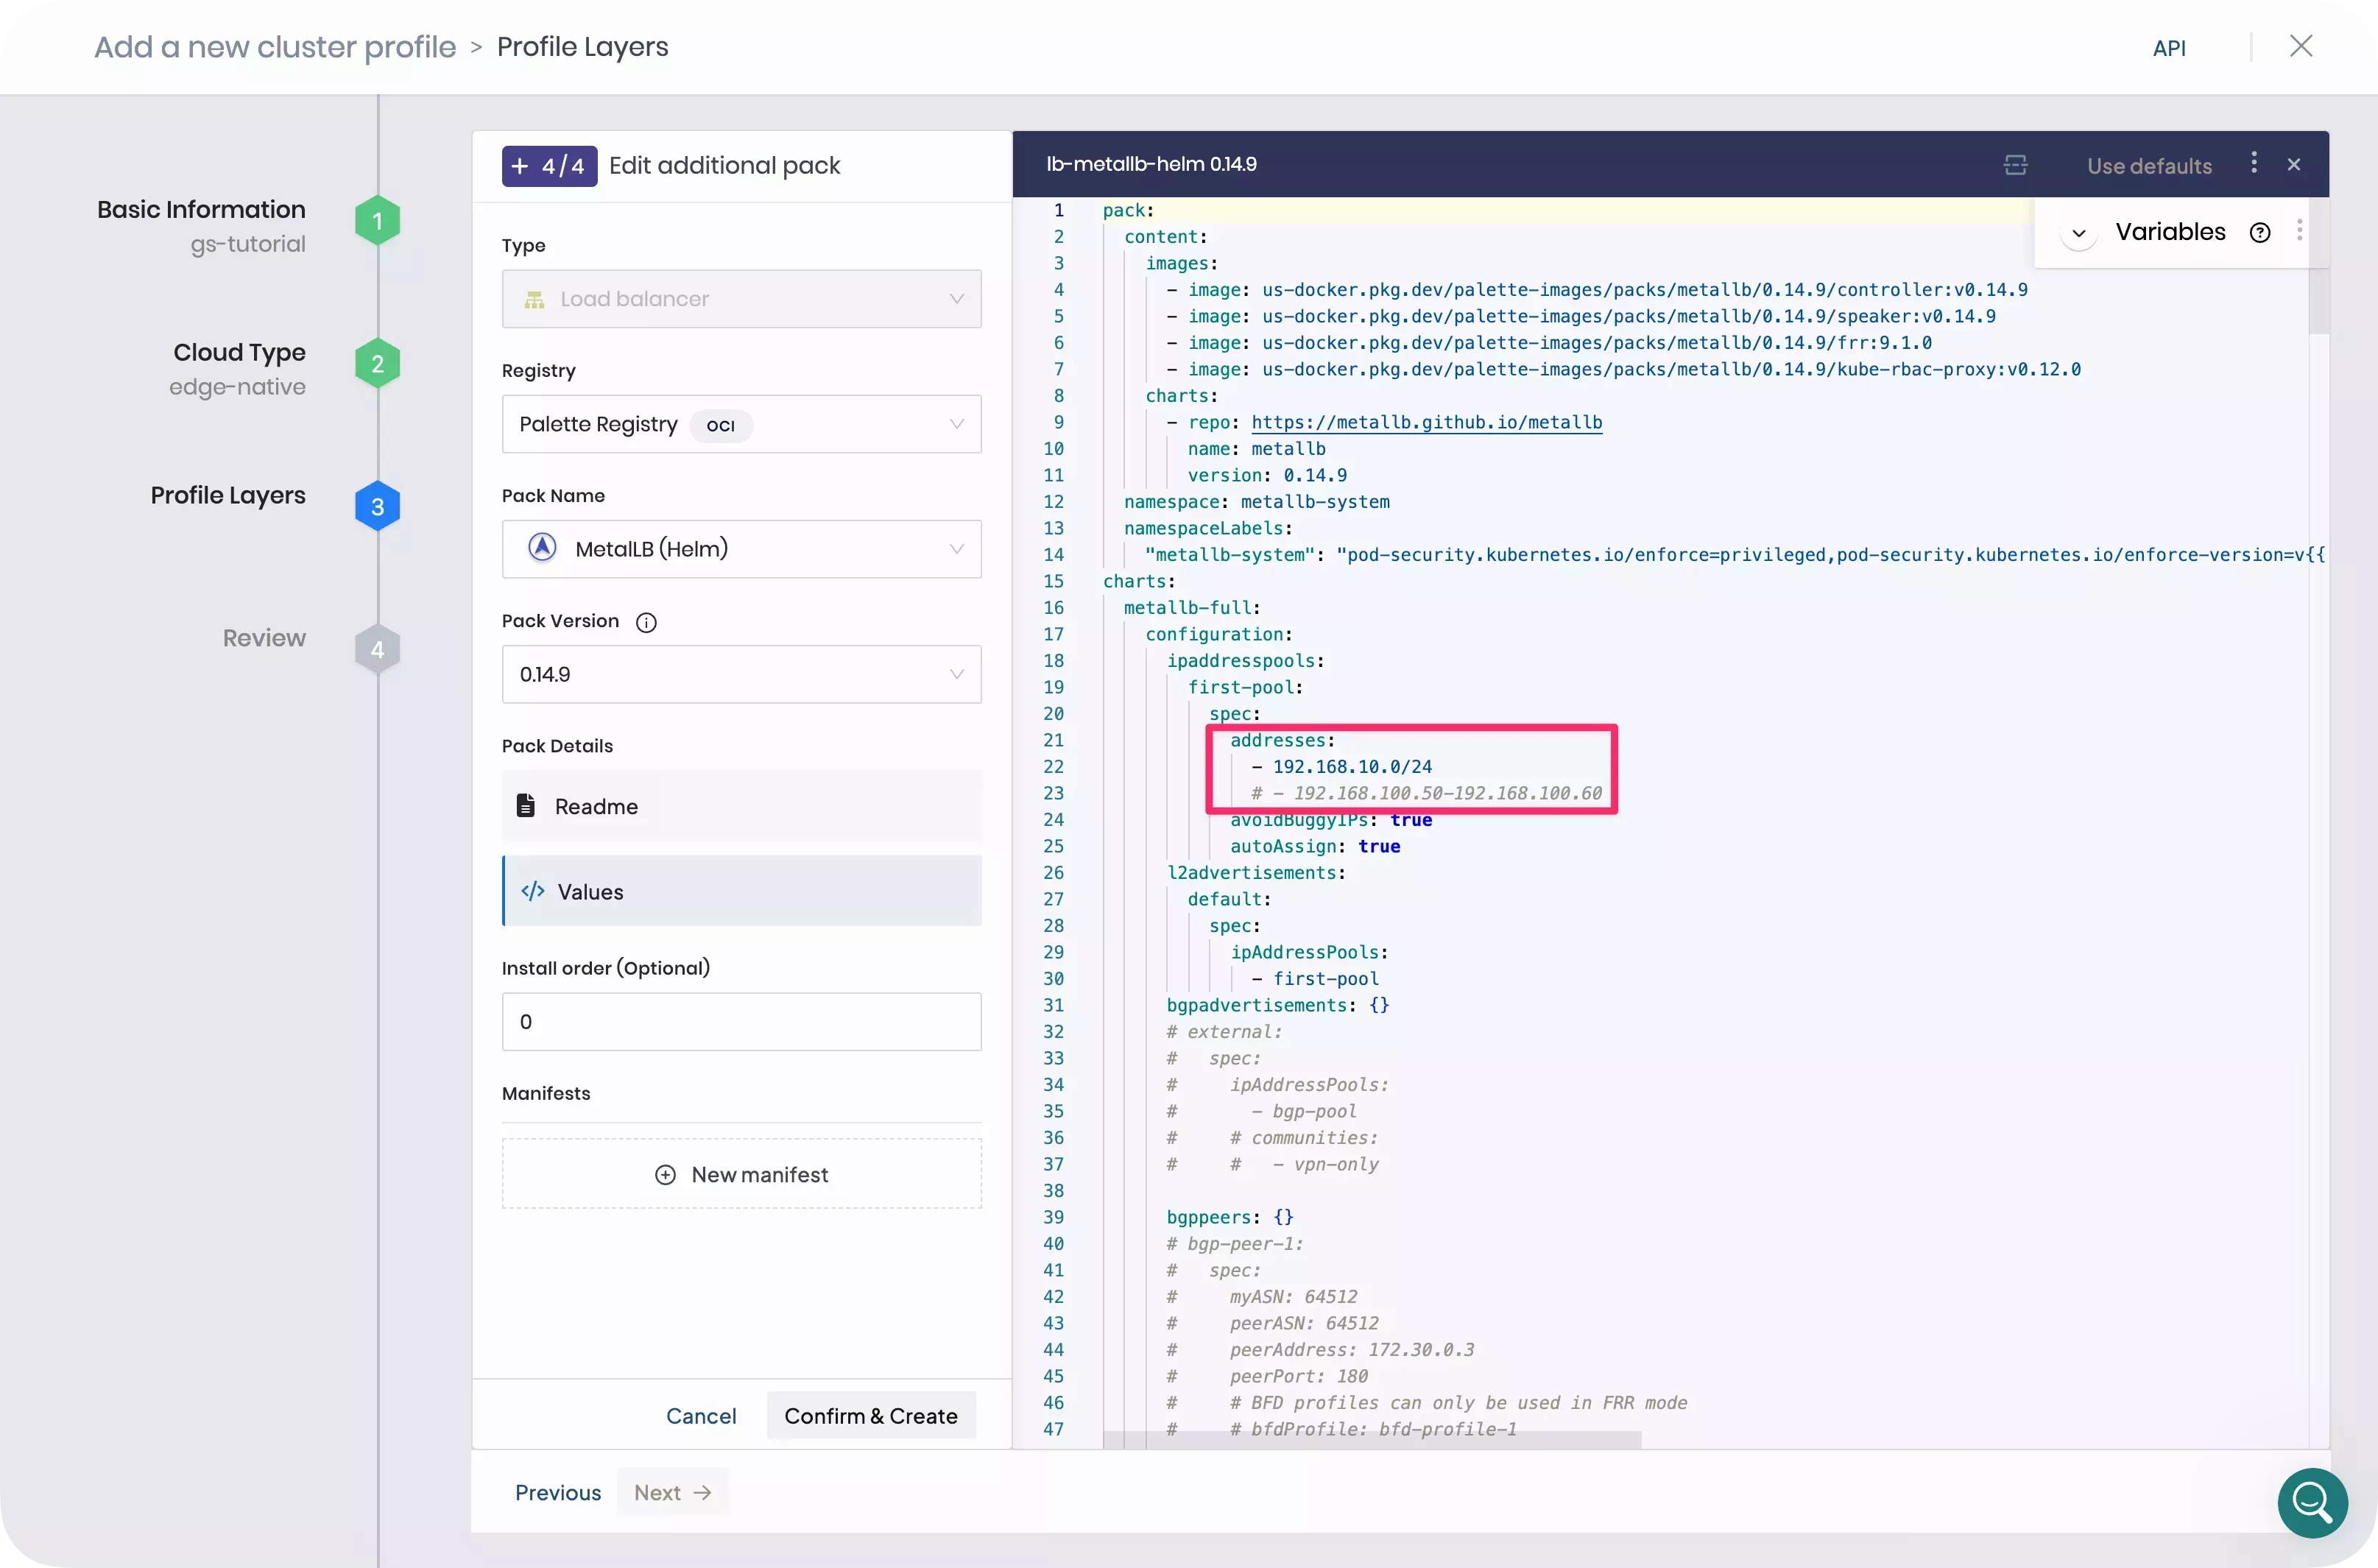
| MetalLB (Helm) | 0.14.9 | Palette Registry | Load Balancer |
The MetalLB pack implements a load balancer for your Edge Kubernetes cluster. It is required to help the LoadBalancer
service specified in the Hello Universe pack obtain an IP address so that you can access the demo application from your
browser.
Under Pack Details, select Values and replace the default 192.168.10.0/24 IP CIDR listed under the addresses
field with a valid IP address or IP range from the host network. Click Confirm & Create to add the MetalLB pack to
your cluster profile.
Finally, click Add New Pack again and search for the Hello Universe pack.
| Pack Name | Version | Registry | Layer |
|---|---|---|---|
| Hello Universe | 1.3.0 | Palette Community Registry | Application |
Once you select the pack, Palette displays its README file, providing additional guidance on usage and configuration options. This pack deploys the hello-universe demo application.
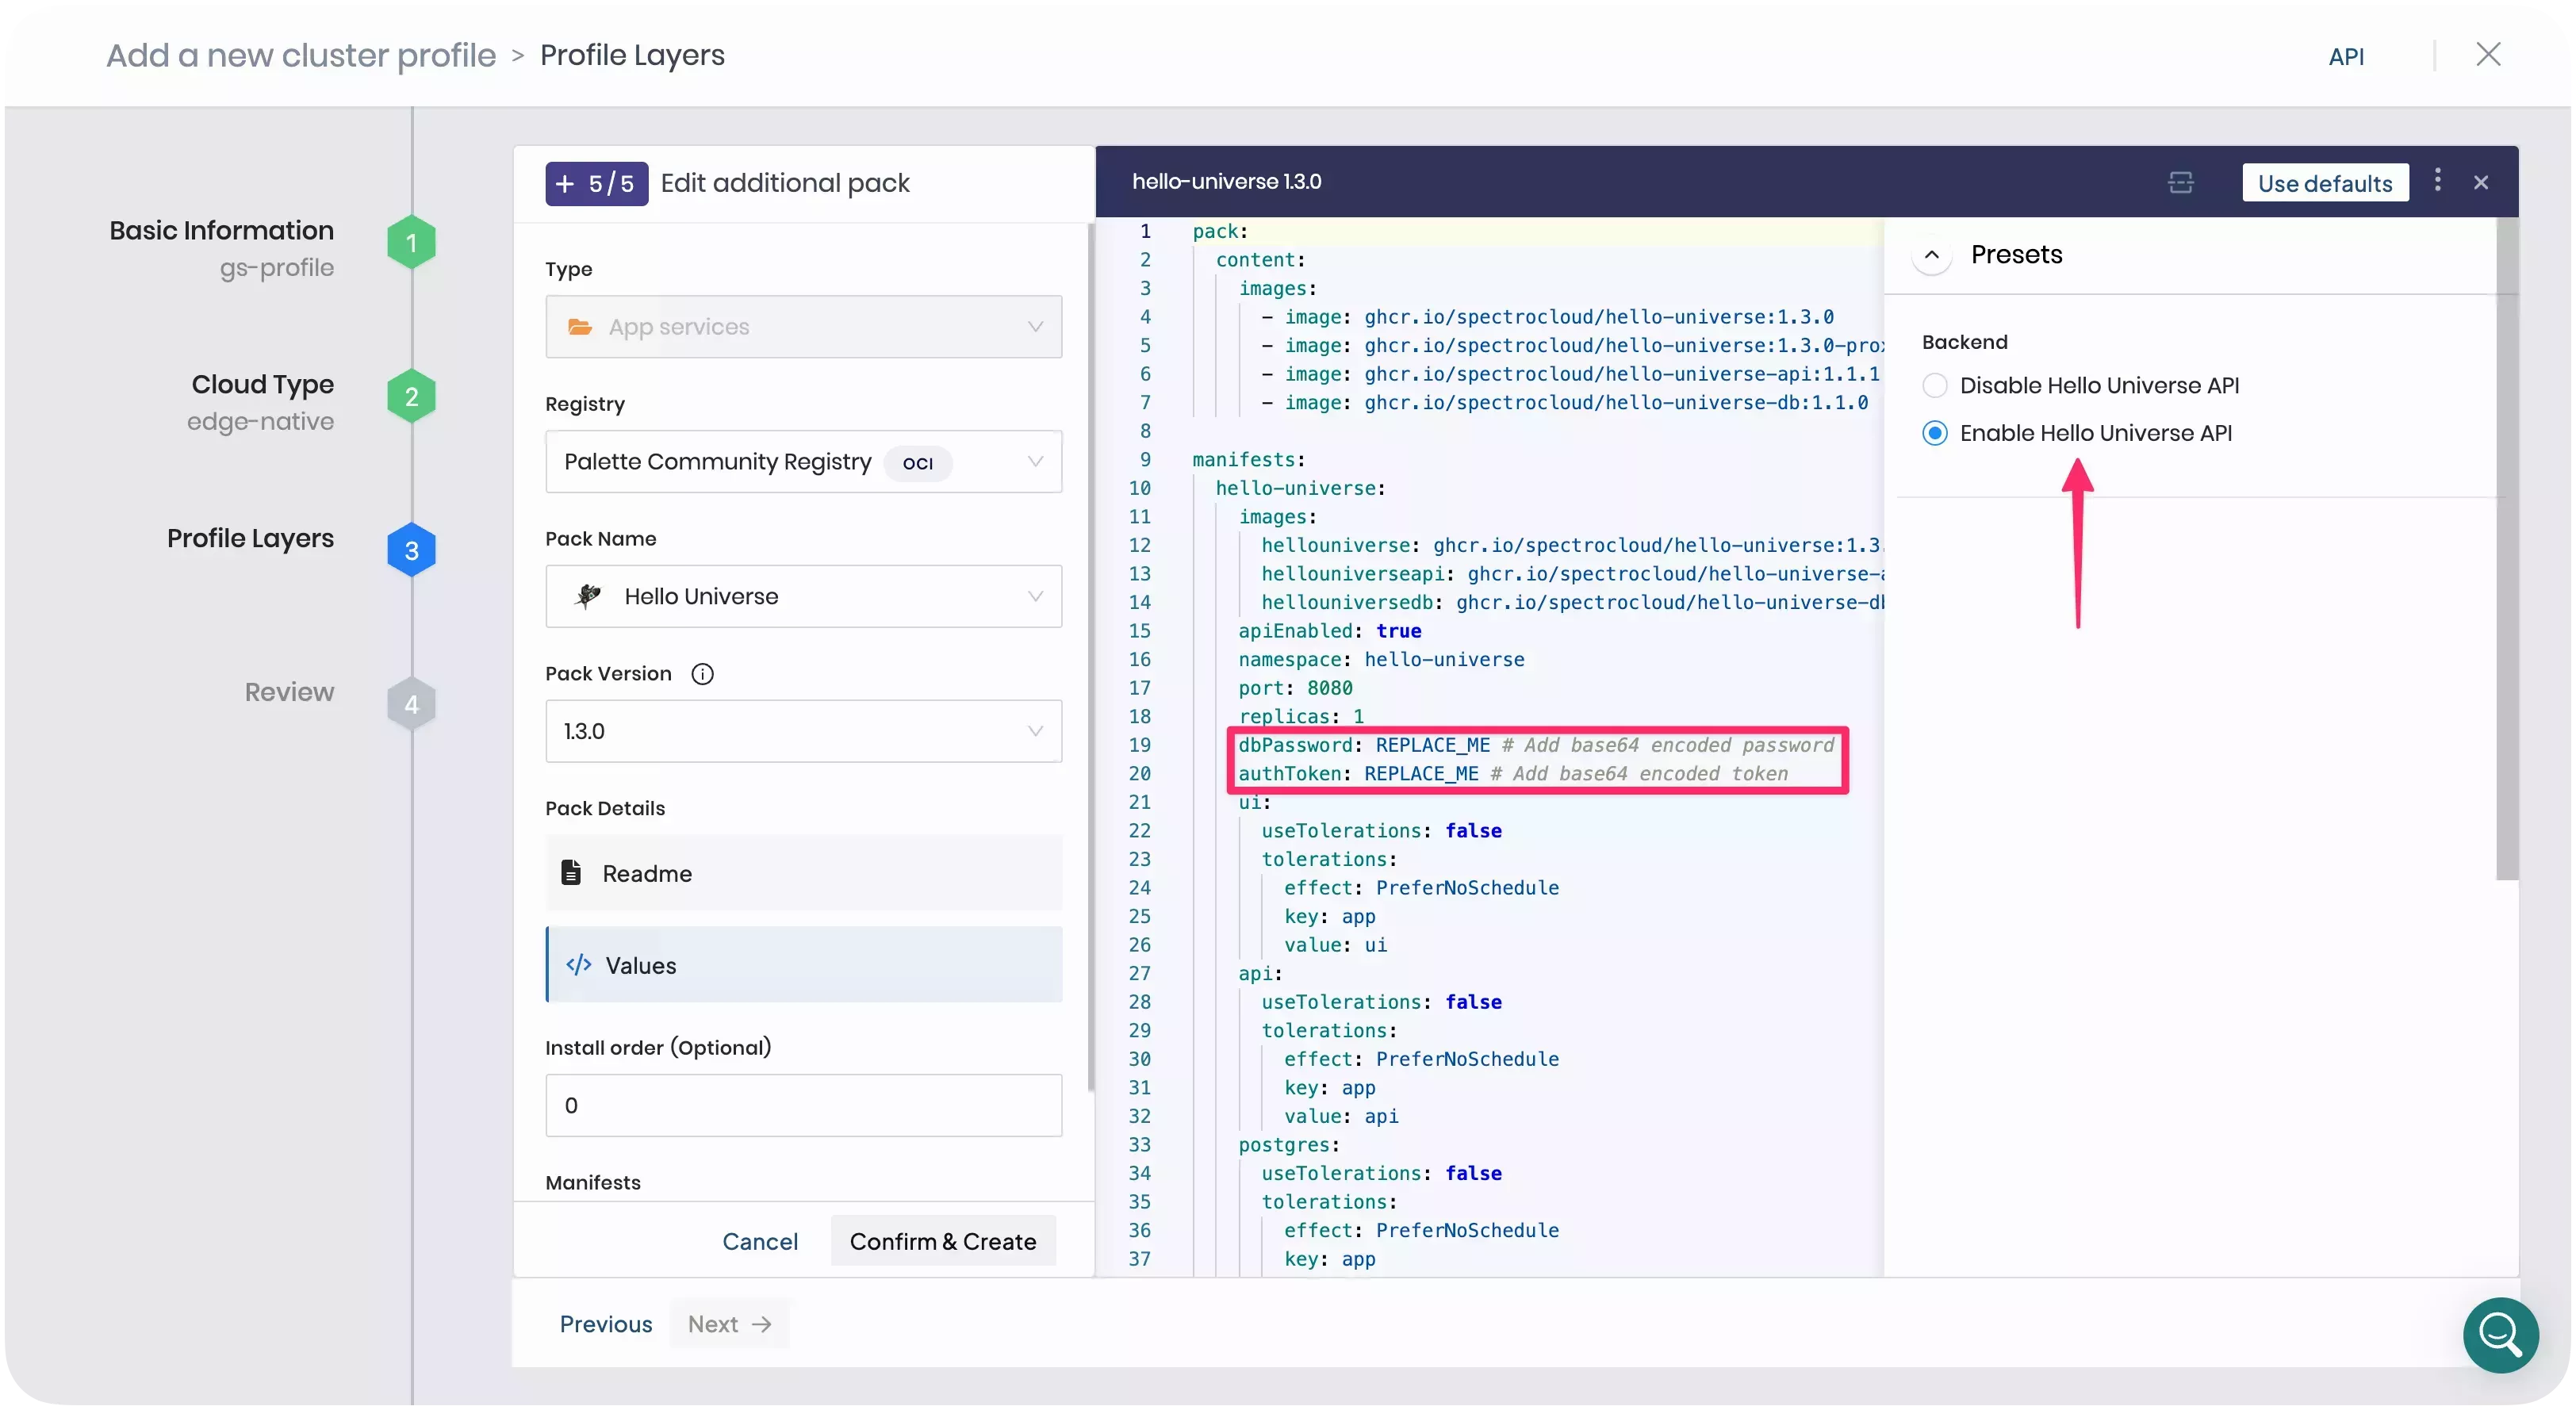
Under Pack Details, select Values, then choose Presets. This pack has two presets available:
- Disable Hello Universe API configures the
hello-universeapplication as a standalone frontend application. This is the default option. - Enable Hello Universe API configures the
hello-universeapplication as a three-tier application with a frontend, API server, and Postgres database.
Select the Enable Hello Universe API preset. The pack manifest changes according to this selection.
When using this preset, you must provide two base64-encoded values: one for the authorization token and one for the database password. Replace the database password value with your own encoded value.
You can use the base64 command to create a base64-encoded value.
echo -n "password" | base64
The output contains your base64-encoded value.
cGFzc3dvcmQ=
For the token, use the default encoded value listed in the hello-universe repository.
dbPassword: "cGFzc3dvcmQ="
authToken: "OTMxQTNCMDItOERDQy01NDNGLUExQjItNjk0MjNEMUEwQjk0"
Click Confirm & Create to save the alterations and add the pack to your cluster profile.
Click Next to proceed. If there are no compatibility issues, Palette displays the cluster profile for review. Verify that the layers you added are correct, and click Finish Configuration to create the cluster profile.
Next Steps
In this tutorial, you learned how to create a cluster profile for your Edge deployment. We recommend proceeding to the Prepare Edge Host tutorial to learn how to prepare your virtual or physical device to become a node of an Edge cluster.