Deploy Edge Cluster
This is the final tutorial in the Edge Getting Started series. It teaches you how to deploy an Edge Kubernetes cluster in Palette using the provider images, Edge host, and cluster profile created in the previous tutorials.
You will learn how to select the desired cluster profile, assign the registered Edge host to the cluster, configure the number of nodes, and verify the deployment was successful by accessing the demo application included in the cluster profile, Hello Universe.
Prerequisites
- You have completed the Build Edge Artifacts tutorial and pushed the provider images to a registry.
- You have completed the Prepare Edge Host tutorial and have a registered Edge host in Palette.
- You have completed the Create Edge Cluster Profile tutorial and have an Edge cluster profile created in Palette.
- You have access to Palette's UI.
- You have a DHCP-enabled network with one available IP address on the same network as the Edge host. You will use this IP as the cluster's Virtual IP (VIP) address.
Deploy Edge Cluster
Log in to Palette.
From the left main menu, select Clusters, then click Create Cluster. If you already have clusters deployed, select Add New Cluster instead. Ensure you are in the Default project.
Palette prompts you to select the cluster type. Select Edge Native and click the Start Edge Native Configuration button.
In the Basic Information section, set the cluster name to gs-edge-cluster, add a brief cluster description, and
assign the tag env:edge. Click Next to proceed.
On the Cluster setup type window, choose Cluster Profiles > Add Cluster Profile. Select the gs-profile cluster
profile you created earlier, and click Confirm.
Review the cluster profile layers and click Next to proceed.
We recommend enabling the overlay network configuration when using DHCP-enabled networks to ensure stable IP addresses for the cluster. However, for education purposes, this tutorial does not use the overlay network. For production use or detailed configuration instructions, refer to the Enable Overlay Network guide.
In the Cluster Config section, provide a Virtual IP (VIP) address for the Edge cluster. This address must be an unused address on the same network as your Edge host.
You can use the nmap tool to scan your network and check which IP addresses are in
use. Issue the following command in your terminal, replacing the example CIDR 192.168.0.0/24 with your network's CIDR.
sudo nmap -sn 192.168.0.0/24
The output displays the IP addresses that are currently in use on your network.
Optionally, you can also select an SSH key to access the cluster's nodes and specify a Network Time Protocol (NTP) server list.
Click Next to continue.
In the Nodes Config section, provide the following details for the control plane pool. This tutorial deploys a single-node Edge cluster with no worker pool.
| Field | Value |
|---|---|
| Node pool name | control-plane-pool |
| Allow worker capability | Yes |
| Additional Labels (Optional) | None |
| Taints (Optional) | None |
| Pool Configuration > Edge Hosts | Select the Edge host configured in the Prepare Edge Host tutorial to become the node of your cluster. |
The following image shows the Edge host selection in the control plane pool.

Next, select Remove to delete the worker pool and click Next to proceed with the deployment.
The Cluster Settings section provides advanced options for scheduled scans, scheduled backups, and cluster role binding. For this tutorial, you can use the default settings. Select Validate to continue.
The Review section allows you to review the cluster configuration. If everything looks correct, click Finish Configuration to deploy the cluster.
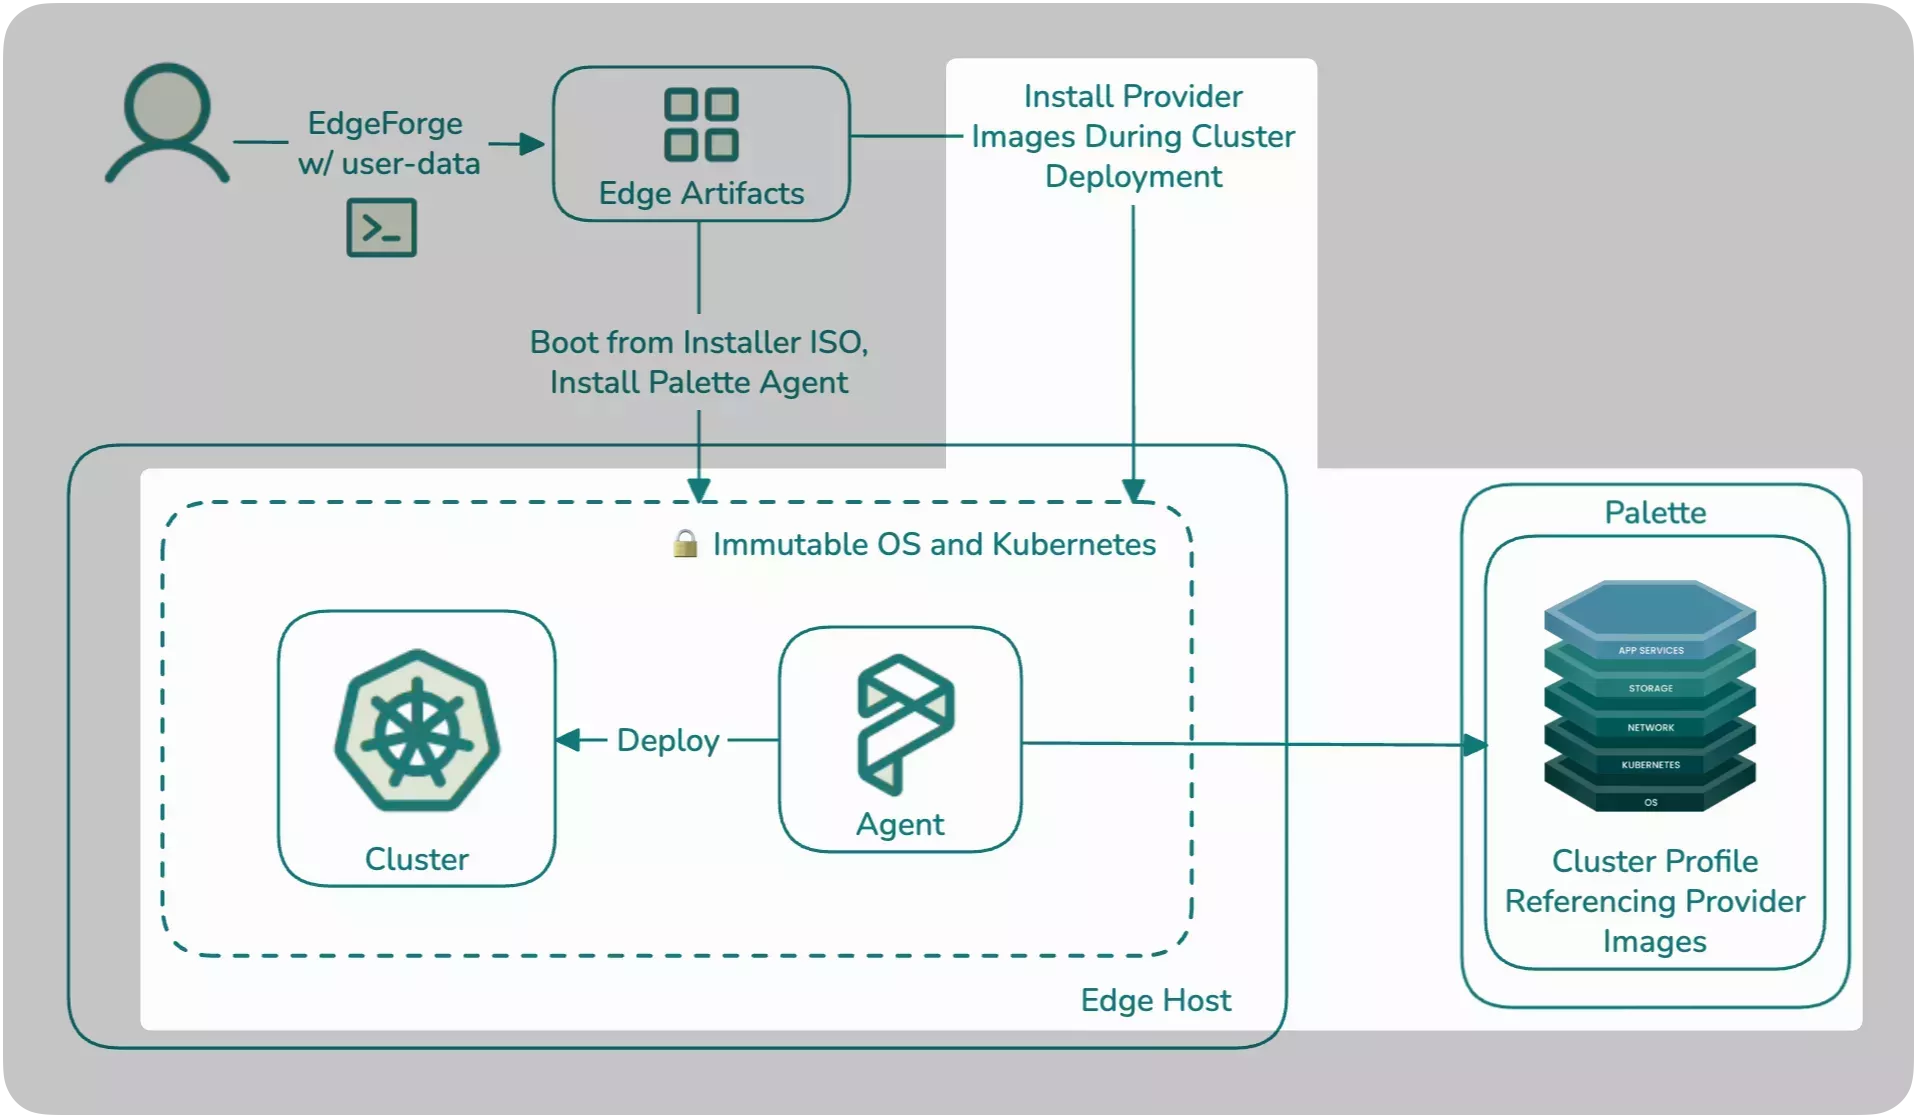
After you create the cluster, the Palette Edge host agent pulls the provider images you built in the Build Edge Artifacts tutorial and starts the installation process.
The cluster deployment may take 15 to 30 minutes, depending on the host and cluster configuration.
You can track the installation progress in Palette. The cluster Overview page displays a summary of the deployment progress, while the Events tab provides detailed logs.
Validate
From Palette's left main menu, select Clusters.
Next, select your cluster to open its Overview tab.
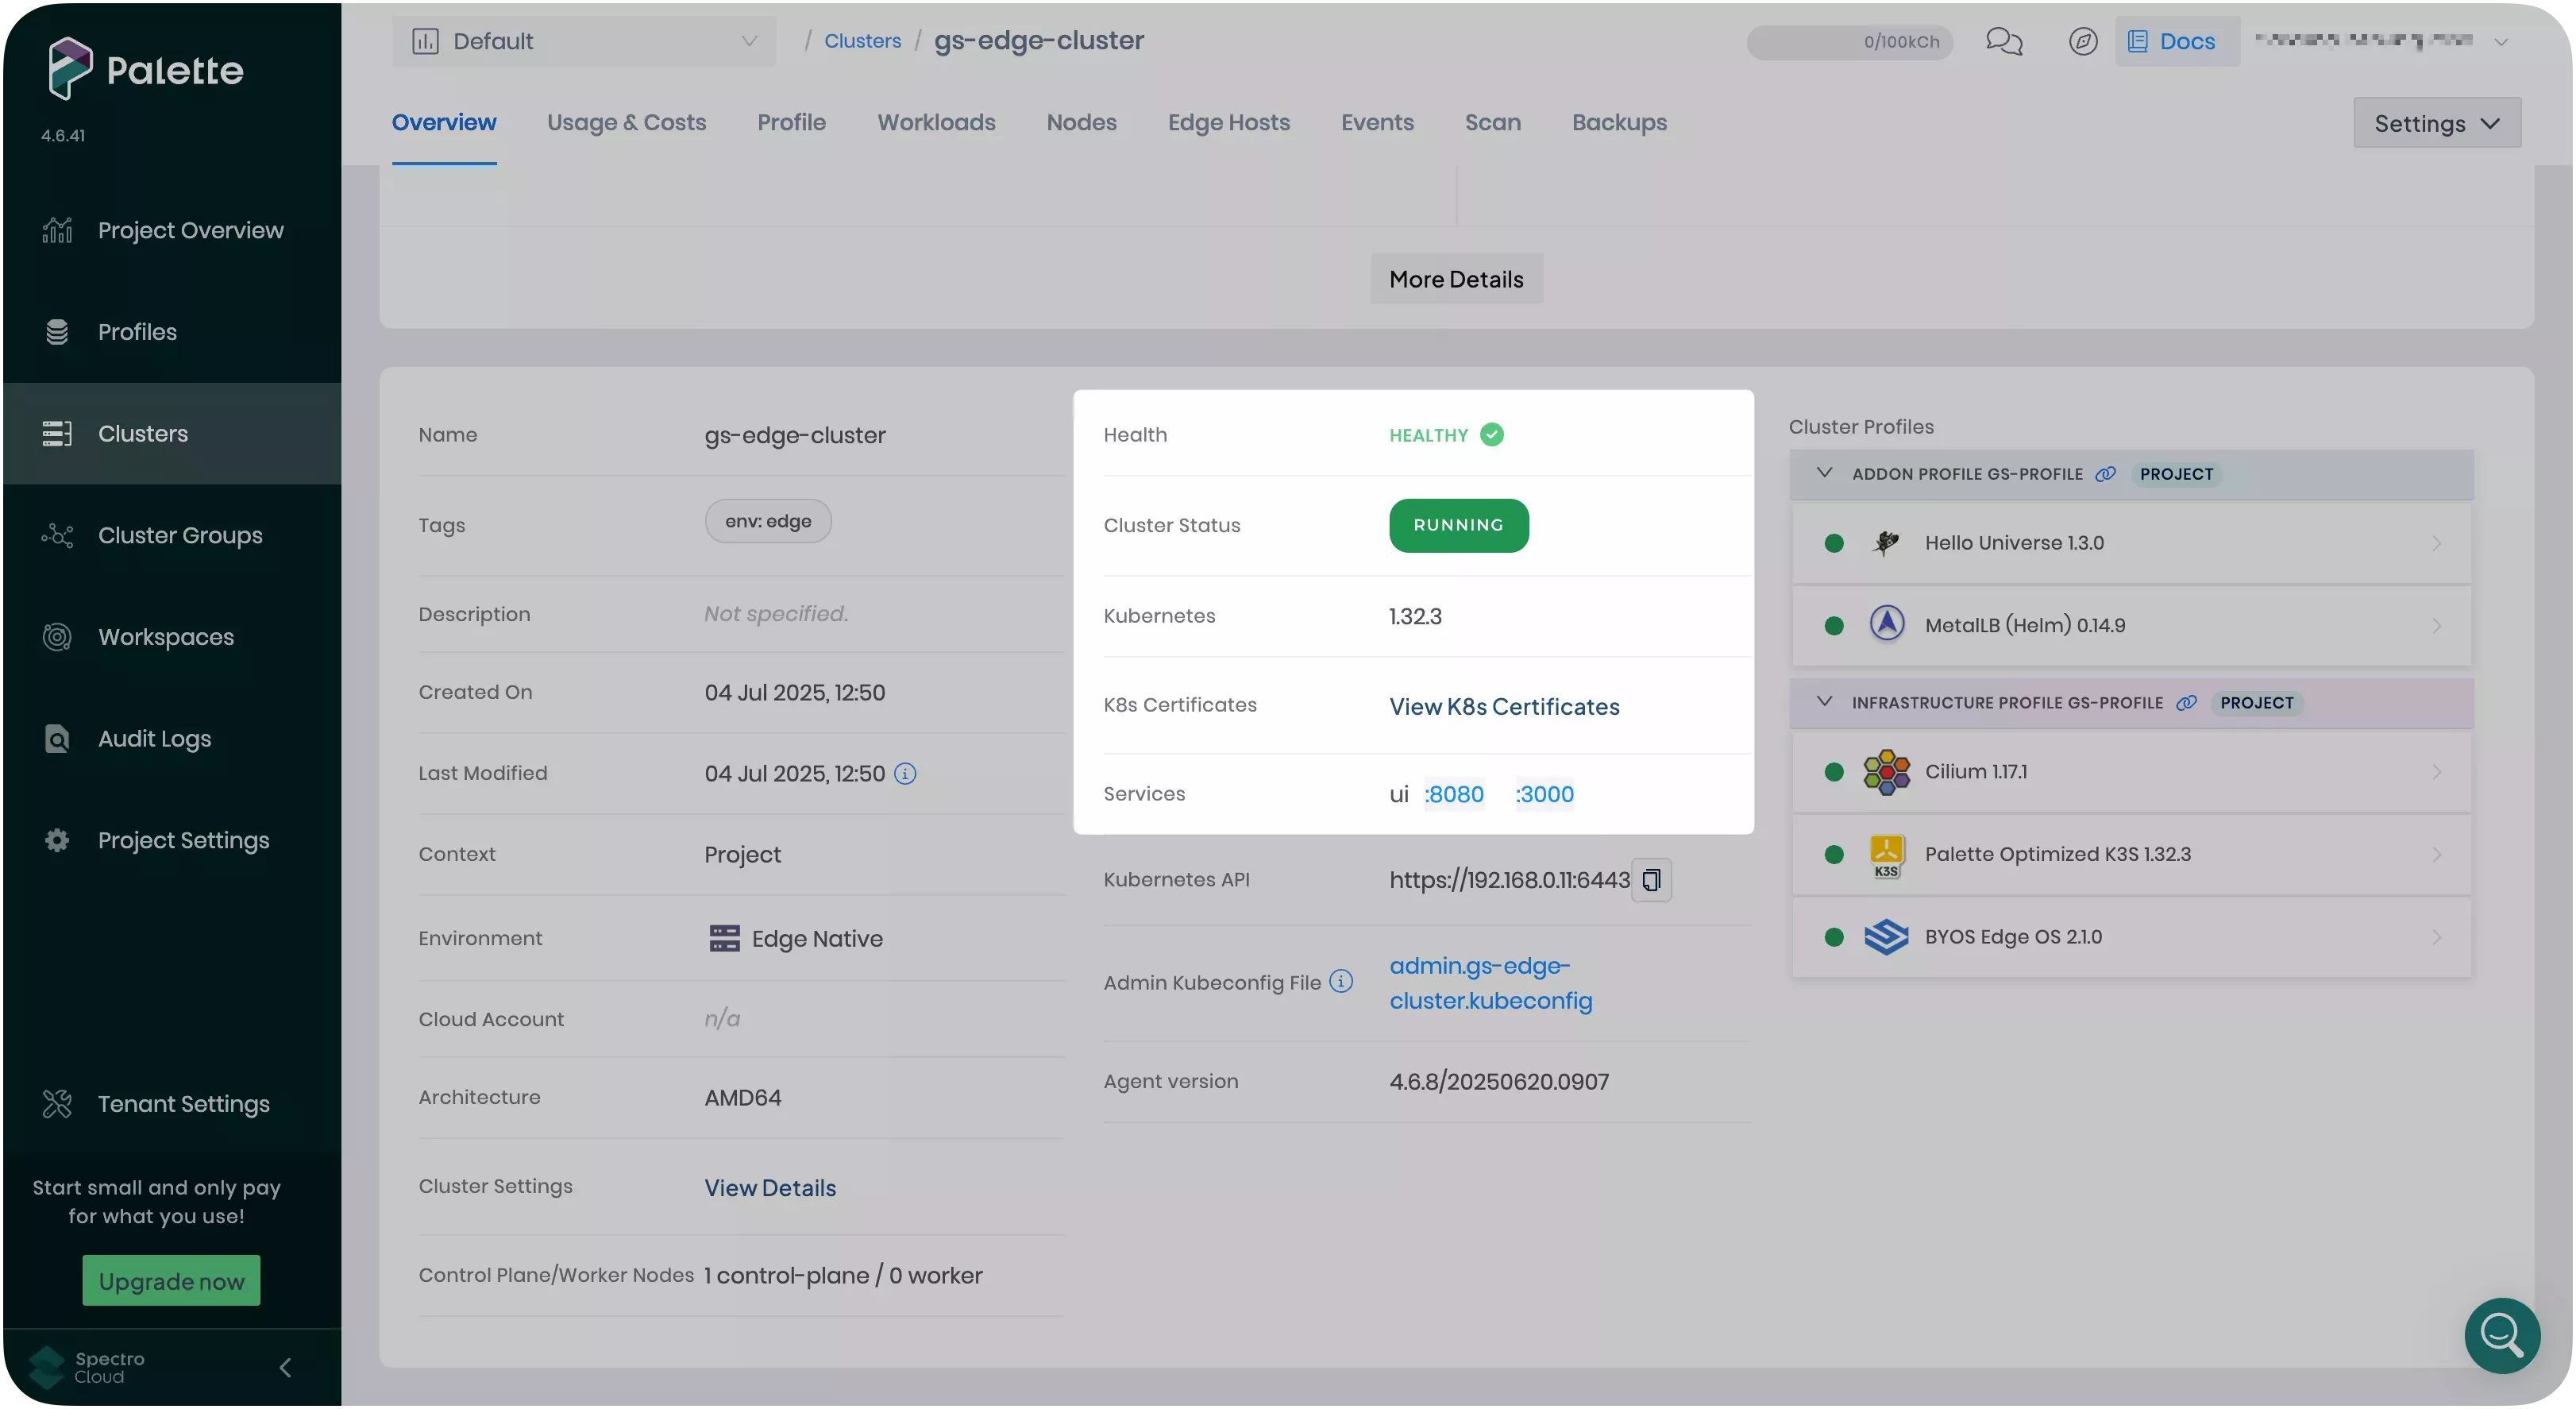
Confirm that your cluster displays a Running status and is listed as Healthy.
When the Hello Universe application is deployed and ready for network traffic, Palette exposes the service URL in the Services field. Click the URL on port :8080 to access the application's landing page.
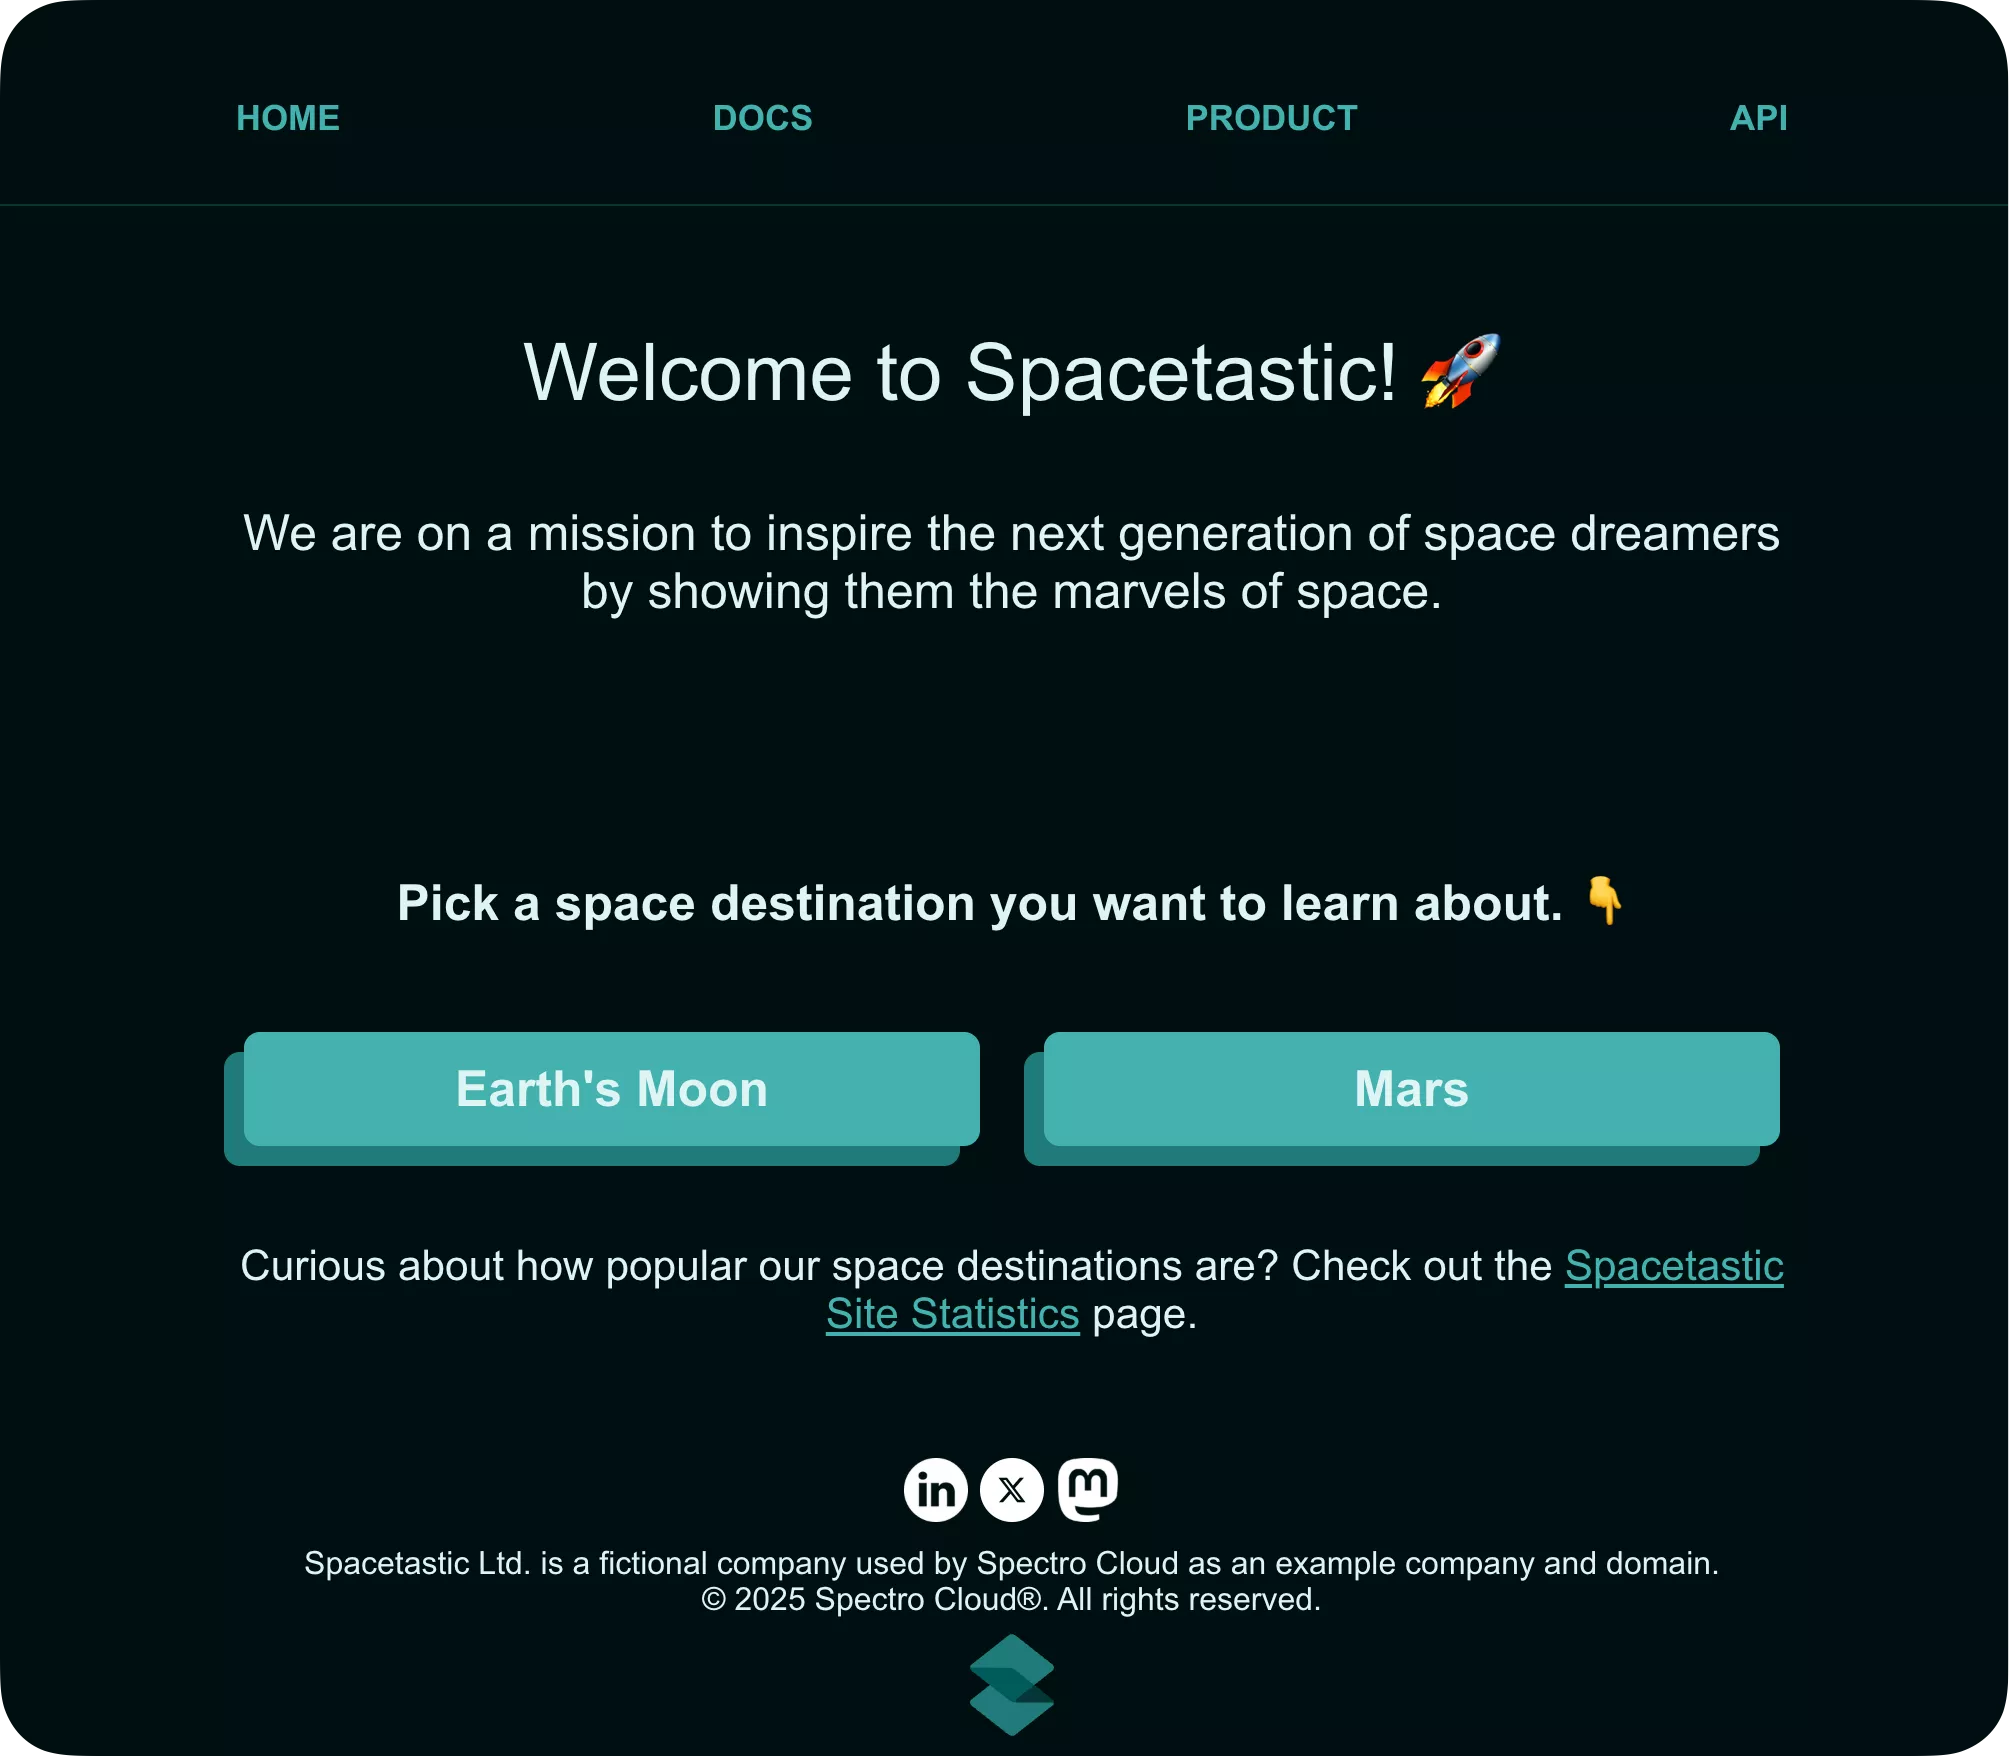
Welcome to the Spacetastic astronomy education platform. Feel free to explore the pages to learn more about space. The statistics page offers information on visitor counts for your deployed cluster.
Clean Up
You have successfully provisioned an Edge cluster with a three-tier demo application. Use the following steps to remove the resources created during this tutorial series.
Cluster and Cluster Profile
To remove the Edge cluster, log in to Palette and select Clusters from the left main menu. Select the
gs-edge-cluster cluster to access its details page.
Next, click on Settings and select Delete Cluster.
Type the cluster name to proceed with the deletion. This process may take several minutes to complete.
If a cluster remains in the delete phase for over 15 minutes, it becomes eligible for force deletion. To force delete a cluster, access the cluster’s details page, click Settings, then select Force Delete Cluster. Palette automatically removes clusters stuck in the cluster deletion phase for over 24 hours.
Once the cluster is deleted, proceed with the cluster profile deletion.
From the left main menu, select Profiles. Select the gs-profile cluster profile, click on the three-dot menu, and
select Delete. Confirm the selection to remove the cluster profile.
Edge Host
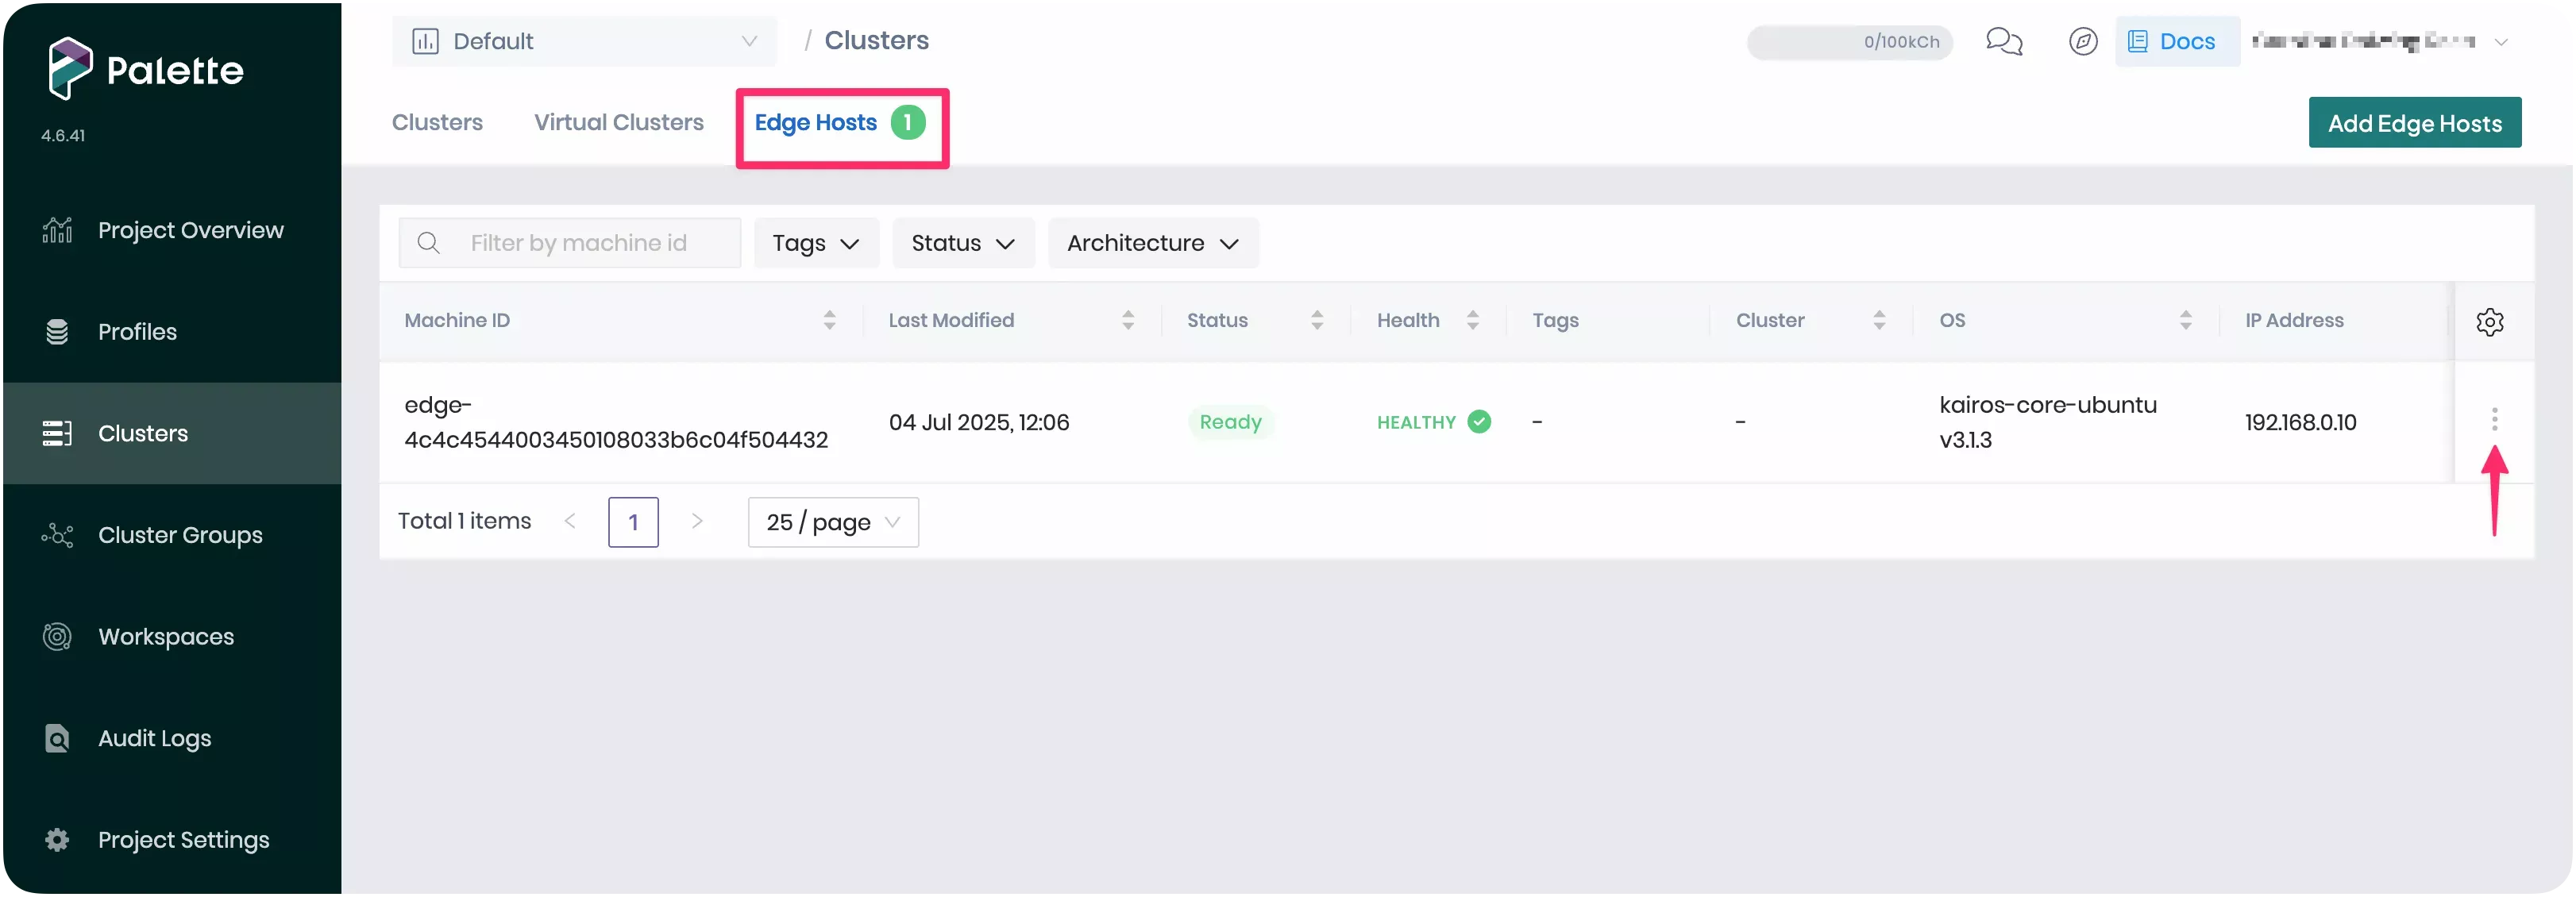
After removing the Edge cluster and cluster profile, select Clusters from the left main menu, then select Edge Hosts.
Locate the Edge host configured in the Prepare Edge Host tutorial. Click on the three-dot menu and select Delete to delete the Edge host. Confirm the deletion by clicking OK. This removes the Edge host from Palette but does not delete the underlying infrastructure.
- VM Host
- Bare Metal Host
If you used a VirtualBox VM as the Edge host, open the VirtualBox application on your host machine to delete the VM.
Right-click the edge-vm VM and select Stop. Then, click Power Off to turn the machine off.
Next, right-click the VM again and select Remove. Click Delete all files to delete the VM and its hard disk.
If you used a physical device as the Edge host, you can reset it to its post-initial setup state. This removes all workloads, content, and cluster definitions from the Edge host.
To reset the Edge host, SSH into it and issue the following command.
grub2-editenv /oem/grubenv set next_entry=statereset
Next, reboot the host.
sudo reboot
Refer to Reset Host via Terminal for more information about Edge host resetting.
Edge Artifacts
Open a terminal window on the machine you used to build the artifacts in the
Build Edge Artifacts tutorial and navigate to the CanvOS repository.
Delete the Edge Installer ISO image and its checksum by issuing the following commands.
rm build/palette-edge-installer.iso
rm build/palette-edge-installer.iso.sha256
Next, delete the provider images both locally and from the registry where you pushed them. Issue the following command
to delete them locally, replacing <registry-name> with the name of your registry.
docker rmi <registry-name>/ubuntu:k3s-1.32.1-v4.6.9-gs-tutorial
docker rmi <registry-name>/ubuntu:k3s-1.32.1-v4.6.9-gs-tutorial_linux_amd64
Wrap-up
In this tutorial, you learned how to deploy a single-node Edge cluster along with a demo application, using the Edge host, cluster profile, and artifacts prepared in earlier tutorials from this series. This deployment completes the Edge Getting Started tutorial series.
We encourage you to check out the Additional Capabilities section to explore other Palette functionalities, and the Edge documentation section to learn more about Palette Edge.