Deploy an Edge Cluster on VMware
Palette supports deploying Kubernetes clusters in remote locations to support edge computing workloads. Palette's Edge solution enables you to deploy your edge devices, also called Edge hosts, which contain all the required software dependencies to support Palette-managed Kubernetes cluster deployment.
Maintaining consistency while preparing edge devices at scale can be challenging for operation teams. For example, imagine you are an IT administrator for a retail company that has decided to expand to 1000 new stores this year. The company needs you to deploy Kubernetes clusters in each new store using edge devices, such as Intel NUC, and ensure each device has the same software and security configurations. Your job is to prepare each device so the development team can deploy Kubernetes clusters on each device. You have decided to use Palette's Edge solution to help you meet the organizational requirements. You will prepare a small set of Edge devices and deploy a Kubernetes cluster to verify readiness for consistent deployment across all physical sites.
The following points summarize the primary stages of Edge cluster deployment to a production environment:
-
Create Edge artifacts such as the Edge Installer ISO, provider images, and content bundles.
-
Initialize the Edge device with the Edge installer ISO. The ISO includes a base Operating System (OS) and other configurations such as networking, proxy, security, tooling, and user privileges.
-
Create a cluster profile to ensure consistency in all the Edge hosts. The cluster profile lets you declare the desired software dependencies for each Kubernetes cluster.
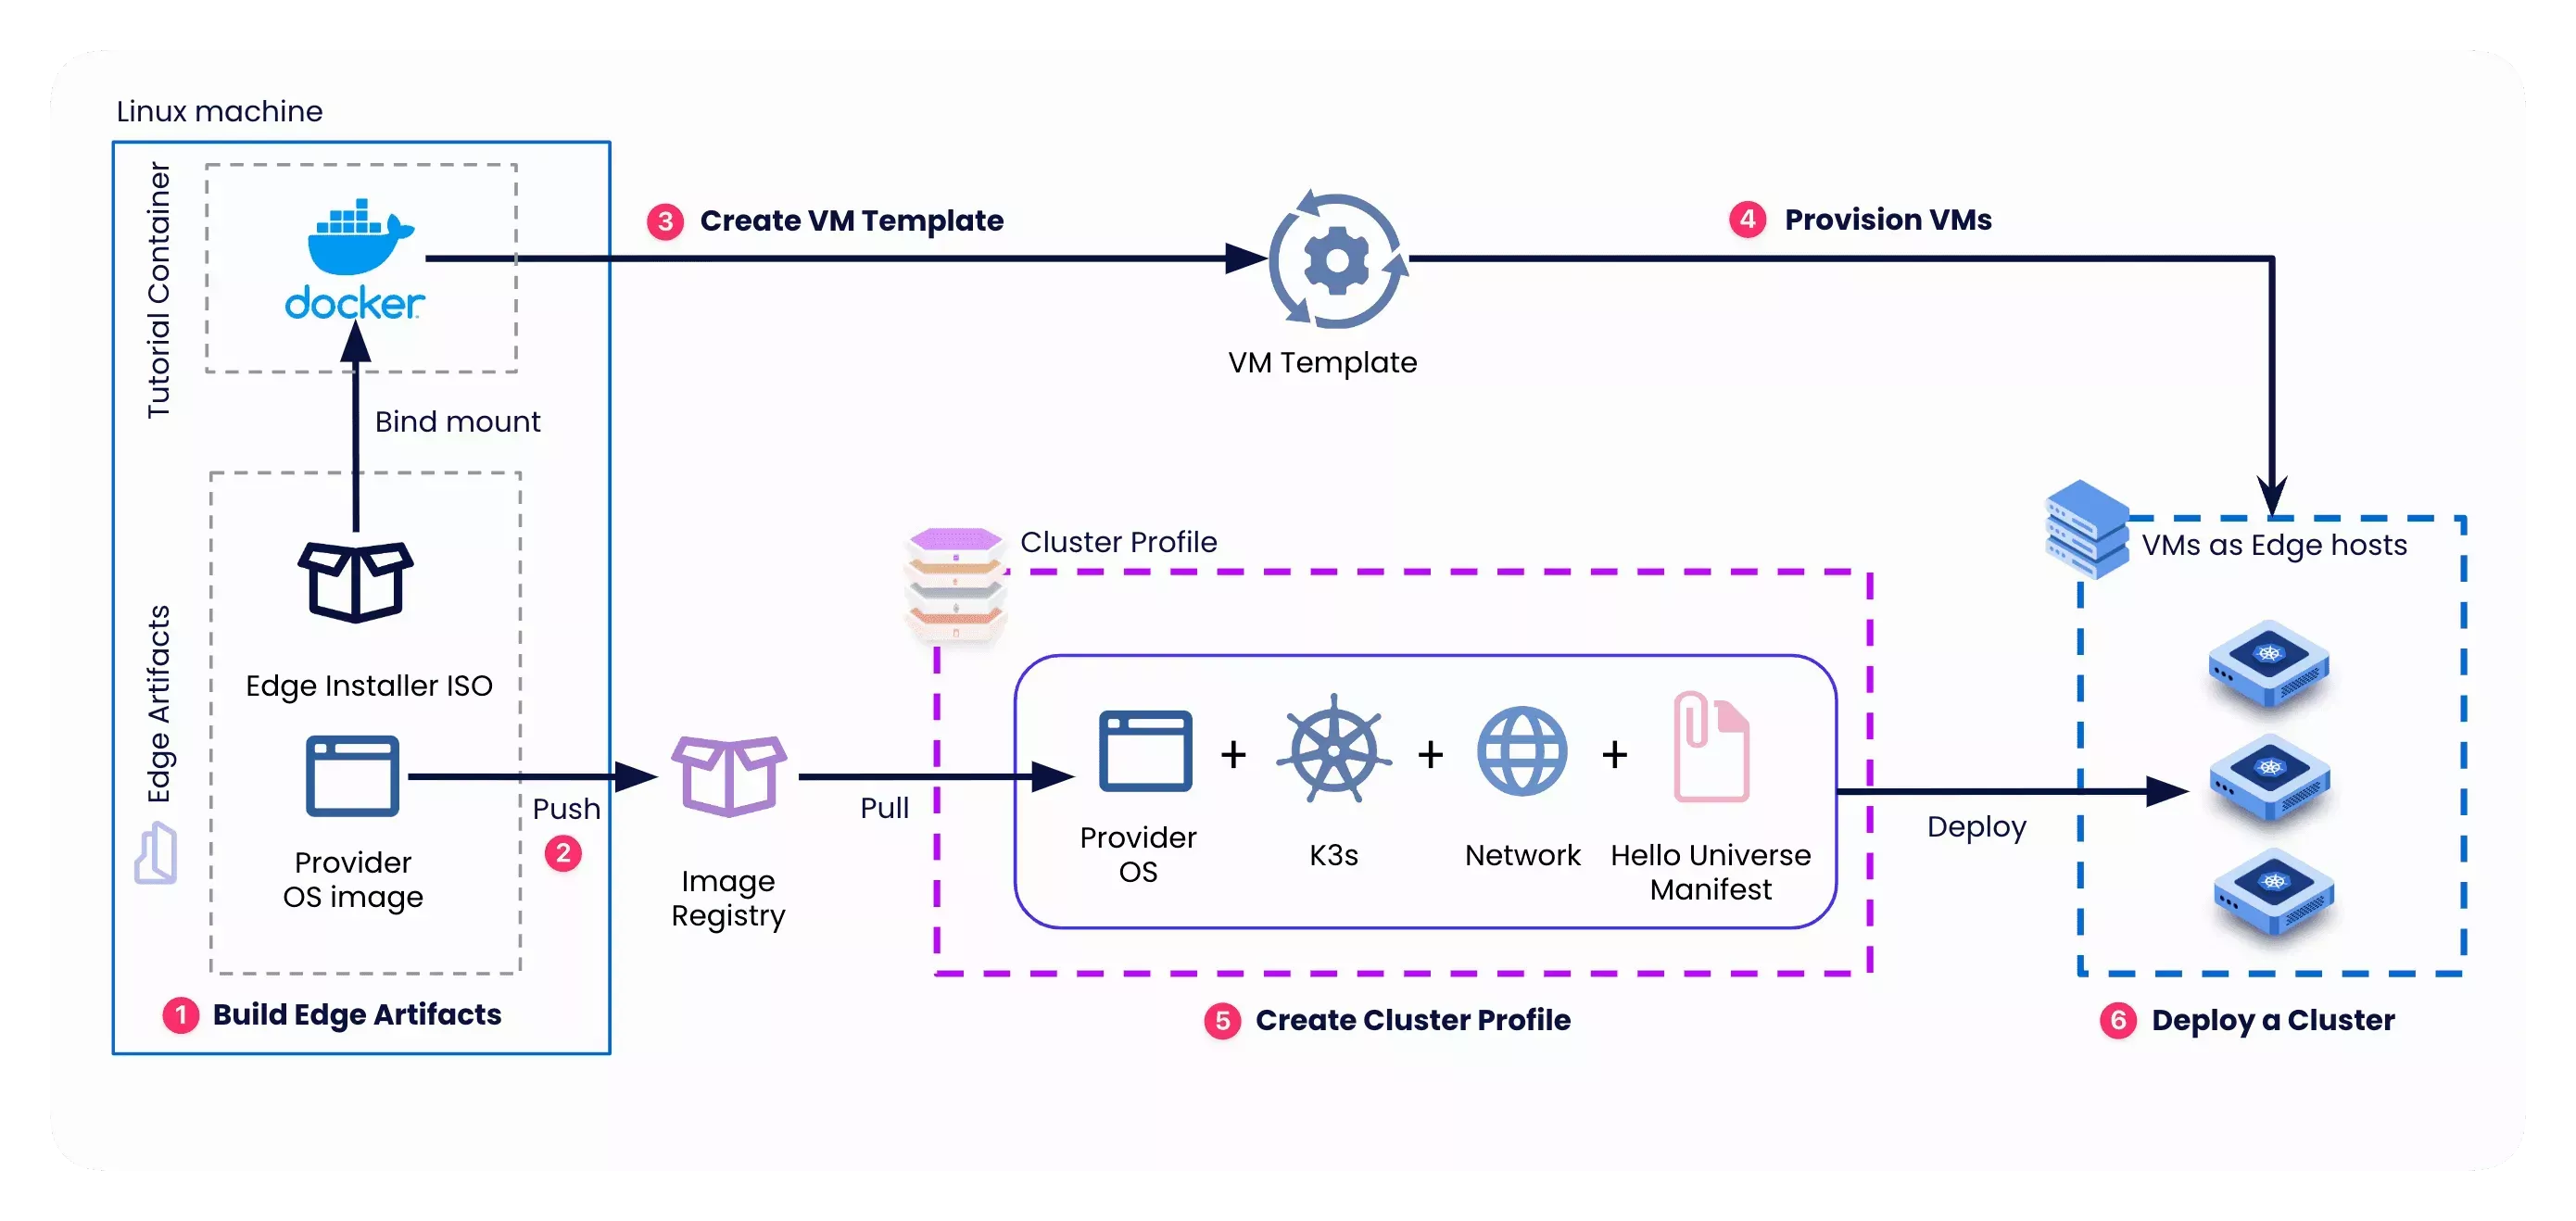
Following the primary stages outlined above, this tutorial will guide you to build the Edge artifacts (Edge installer ISO image and provider images) and use the Edge installer ISO image to prepare Edge hosts. Next, you will use the provider image to create a cluster profile and then deploy a cluster on those Edge hosts. You will use VMware to deploy the Edge hosts to simulate a bare metal environment.
For learning purposes, you will set up Virtual Machines (VMs) as Edge hosts and deploy a cluster on Edge host VMs. VMs provide a more accessible Edge learning experience, as you do not require connecting to physical Edge devices. The diagram below shows the main steps to prepare Edge hosts and deploy a cluster.
Prerequisites
To complete this tutorial, you will need the following:
-
Access to a VMware vCenter environment where you will provision VMs as Edge hosts. You will need the server URL, login credentials, and names of the data center, data store, resource pool, folder, cluster, and DHCP-enabled network.
-
The VMs you will prepare as Edge hosts must be attached to a DHCP-enabled network. To ensure DHCP is enabled on the network, review the network settings on your ESXi Host. You can refer to the vSphere Networking guide from VMware to configure a DHCP server on the network.
-
A physical or virtual Linux machine with AMD64 (also known as x86_64) processor architecture. You can use the
uname -mcommand to check your architecture.warningThe Linux machine must have network connectivity to your VMware vCenter environment.
-
The following minimum hardware configuration:
- 4 CPU
- 8 GB memory
- 150 GB storage
-
The following software installed on the Linux machine:
-
Git. Ensure git installation by issuing the
git --versioncommand. -
(Optional) Earthly is installed and available. If you do not install Earthly, you can still build the artifacts, but it would require root privileges, and some of the resulting artifacts will be owned by the root user.
-
An image management tool with
sudoprivileges such as Docker or crane is installed and available. Avoid installing these tools usingsnap, as it creates an isolated, sandboxed environment that prevents the commands in this tutorial from accessing them properly. Instead, install them using your system’s native package manager (for example,apt).sudo apt install docker.ioinfoIf you do not install Earthly, you must install Docker.
-
-
A Spectro Cloud account. If you have not signed up, you can sign up for an account here.
-
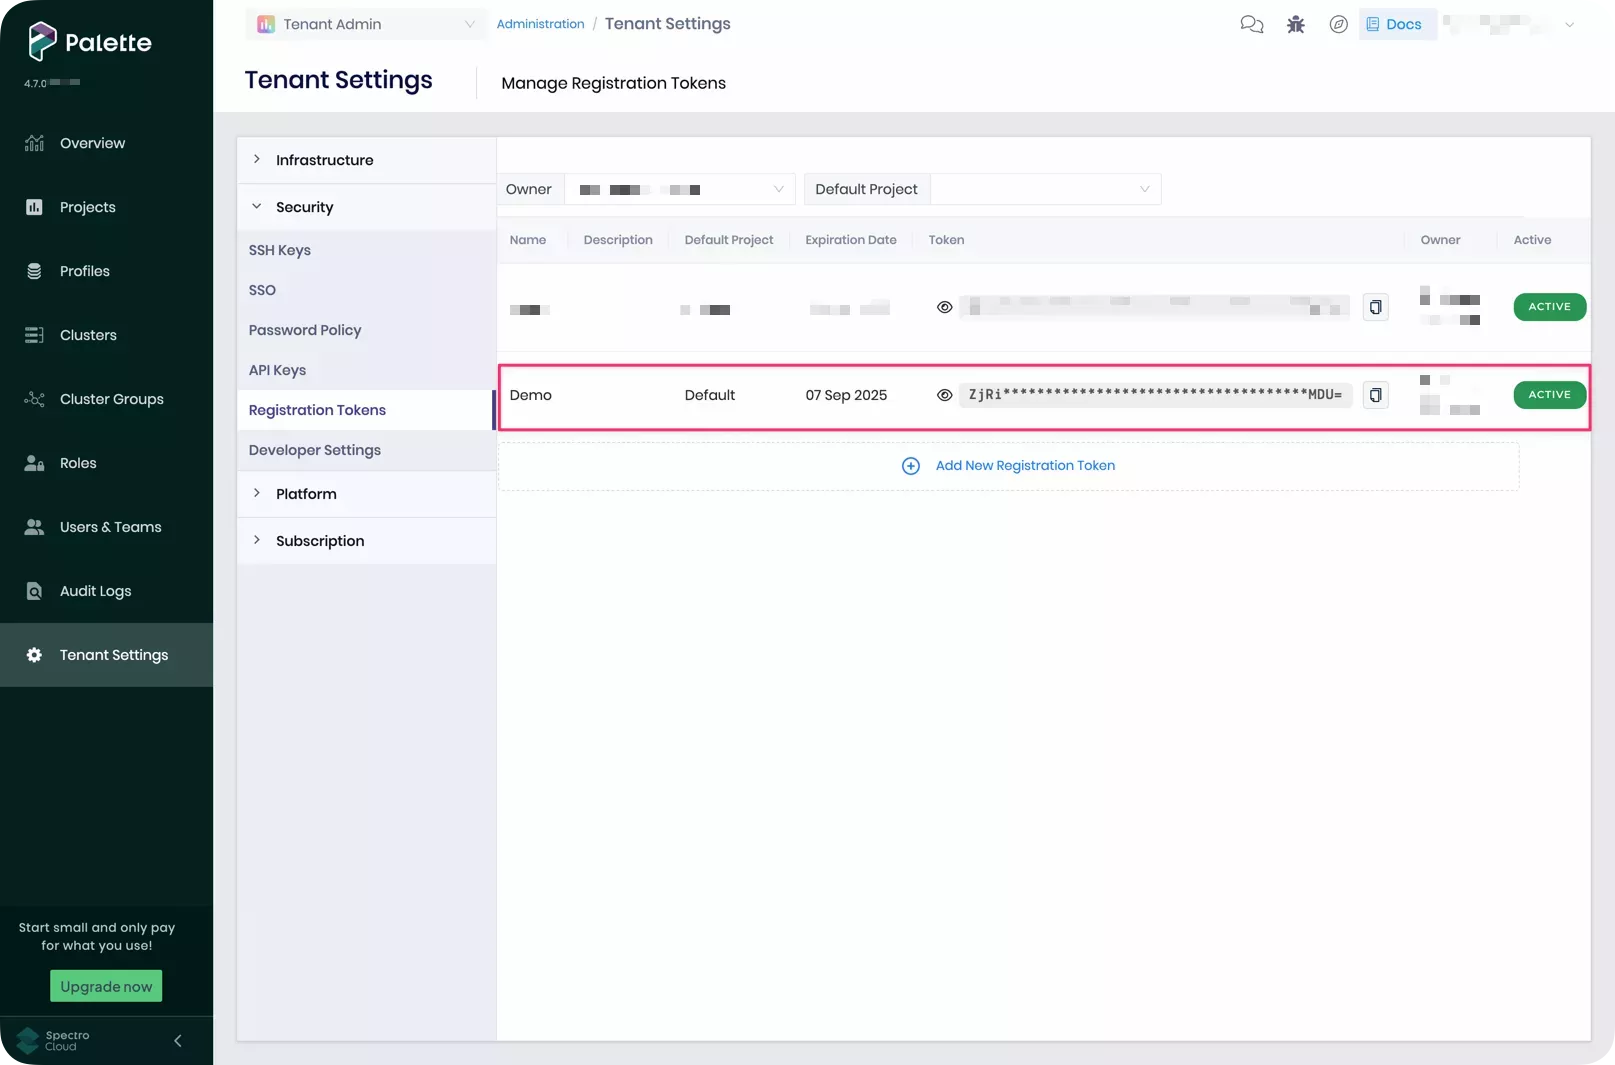
A Palette registration token for pairing Edge hosts with Palette. You will need tenant admin access to Palette to generate a new registration token. For detailed instructions, refer to the Create Registration Token guide. Copy the newly created token to a clipboard or notepad file to use later in this tutorial.
The screenshot below shows a sample registration token in the Tenant Settings > Registration Tokens section in Palette.
-
Access to an image registry and permissions to push images. This page uses a public Docker Hub registry as an example. If you need to use a private registry, refer to the Deploy Cluster with a Private Provider Registry guide for instructions on how to configure the credentials.
Build Edge Artifacts
In this section, you will use the CanvOS utility to build an Edge installer ISO image and provider images for all the Palette-supported Kubernetes versions. The utility builds multiple provider images, so you can use any image that matches the desired Kubernetes version you want to use with your cluster profile. You must perform this part of the tutorial on a Linux machine with an AMD64(x86_64) processor architecture that has network connectivity to your VMware vCenter environment.
This tutorial builds and uses the provider image compatible with K3s v1.32.1.
Check Out Starter Code
Issue the following and subsequent command-line instructions on your Linux machine, which this tutorial refers to as the development environment.
Clone the CanvOS GitHub repository containing the starter code to build Edge artifacts.
git clone https://github.com/spectrocloud/CanvOS.git
Change to the CanvOS directory.
cd CanvOS
View the available git tags.
git tag --sort=v:refname
Check out the desired tag. We recommend using a CanvOS minor version that matches or is older than Palette's minor
version. This tutorial uses the tag v4.7.16 as an example.
git checkout v4.7.16
Define Build Arguments
CanvOS requires arguments such as image tag, registry, repository, and OS distribution. The arguments are defined in the
.arg file. In this step, you will create the .arg file and define all the required arguments.
Set a custom tag for the provider images. The tag must be an alphanumeric lowercase string. This tutorial uses demo as
an example. Additionally, replace spectrocloud with the name of your registry.
export CUSTOM_TAG=demo
export IMAGE_REGISTRY=spectrocloud
Next, issue the following command to create the .arg file using the custom tag and registry. The remaining arguments
use the predefined values. For example, this tutorial uses K3s version 1.33.5 as the Kubernetes
distribution and Ubuntu as the OS distribution. Review the k8s_version.json file in the CanvOS repository for all the
supported Kubernetes versions.
If you are using a CanvOS tag that is earlier than v4.4.12, the k8s_version.json file does not exist in those tags. In
that case, review the Earthfile file in the CanvOS repository for all supported Kubernetes versions.
Using the arguments defined in the .arg file, the final provider images you generate will have the following naming
convention, [IMAGE_REGISTRY]/[IMAGE_REPO]:[CUSTOM_TAG]. In this example, the provider images will be
spectrocloud/ubuntu:k3s-1.33.5-v4.7.16-demo. Refer to the .arg.template sample file in the current directory or the
README to learn more about the default values.
cat << EOF > .arg
CUSTOM_TAG=$CUSTOM_TAG
IMAGE_REGISTRY=$IMAGE_REGISTRY
OS_DISTRIBUTION=ubuntu
IMAGE_REPO=ubuntu
OS_VERSION=22.04
K8S_DISTRIBUTION=k3s
K8S_VERSION=1.33.5
ISO_NAME=palette-edge-installer
ARCH=amd64
UPDATE_KERNEL=false
EOF
Future versions of CanvOS may require different arguments. Refer to the CanvOS README to learn more about the arguments needed for each version tag.
Verify that the file was created correctly using the cat command.
cat .arg
Refer to the Build Edge Artifacts guide to learn more about customizing arguments.
Create User Data
Next, you will create a user-data file that embeds
your tenant registration token
and Edge host's login credentials in the Edge Installer ISO image.
Visit the Edge Installer Configuration Reference page for a complete list of configuration parameters, the Prepare User Data guide for more examples of user data configurations, and the Cloud Init Stages page for the supported cloud init stages.
Export your Palette registration token and Edge host login credentials.
export TOKEN=<palette-registration-token>
export USER=<host-user-name>
export PASSWORD=<user-name-password>
Next, issue the command below to create the user-data file using the exported token and user information. The
#cloud-config header is required by the cloud-init standard.
cat << EOF > user-data
#cloud-config
stylus:
  site:
    edgeHostToken: $TOKEN
    paletteEndpoint: api.spectrocloud.com

stages:
  initramfs:
    - users:
        $USER:
          passwd: $PASSWORD

install:
  poweroff: true
EOF
If you haven't set a default project for the registration token, ensure that you provide the stylus.site.projectName
parameter with the value Default in user-data.
Ensure that you include the install.poweroff.true parameter. This ensures that the Edge host will power off after
installation. If you do not include this parameter, this could lead to a VM you will use in a subsequent step to refuse
to power off automatically and cause a timeout error unless you manually shut down the VM.
Confirm that the file was created correctly.
cat user-data
The output should show your user data file, with the value of your Palette registration token assigned to the
edgeHostToken parameter, as well as the user and password to be created. This tutorial uses kairos as an example for
both the username and password.
#cloud-config
stylus:
  site:
    edgeHostToken: ****************
    paletteEndpoint: api.spectrocloud.com

stages:
  initramfs:
    - users:
        kairos:
          passwd: kairos

install:
  poweroff: true
Build Artifacts
Issue the following command to start the build process.
sudo ./earthly.sh +build-all-images
The build may take 15 to 20 minutes to complete, depending on the hardware resources available on the host machine. Once complete, a success message appears.
# Output condensed for readability
===================== Earthly Build SUCCESS =====================
Share your logs with an Earthly account (experimental)! Register for one at https://ci.earthly.dev.
Copy and save the output attributes in a notepad or clipboard to use later in your cluster profile.
pack:
  content:
    images:
      - image: "{{.spectro.pack.edge-native-byoi.options.system.uri}}"
  # Below config is default value, please uncomment if you want to modify default values
  #drain:
  #cordon: true
  #timeout: 60 # The length of time to wait before giving up, zero means infinite
  #gracePeriod: 60 # Period of time in seconds given to each pod to terminate gracefully. If negative, the default value specified in the pod will be used
  #ignoreDaemonSets: true
  #deleteLocalData: true # Continue even if there are pods using emptyDir (local data that will be deleted when the node is drained)
  #force: true # Continue even if there are pods that do not declare a controller
  #disableEviction: false # Force drain to use delete, even if eviction is supported. This will bypass checking PodDisruptionBudgets, use with caution
  #skipWaitForDeleteTimeout: 60 # If pod DeletionTimestamp older than N seconds, skip waiting for the pod. Seconds must be greater than 0 to skip.
options:
  system.uri:
    "{{ .spectro.pack.edge-native-byoi.options.system.registry }}/{{ .spectro.pack.edge-native-byoi.options.system.repo
    }}:{{ .spectro.pack.edge-native-byoi.options.system.k8sDistribution }}-{{ .spectro.system.kubernetes.version }}-{{
    .spectro.pack.edge-native-byoi.options.system.peVersion }}-{{
    .spectro.pack.edge-native-byoi.options.system.customTag }}"

  system.registry: spectrocloud
  system.repo: ubuntu
  system.k8sDistribution: k3s
  system.osName: ubuntu
  system.peVersion: v4.7.16
  system.customTag: demo
  system.osVersion: 22.04
Confirm that the Edge installer ISO and its checksum have been created correctly.
ls build/
palette-edge-installer.iso palette-edge-installer.iso.sha256
Export the path to the ISO file, the build directory, in the ISOFILEPATH local variable. Later in the tutorial, you
will use this local variable to mount the build directory to a Docker container.
export ISOFILEPATH=$PWD/build
echo $ISOFILEPATH
List the container images to confirm that the provider images were built successfully.
sudo docker images --filter=reference='*/*:*demo*'
REPOSITORY            TAG                                   IMAGE ID       CREATED          SIZE
spectrocloud/ubuntu   k3s-1.33.5-v4.7.16-demo               9d1ced2fee15   32 minutes ago   4.41GB
spectrocloud/ubuntu   k3s-1.33.5-v4.7.16-demo_linux_amd64   9d1ced2fee15   32 minutes ago   4.41GB
Push Provider Images
To use the provider image with your Edge deployment, push it to the image registry specified in the .arg file. Issue
the following command to log in to Docker Hub. Provide your Docker ID and password when prompted.
sudo docker login
Login Succeeded
Once authenticated, push the provider image to the registry so that your Edge host can download it during the cluster deployment.
sudo docker push $IMAGE_REGISTRY/ubuntu:k3s-1.33.5-v4.7.16-$CUSTOM_TAG
Provision Edge Virtual Machines
In this section, you will create a VM template in VMware vCenter from the Edge installer ISO image and clone that VM template to provision three VMs. Think of a VM template as a static blueprint that you can use to create new and consistent VMs. VM Templates ensure rapid and consistent deployment of VMs by eliminating the need for repetitive manual configurations of the guest OS, dependencies, and user data.
This tutorial example will use Packer to create a VM template from the Edge installer ISO
image. Later, it will use GOVC to clone the VM template to
provision three VMs. You do not have to install Packer or GOVC in your Linux development environment. You will use our
official tutorials container that already contains the required tools.
Create a VM Template
You will use a script that includes a heredoc input block. The script prompts you to enter your VMware vCenter
environment details and saves them as environment variables in a file named .packerenv. Packer reads the environment
variables during the build process.
Before you invoke the script, have values handy in a notepad for the VMware vCenter environment variables listed in the table.
| Variable | Description | How to find its value? |
|---|---|---|
PKR_VAR_vcenter_server | vCenter server URL | Check with your VMware data center administrator. Omit http:// or https:// in the URL. Example: vcenter.spectrocloud.dev. |
PKR_VAR_vcenter_username | vSphere client username | Request credentials from your VMware data center administrator. Example: myusername@vsphere.local |
PKR_VAR_vcenter_password | vSphere client password | -- |
PKR_VAR_vcenter_datacenter | Data center name | Expand your vSphere client's main menu and select Inventory > Hosts and Clusters. The data center name is displayed in the left navigation tree. |
PKR_VAR_vcenter_cluster | Cluster name | Expand the data center inventory to view the cluster name in the left navigation tree. |
PKR_VAR_vcenter_resource_pool | Resource pool name | Expand the cluster inventory to view the resource pool name. |
PKR_VAR_vcenter_folder | Folder name | Switch to the VMs and Templates view in your vSphere client. The folder name is displayed in the left navigation tree. |
PKR_VAR_vcenter_datastore | Datastore name | Switch to the Storage view in your vSphere client. The datastore name is displayed in the left navigation tree. |
PKR_VAR_vcenter_network | Network name | Switch to the Networking view in your vSphere client. The network name is displayed in the left navigation tree. |
Issue the following command, which uses a heredoc input to create the .packerenv file containing VMware vCenter
details as environment variables.
cat << EOF > .packerenv
PKR_VAR_vcenter_server=$(read -ep 'Enter vCenter Server URL without http:// or https://, for example: vcenter.spectrocloud.dev ' vcenter_server && echo $vcenter_server)
PKR_VAR_vcenter_username=$(read -ep 'Enter vCenter Username value: ' vcenter_username && echo $vcenter_username)
PKR_VAR_vcenter_password=$(read -ep 'Enter vCenter Password value: ' vcenter_password && echo $vcenter_password)
PKR_VAR_vcenter_datacenter=$(read -ep 'Enter vCenter Datacenter name: ' vcenter_datacenter && echo $vcenter_datacenter)
PKR_VAR_vcenter_cluster=$(read -ep 'Enter vCenter Cluster name: ' vcenter_cluster && echo $vcenter_cluster)
PKR_VAR_vcenter_resource_pool=$(read -ep 'Enter vCenter Resource Pool name: ' vcenter_resource_pool && echo $vcenter_resource_pool)
PKR_VAR_vcenter_folder=$(read -ep 'Enter vCenter Folder name: ' vcenter_folder && echo $vcenter_folder)
PKR_VAR_vcenter_datastore=$(read -ep 'Enter vCenter Datastore name: ' vcenter_datastore && echo $vcenter_datastore)
PKR_VAR_vcenter_network=$(read -ep 'Enter vCenter Network name: ' vcenter_network && echo $vcenter_network)
EOF
Avoid using parentheses ( ) in your password, as the shell interprets them as special characters within a heredoc
block.
View the file to ensure you have filled in the details correctly.
cat .packerenv
You will use the .packerenv file later in the tutorial when you start Packer.
After you create the .packerenv file, source this file to set the variables in your environment. Echo one of the
variables to ensure the variables are accessible on your host machine.
source .packerenv
echo $PKR_VAR_vcenter_server
After you create the .packerenv file, create another environment variable file named .goenv.
GOVC is the tool you will be using to interact with
vSphere, and it requires the same variables that you provided to Packer.
cat << EOF > .goenv
vcenter_server=$PKR_VAR_vcenter_server
vcenter_username=$PKR_VAR_vcenter_username
vcenter_password=$PKR_VAR_vcenter_password
vcenter_datacenter=$PKR_VAR_vcenter_datacenter
vcenter_datastore=$PKR_VAR_vcenter_datastore
vcenter_resource_pool=$PKR_VAR_vcenter_resource_pool
vcenter_folder=$PKR_VAR_vcenter_folder
vcenter_cluster=$PKR_VAR_vcenter_cluster
vcenter_network=$PKR_VAR_vcenter_network
EOF
View the file to ensure variable values are set correctly.
cat .goenv
Next, verify the ISOFILEPATH local variable has the path to the ISO file. The docker run command uses this variable
to bind mount the host's build directory to the container.
echo $ISOFILEPATH
The environment variable you set using export [var-name]=[var-value] will not persist across terminal sessions. If you
opened a new terminal session in your development environment, you will lose the ISOFILEPATH variable and will need to
reset it.
The next step is to use the following docker run command to trigger Packer build process to create a VM template. Here
is an explanation of the options and sub-commands used below:
-
The
--env-fileoption reads the.packerenvfile. -
The
--volumeoption mounts a local directory to our official tutorials container,ghcr.io/spectrocloud/tutorials:1.3.0. -
The
sh -c "source /edge/vmware/clone_vm_template/setenv.sh "shell sub-command defines the GOVC environment variables, the number of VMs, a prefix string for the VM name, and the VM template name. Most of the GOVC environment variables refer to the variables you have defined in the.goenvfile. -
The
cd /edge/vmware/packer/ && packer build -force --var-file=vsphere.hcl build.pkr.hclshell sub-command changes to the container's/edge/vmware/packerdirectory and invokespacker buildto create the VM template. Thepacker buildcommand has the following options:- The
-forceflag destroys any existing template. - The
--var-fileoption reads thevsphere.hclfile from the container. This file contains the VM template name, VM configuration, and ISO file name to use. The VM configuration conforms to the minimum device requirements.
The
vsphere.hclfile content is shown below for your reference. This tutorial does not require you to modify these configurations.# VM Template Name
vm_name = "palette-edge-template"
# VM Settings
vm_guest_os_type = "ubuntu64Guest"
vm_version = 14
vm_firmware = "bios"
vm_cdrom_type = "sata"
vm_cpu_sockets = 4
vm_cpu_cores = 1
vm_mem_size = 8192
vm_disk_size = 153600
thin_provision = true
disk_eagerly_scrub = false
vm_disk_controller_type = ["pvscsi"]
vm_network_card = "vmxnet3"
vm_boot_wait = "5s"
# ISO Objects
iso = "build/palette-edge-installer.iso"
iso_checksum = "build/palette-edge-installer.iso.sha256"infoShould you need to change the VM template name or VM settings defined in the
vsphere.hclfile, or review the Packer script, you must open a bash session into the container using thesudo docker run --interactive --tty --env-file .packerenv --volume "${ISOFILEPATH}:/edge/vmware/packer/build" ghcr.io/spectrocloud/tutorials:1.3.0 bashcommand, and change to theedge/vmware/packerdirectory to make the modifications. After you finish the modifications, issue thepacker build -force --var-file=vsphere.hcl build.pkr.hclcommand inside the container to trigger the Packer build process. This command creates a VM template, so that you can skip the next step. - The
Issue the following command to trigger the Packer build process to create a VM template in the VMware vCenter. It will
also delete any existing packer_cache before uploading and keeping a copy of the palette-edge-installer.iso to the
packer_cache directory in the specified datastore.
sudo docker run --interactive --tty --rm \
  --env-file .packerenv \
  --env-file .goenv \
  --volume "${ISOFILEPATH}:/edge/vmware/packer/build" \
  ghcr.io/spectrocloud/tutorials:1.3.0 \
  sh -c "source /edge/vmware/clone_vm_template/setenv.sh && cd /edge/vmware/packer/ && packer init build.pkr.hcl && packer build -force --var-file=vsphere.hcl build.pkr.hcl"
Depending on your machine and network, the build process can take 7-10 minutes to finish.
# Sample output
==> vsphere-iso.edge-template: Power on VM...
    vsphere-iso.edge-template: Please shutdown virtual machine within 20m0s.
==> vsphere-iso.edge-template: Deleting Floppy drives...
==> vsphere-iso.edge-template: Eject CD-ROM drives...
==> vsphere-iso.edge-template: Deleting CD-ROM drives...
==> vsphere-iso.edge-template: Convert VM into template...
Build 'vsphere-iso.edge-template' finished after 7 minutes 13 seconds.
==> Wait completed after 7 minutes 13 seconds
==> Builds finished. The artifacts of successful builds are:
--> vsphere-iso.edge-template: palette-edge-template
Provision VMs
Once Packer creates the VM template, you can use the template when provisioning VMs. In the next steps, you will use the GOVC tool to deploy a VM and reference the VM template that Packer created. Remember that the VM instances you are deploying simulate bare metal devices.
GOVC requires the same VMware vCenter details as the environment variables you defined earlier in the .goenv file.
Next, use the docker run command below to clone the VM template and provision three VMs. Here is an explanation of the
options and sub-commands used below:
-
The
--env-fileoption reads the.goenvfile in our officialghcr.io/spectrocloud/tutorials:1.3.0tutorials container. -
The
sh -c "cd edge/vmware/clone_vm_template/ && ./deploy-edge-host.sh"shell sub-command changes to the container'sedge/vmware/clone_vm_templatedirectory and invokes thedeploy-edge-host.shshell script.
The edge/vmware/clone_vm_template directory in the container has the following files:
-
deploy-edge-host.sh- Provisions the VMs. -
delete-edge-host.sh- Deletes the VMs. -
setenv.sh- Defines the GOVC environment variables, the number of VMs, a prefix string for the VM name, and the VM template name. Most of the GOVC environment variables refer to the variables you have defined in the.goenvfile.
Below is the setenv.sh file content for your reference. This tutorial does not require you to modify these
configurations.
#!/bin/bash
# Number of VMs to provision
export NO_OF_VMS=3
export VM_PREFIX="demo"
export INSTALLER_TEMPLATE="palette-edge-template"

#### DO NOT MODIFY BELOW HERE ####################
# GOVC Properties
export GOVC_URL="https://${vcenter_server}"     # Use HTTPS. For example, https://vcenter.company.com
export GOVC_USERNAME="${vcenter_username}"
export GOVC_PASSWORD="${vcenter_password}"
export GOVC_INSECURE=1 #1 if insecure
export GOVC_DATACENTER="${vcenter_datacenter}"
export GOVC_DATASTORE="${vcenter_datastore}"
export GOVC_NETWORK="${vcenter_network}"
export GOVC_RESOURCE_POOL="${vcenter_resource_pool}"
export GOVC_FOLDER="${vcenter_folder}"
Suppose you have changed the VM template name in the previous step or need to change the number of VMs to provision. In
that case, you must modify the setenv.sh script. To do so, you can reuse the container bash session from the previous
step if it is still active, or you can open another bash session into the container using the
sudo docker run --interactive --tty --env-file .goenv ghcr.io/spectrocloud/tutorials:1.3.0 bash command. If you use an
existing container bash session, create the .goenv file described above and source it in your container environment.
Next, change to the edge/vmware/clone_vm_template directory to modify the setenv.sh script, and issue the
./deploy-edge-host.sh command to deploy the VMs.
Issue the following command to clone the VM template and provision three VMs.
sudo docker run --interactive --tty --rm \
  --env-file .goenv \
  ghcr.io/spectrocloud/tutorials:1.3.0 \
  sh -c "cd edge/vmware/clone_vm_template/ && ./deploy-edge-host.sh"
The cloning process can take 3-4 minutes to finish and displays output similar to that shown below. The output displays the Edge host ID for each VM, as highlighted in the sample output below. VMs use this host ID to auto-register with Palette.
# Sample output for one VM
Cloning /Datacenter/vm/vm-folder/palette-edge-template to demo-1...OK
Cloned VM demo-1
Powering on VM demo-1
Powering on VirtualMachine:vm-13436... OK
Getting UUID demo-1
Edge Host ID   VM demo-1 : edge-97f2384233b498f6aa8dec90c3437c28
For each of the three VMs, copy the Edge host ID. An Edge host ID looks similar to
edge-97f2384233b498f6aa8dec90c3437c28.
You must copy the Edge host IDs for future reference. In addition, if auto registration fails you will need the Edge host IDs to manually register Edge hosts in Palette.
Verify Host Registration
Before deploying a cluster, you must verify Edge host registration status in Palette.
Open a web browser and log in to Palette. Navigate to the left main menu and select Clusters. Click on the Edge Hosts tab and verify the three VMs you created are registered with Palette.
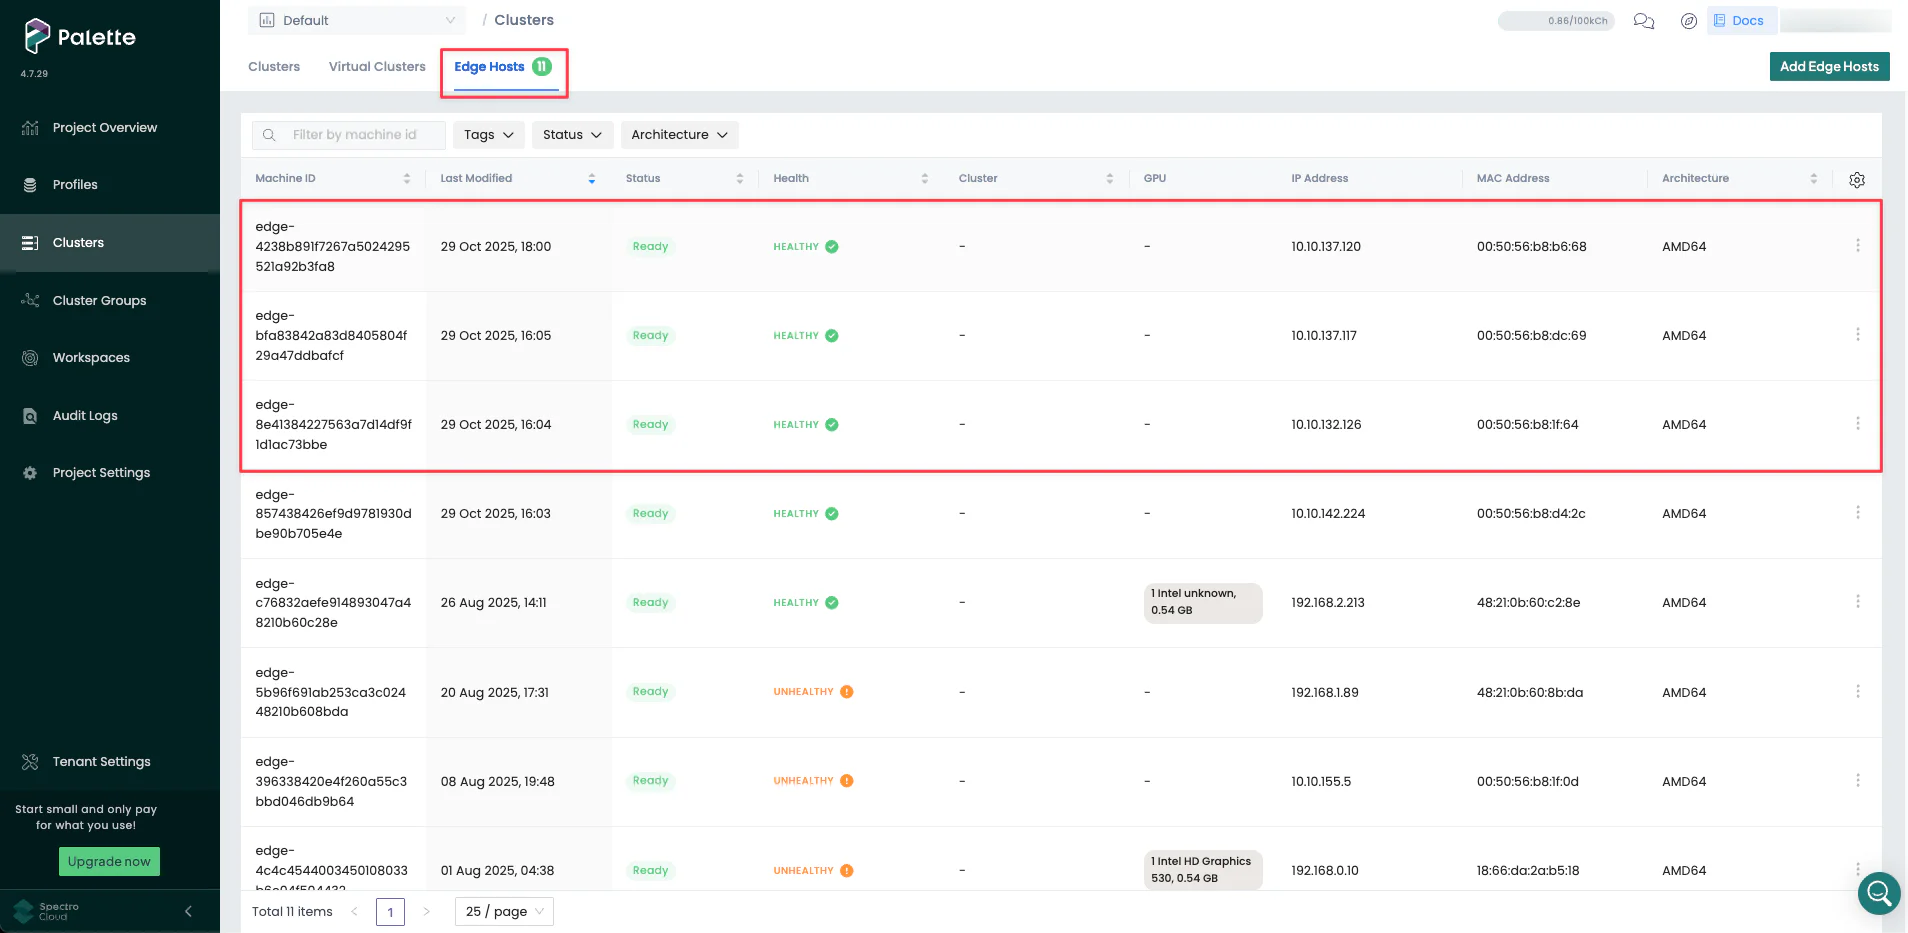
If the three Edge hosts are not displayed in the Edge hosts tab, the automatic registration failed. If this happens, you can manually register hosts by clicking the Add Edge Hosts button and pasting the Edge host ID. Repeat this host registration process for each of the three VMs. If you need help, the detailed instructions are available in the Register Edge Host guide.
Once you verify the host registration, the next step is to deploy a cluster. In this section, you will use the Palette User Interface (UI) to deploy a cluster that is made up of the three Edge hosts you deployed.
Create a Cluster Profile
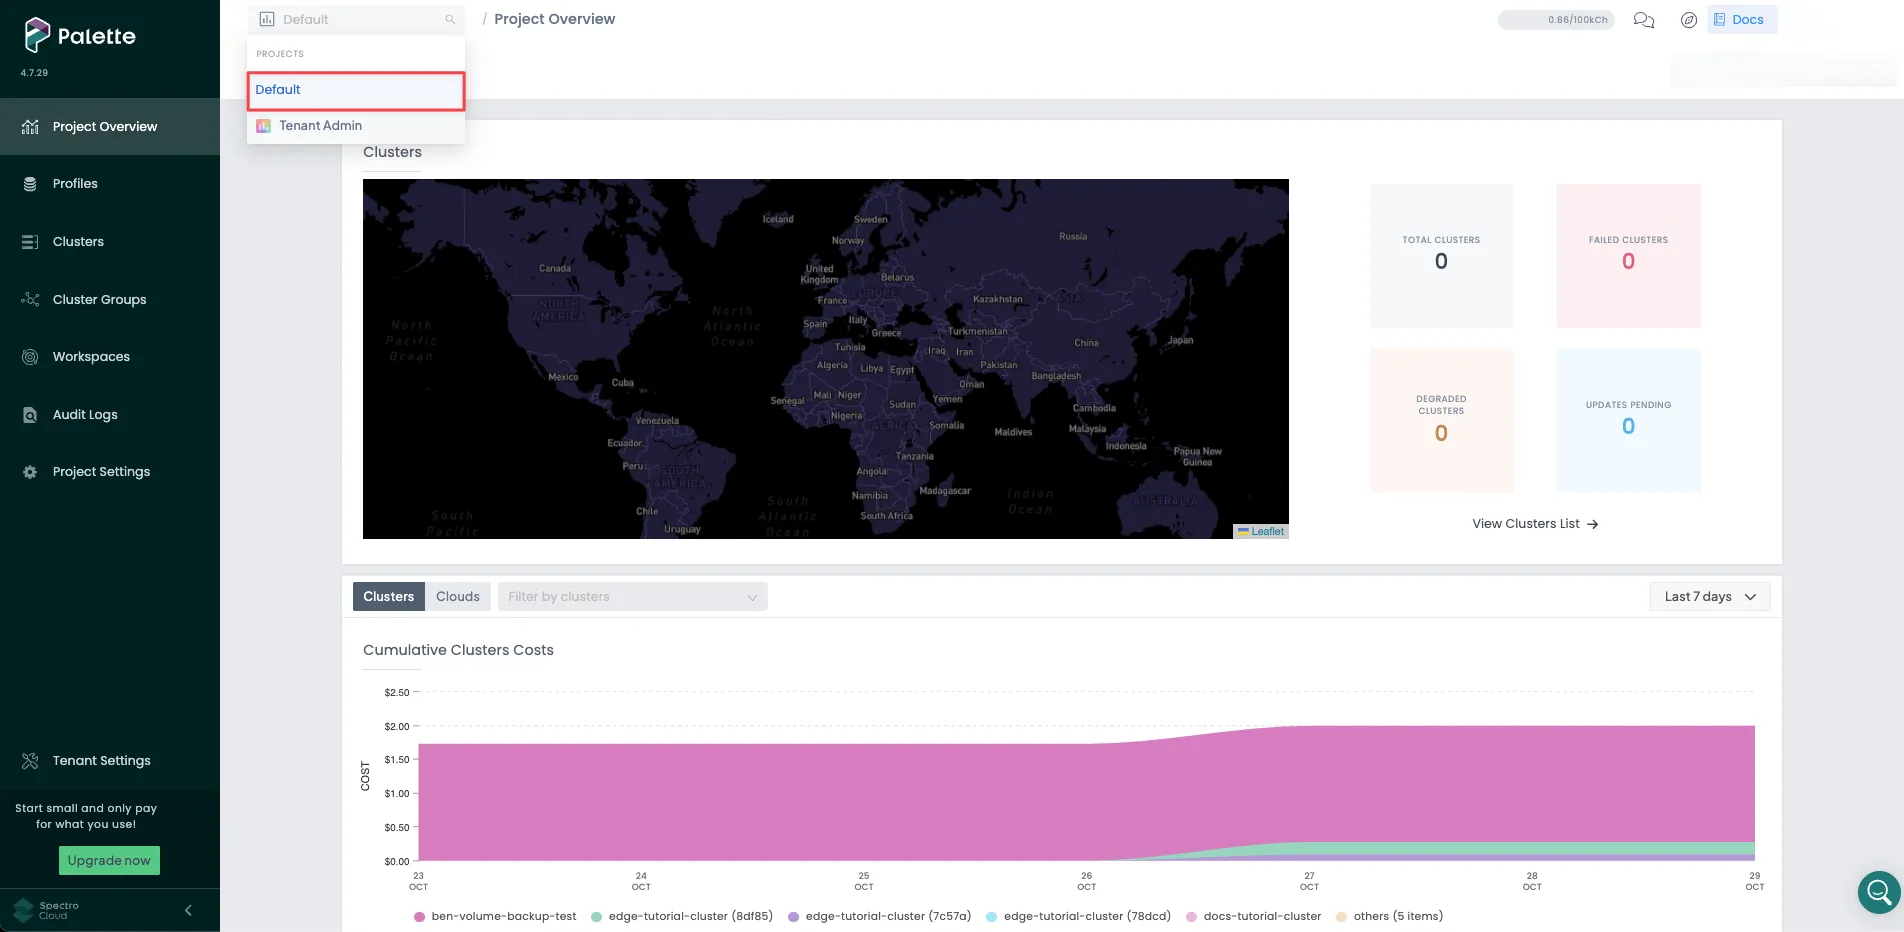
Validate you are in the Default project scope before creating a cluster profile.
Next, create a cluster profile with the core infrastructure layers and a manifest of a sample application, Hello Universe. Navigate to the left main menu and select Profiles. Click on the Add Cluster Profile button, and fill out the required input fields. The cluster profile wizard contains the following sections.
Basic Information
Use the following values when filling out the Basic Information section.
| Field | Value |
|---|---|
| Name | edge-tutorial-cluster |
| Version | 1.0.0 |
| Description | Cluster profile as part of the Edge Cluster Deployment tutorial. |
| Type | Full |
| Tags | spectrocloud:education, app:hello-universe, terraform_managed:false |
Click on Next to continue.
Cloud Type
In the Cloud Type section, choose Edge Native and click on Next at the bottom to proceed to the next section.
Profile Layers
In the Profile Layers section, add the following BYOOS Edge OS pack to the OS layer.
| Pack Type | Registry | Pack Name | Pack Version |
|---|---|---|---|
| OS | Public Repo | BYOOS Edge OS | Not applicable |
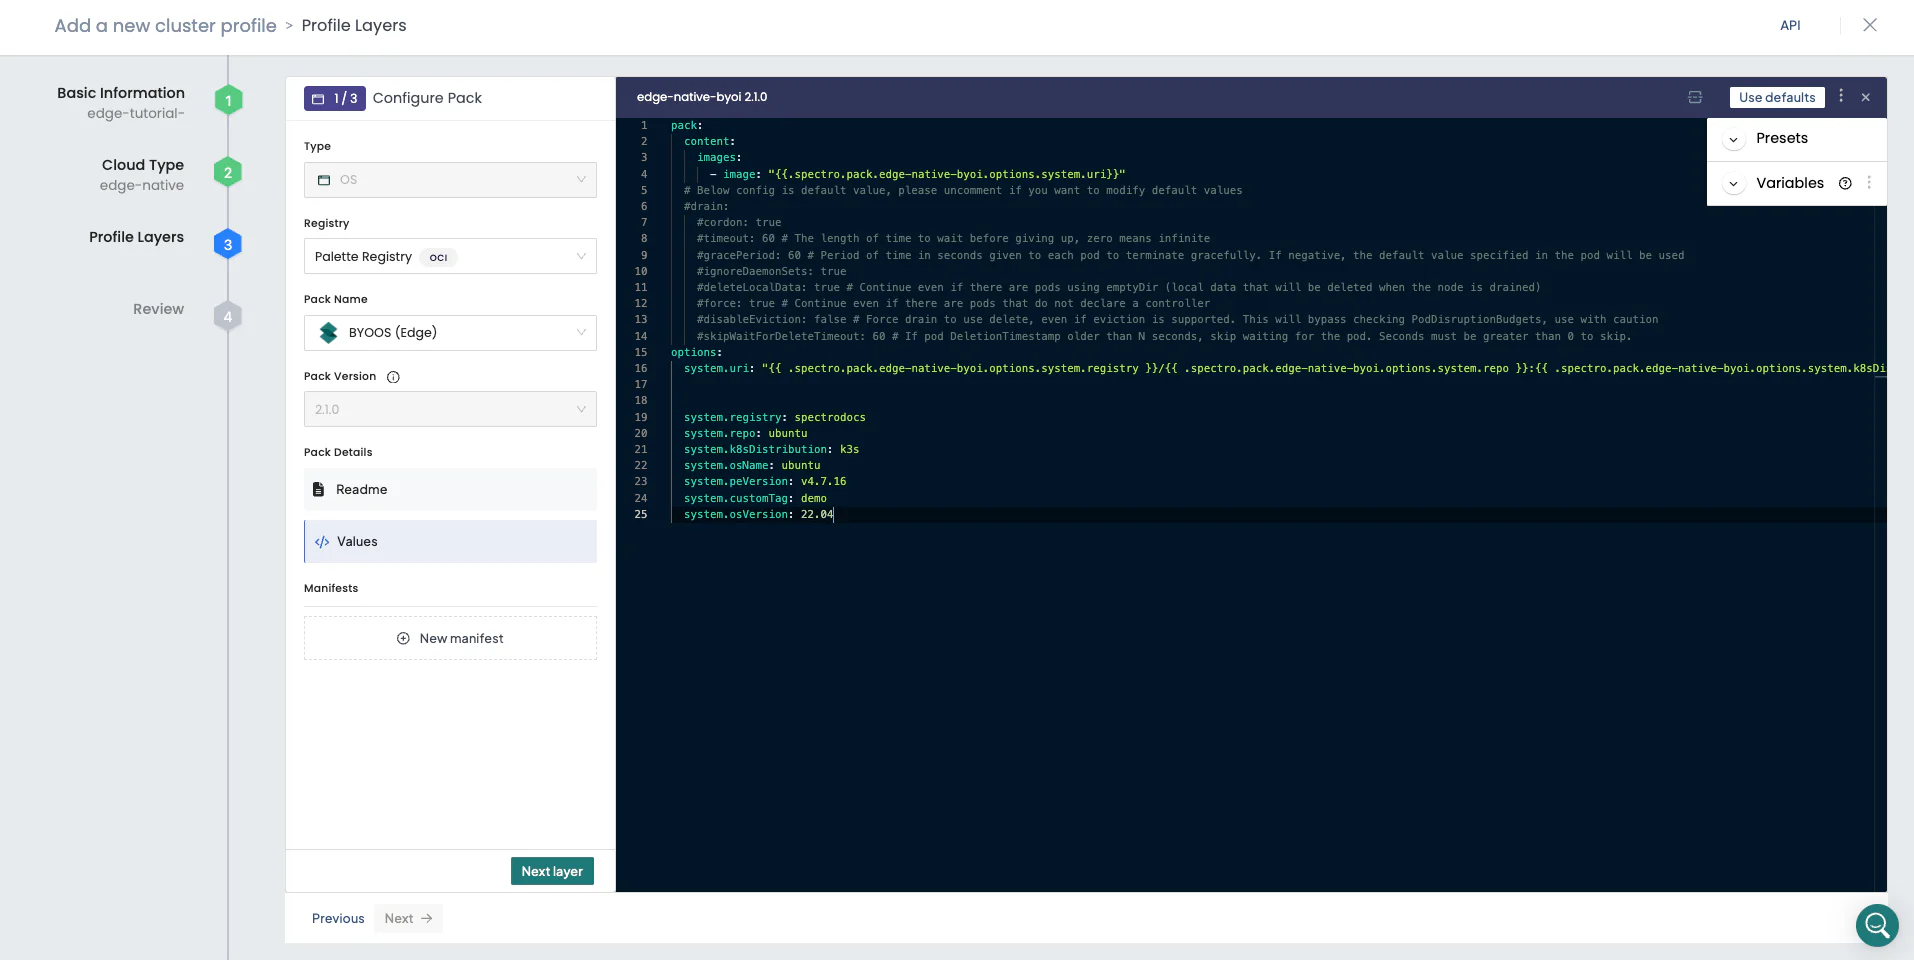
Replace the OS layer manifest with the custom manifest so that the cluster profile can pull the provider image from the registry you pushed it to. You may recall that the CanvOS script returned an output containing a custom manifest after building the Edge artifacts. Copy the CanvOS output into the cluster profile's BYOOS pack YAML file.
The system.xxxxx attribute values in the manifest are as same as those you defined in the .arg file while building
the Edge artifacts. The code snippet below serves as an example.
pack:
  content:
    images:
      - image: "{{.spectro.pack.edge-native-byoi.options.system.uri}}"
  # Below config is default value, please uncomment if you want to modify default values
  #drain:
  #cordon: true
  #timeout: 60 # The length of time to wait before giving up, zero means infinite
  #gracePeriod: 60 # Period of time in seconds given to each pod to terminate gracefully. If negative, the default value specified in the pod will be used
  #ignoreDaemonSets: true
  #deleteLocalData: true # Continue even if there are pods using emptyDir (local data that will be deleted when the node is drained)
  #force: true # Continue even if there are pods that do not declare a controller
  #disableEviction: false # Force drain to use delete, even if eviction is supported. This will bypass checking PodDisruptionBudgets, use with caution
  #skipWaitForDeleteTimeout: 60 # If pod DeletionTimestamp older than N seconds, skip waiting for the pod. Seconds must be greater than 0 to skip.
options:
  system.uri:
    "{{ .spectro.pack.edge-native-byoi.options.system.registry }}/{{ .spectro.pack.edge-native-byoi.options.system.repo
    }}:{{ .spectro.pack.edge-native-byoi.options.system.k8sDistribution }}-{{ .spectro.system.kubernetes.version }}-{{
    .spectro.pack.edge-native-byoi.options.system.peVersion }}-{{
    .spectro.pack.edge-native-byoi.options.system.customTag }}"

  system.registry: spectrocloud
  system.repo: ubuntu
  system.k8sDistribution: k3s
  system.osName: ubuntu
  system.peVersion: v4.7.16
  system.customTag: demo
  system.osVersion: 22.04
The screenshot below shows you how to reference your provider OS image in a cluster profile by using the utility build output with the BYOOS pack.
Click on the Next layer button to add the following Kubernetes layer to your cluster profile.
| Pack Type | Registry | Pack Name | Pack Version |
|---|---|---|---|
| Kubernetes | Public Repo | Palette Optimized K3s | 1.33.5 |
The pack version must match the version pushed to the image registry. The system.uri attribute of the BYOOS pack will
reference the Kubernetes version you select using the {{ .spectro.system.kubernetes.version }}
macro.
Click on the Next layer button, and add the following network layer. This example uses the Calico Container Network Interface (CNI). However, you can choose a different CNI pack that fits your needs, such as Flannel, Cilium, or Custom CNI.
| Pack Type | Registry | Pack Name | Pack Version |
|---|---|---|---|
| Network | Public Repo | Calico | 3.30.x |
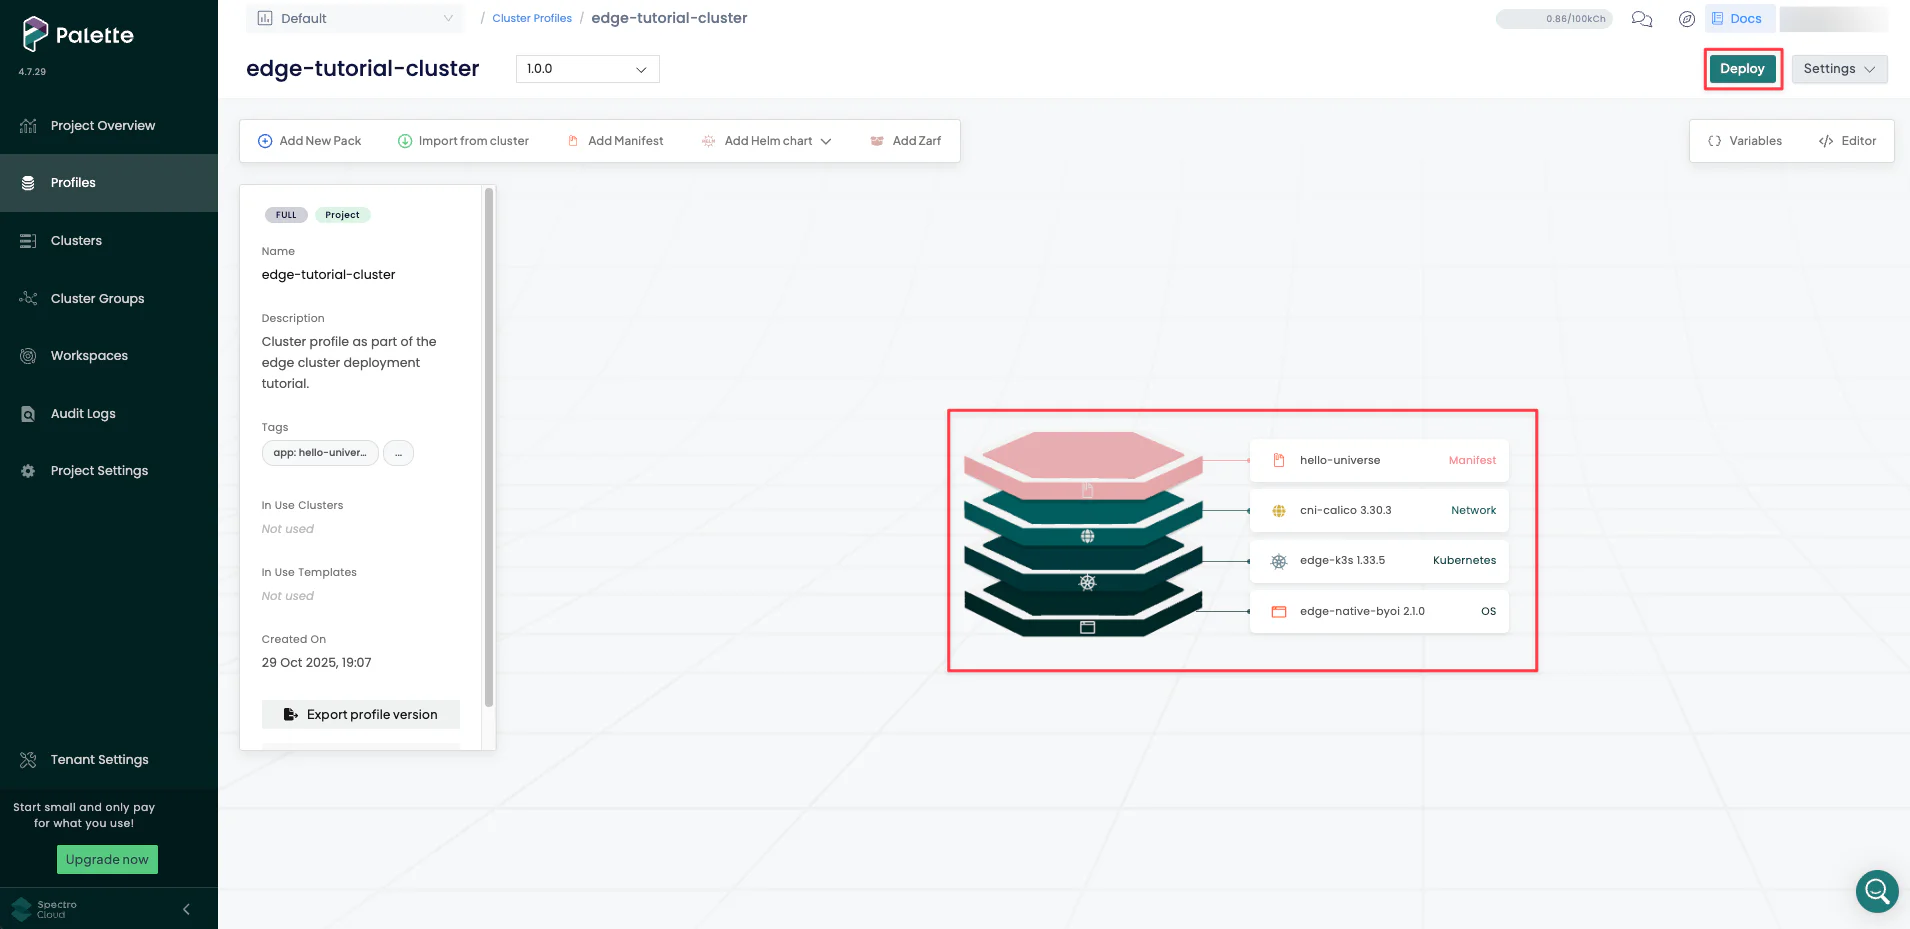
Click on the Confirm button to complete the core infrastructure stack. Palette displays the newly created infrastructure profile as a layered diagram.
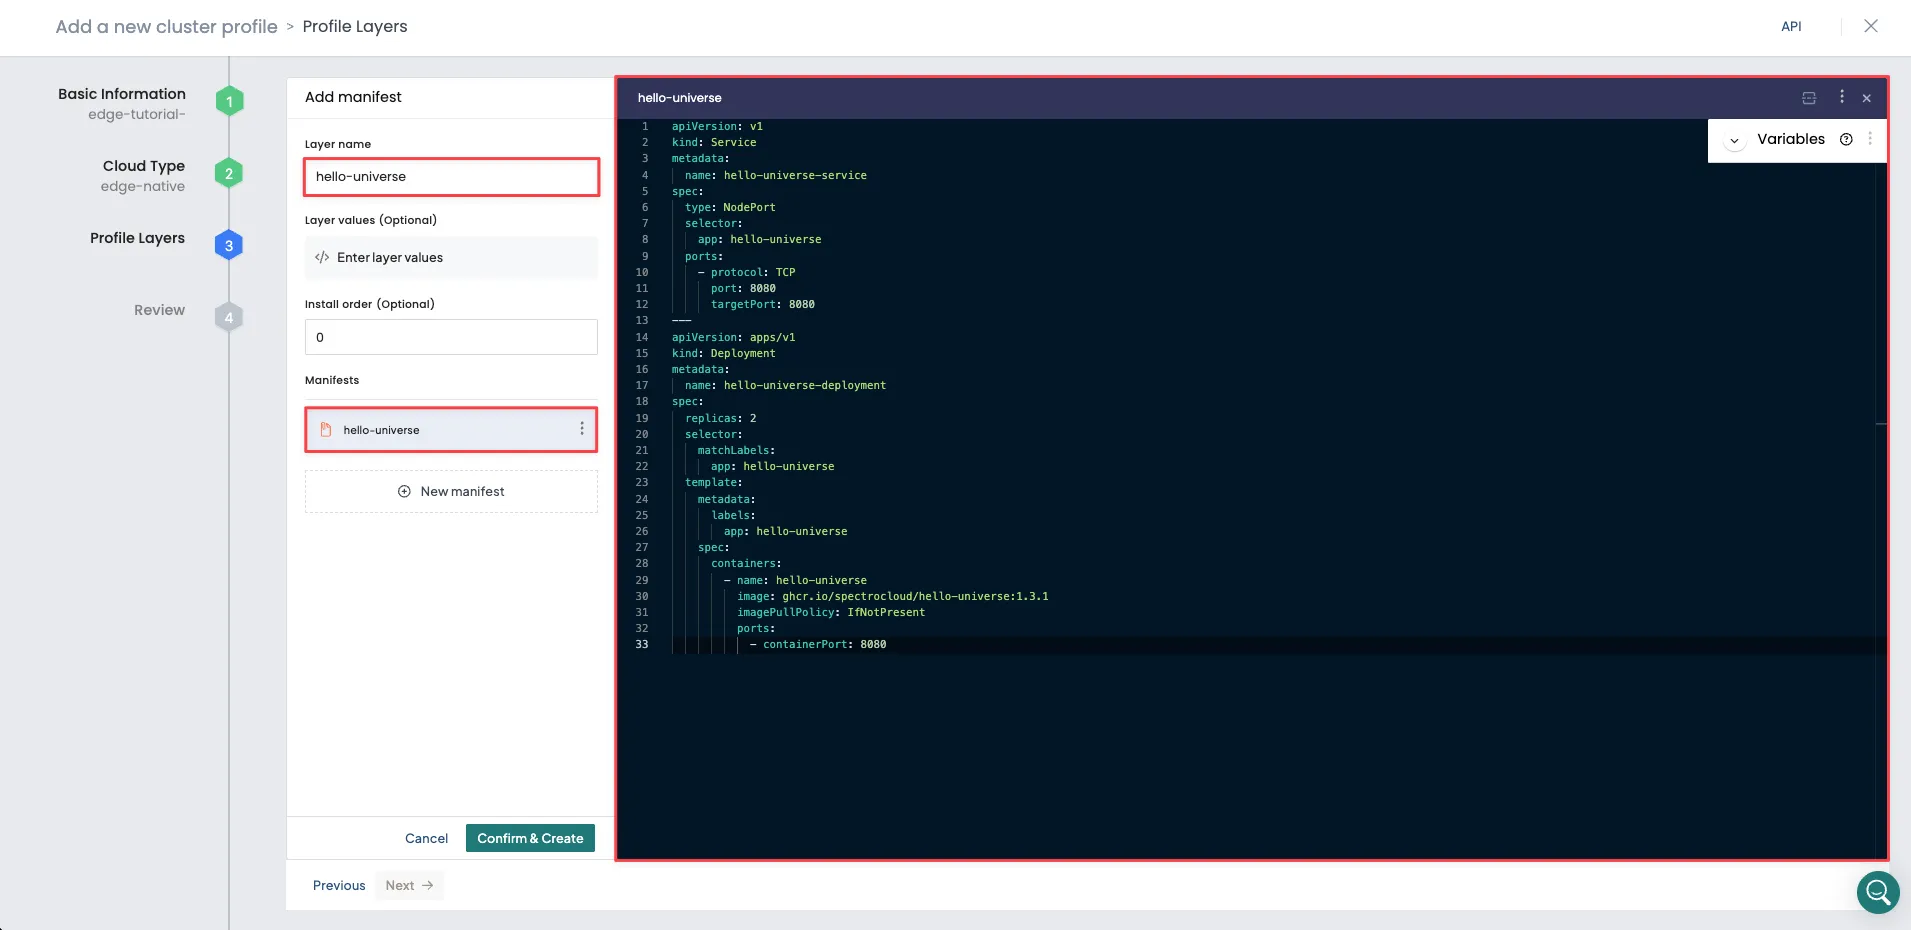
Finally, click on the Add Manifest button to add the Hello Universe application manifest.

Use the following values to add the Hello Universe manifest metadata.
| Field | Value |
|---|---|
| Layer name | hello-universe |
| Layer values (Optional) | Leave default |
| Install order (Optional) | Leave default |
| Manifests | Add new manifest, and name it hello-universe |
When you provide the hello-universe value in the Manifest field, a blank text editor opens at right. Copy the
following manifest and paste it into the text editor.
apiVersion: v1
kind: Service
metadata:
  name: hello-universe-service
spec:
  type: NodePort
  selector:
    app: hello-universe
  ports:
    - protocol: TCP
      port: 8080
      targetPort: 8080
---
apiVersion: apps/v1
kind: Deployment
metadata:
  name: hello-universe-deployment
spec:
  replicas: 2
  selector:
    matchLabels:
      app: hello-universe
  template:
    metadata:
      labels:
        app: hello-universe
    spec:
      containers:
        - name: hello-universe
          image: ghcr.io/spectrocloud/hello-universe:1.3.1
          imagePullPolicy: IfNotPresent
          ports:
            - containerPort: 8080
The screenshot below shows the manifest pasted into the text editor. Click on the Confirm & Create button to finish adding the manifest.
If there are no errors or compatibility issues, Palette displays the newly created full cluster profile for review. Verify the layers you added, and click on the Next button.
Review all layers and click Finish Configuration to create the cluster profile.
Create a Cluster
Click on the newly created cluster profile to view its details page. Click the Deploy button to deploy a new Edge cluster.
The cluster deployment wizard displays the following sections.
Basic Information
Use the following values in the Basic Information section.
| Field | Value |
|---|---|
| Cluster name | edge-tutorial-cluster |
| Description | Cluster as part of the Edge tutorial. |
| Tags | spectro-cloud-education, app:hello-universe, terraform_managed:false |
Click Next to continue.
Parameters
The Parameters section offers you another opportunity to change the profile configuration. For example, clicking on
the BYOS Edge OS 1.0.0 layer allows you to configure the system.registry, system.repo, and other available
attributes.
Use the default values for all attributes across all layers and click Next.
Cluster configuration
Provide the Virtual IP (VIP) address for the host cluster to use during the cluster configuration process. An Edge cluster virtual IP represents the entire cluster, and external clients or applications can use it to access services the Edge cluster provides. Ask your system administrator for an IP address you can use. It must be unique and not conflict with any other IP addresses in the network.
If available, you can optionally select an SSH key to remote into the host cluster and provide a Network Time Protocol (NTP) server list.
Click Next to continue.
Nodes configuration
In this section, you will use the Edge hosts to create the cluster nodes. Use one of the Edge hosts as the control plane node and the remaining two as worker nodes. In this example, the control plane node is called the control plane pool, and the set of worker nodes is the worker pool.
In the CONTROL-PLANE POOL CONFIGURATION section, under Pool Configuration, select Add Edge Hosts, and choose one of the registered Edge hosts. The screenshot below shows an Edge host added to the control plane pool.
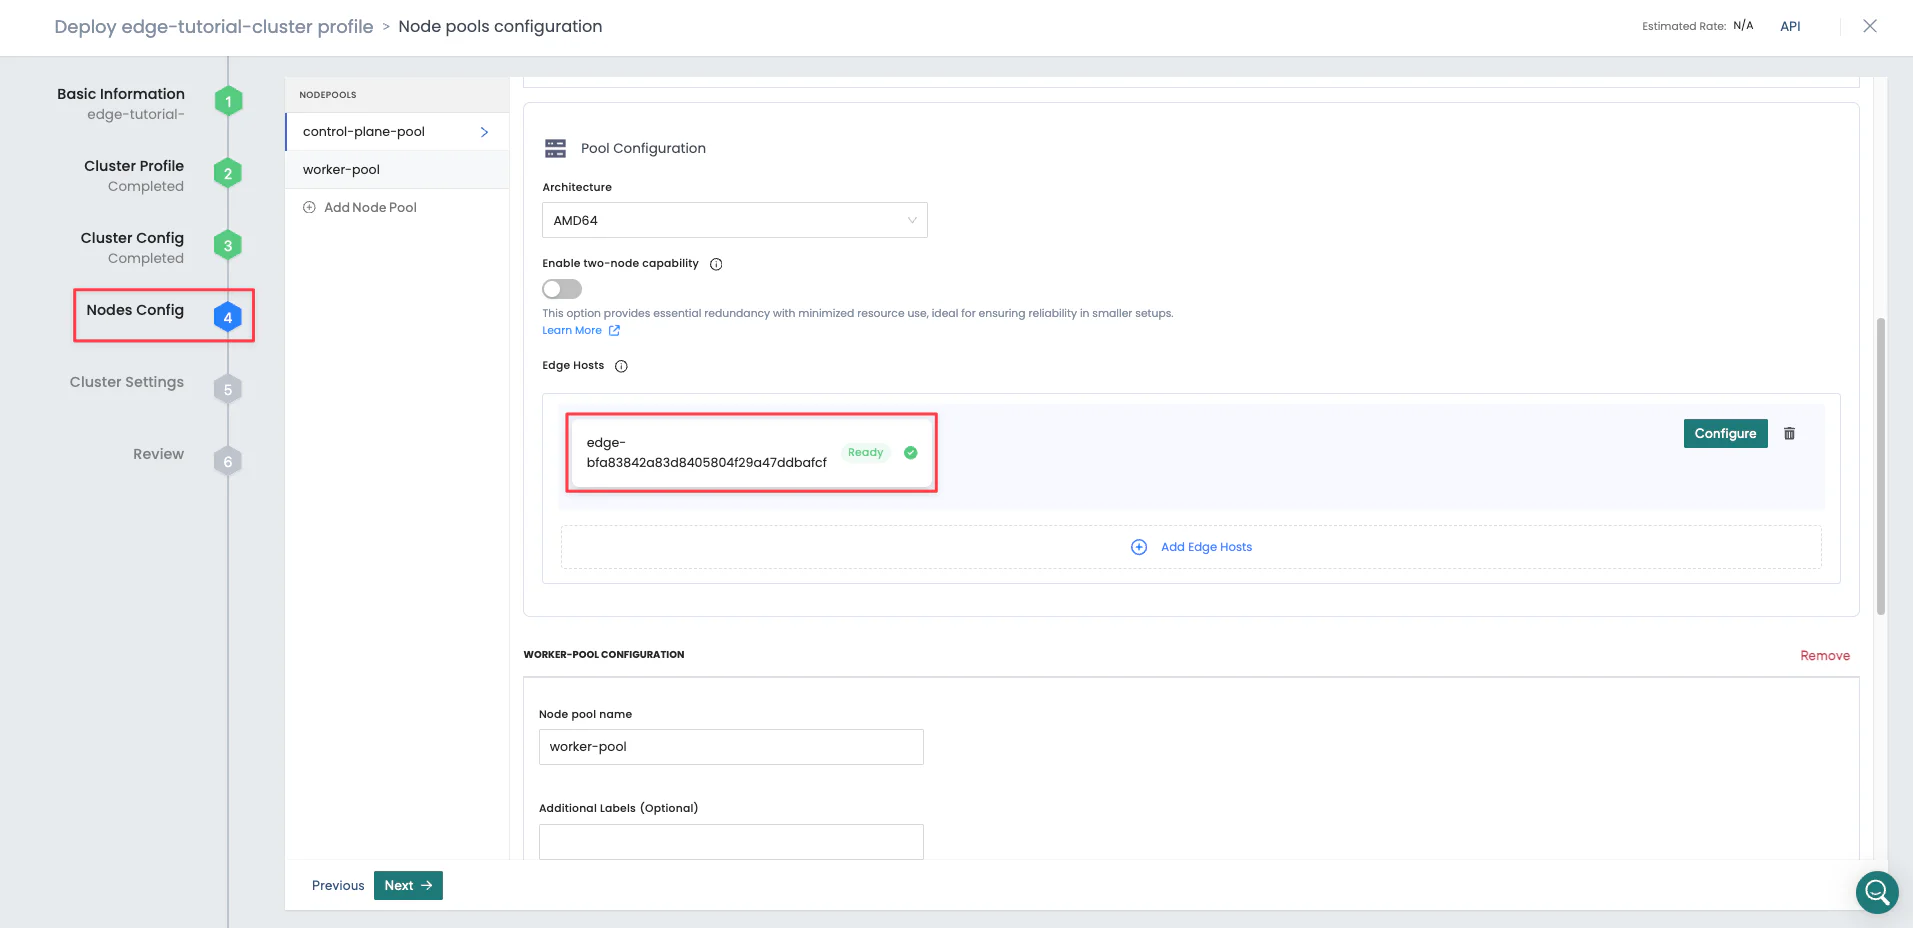
This tutorial does not require you to modify the default values of the CONTROL-PLANE POOL CONFIGURATION fields or configure the hosts.
In the WORKER POOL CONFIGURATION section, under Pool Configuration, select Add Edge Hosts, and choose the remaining two Edge hosts. The screenshot below shows two Edge hosts added to the worker pool.
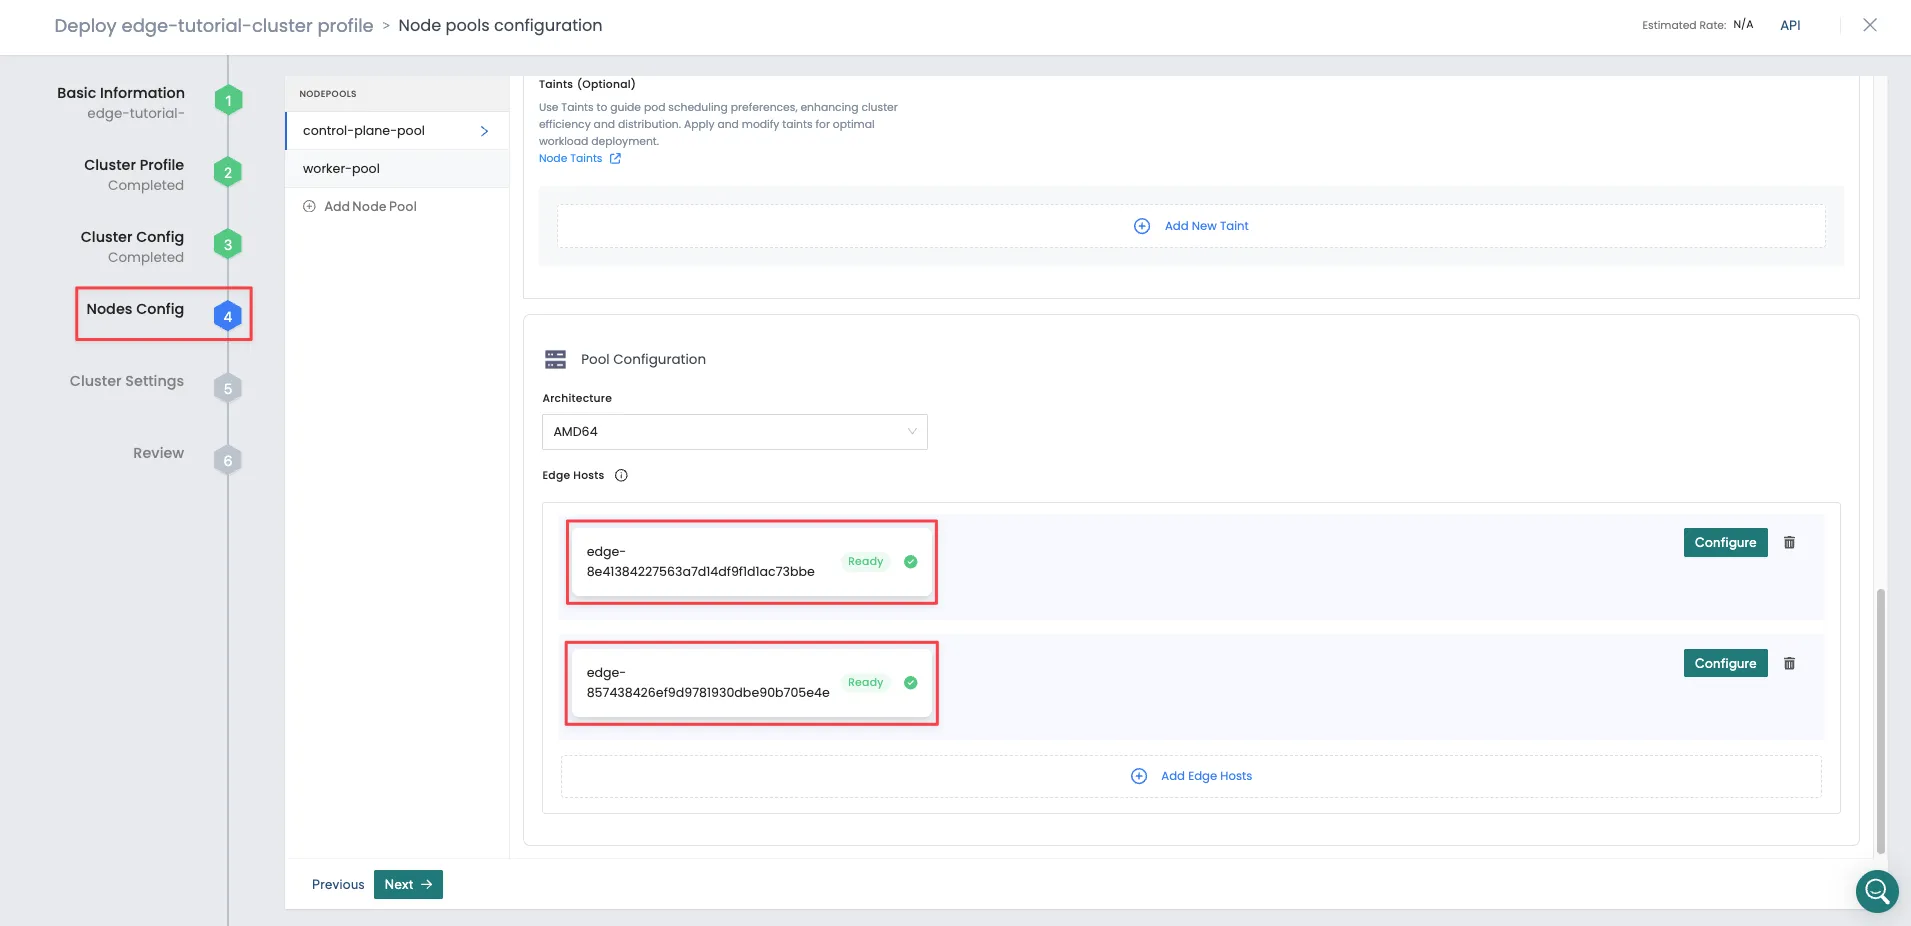
This tutorial does not require you to modify the default values of the WORKER POOL CONFIGURATION fields or configure the hosts.
Click Next to continue.
Settings
This section displays options for OS patching, scheduled scans, scheduled backups, cluster role binding, and location. Use the default values, and click on the Validate button.
Review
Review all configurations in this section. The Review page displays the cluster name, tags, node pools, and layers. If everything looks good, click on the Finish Configuration button to finish deploying the cluster. Deployment may take up to 20 minutes to finish.
While deployment is in progress, Palette displays the cluster status as Provisioning. While you wait for the cluster to finish deploying, you can explore the various tabs on the cluster details page, such as Overview, Workloads, and Events.
Validate
In Palette, navigate to the left Main Menu and select Clusters. Select your cluster to display the cluster Overview page and monitor cluster provisioning progress.
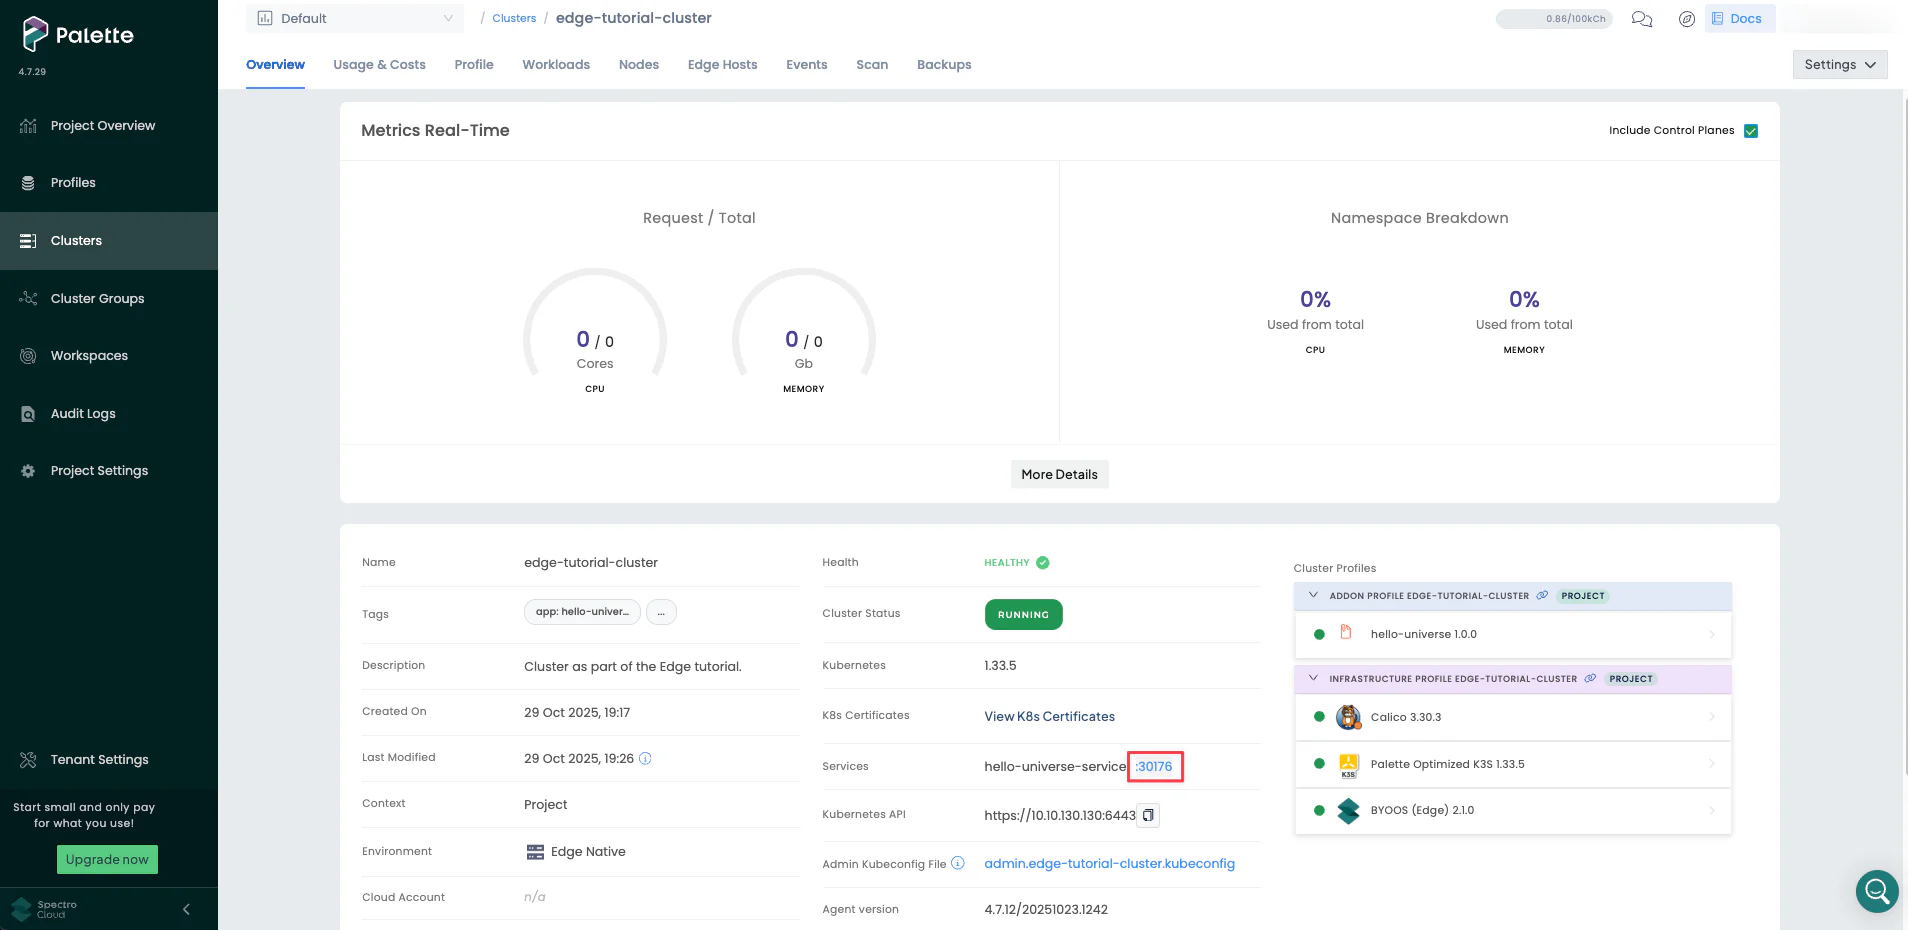
When cluster status displays Running and Healthy, you can access the application from the exposed service URL with the port number displayed. One random port between 30000-32767 is exposed for the Hello Universe application. Click on the port number to access the application.
The screenshot below highlights the NodePort to access the application.
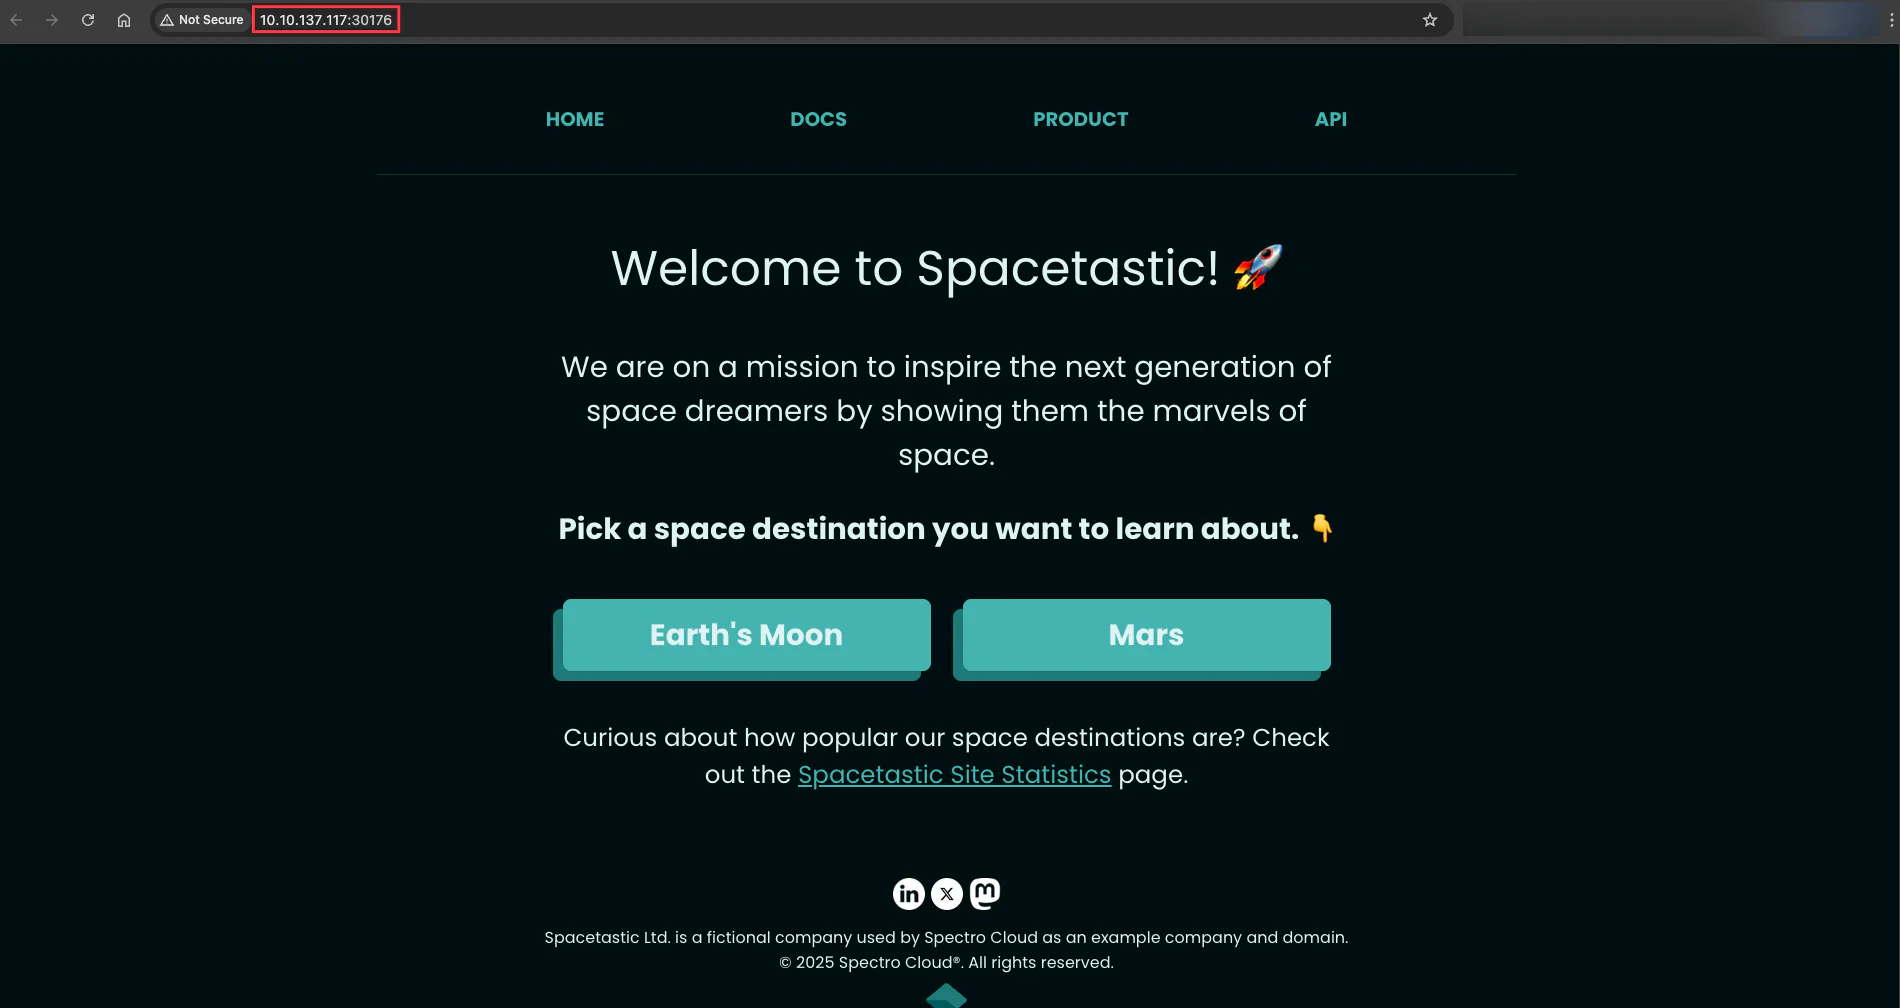
Clicking on the exposed NodePort displays the Hello Universe application.
We recommend waiting to click on the service URL, as it takes one to three minutes for DNS to properly resolve the public NodePort URL. This prevents the browser from caching an unresolved DNS request.
You have successfully provisioned an Edge cluster and deployed the Hello Universe application on it.
Cleanup
The following steps will guide you in cleaning up your environment, including the cluster, cluster profile, and Edge hosts.
Delete the Cluster, Profile, and Edge Registrations
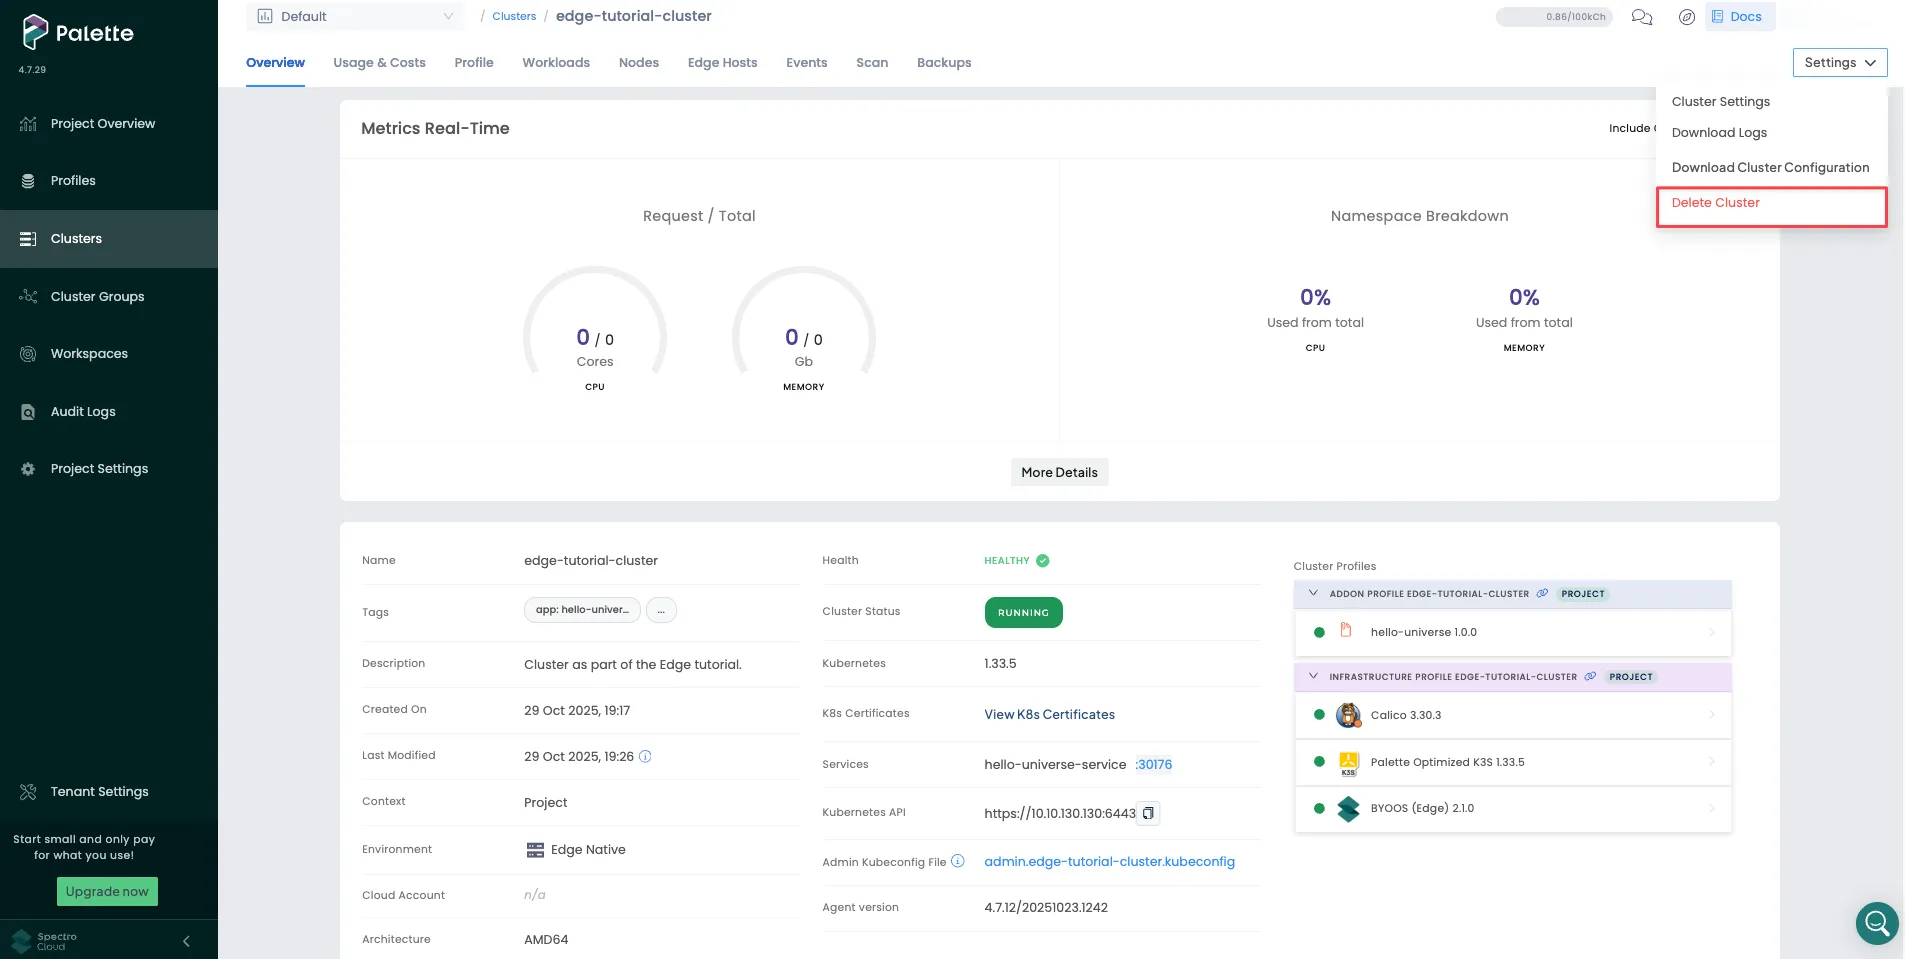
In Palette, display the cluster details page. Click on the Settings button to expand the drop-down menu, and select the Delete Cluster option, as shown in the screenshot below.
Palette prompts you to enter the cluster name and confirm the delete action. Type the cluster name to delete the cluster. The cluster status changes to Deleting. Deletion takes up to 10 minutes.
After you delete the cluster, click Profiles on the left main menu, and select the profile to delete. Choose the Delete option in the three-dot menu, as shown in the screenshot below.

Wait for Palette to successfully delete the resources.
After you delete the cluster profile, click Clusters on the left main menu, navigate to the Edge Hosts tab, and select one of the edge devices used for this tutorial. Choose the Delete option in the three-dot menu, as shown in the screenshot below.
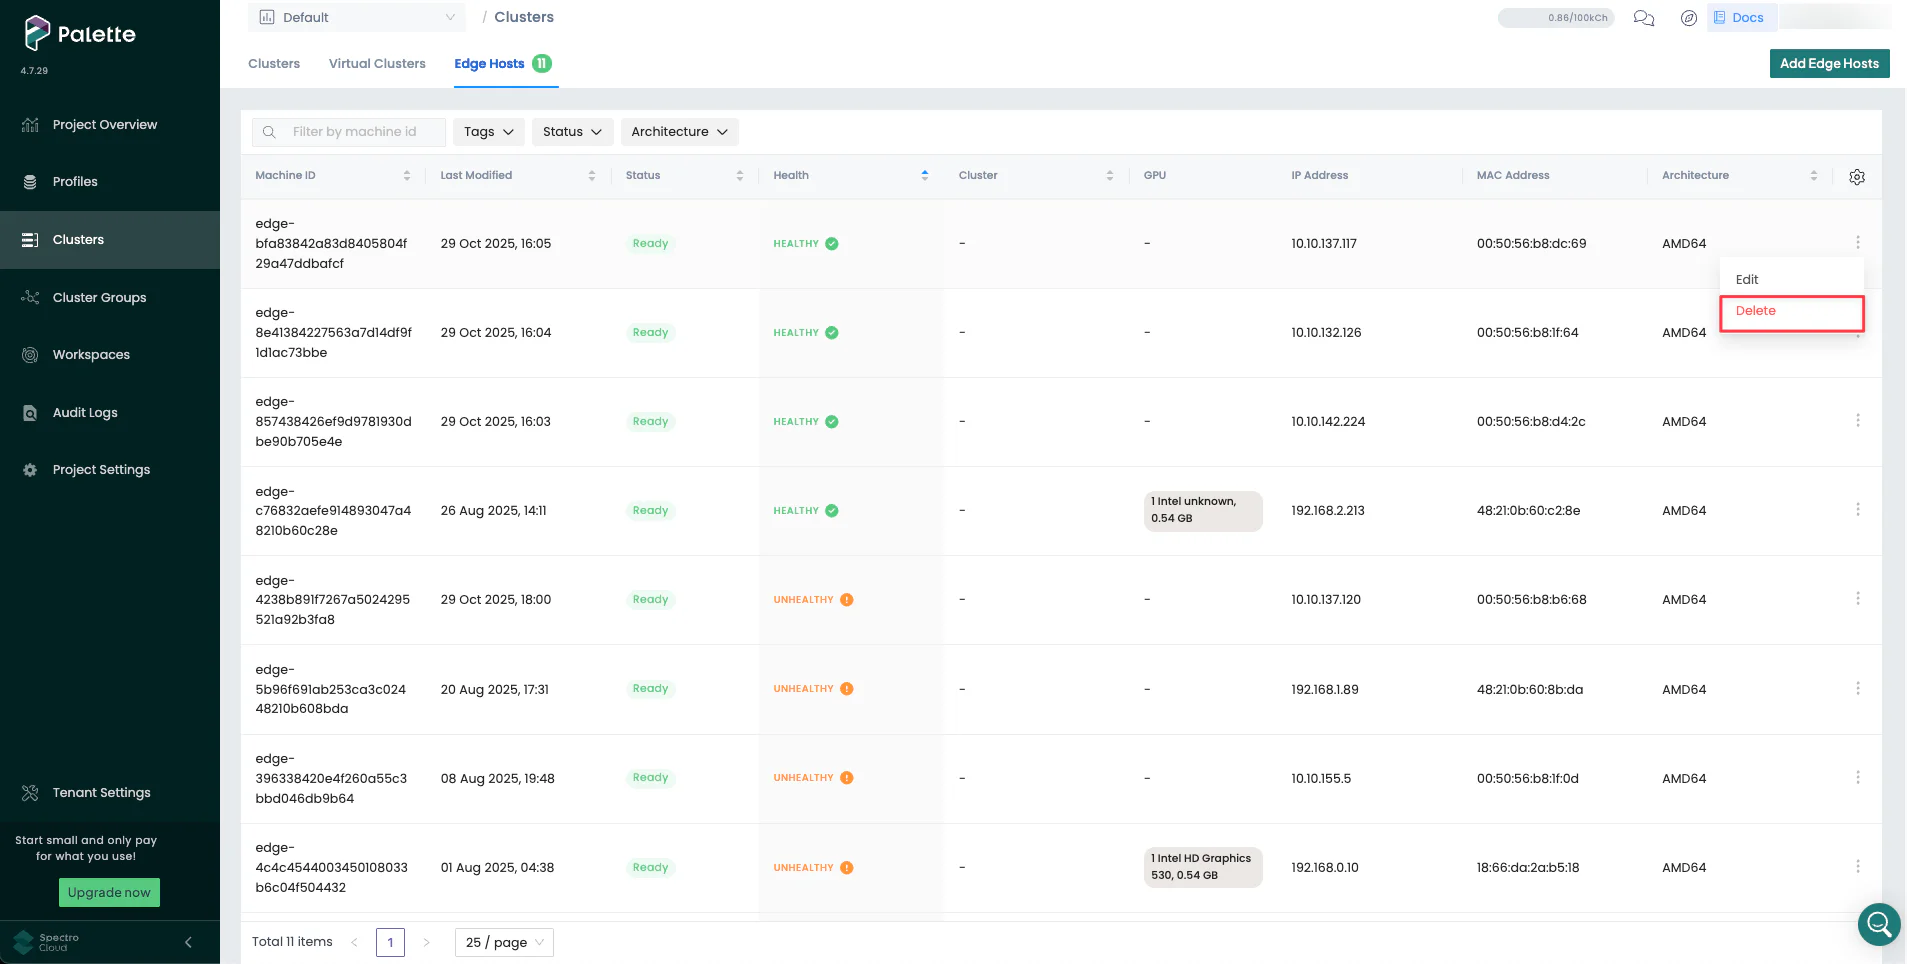
Wait for Palette to successfully delete the resource and repeat the steps for the other two edge devices.
Delete Edge Hosts
Switch back to the CanvOS directory in the Linux development environment containing the .goenv file, and use the
following command to delete the Edge hosts.
sudo docker run --interactive --tty --rm --env-file .goenv \
  ghcr.io/spectrocloud/tutorials:1.3.0 \
  sh -c "cd edge/vmware/clone_vm_template/ && ./delete-edge-host.sh"
Delete Edge Artifacts
If you want to delete Edge artifacts from your Linux development environment, delete the Edge installer ISO image and
its checksum by issuing the following commands from the CanvOS directory.
sudo rm build/palette-edge-installer.iso
sudo rm build/palette-edge-installer.iso.sha256
Issue the following command to list all images in your current development environment.
sudo docker images --filter=reference='*/*:*demo*'
Note the provider image name and tags, and use the following command syntax to remove all provider images.
sudo docker rmi spectrocloud/ubuntu:k3s-1.33.5-v4.7.16-demo
sudo docker rmi spectrocloud/ubuntu:k3s-1.33.5-v4.7.16-demo_linux_amd64
Delete VMware vSphere Resources
Navigate to Inventory > VMs and Templates in your vSphere client. To delete the palette-edge-template VM template, right-click on it and choose Delete from Disk option from the drop-down menu.
Switch to the Storage view in your vSphere client. To delete the palette-edge-installer.iso file from the
packer_cache directory in the VMware vCenter datastore, right-click on it and choose Delete option from the
drop-down Menu.
Wrap-Up
Building Edge artifacts allows you to prepare Edge hosts and deploy Palette-managed Edge clusters. Edge artifacts consist of an Edge installer ISO and provider images for all the Palette-supported Kubernetes versions. An Edge installer ISO assists in preparing the Edge hosts, and the provider image is used in the cluster profile.
In this tutorial, you learned how to build Edge artifacts, prepare VMware VMs as Edge hosts using the Edge installer ISO, create a cluster profile referencing a provider image, and deploy a cluster.
Palette's Edge solution allows you to prepare your Edge hosts with the desired OS, dependencies, and user data configurations. It supports multiple Kubernetes versions while building the Edge artifacts and creating cluster profiles, enabling you to choose the desired Kubernetes version for your cluster deployment.
Before you plan a production-level deployment at scale, you can prepare a small set of Edge devices for development testing and to validate the devices' state and installed applications. Once the validation is satisfactory and meets your requirements, you can roll out Edge artifacts and cluster profiles for deployment in production. This approach maintains consistency while deploying Kubernetes clusters at scale across all physical sites, be it 1000 or more sites. In addition, you can use Palette to manage the entire lifecycle of Edge clusters.
To learn more about Edge, check out the resources below.