Update a Cluster Profile
You can update a cluster profile to change the configuration of one or more layers and add or remove non-infrastructure layers. You can also update basic profile information such as the name, description, and tags.
Cluster profile changes will generate an update notification on all the clusters that are created from the profile. Update notifications include information about all the changes applied to the profile since the initial creation or since the previous update.
We do not recommend updating a currently deployed cluster profile version to push out changes. Instead, we recommend creating a new profile version, and then upgrade active clusters to the new version. For information on versioning profiles, check out Version a Cluster Profile.
You can apply cluster updates individually at any time. To learn how to apply updates to an active cluster, review the Update a Cluster guide.
Refer to the following sections to learn how to update a cluster profile.
Modify Basic Profile Information
Prerequisites
-
A cluster profile created in Palette.
-
Your Palette account role must have the
clusterProfile.updatepermission to update a profile. Refer to the Cluster Profile permissions reference for more information about roles and permissions.
Modify Profile Information
-
Log in to Palette.
-
From the left Main Menu, click on Profiles, and select the profile you want to update. Palette displays the profile details and stack.
-
Click on Settings and choose Edit Info from the drop-down Menu. You can modify the profile name, version, description, and tags. Save your changes.
infoUpdated tags will not be propagated to previously created clusters. However, tag changes will apply to new clusters you create that use the updated profile.
Validate
-
Log in to Palette.
-
From the left Main Menu, click on Profiles and select the profile you updated. Palette displays the profile details and stack.
-
Check that profile details display your changes.
To learn how to apply the changes, review Apply Profile Updates to Clusters.
Update a Profile Layer
Prerequisites
-
A cluster profile created in Palette.
-
Your Palette account role must have the
clusterProfile.updatepermission to update a profile. Refer to the Cluster Profile permissions reference for more information about roles and permissions.
Update Layer
-
Log in to Palette.
-
From the left Main Menu, click on Profiles and select the profile you want to update. Palette displays the profile details and stack.
-
You can do the following:
-
Select Add New Pack and choose a pack to add to the profile.
-
Select Import from cluster to import a pack from another cluster.
-
Select the pack layer you want to update, and edit pack values in the YAML file that displays in the editor.
-
Click on the Update button to view and apply available updates to packs. To learn how to update your customized packs, review Update the Pack Version.
-
Select Add Manifest to add, edit, or remove a manifest.
-
Select Add Helm chart to add, edit, or remove a Helm chart.
-
Select Add Zarf to add applications in air-gapped environments.
-
Remove non-infrastructure pack layers from the profile. Click the layer to display its details and click the trash can icon in the Edit Pack panel.
infoYou cannot remove Operating System (OS), Kubernetes, Networking, or Storage infrastructure layers.
-
Select Settings and choose Delete to delete the entire profile. You can also delete the profile when you choose Delete from the three-dots Menu on the Profiles page.
-
-
Confirm your updates.
Validate
-
Log in to Palette.
-
From the left Main Menu, click on Profiles.
-
If you made changes, click the profile you updated. Palette displays the profile details and stack.
-
Check that layers are added to or removed from the profile stack.
-
If you added, removed, or modified a manifest, click the layer in the stack that you updated and verify the manifest changes.
To learn how to apply the changes, review Apply Profile Updates to Clusters.
Accept Updates to a Cluster Profile
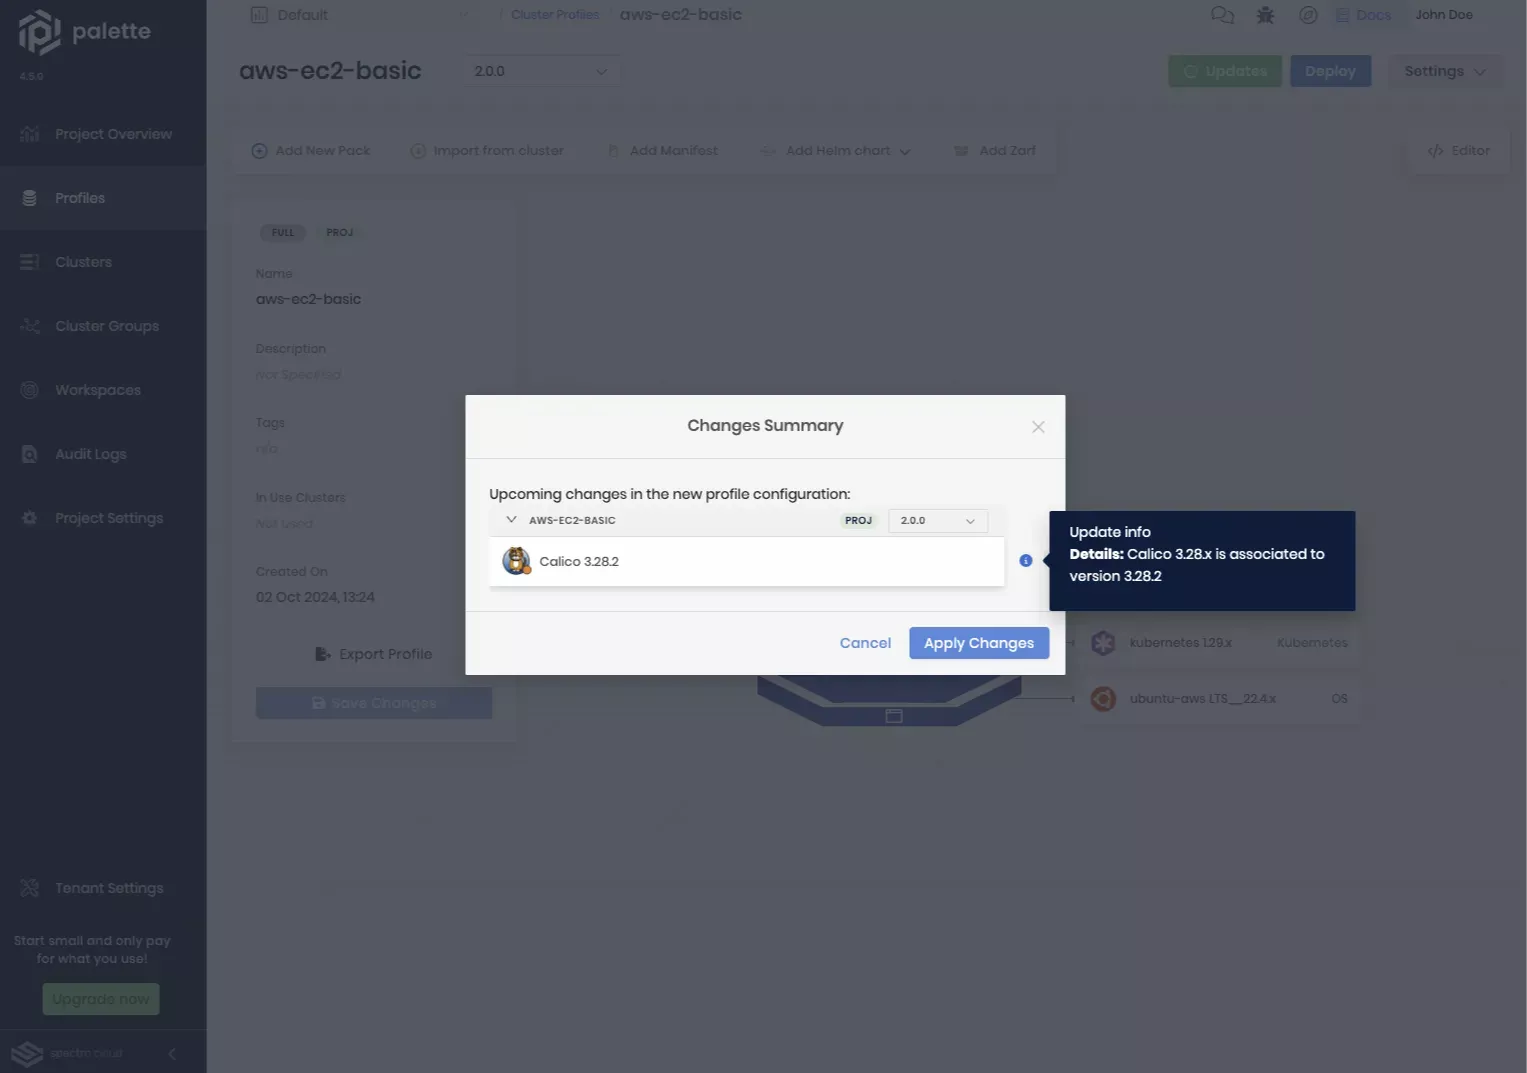
Palette will automatically display the Update button when a new version of a pack is available. For example, if you have the Container Network Interface (CNI) Calico pack version 3.28.0 in your profile, and a new version becomes available, for example, version 3.28.2, Palette will automatically display the Update button when you visit the cluster profile's details page. If you click on the Update button, Palette will display the new versions available for each pack in the profile.
Review the following steps to accept incoming pack updates to a cluster profile.
Prerequisites
-
A cluster profile created in Palette.
-
There are updates available for at least one pack in the profile.
-
Your Palette account role must have the
clusterProfile.updatepermission to update a profile. Refer to the Cluster Profile permissions reference for more information about roles and permissions.
Review Update Changes
-
Log in to Palette.
-
From the left Main Menu, select Profiles.
-
Select the profile you want to update to access the profile details page.
-
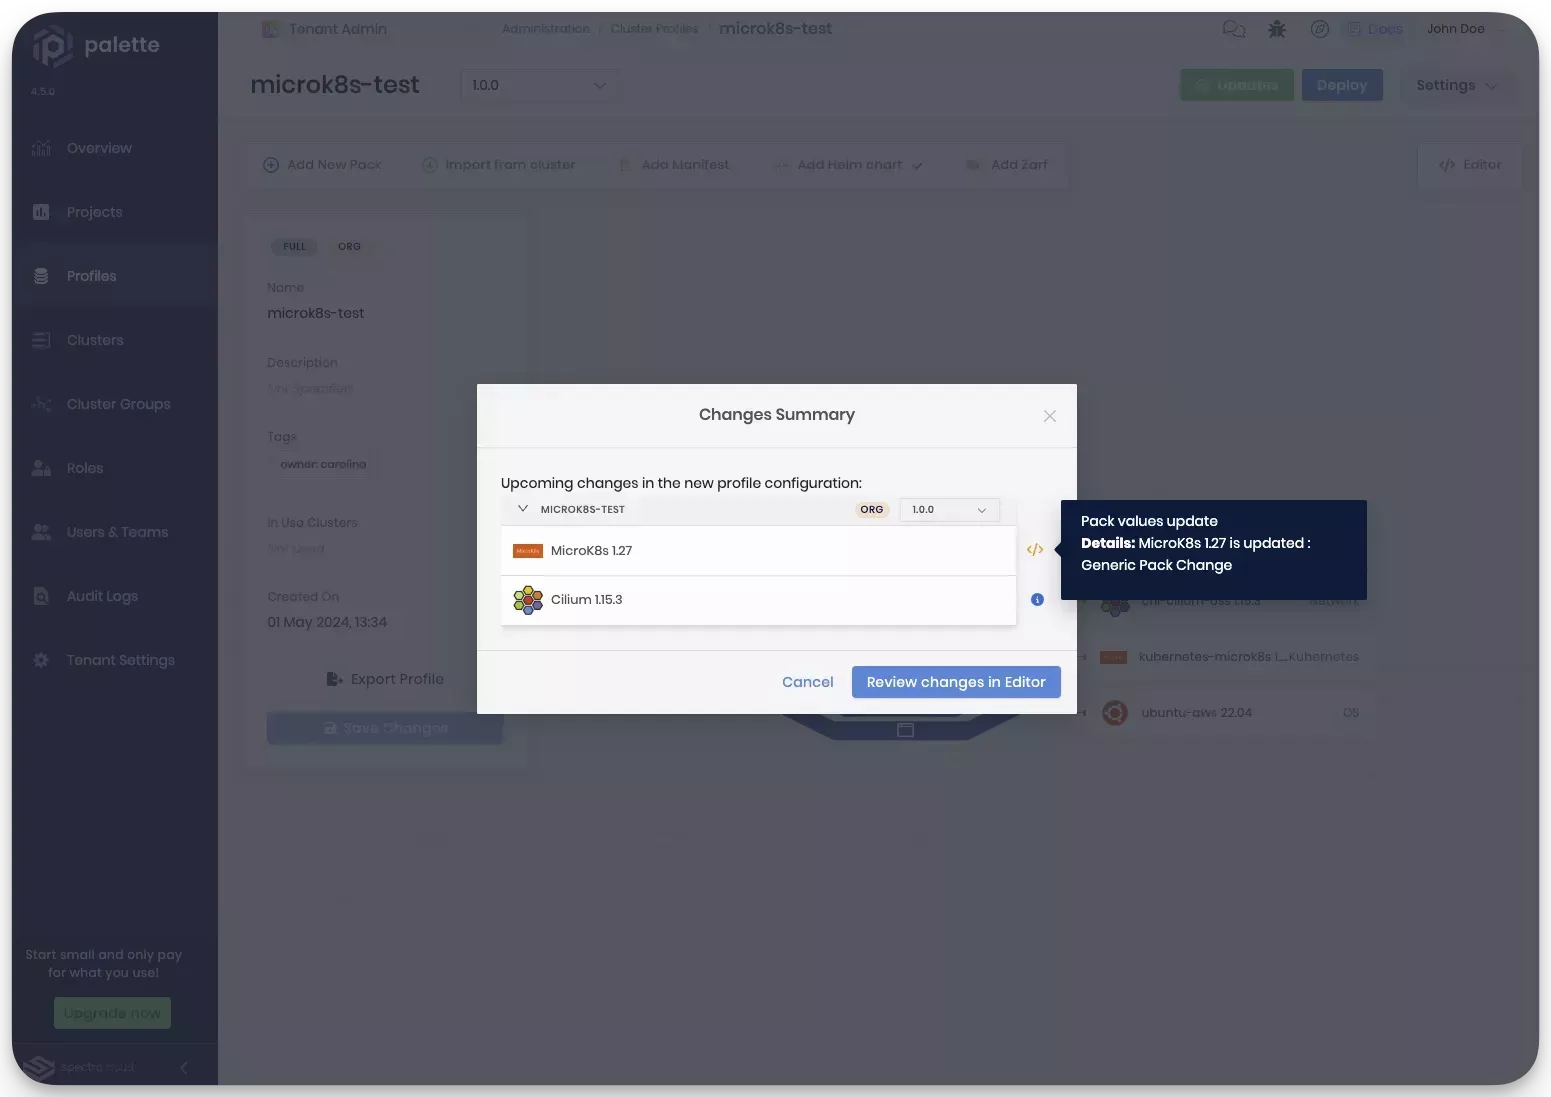
Palette displays profile details and the profile stack. If there are pending updates, Palette displays the Updates button in the top right-hand corner of the page. Click on the Updates button to view the Changes Summary modal.
-
If the changes can be applied without any issues, then Palette will display the Apply Changes button.

Otherwise, you will be presented with the Review changes in Editor button, which allows you to review the changes before applying them.
tipIf a pack row has an information icon, hover over the icon to learn more about the changes.

-
Click on the Apply Changes button to apply the updates to the profile. If there are changes that require your attention, click on the Review changes in Editor button to start the review process.
-
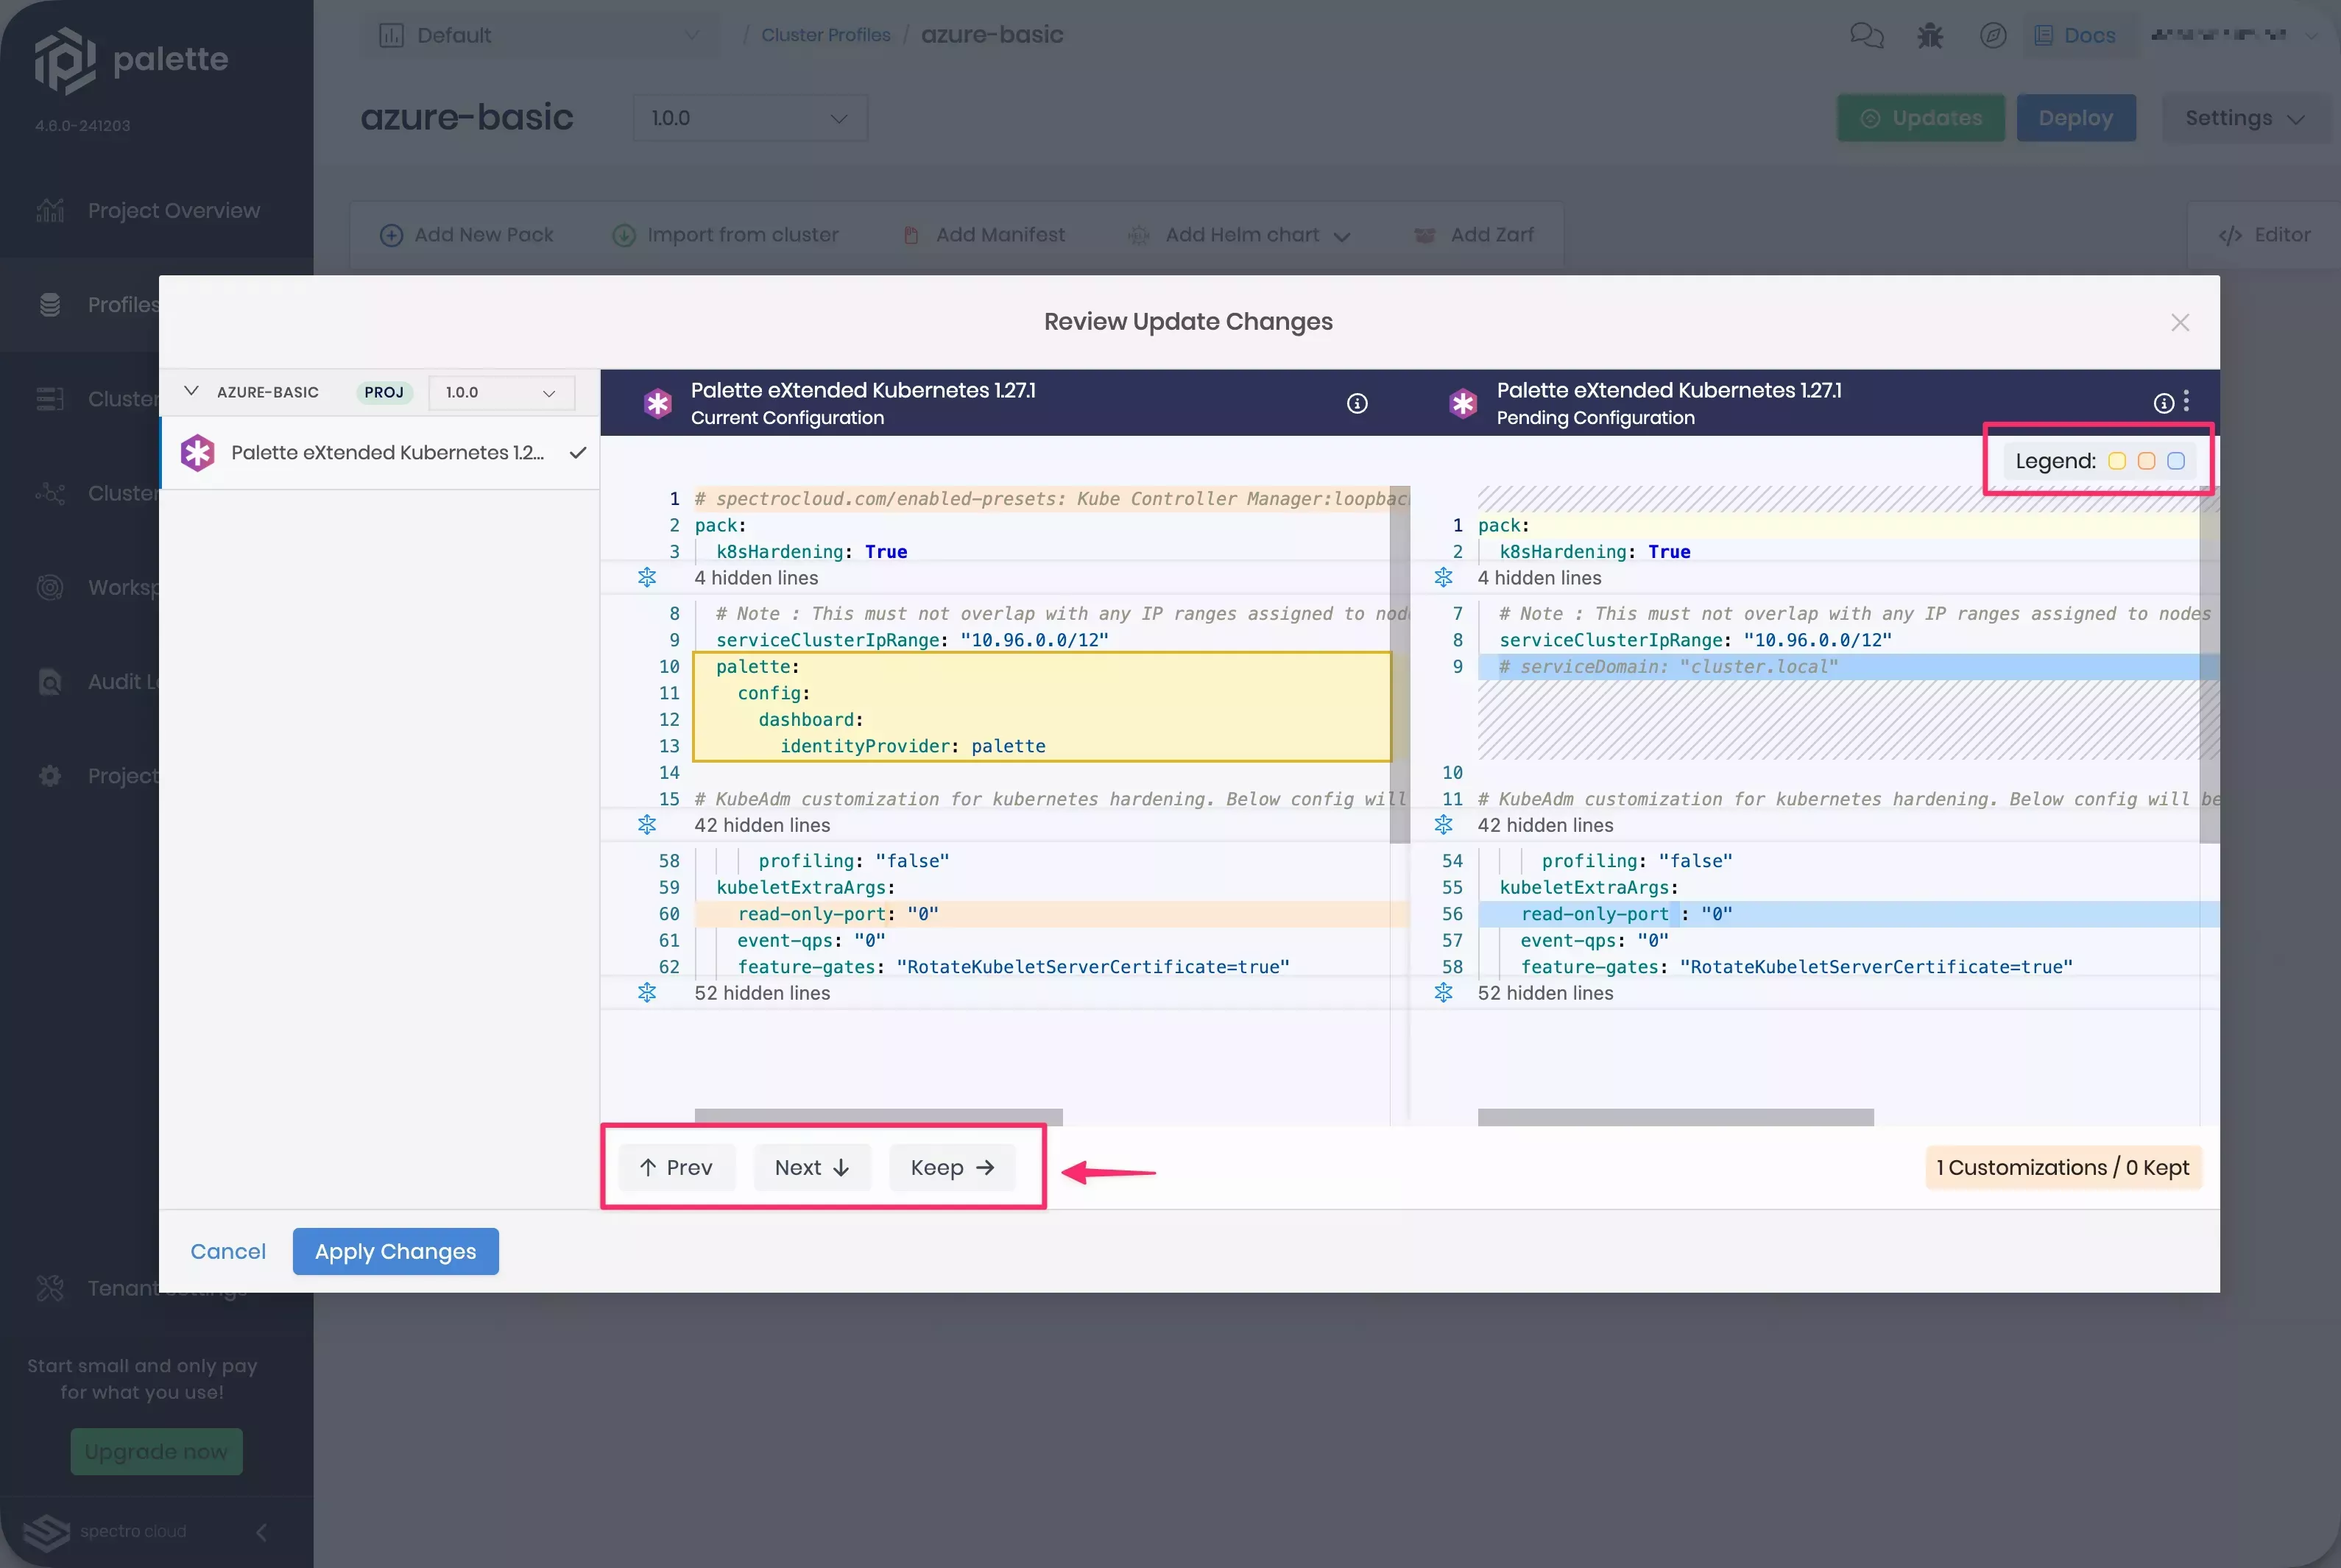
The differential editor will display the changes between the Current Configuration and Pending Configuration. The left side of the editor displays the current configuration. The right side displays the new pack version's incoming changes. Review the changes and apply them as needed. Use the three buttons at the bottom to navigate through the changes.
- Prev: Click to navigate to the previous change.
- Next: Click to navigate to the next change.
- Keep: Click to apply the current change.
- Revert: Click to revert the accepted change. This button will only appear after you have clicked the Keep button.
The differential editor will display the changes by highlighting the differences between the configurations. The Legend displays the colors and contains tooltips explaining their meanings. The color-coded highlights indicate the following:
-
Yellow highlight indicates a line that has been changed when compared to the original pack default values. These may be lines you have added in the current configuration or lines that have been removed because they are no longer valid in the new configuration. If you need them, use the Keep button to transfer the lines to the new pack version. Otherwise, click on Next to proceed.
-
Orange highlight indicates a difference between the current configuration and the pending pack defaults. These differences occur when the new pack version changes existing fields to a new default value. The Pending Configuration is editable, so you can change the configurations that you want to keep by editing the pack YAML specification.
-
Blue highlight indicates changes or customizations provided by the pack in the pending configuration.

-
Repeat step 7 until you have reviewed all the changes for each pack layer. You can select a different pack layer from the left-hand side of the editor. Once a pack layer is reviewed, a gray checkmark will appear next to the pack name.
-
Click on the Apply Changes button to apply the updates to the profile.
Validate
-
Log in to Palette as a tenant admin.
-
From the left Main Menu, select Profiles.
-
Click the profile you updated to access the profile details page.
-
Check that the updated layer displays the new pack versions.
-
Click on the pack layer and review its configuration to ensure the changes are applied.
Update the Pack Version
Packs typically contain changes between versions, such as the addition or removal of parameters and policies. The following steps will guide you in updating configurations.
Ensure you follow these practices when updating to a new pack version.
- You should not copy the pack configuration from one version to another, as the newer version often contains customizations. Instead, you should integrate your changes manually in the new version. Use the Keep button to copy the lines from the current configuration to the new version.
- Update to a newer Kubernetes version incrementally, one minor version at a time.
- Select a specific target version instead of a group that ends in
.x - We do not recommend downgrading packs to the previous version.
Prerequisites
-
A cluster profile created in Palette.
-
There are updates available for at least one pack in the profile.
-
Your Palette account role must have the
clusterProfile.updatepermission to update a profile. Refer to the Cluster Profile permissions reference for more information about roles and permissions.
Update Pack Version
-
Log in to Palette.
-
From the left Main Menu, select Profiles.
-
Select the profile you want to update to access the profile details page.
-
In the Edit Pack panel, select a specific target version, not a group that ends in
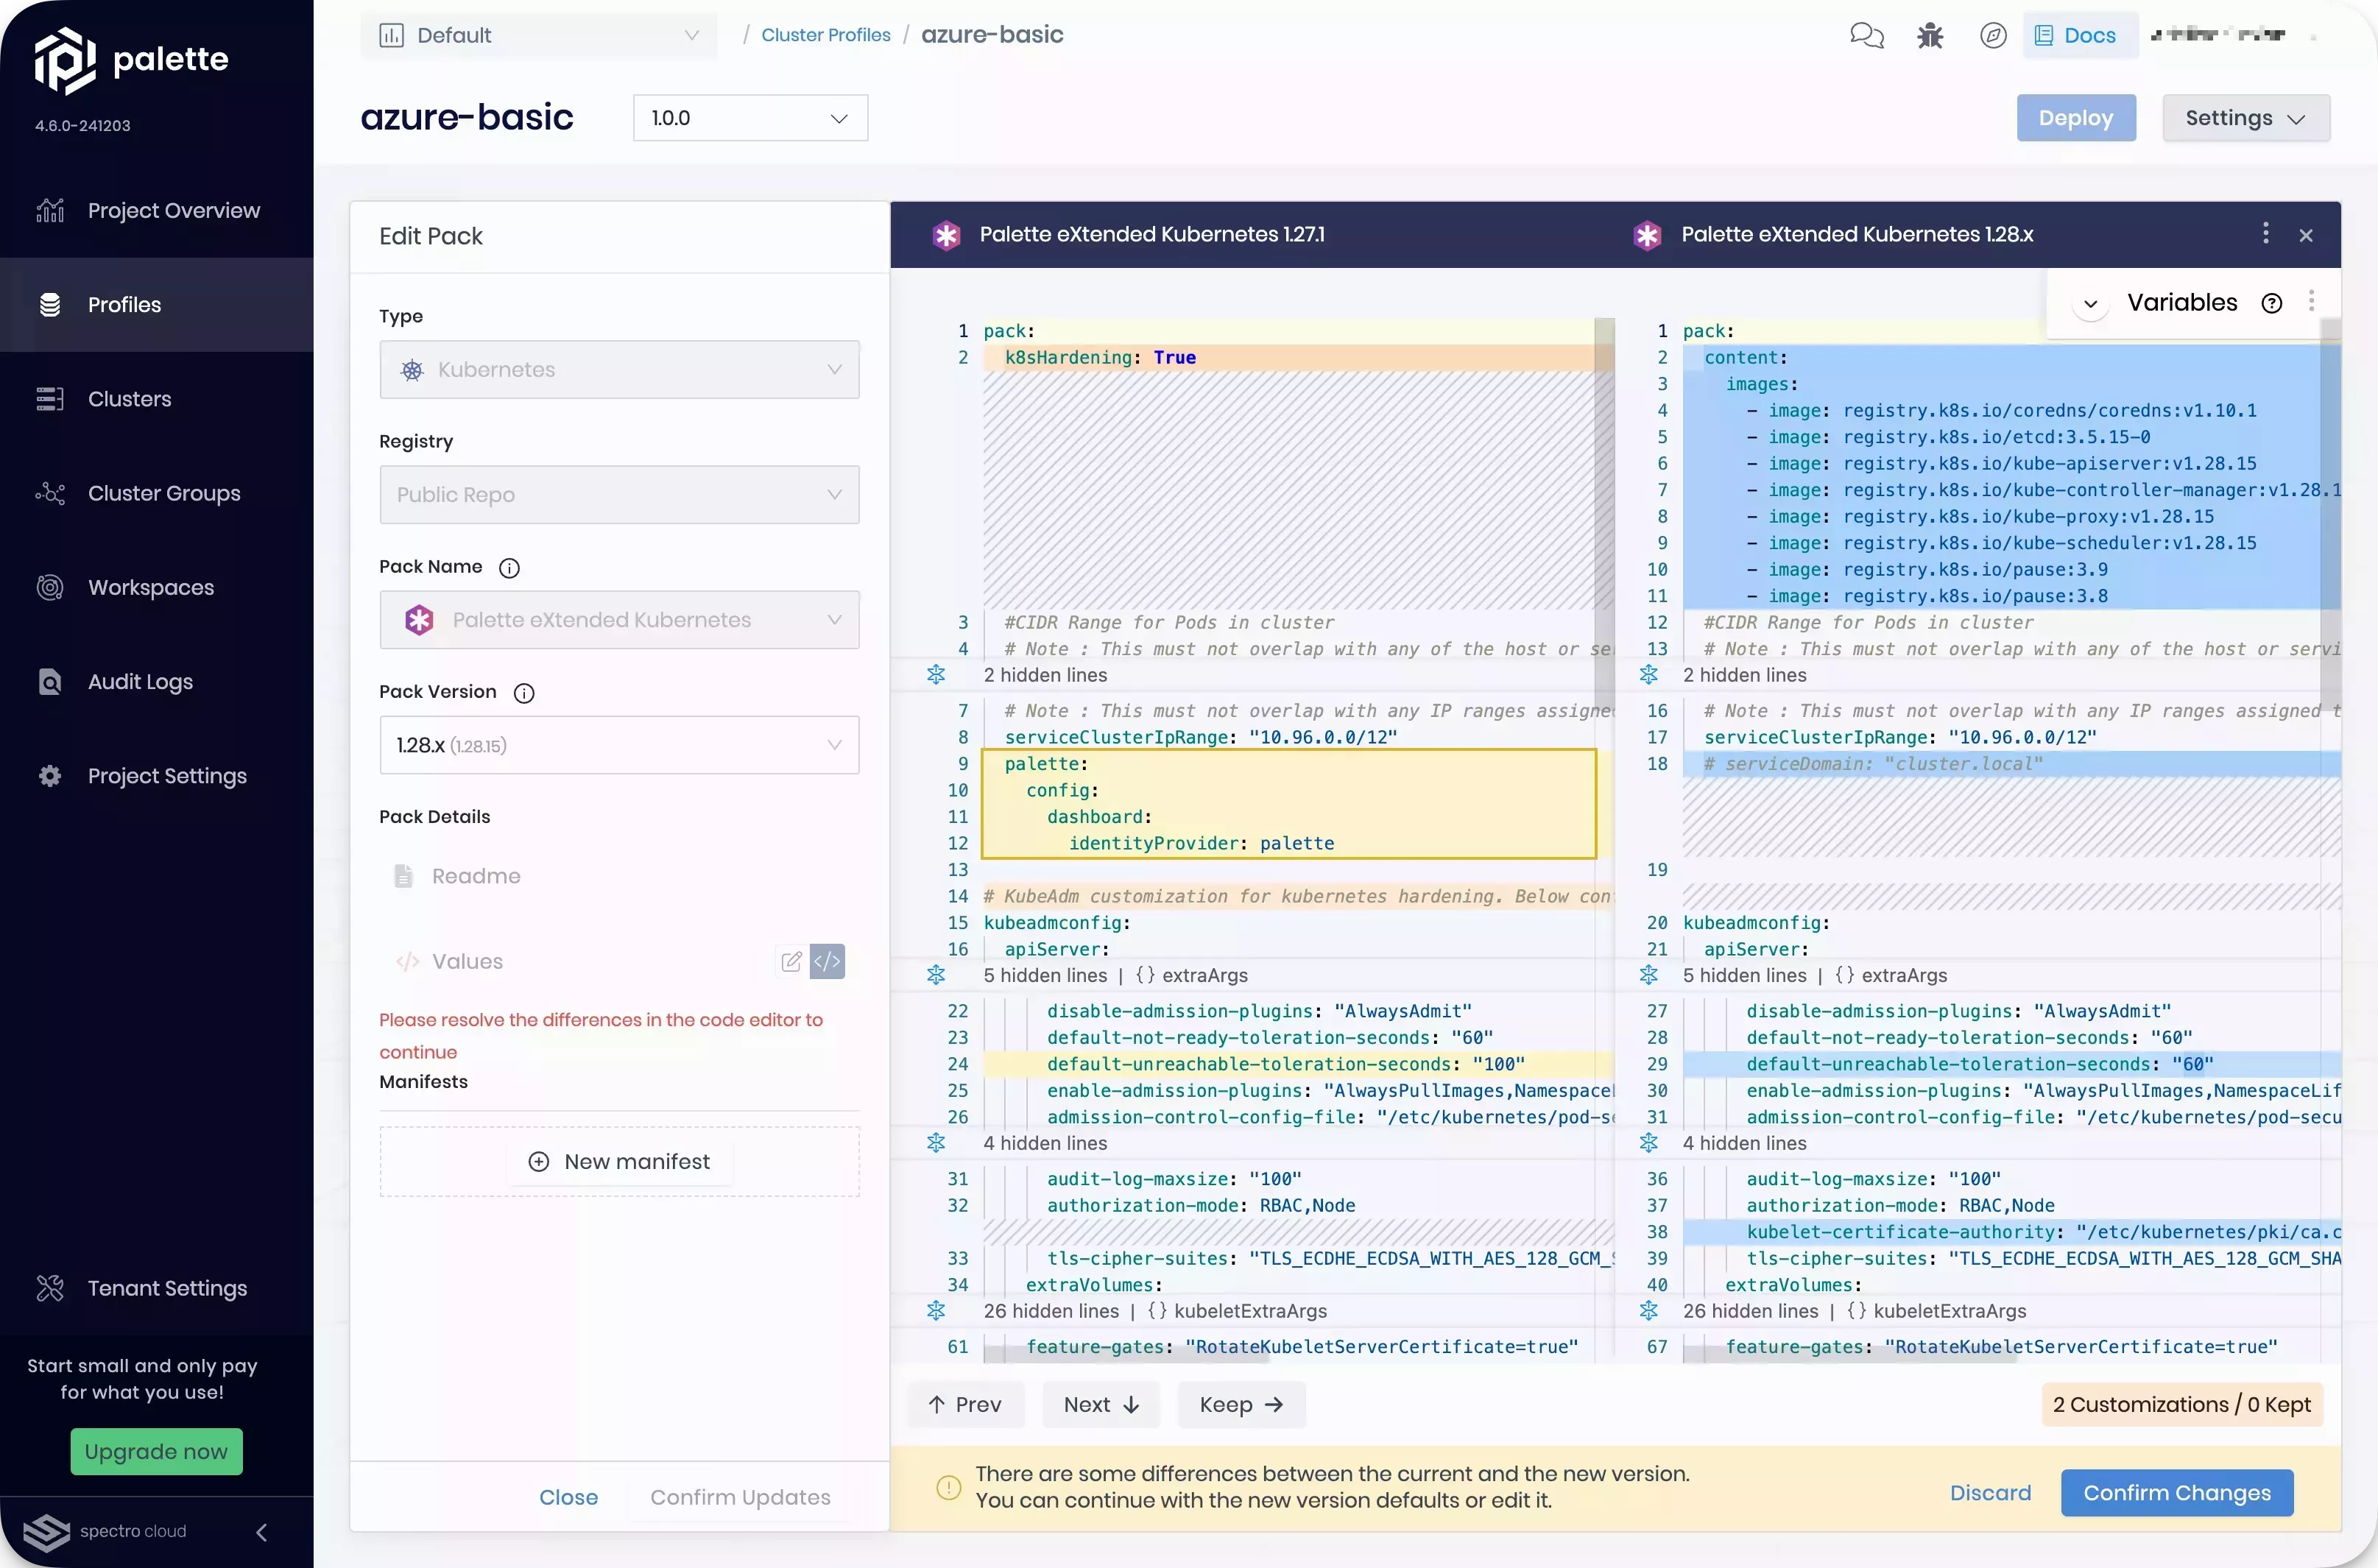
.x. Palette displays the difference between the current version at left and the new version at right. The target version is displayed in the header.Differences between the displayed configurations are as follows:
-
Yellow highlight indicates a line that has been changed when compared to the original pack default values. These may be lines you have added in the current configuration or lines that have been removed because they are no longer valid in the new configuration. If you need them, use the Keep button to transfer the lines to the new pack version. Otherwise, click on Next to proceed.
-
Orange highlight indicates a difference between the current configuration and the new pack defaults. These differences occur when the new pack version changes existing fields to a new default value. The right-hand panel is editable, so you can change the configurations that you want to keep by editing the pack YAML specification.
-
Blue highlight indicates changes or customizations provided by the pack in the pending configuration.
Example of Difference Between Current and New Configurations

-
-
Check for yellow-highlights in the current configuration that are missing in the new configuration. If there are any customizations lines you added, use the Keep button to transfer the lines to the new version. Otherwise, click on Next to proceed.
-
Review the orange-highlights in the current configuration. Ensure that the corresponding new blue-highlight values will suit your needs.
-
Check for changed settings in the new configuration, and copy settings from the current configuration to the new configuration.
-
Review new sections in the new configuration. You should adopt them, as they are typically needed to support the new configuration.
-
Check for changes in the same line that have a different value. If it is not a customization you made, you should adopt the new value, as it is known to be compatible with the new version.
-
Confirm your updates.
To learn how to apply the changes, review Apply Profile Updates to Clusters.
Validate
-
Log in to Palette as a tenant admin.
-
From the left Main Menu, select Profiles.
-
Click the profile you updated. Palette displays the profile stack.
-
Check that the updated layer displays the new pack version.
Palette indicates any problematic layers in the stack. You can hover over the pack name to view details about the misconfiguration.
-
Click on the pack layer and review its configuration. Apply fixes and confirm your updates.
-
Repeat the process until Palette indicates the configuration works.
Apply Profile Updates to Clusters
You can accept changes to a cluster's cluster profile and override the existing profile configurations to update a cluster. Accepting these changes will only apply to the cluster you are updating and will not propagate to the cluster profile or other clusters using the same profile.
We do not recommend updating a currently deployed cluster profile version to push out changes. Instead, we recommend creating a new profile version, and then upgrade active clusters to the new version. For information on versioning profiles, check out Version a Cluster Profile.
Prerequisites
-
A cluster profile created in Palette.
-
A deployed and healthy cluster with an associated cluster profile that has updates available.
Apply Updates
-
Log in to Palette.
-
From the left Main Menu, select Clusters. Clusters that are eligible for an update will have an Updates Available badge.
-
Select the cluster with the update notification to start the Apply Updates wizard. Click on the Apply button.
-
The Apply Updates wizard opens with the update notification, which contains details about the updates that will be applied. Click the Confirm button to apply updates to the cluster.
Validate
-
Log in to Palette.
-
From the left Main Menu, click on Profiles and select the updated cluster.
-
Check that layers are added to or removed from the profile stack, and verify other profile details.
-
If you added, removed, or modified a manifest, click the layer in the stack that you updated and verify the manifest changes.