Run Claude Code on Your Own Hardware with Open-Weight Models
In this tutorial, you deploy a model to a PaletteAI Inference Launchpad appliance and connect Claude Code to it. When you finish, a model on your appliance answers the coding questions you send from Claude Code. Along the way, you learn about the model catalog, GPU memory, clients, API tokens, and alias routing.
You work in two places:
- The console in a browser, where you deploy the model and create the client.
- A terminal on your machine, where you watch the appliance and run Claude Code. Any directory works.
Set aside about 30 minutes. The appliance spends most of that time loading model weights onto a GPU. Your first result appears about one minute in.
What You Need
Confirm each of the following before you start. Every item is something you can check in a few seconds, and stopping now is faster than stopping at Create a Client and Its API Token.
On the appliance:
-
PaletteAI Inference Launchpad 1.2.0 or later. To check, in the console look at the bottom of the left main menu. Anything earlier does not have the surfaces this tutorial uses. To upgrade, refer to Upgrade the Platform.
-
The console reachable in a browser at
https://<appliance-address>. -
The local admin account you set during setup.
-
At least one model on the appliance. To check, in the console open Cluster > Models. If the table lists a row, you have a deployed model.
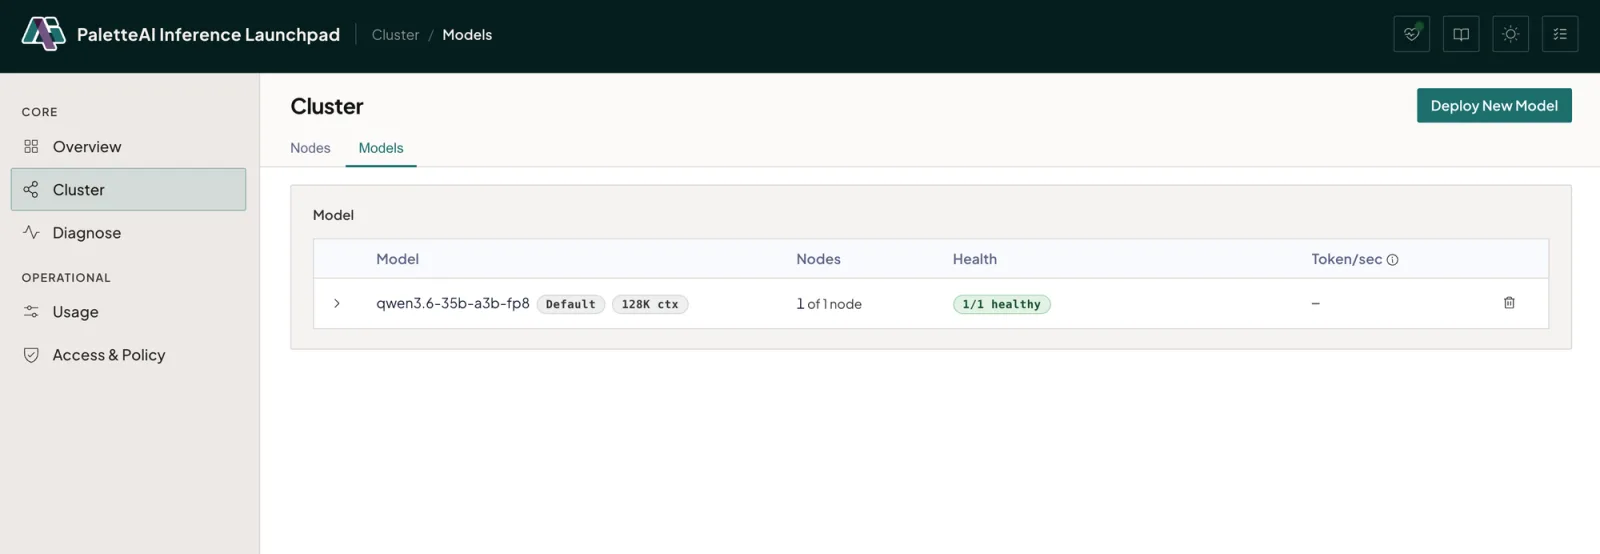
If the table is empty, select Deploy Model, confirm that the Model drop-down menu is not empty, and then close the wizard. You deploy the model later in Deploy a Model.
If the drop-down menu is also empty, refer to Upload a Model.
On your own machine:
-
Claude Code, installed and already working against Anthropic's hosted API. For installation, refer to the Claude Code documentation.
-
A terminal, with
curlandjqavailable. -
Network access to the appliance address. If the console loads in your browser, your terminal can reach it too.
Sign In to the Console
First, open https://<appliance-address> in a browser and sign in with your admin account.
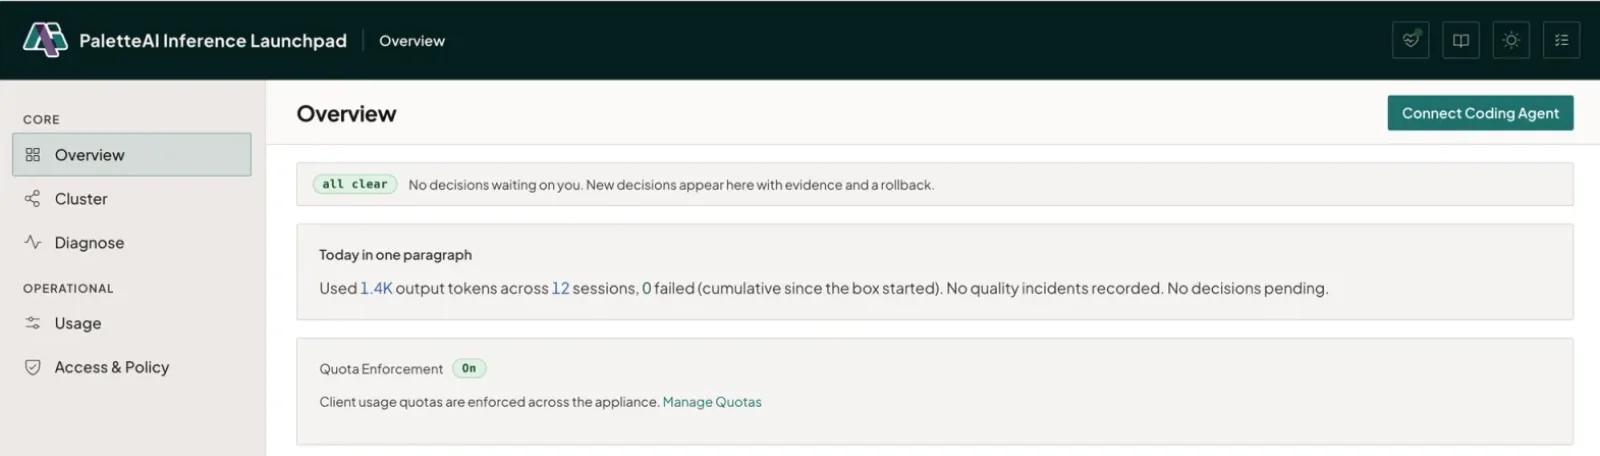
The Overview page opens. Notice the status indicator near the top of the page. On a healthy appliance it reads
all clear, which means the appliance has nothing waiting on you.
Keep this browser tab open.
Download the Platform CA Certificate
Your appliance presents a certificate signed by its own platform Certificate Authority (CA). Your machine does not trust that CA yet, so you download the certificate now and reach for it in every step that talks to the appliance.
-
On the Overview page, select Connect Coding Agent. The Connect a coding agent dialog opens.
-
Select the Claude Code CLI tab.
-
Select CA certificate. The browser saves
palette-ai-inference-launchpad-ca.crtto yourDownloadsfolder.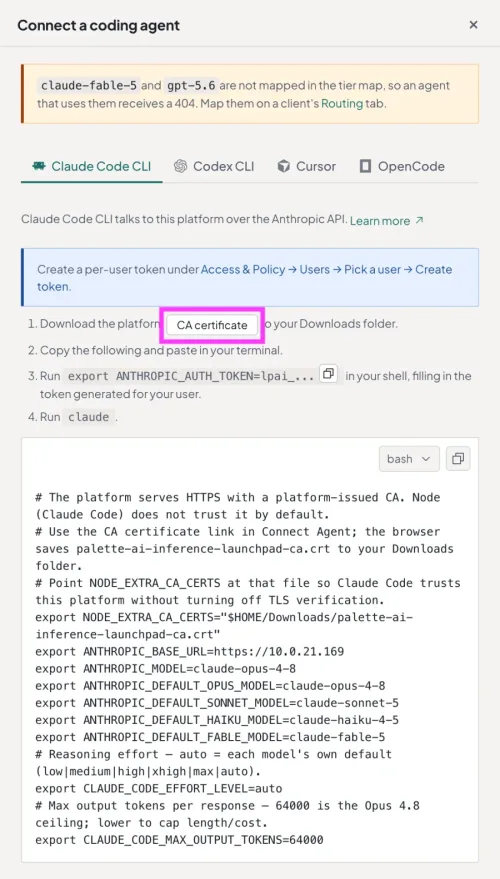
-
Close the dialog. You open it again in Point Claude Code at the Appliance.
Ask the Appliance About Its GPUs
Before you change anything on the appliance, read something from it. Open a terminal and run the following command,
replacing <appliance-address> with your appliance address.
curl --silent --cacert $HOME/Downloads/palette-ai-inference-launchpad-ca.crt https://<appliance-address>/healthz | jq '.gpus'
[
  {
    "index": "0",
    "name": "NVIDIA RTX PRO 6000 Blackwell Server Edition",
    "util_pct": "0",
    "mem_used_mib": "0",
    "mem_total_mib": "97887",
    "temp_c": "29",
    "util_available": true,
    "mem_available": true
  },
  {
    "index": "1",
    "name": "NVIDIA RTX PRO 6000 Blackwell Server Edition",
    "util_pct": "0",
    "mem_used_mib": "0",
    "mem_total_mib": "97887",
    "temp_c": "30",
    "util_available": true,
    "mem_available": true
  }
]
Your output names your own GPUs, so the model names and the totals differ from the example.
Notice the mem_used_mib value on each GPU. Any GPU that reads 0 has nothing loaded. Remember this command, because
you run it again in Watch the Weights Load and the number changes.
Deploy a Model
If a model is already deployed on your appliance, skip ahead to Create a Client and Its API Token and use that model.
Give those GPUs something to do.
-
In the console, select Cluster from the left main menu. The page opens on the Nodes tab.
-
Select the Models tab, and then select Deploy Model. The Deploy a model wizard opens on the Model and placement step.
-
Open the Model drop-down menu and select a model that serves chat requests. A smaller model finishes loading sooner. A vision preprocessing sidecar is not a chat model, so do not choose one here.
The catalog lists only models whose weights are already on a node in this appliance, so your list is specific to your hardware.
-
In Nodes, confirm that your node is selected. If it is not, select it.
-
Select Next twice. The GPU sharing step opens.
-
Select Deploy without changing the GPU sharing toggle. The step sets the toggle for your appliance. When the toggle is on, the step states the group that your model joins, and your model shares a GPU with the models of that group, such as the semantic router. For how that works, refer to GPU Sharing.
The model appears in the Model table. Its state reads Deploying while the appliance brings it up.
Watch the Weights Load
Loading model weights onto a GPU takes a few minutes. Rather than wait, watch it happen. Run the same command from Ask the Appliance About Its GPUs again.
curl --silent --cacert $HOME/Downloads/palette-ai-inference-launchpad-ca.crt https://<appliance-address>/healthz | jq '.gpus'
[
  {
    "index": "0",
    "name": "NVIDIA RTX PRO 6000 Blackwell Server Edition",
    "util_pct": "0",
    "mem_used_mib": "0",
    "mem_total_mib": "97887",
    "temp_c": "30",
    "util_available": true,
    "mem_available": true
  },
  {
    "index": "1",
    "name": "NVIDIA RTX PRO 6000 Blackwell Server Edition",
    "util_pct": "0",
    "mem_used_mib": "88110",
    "mem_total_mib": "97887",
    "temp_c": "39",
    "util_available": true,
    "mem_available": true
  }
]
Notice that mem_used_mib is climbing on one GPU, and that its temp_c has risen with it. Those are your model weights
arriving on the card. Run the command a few more times. Watching the number settle is the clearest sign that the
appliance is doing what you asked.
Now return to the console and confirm that the model finished. In the Model table on the Cluster page, the
Nodes column reads 1/1 healthy for the node you chose, and the model's state reads Ready.
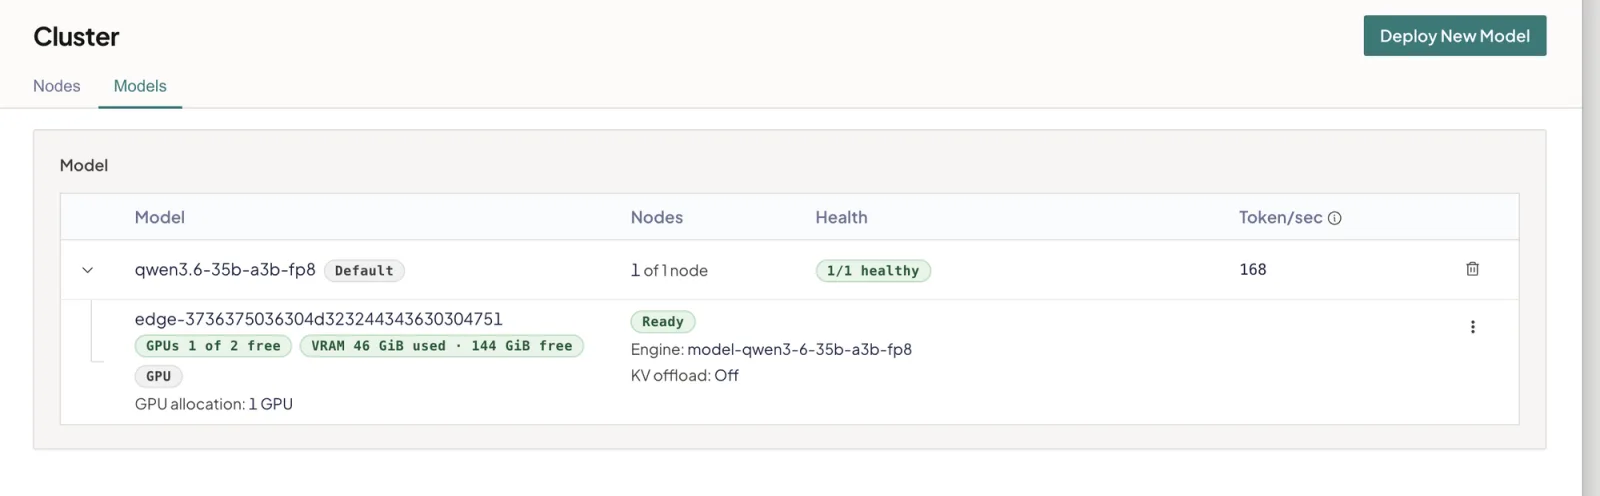
Wait until the state reads Ready before you map an alias to the model. An alias pointed at a model that is not yet
serving cannot answer requests, so the verification later in this tutorial would fail.
Create a Client and Its API Token
Claude Code needs a credential, and a credential belongs to a client. Create both here, and tell the appliance which model answers the requests this client sends.
-
In the workspace drop-down menu in the console header, select Default, the workspace the appliance ships with.
-
From the left main menu, select Access & Policy. The Clients list opens.
-
Select Add Client. The Add client wizard opens on the Overview step.
-
Enter
coding-agentas the Client name, and then select Next. -
On the Quotas step, select Next without adding a limit.
-
On the Egress step, select Next without enabling egress. Every request in this tutorial is answered on the appliance, so this client never needs to reach an external model.
-
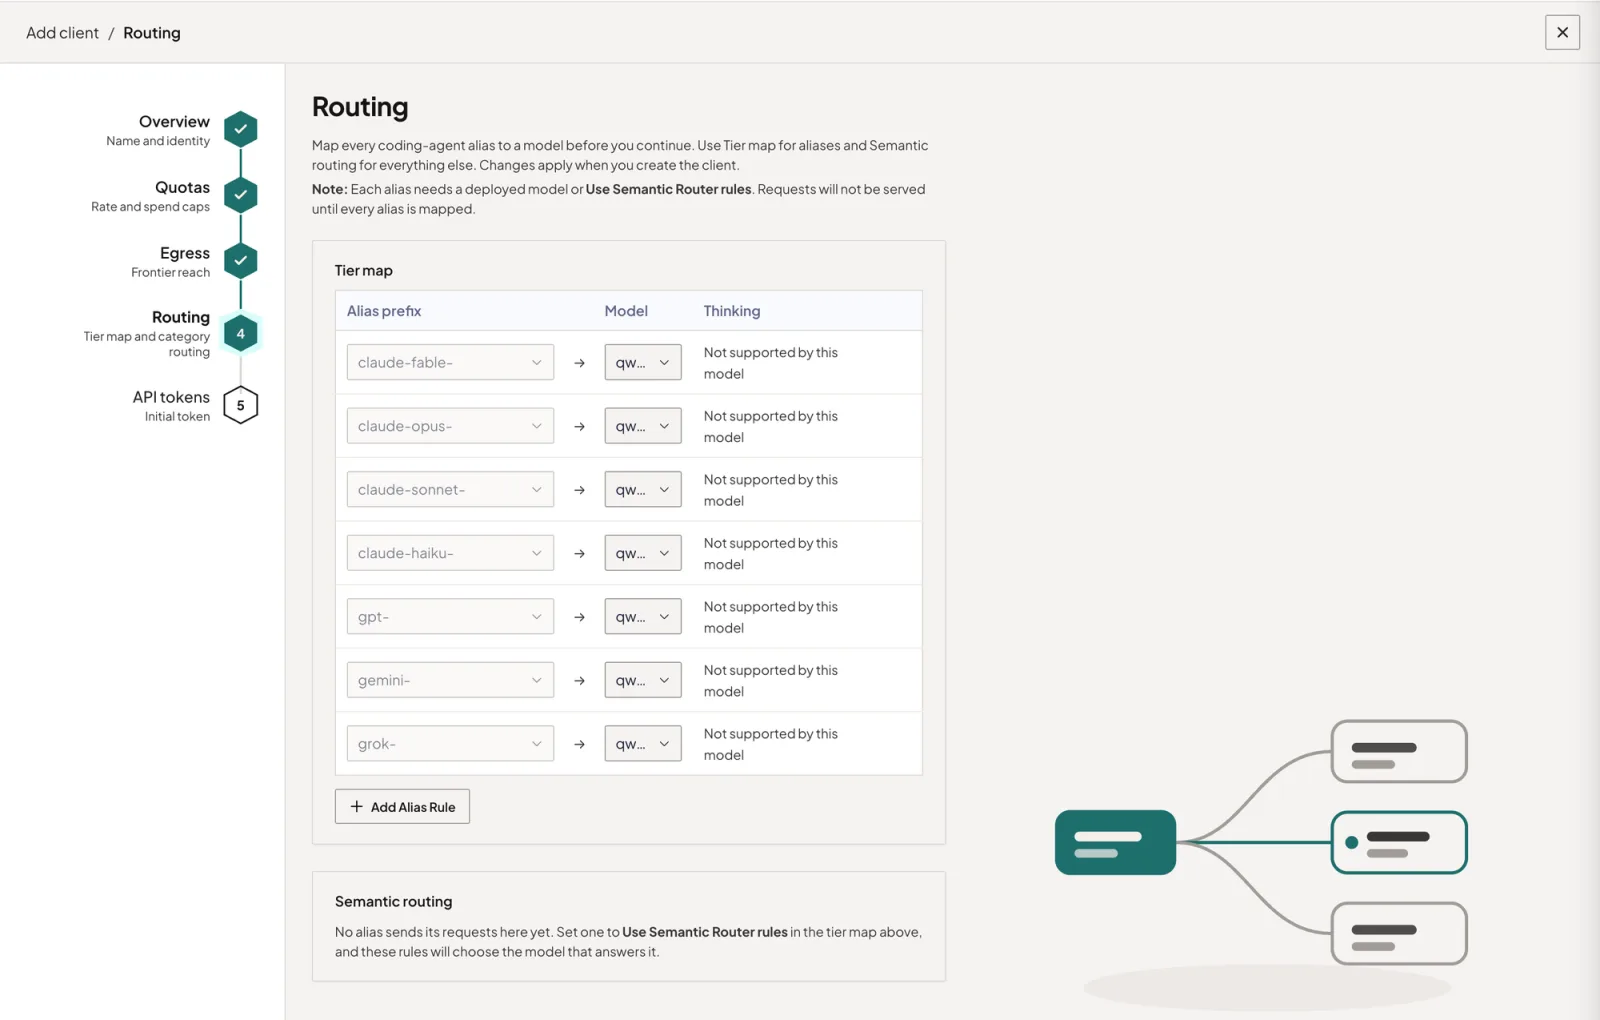
On the Routing step, set every row in the Tier map to the model deployed on your appliance, and then select Next. The wizard requires every alias to be mapped before it lets you continue.
-
On the API tokens step, select Add API Token. In the Add API token dialog, enter
tutorialas the Label, select a date within the next year in Expires, and then select Add Token. -
Select Create.
-
The console reveals the token, which begins with
lpai_.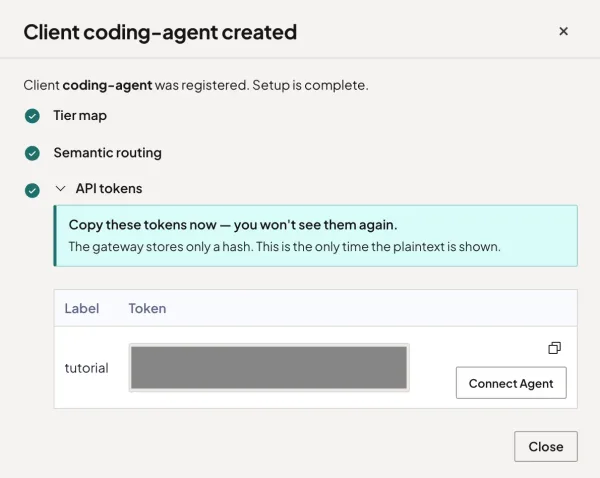 warning
The console shows the token once and stores only a hash. Keep this modal open until you finish Point Claude Code at the Appliance.
-
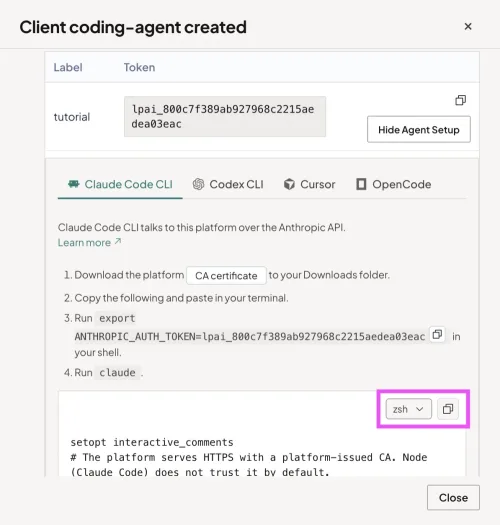
In the same modal, select Connect Agent. The coding-agent setup expands inline.
Point Claude Code at the Appliance
Now connect the two halves.
-
Select your shell from the dropdown at the top of the code block. Then select the copy button to copy the configuration.
-
In your terminal, paste the configuration. Any directory works.
-
In the panel, select the copy button next to the
export ANTHROPIC_AUTH_TOKEN=...line. In your terminal, paste it. The panel fills in your real token, so nothing needs replacing.
-
Start Claude Code.
claude -
In Claude Code, run
/statusand check that the Anthropic base URL line points at your appliance address.Expected outputSettings Status Config Usage Stats
Auth token: ANTHROPIC_AUTH_TOKEN
Anthropic base URL: https://<appliance-address>
Additional CA cert(s): $HOME/Downloads/palette-ai-inference-launchpad-ca.crt
Model: claude-opus-4-8
Ask a Question, and Then Ask Another
-
In your Claude Code session, ask a coding question, such as
what is the difference between a shallow copy and a deep copy?The model on your appliance answers. That reply came from your own hardware. -
Ask a second question, such as
what is the difference between a stack and a queue?The reply arrives the same way. This is the loop you work in from now on.
Monitor Your Token Usage
Now confirm that the appliance counted it.
-
In the console, select Usage from the left main menu.
-
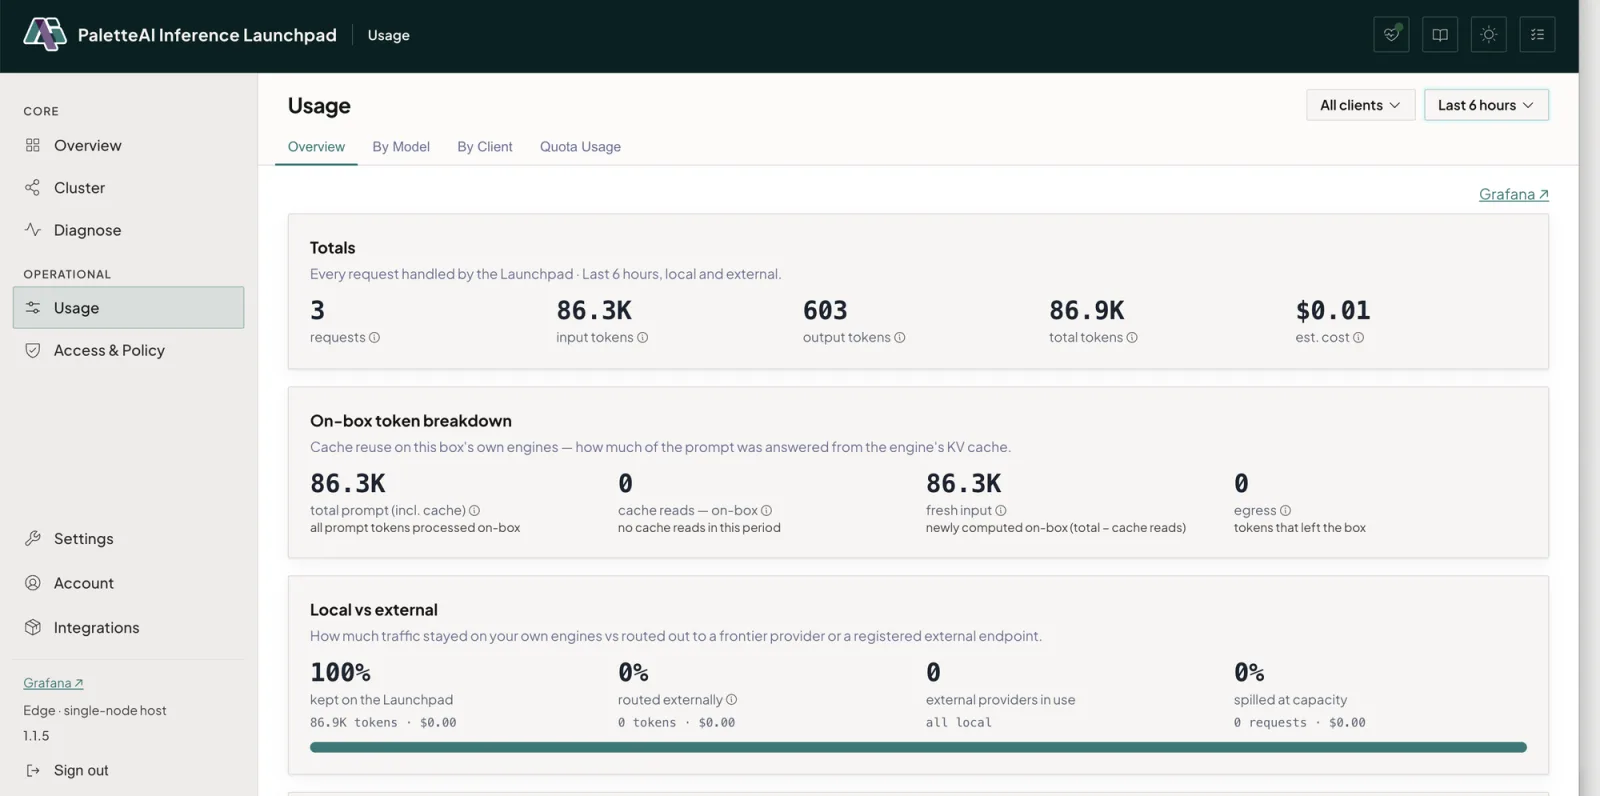
On the Overview tab, read the Totals card. Requests, input tokens, and output tokens have all risen from zero.
-
Find the Local vs external card. Every token is kept on the Launchpad, and the share routed externally reads zero tokens, because your appliance answered each request and no frontier model took part.
-
Select the By Client tab, and find the
coding-agentclient you named in Create a Client and Its API Token. Its row carries the tokens your two questions spent.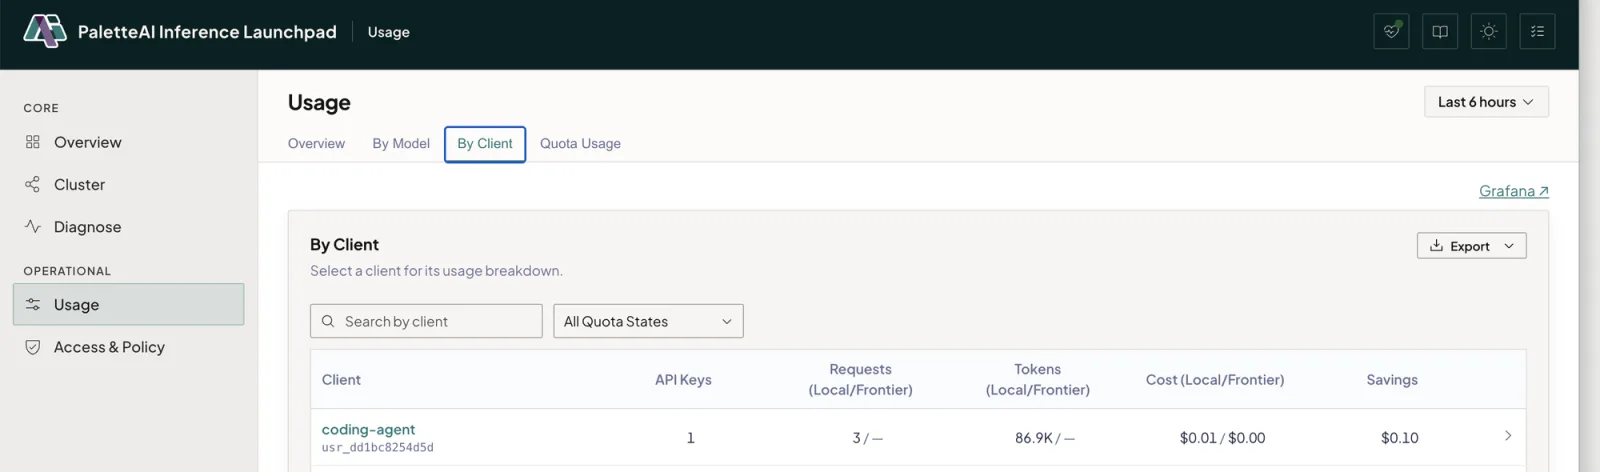
Change a Setting and Watch
Before you leave, change one setting and ask the same question again. This change cannot break anything you did.
-
In your Claude Code session, exit with
/exit. -
In the same terminal, lower the output ceiling.
export CLAUDE_CODE_MAX_OUTPUT_TOKENS=1024 -
Start Claude Code again.
claude -
Ask the shallow-copy-vs-deep-copy question again. The reply is shorter, because Claude Code stopped it earlier.
What You Built
You downloaded the platform CA certificate, created a client and its API token, routed the Tier map's aliases to a model on your appliance, and had Claude Code answer coding questions using that model. You watched the requests and tokens land under your client on the Usage page, and saw the output ceiling take effect when you lowered it.
Clean Up
Undo the changes the tutorial made.
-
In your Claude Code session, exit with
/exit. -
In the same terminal, unset the tutorial's environment variables.
unset NODE_EXTRA_CA_CERTS
unset ANTHROPIC_BASE_URL
unset ANTHROPIC_AUTH_TOKEN
unset ANTHROPIC_MODEL
unset ANTHROPIC_DEFAULT_OPUS_MODEL
unset ANTHROPIC_DEFAULT_SONNET_MODEL
unset ANTHROPIC_DEFAULT_HAIKU_MODEL
unset ANTHROPIC_DEFAULT_FABLE_MODEL
unset CLAUDE_CODE_EFFORT_LEVEL
unset CLAUDE_CODE_MAX_OUTPUT_TOKENS -
Remove the platform CA certificate.
- bash / zsh
- PowerShell
rm $HOME/Downloads/palette-ai-inference-launchpad-ca.crtRemove-Item $env:USERPROFILE\Downloads\palette-ai-inference-launchpad-ca.crt -
In the console header, confirm that the workspace drop-down menu shows Default.
-
From the left main menu, select Access & Policy.
-
In the Clients list, find the
coding-agentrow and select the three-dot menu at the end of the row.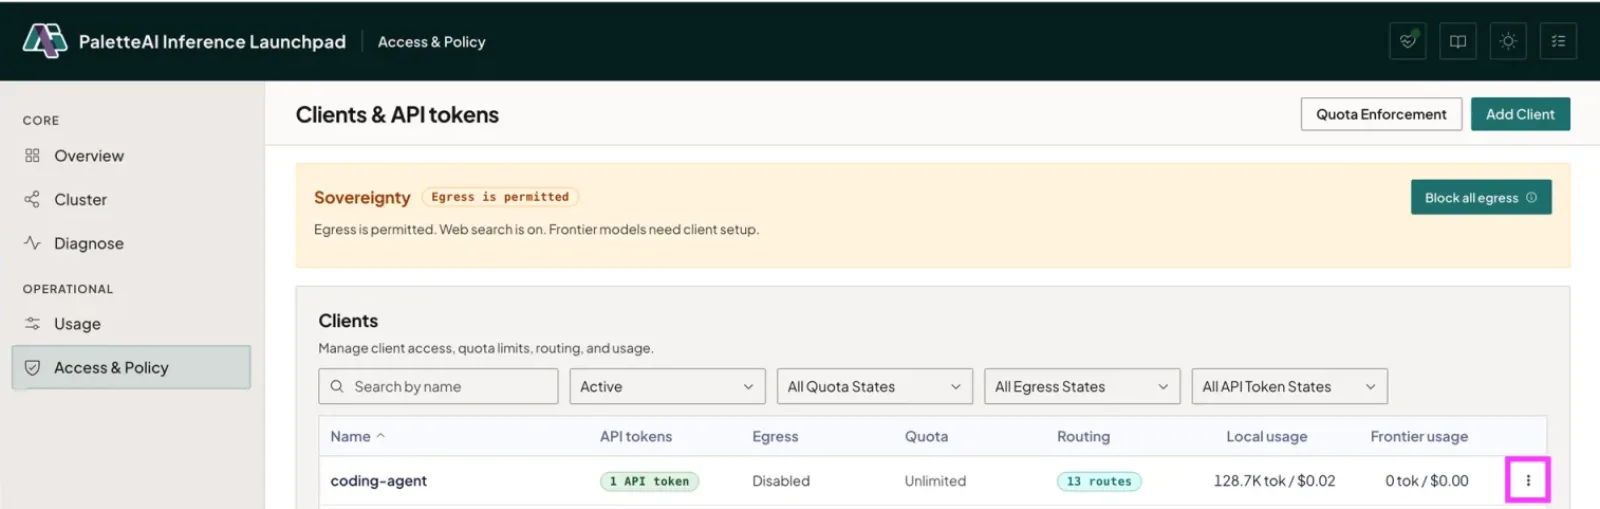
-
Select Delete and confirm.

Next Steps
-
To cap what a client can spend, refer to Set and Manage Client Quotas.
-
To let this client reach a frontier model when your own model is not enough, refer to Manage a Client's Model Access.
-
To carry out a specific task on the appliance, refer to the How-to Guides.