Deploy a Model
This guide explains how to deploy a model to a running PaletteAI Inference Launchpad appliance, choose which nodes run it, and verify that the model is serving requests. On a multi-node appliance, you select the target nodes in the deploy dialog. For why you would pin a model to some nodes and not others, refer to Model Placement.
Prerequisites
- A running PaletteAI Inference Launchpad appliance, with the admin console reachable and operator access.
- At least one node that can host the model you intend to deploy. The deploy dialog lists each node's hardware, free GPUs, and whether it can run the model.
- The model present in the appliance catalog and able to fit at least one node's available GPU resources. To confirm support, refer to Certified Models by Hardware and Suggested Hardware. To place a model in the appliance catalog, follow Upload a Model first.
Deploy a Model
-
From the left main menu, select Cluster. The page opens on the Nodes tab.
-
Select the Models tab, and then select Deploy New Model. The Deploy model dialog opens.
-
Open the Model drop-down menu and select the model to deploy.
-
(Optional) Open the Engine drop-down menu and select an engine. Leave it on auto to let the appliance choose the engine. For what an engine is and when you would override the automatic choice, refer to Inference Engines.
-
In Nodes, review each node. The list shows the node's name, hardware, free GPUs, and whether it can run the model you selected. Select every node that should run the model. A node that cannot run the model is not selectable and states why, with a message such as
2 free GPU(s), needs 4,has NVIDIA-L40S, model requires NVIDIA-RTX-PRO-6000-Blackwell-Server-Edition, orthe model's weights are not staged on this node. For the full list of reasons, refer to Why a Node Cannot Be Chosen.On a first deploy, no nodes are pre-selected. The dialog reports
N of M eligible nodes chosenand does not offer Deploy until you choose at least one node. On a repeat deploy of the same model, nodes that already serve the model arrive pre-selected and locked as Already deployed, and Deploy is available without any further selection.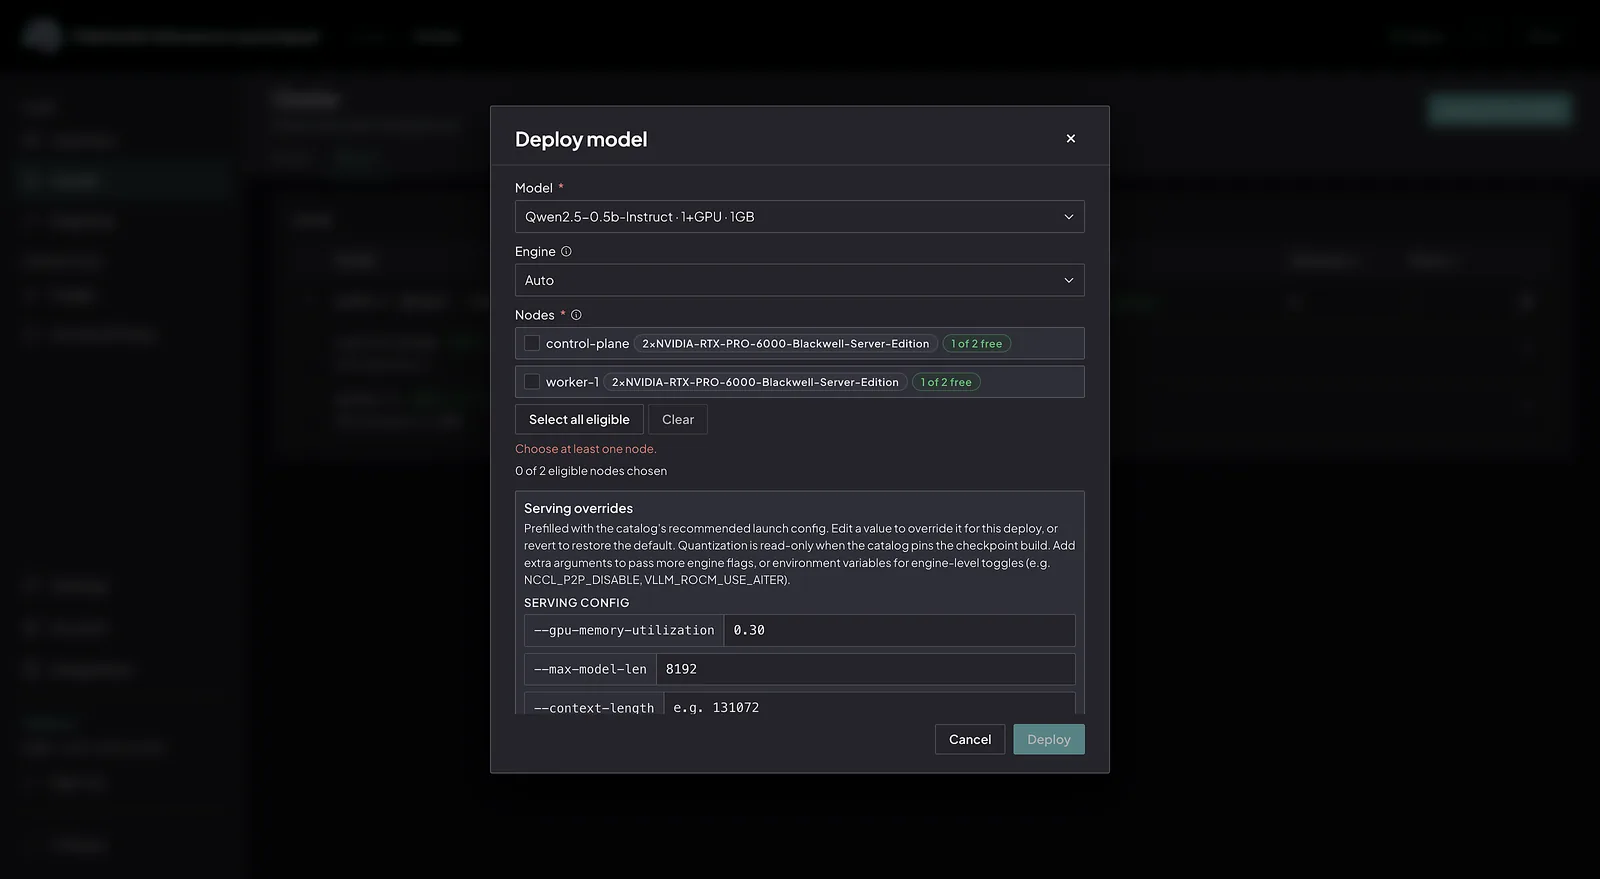
-
(Optional) To select every node that can run the model right now, select Select all eligible. That choice is a snapshot. A node you add to the cluster later does not receive this model until you add it, as described in Add a Model to More Nodes.
-
Select Deploy, review the deployment preview, and then select Confirm & Apply.
The appliance writes nothing until you confirm. It then brings the model through gate, provision, smoke-test, and ready stages on each chosen node. For that lifecycle, refer to Model Provisioning Lifecycle.
A deploy from the console always records the nodes you selected. The model runs only on that list. It does not start automatically on a node you add to the cluster later. To run it on additional nodes, refer to Add a Model to More Nodes.
Verify the Model Is Serving
Confirm the model is serving before you route traffic to it.
-
Locate the model in the Model table on the Cluster page.
-
Confirm that the Nodes column reads
N of M nodes, whereNis the number of nodes you chose andMis the number of nodes in the cluster. The health chip counts serving against the chosen set, so2/2 healthymeans every chosen node is serving. -
Expand the model row. Only the nodes you chose are listed. A node you did not select is absent, which means it was never asked to run this model.

-
Confirm that each listed node's state reaches
readyorserving. A state ofdeployingorsmoke-testingmeans the model is still coming online on that node. A state ofWaiting to startmeans the node is chosen and no engine has reported yet. A state offailedorverification failedmeans the model did not come online on that node.
While a model is deploying, a node hosting it can briefly report a Degraded or Not serving state. This is expected
during deployment and clears once the model finishes coming online, at which point the node returns to a healthy state.
For why a model becomes routable only after it passes its smoke test, refer to Model Provisioning Lifecycle.
Review or Change an Engine Argument That Uses JSON
When a { } JSON chip appears on an Extra arguments row in the Deploy model panel, use the JSON argument editor
to review or change the value for this deploy. For background on when the recipe carries a JSON-valued argument, refer
to Engine Arguments.
-
On the Cluster page, select the Models tab, and then select Deploy New Model. The Deploy model panel opens.
-
Choose the model in the Model drop-down menu, then expand the Serving overrides card.
-
Under Extra arguments, locate a row whose value is a
{ } JSONchip followed by a one-line preview of its top-level fields. -
Select Edit JSON on that row. The dialog opens with the argument's flag in its title, for example
Edit --kv-transfer-config, and the sub-lineChanges apply to this deploy only. Field names come from the engine. -
On the Form tab, change values in place. Every field carries its type as a badge:
string,number,boolean, ornull. A boolean field renders as atrue/falsebutton pair. A number field rejects non-numeric text withEnter a number.A byte field shows its size in readable units, such as64 GiB.A per-rank byte field also shows the node total for the model's tensor-parallel width. Anullfield is not editable on this tab and readsSet a value on the Raw JSON tab.To add or remove a field, switch to the Raw JSON tab. A note at the top of the Form tab makes this explicit:
Add or remove fields on the Raw JSON tab. The form edits values only, so a typo cannot invent a key the engine ignores. -
On the Raw JSON tab, review the whole document, or add and remove fields. The tab validates on every keystroke. When the text does not parse, the error appears as
Line N: [message], Apply is unavailable, and the Form tab is unavailable with the tooltipFix the JSON error first.Correct the parse error to re-enable both. -
If the editor shows the warning
[key] is the text '[value]', not the boolean [value]. Engines read any non-empty text as true., select Convert to boolean [value]. If it shows the softer nudge for a quoted number, select Convert to number [value]. -
Select Apply to keep the change, or Cancel to discard it. Apply writes the argument back for this deploy only.
Add a Model to More Nodes
To run an already deployed model on additional nodes, deploy it again and select the extra nodes. Nodes that already serve the model stay selected and show Already deployed.
-
From the left main menu, select Cluster. The page opens on the Nodes tab.
-
Select the Models tab, and then select Deploy New Model.
-
Select the same model. In Nodes, already serving nodes are locked with Already deployed. Select each additional eligible node.
-
Select Deploy, review the preview, and then select Confirm & Apply.
The appliance creates an engine on each newly chosen node and leaves the existing engines and the model's endpoint alone. Traffic continues on the nodes that were already serving.
Remove a Model from a Node
To stop a model on one node and leave it running elsewhere, expand the model row and remove it from that node.
-
From the left main menu, select Cluster, and then select the Models tab.
-
Expand the model row, open the node's three-dot menu, and select Remove.
-
Review the preview, and then select Confirm & apply.
The node stays visible while its engine shuts down. It reads Removing with the message
No longer chosen. Its engine is shutting down. The row disappears once the engine is gone. The model's endpoint and
the remaining chosen nodes keep serving.

To remove the model from every node, use the trash icon on the model's row instead of a per-node Remove.
Resolve a Blocked Deployment
If a deployment cannot proceed, the dialog explains why. Deploy is unavailable when you have not chosen a node, and
the dialog shows an Unable to deploy notice when the model is already deployed on every node in the cluster. Common
reasons include the following:
- You have not chosen a node. The dialog reads
Choose at least one node. - The model is already deployed on every node in the cluster. Deploy stays enabled, but the dialog shows an
Unable to deploynotice. - A node does not have enough free GPUs, for example
2 free GPU(s), needs 4. - A node's GPU product does not match the model, for example
has NVIDIA-L40S, model requires NVIDIA-RTX-PRO-6000-Blackwell-Server-Edition. - The model's weights are not staged on that node, or only the metadata is staged.
- The node's GPU allocation is unknown. Unknown capacity is treated as unusable, not as free.
- The node is
NotReadyor cordoned.
To resolve the reason, free GPUs on a node by removing another model from that node, stage the model's weights on the node, add capacity to the cluster, or resolve the unknown allocation on the affected nodes. Then deploy the model again. To replace what a node is serving, refer to Replace a Model. For the full list of eligibility reasons and how the appliance behaves when a node degrades between selection and confirmation, refer to Model Placement.
Next Steps
To put a newer version or a different model on a node, refer to Replace a Model. For why you would pin a model to some nodes and not others, refer to Model Placement. To let a text-only model answer questions about images, refer to Enable Vision Preprocessing. To bring a model that is not in the certified catalog, refer to Bring Your Own Model.