Install Palette Agent
Agent mode allows you to bring your own host, regardless of its architecture and Operating System (OS), to be managed by Palette and to operate as nodes in your Kubernetes clusters. For example, you can use an AWS EC2 instance, a Raspberry Pi, a VMware vSphere virtual machine, and more, as long as they meet the minimum hardware requirements.
This page guides you through the process of installing the Palette agent on your host. You will learn how to create the user data file to configure your host, install the agent, and verify that your host was successfully registered with Palette. You will then create a cluster profile and use the registered host to deploy a cluster.
Limitations
-
The following table presents the verified combinations of host architecture and cluster profile layers.
Host Architecture OS Kubernetes Container Network Interface (CNI) Verified AMD64 Ubuntu Palette eXtended Kubernetes - Edge (PXK-E) Calico ✅ AMD64 Ubuntu K3s Flannel ✅ AMD64 Rocky Linux 8.10 (Green Obsidian) Palette eXtended Kubernetes - Edge (PXK-E) Cilium ✅ -
Clusters with Flannel CNI are not verified for local management mode deployments.
-
Agent mode is only supported on Linux distributions that have
systemdinstalled and available. -
The FIPS-compliant version of Agent Mode is only available for Red Hat Enterprise Linux (RHEL) and Rocky Linux 8 systems.
-
Palette versions prior to 4.6.32 do not support local management mode. Even if you build an ISO using Palette agent and CanvOS version 4.6.21 or later, which support local management mode, the agent may be downgraded if your cluster uses a content bundle built against a Palette instance older than 4.6.32. This results in deployment failure.
Prerequisites
-
A physical or virtual host with SSH access, access to the internet, and connection to Palette. For local management mode deployments, the host does not need to have a connection to Palette and may have limited access to the internet. This guide uses an Ubuntu 22.04 virtual machine deployed in VMware vSphere as an example.
-
The host must meet the following minimum hardware requirements:
- 2 CPU
- 8 GB memory
- 100 GB storage
-
A Palette tenant registration token. Refer to the Create a Registration Token guide for instructions on how to create a token.
-
One IP address is required for the cluster's Virtual IP (VIP) address.
-
Ensure that the host has
Bashconfigured as the default shell. -
Ensure the following software is installed and available:
- bash
- jq
- Zstandard
- rsync
- systemd
- systemd-timesyncd - Required if you want Palette to manage Network Time Protocol (NTP).
- systemd-resolved - Required
if you want Palette to manage Domain Name System (DNS) or if you plan to use overlay networks for clusters deployed
on your Edge host. Refer to our Configure networkd to Prepare Host for Overlay Network
guide for information on installing and configuring
systemd-resolved. - systemd-networkd - Required if you
want Palette to manage static IP addresses or if you plan to use overlay networks for clusters deployed on your Edge
host. Refer to our Configure networkd to Prepare Host for Overlay Network guide for
information on installing and configuring
systemd-networkd. - conntrack - Required for clusters that use PXK-E as its Kubernetes layer.
- iptables
- rsyslog - Required for audit logs.
- (Local management mode only) Palette Edge CLI
If you are using Ubuntu or any OS that uses apt or apt-get for package management, you can issue the following command to install all dependencies for installation (not including the Palette Edge CLI) with the following command:
sudo apt-get update && sudo apt-get install -y bash jq zstd rsync systemd-timesyncd conntrack iptables rsyslog --no-install-recommendswarningAvoid installing Docker on the host where you want to install the agent. Docker is a heavyweight tool that could interfere with the Palette agent.
-
If you plan on creating clusters that need to enable network overlay, consider adding specific user data blocks to install and configure the necessary network prerequisites. Refer to Configure networkd to Prepare Host for Overlay Network for more information.
-
If installing the FIPS version of Agent Mode on a Rocky Linux edge host, you must configure your SELinux policies to grant rsync the required host permissions and ensure you enable cgroup V2.
If you are using Cilium and have
firewalldenabled, you must also configure the appropriatefirewalldrules. Follow the process below to apply the necessary configurations before installing Agent Mode.Rocky Linux 8 Configurations
Configure rsync
-
Enable SELinux to allow full rsync access.
setsebool -P rsync_full_access 1 -
Install the necessary tools to create and apply SELinux policy modules.
dnf install selinux-policy-devel audit -
Create a file named rsync_dac_override.te.
nano rsync_dac_override.te -
Add the following content to the rsync_dac_override.te file.
module rsync_dac_override 1.0;

require {
  type rsync_t;
  type default_t;
  class dir read;
  class capability dac_override;
}

# Allow rsync_t to read directories labeled default_t
allow rsync_t default_t:dir read;

# Allow rsync_t to override discretionary access control (DAC)
allow rsync_t self:capability dac_override; -
Compile and package the SELinux policy module.
checkmodule -M -m --output rsync_dac_override.mod rsync_dac_override.te
semodule_package --outfile rsync_dac_override.pp -m rsync_dac_override.mod -
Install the compiled policy module.
semodule --install rsync_dac_override.pp
Enable cgroup V2
-
Issue the following command to check if your kernel supports cgroup v2.
grep cgroup2 /proc/filesystemsIf the response is
nodev cgroup2, your kernel supports cgroup v2 and you may proceed to the next step. If the response does not matchnodev cgroup2, then your kernel does not support cgroup v2. You need to upgrade to a kernel that supports cgroup v2 to proceed. -
Issue the following command to check if cgroup v2 is already enabled.
stat -fc %T /sys/fs/cgroupIf the output is
tmpfsthen cgroup v2 is not enabled. When cgroup v2 is enabled, the output iscgroup2fs. If cgroup v2 is enabled, skip to step 12. -
Issue the following command to edit the GRUB file to enable cgroup v2.
sudo vi /etc/default/grubFind the line starting with
GRUB_CMDLINE_LINUXand add thesystemd.unified_cgroup_hierarchy=1parameter.GRUB_TIMEOUT=5
GRUB_DISTRIBUTOR="$(sed 's, release *$,,g' / etc/system-release)"
GRUB_DEFAULT=saved
GRUB_DISABLE_SUBMENU=true
GRUB_TERMINAL_OUTPUT="console"
GRUB_CMDLINE_LINUX="crashkernel=auto resume=/dev/mapper/rl-swap rd.lvm.lv=rl/root rd.lvm.lv=rl/swap systemd.unified_cgroup_hierarchy=1
systemd.unified_cgroup_hierarchy=1" GRUB_DISABLE_RECOVERY="true"
GRUB_ENABLE_BLSCFG=true -
Save the file and regenerate the GRUB configuration.
sudo grub2-mkconfig -o /boot/grub2/grub.cfg -
Reboot the system.
sudo reboot
Configure firewalld (Cilium Only)
-
(Optional) If you are using Cilium and have
firewalldenabled, put the following commands into a shell script.cat << 'EOF' > firewalld-cilium.sh
#!/bin/bash
if [ -z "$1" ]; then
echo "Usage: $0 <zone>"
exit 1
fi
ZONE="$1"
# Kubernetes API Server
firewall-cmd --permanent --zone="$ZONE" --add-port=6443/tcp
# Etcd
firewall-cmd --permanent --zone="$ZONE" --add-port=2379-2380/tcp
# Kubelet API
firewall-cmd --permanent --zone="$ZONE" --add-port=10250/tcp
# Scheduler and Controller Manager
firewall-cmd --permanent --zone="$ZONE" --add-port=10257-10259/tcp
# kube proxy health check
firewall-cmd --permanent --zone="$ZONE" --add-port=10255/tcp
# Nodeport range
firewall-cmd --permanent --zone="$ZONE" --add-port=30000-32767/tcp
############### Start Cilium Rules ##########################
# Cilium: VXLAN Overlay
firewall-cmd --permanent --zone="$ZONE" --add-port=8472/udp
# Cilium: Health Checks
firewall-cmd --permanent --zone="$ZONE" --add-port=4240/tcp
# Cilium: Geneve Overlay networking (if enabled)
firewall-cmd --permanent --zone="$ZONE" --add-port=6081/udp
# Cilium: WireGuard Encryption (if enabled)
firewall-cmd --permanent --zone="$ZONE" --add-port=51871/udp
# Cilium: IPsec Encryption (if enabled)
firewall-cmd --permanent --zone="$ZONE" --add-protocol=esp
# Cilium: Prometheus Observability
firewall-cmd --permanent --zone="$ZONE" --add-port=9962/tcp
firewall-cmd --permanent --zone="$ZONE" --add-port=9963/tcp
# Cilium: Enable ICMP Type 8 (Echo request) and Type 0 (Echo Reply)
firewall-cmd --permanent --zone="$ZONE" --add-icmp-block-inversion
############### End Cilium Rules ##########################
# DNS and service communications
# DNS (CoreDNS)
firewall-cmd --permanent --zone="$ZONE" --add-port=53/tcp
firewall-cmd --permanent --zone="$ZONE" --add-port=53/udp
# Allow inbound/outbound traffic to port 443 (HTTPS)
firewall-cmd --permanent --zone="$ZONE" --add-port=443/tcp
# Allow NAT traffic
firewall-cmd --permanent --add-masquerade
# Reload firewalld cache
firewall-cmd --reload
EOF
# Make the script executable
chmod +x firewalld-cilium.sh -
Execute the script with the name of the
firewalldzone. For example, the following script sets the rules in the firewall zonepublic../firewalld-cilium.sh public
-
Install Palette Agent
- Central Management Mode
- Local Management Mode
-
In your terminal, use the following command to SSH into the host. Replace
</path/to/private/key>with the path to your private SSH key and<host-ip-or-domain>with the host's IP address or hostname.ssh -i </path/to/private/key> ubuntu@<host-ip-or-domain> -
Export your Palette registration token. Replace
<your-palette-registration-token>with your token.export TOKEN=<your-palette-registration-token> -
(Optional) If you are not installing the agent on a host that accesses the internet via a proxy, skip this step.
If you are installing the agent on a host that accesses the internet via a network proxy, export the proxy configurations in your current terminal session. We recommend exporting the variables both in uppercase and lowercase to ensure compatibility. Replace
<httpProxyAddress>and<httpsProxyAddress>with the address and port to your HTTP and HTTPS proxy servers, respectively.export http_proxy=<httpProxyAddress>
export https_proxy=<httpsProxyAddress>
export HTTP_PROXY=<httpProxyAddress>
export HTTPS_PROXY=<httpsProxyAddress> -
Issue the command below to create the user-data file and configure your host declaratively.
infoIf your host needs a proxy to access the internet, you need to provide the proxy configurations in the user data as well. For more information, refer to Site Network Parameters.
Alternatively, you can install the agent first and configure proxy in Local UI. For more information, refer to Configure HTTP Proxy.
The following configuration includes a Palette registration token and the default Palette endpoint, specifies a Palette project, and sets up the
kairosuser. It also specifies credentials for private external registries as well as registry mapping rules. Note the following:-
The host will not shut down and will instead reboot after the agent is installed, with kube-vip enabled, as this is required for bare metal and VMware vSphere deployments. If your environment does not require kube-vip, set
stylus.vip.skiptotrue. Refer to Edge Installer Configuration Reference to learn more about user data configuration. -
The
projectNameparameter is not required if the associated Palette registration token has a Default Project set. -
Palette automatically displays Graphics Processing Unit (GPU) specifications for Edge hosts with certain GPU vendor-model combinations in Edge Host Grid View and on the Edge host Overview tab. For other GPU models and vendors, Palette attempts to automatically source GPU information using the vendor-specific driver or command-line interface (CLI) installed on the Edge host. If Palette cannot automatically retrieve the GPU specs, you can provide them manually via the
user-datafile (Appliance and Agent mode) or with acustom-hardware-specs-lookup.jsonfile (Appliance mode only). Refer to Prepare User Data and Argument Files for additional information.cat << EOF > user-data
#cloud-config
install:
reboot: true
poweroff: false
stylus:
vip:
skip: false
site:
edgeHostToken: $TOKEN
paletteEndpoint: api.spectrocloud.com
projectName: Default
externalRegistries:
registries:
- domain: "example.registry.com/palette-images"
username: "admin"
password: "***************"
repositoryName: example-repository-private
certificates:
- |
-----BEGIN CERTIFICATE-----
**********************
-----END CERTIFICATE-----
registryMappingRules:
"us-docker.pkg.dev/palette-images": "example.registry.com/palette-images"
stages:
initramfs:
- users:
kairos:
groups:
- sudo
passwd: kairos
EOF
Confirm that the file was created correctly.
cat user-dataThe output should contain the value of your Palette registration token assigned to the
edgeHostTokenparameter, as displayed in the example output below.#cloud-config
install:
reboot: true
poweroff: false
stylus:
vip:
skip: false
site:
edgeHostToken: ****************
paletteEndpoint: api.spectrocloud.com
projectName: Default
externalRegistries:
registries:
- domain: "example.registry.com/palette-images"
username: "admin"
password: "***************"
repositoryName: example-repository-private
certificates:
- |
-----BEGIN CERTIFICATE-----
**********************
-----END CERTIFICATE-----
registryMappingRules:
"us-docker.pkg.dev/palette-images": "example.registry.com/palette-images"
stages:
initramfs:
- users:
kairos:
groups:
- sudo
passwd: kairoswarningIf your setup meets the following conditions, include the following
initramfsstage in youruser-datafile, replacing<interface-name>with the name of the network interface on your Edge host:-
Your host is a virtual machine.
-
The virtual machine uses a VMXNET3 adapter.
-
You are planning to use one of the following in your Edge cluster:
-
An overlay network.
-
Flannel for your CNI.
stages:
  initramfs:
    - name: "Disable UDP segmentation"
      commands:
        - ethtool --offload <interface-name> tx-udp_tnl-segmentation off
- ethtool --offload <interface-name> tx-udp_tnl-csum-segmentation off -
This is due to a known issue with VMware's VMXNET3 adapter, which is widely used in different virtual machine management services, including VMware vSphere and Hyper-V.
-
-
Export the path to your user data file.
export USERDATA=./user-data -
If you are using Palette SaaS, download the latest Palette agent installation script. There is a FIPS-compliant script, if needed.
- Non-FIPS
- FIPS
curl --location --output ./palette-agent-install.sh https://github.com/spectrocloud/agent-mode/releases/latest/download/palette-agent-install.shcurl --location --output ./palette-agent-install-fips.sh https://github.com/spectrocloud/agent-mode/releases/latest/download/palette-agent-install-fips.shIf you have a dedicated or on-prem instance of Palette, you need to identify the correct agent version and then download the corresponding version of the agent installation script.
-
Use the following command to identify the agent version for your Palette instance. Replace
<palette-endpoint>with your Palette endpoint and<api-key>with your Palette API key.curl --location --request GET 'https://<palette-endpoint>/v1/services/stylus/version' --header 'Content-Type: application/json' --header 'Apikey: <api-key>' | jq --raw-output '.spec.latestVersion.content | match("version: ([^\n]+)").captures[0].string'Example output4.5.0 -
Use the following command to download the version of the Palette agent for your dedicated or on-prem instance. Replace
<stylus-version>with your output from the previous step.- Non-FIPS
- FIPS
curl --location --output ./palette-agent-install.sh https://github.com/spectrocloud/agent-mode/releases/download/v<stylus-version>/palette-agent-install.shcurl --location --output ./palette-agent-install-fips.sh https://github.com/spectrocloud/agent-mode/releases/download/v<stylus-version>/palette-agent-install-fips.sh
-
Grant execution permissions to the installation script.
- Non-FIPS
- FIPS
chmod +x ./palette-agent-install.shchmod +x ./palette-agent-install-fips.sh -
Issue the following command to install the agent on your host.
- Non-FIPS
- FIPS
sudo --preserve-env ./palette-agent-install.shsudo --preserve-env ./palette-agent-install-fips.shThe termination of the SSH connection, as shown in the example below, confirms that the script has completed its tasks.
Connection to 192.168.1.100 closed by remote host.
Connection to 192.168.1.100 closed. -
Upon agent installation, the host will reboot to the registration screen and use the provided
EdgeHostTokenfor automatic registration with Palette. The host will be registered in the same project where the registration token was created. -
Log in to Palette and select Clusters from the left Main Menu.
-
Select the Edge Hosts tab and verify your host is displayed and marked as Healthy in the Edge hosts list.
-
Once the host has been registered with Palette, proceed with the cluster profile creation. Select Profiles from the left Main Menu.
-
Click on Add Cluster Profile.
-
In the Basic Information section, assign a profile name, a description, and tags. Select the type as Full and click Next.
-
Select Edge Native as the Cloud Type and click Next.
-
The Profile Layers section specifies the packs that compose the profile. Add the BYOS Edge OS pack version 2.1.0 to the OS layer.
-
Click Values under Pack Details, then click on Presets on the right-hand side. Select Agent Mode.
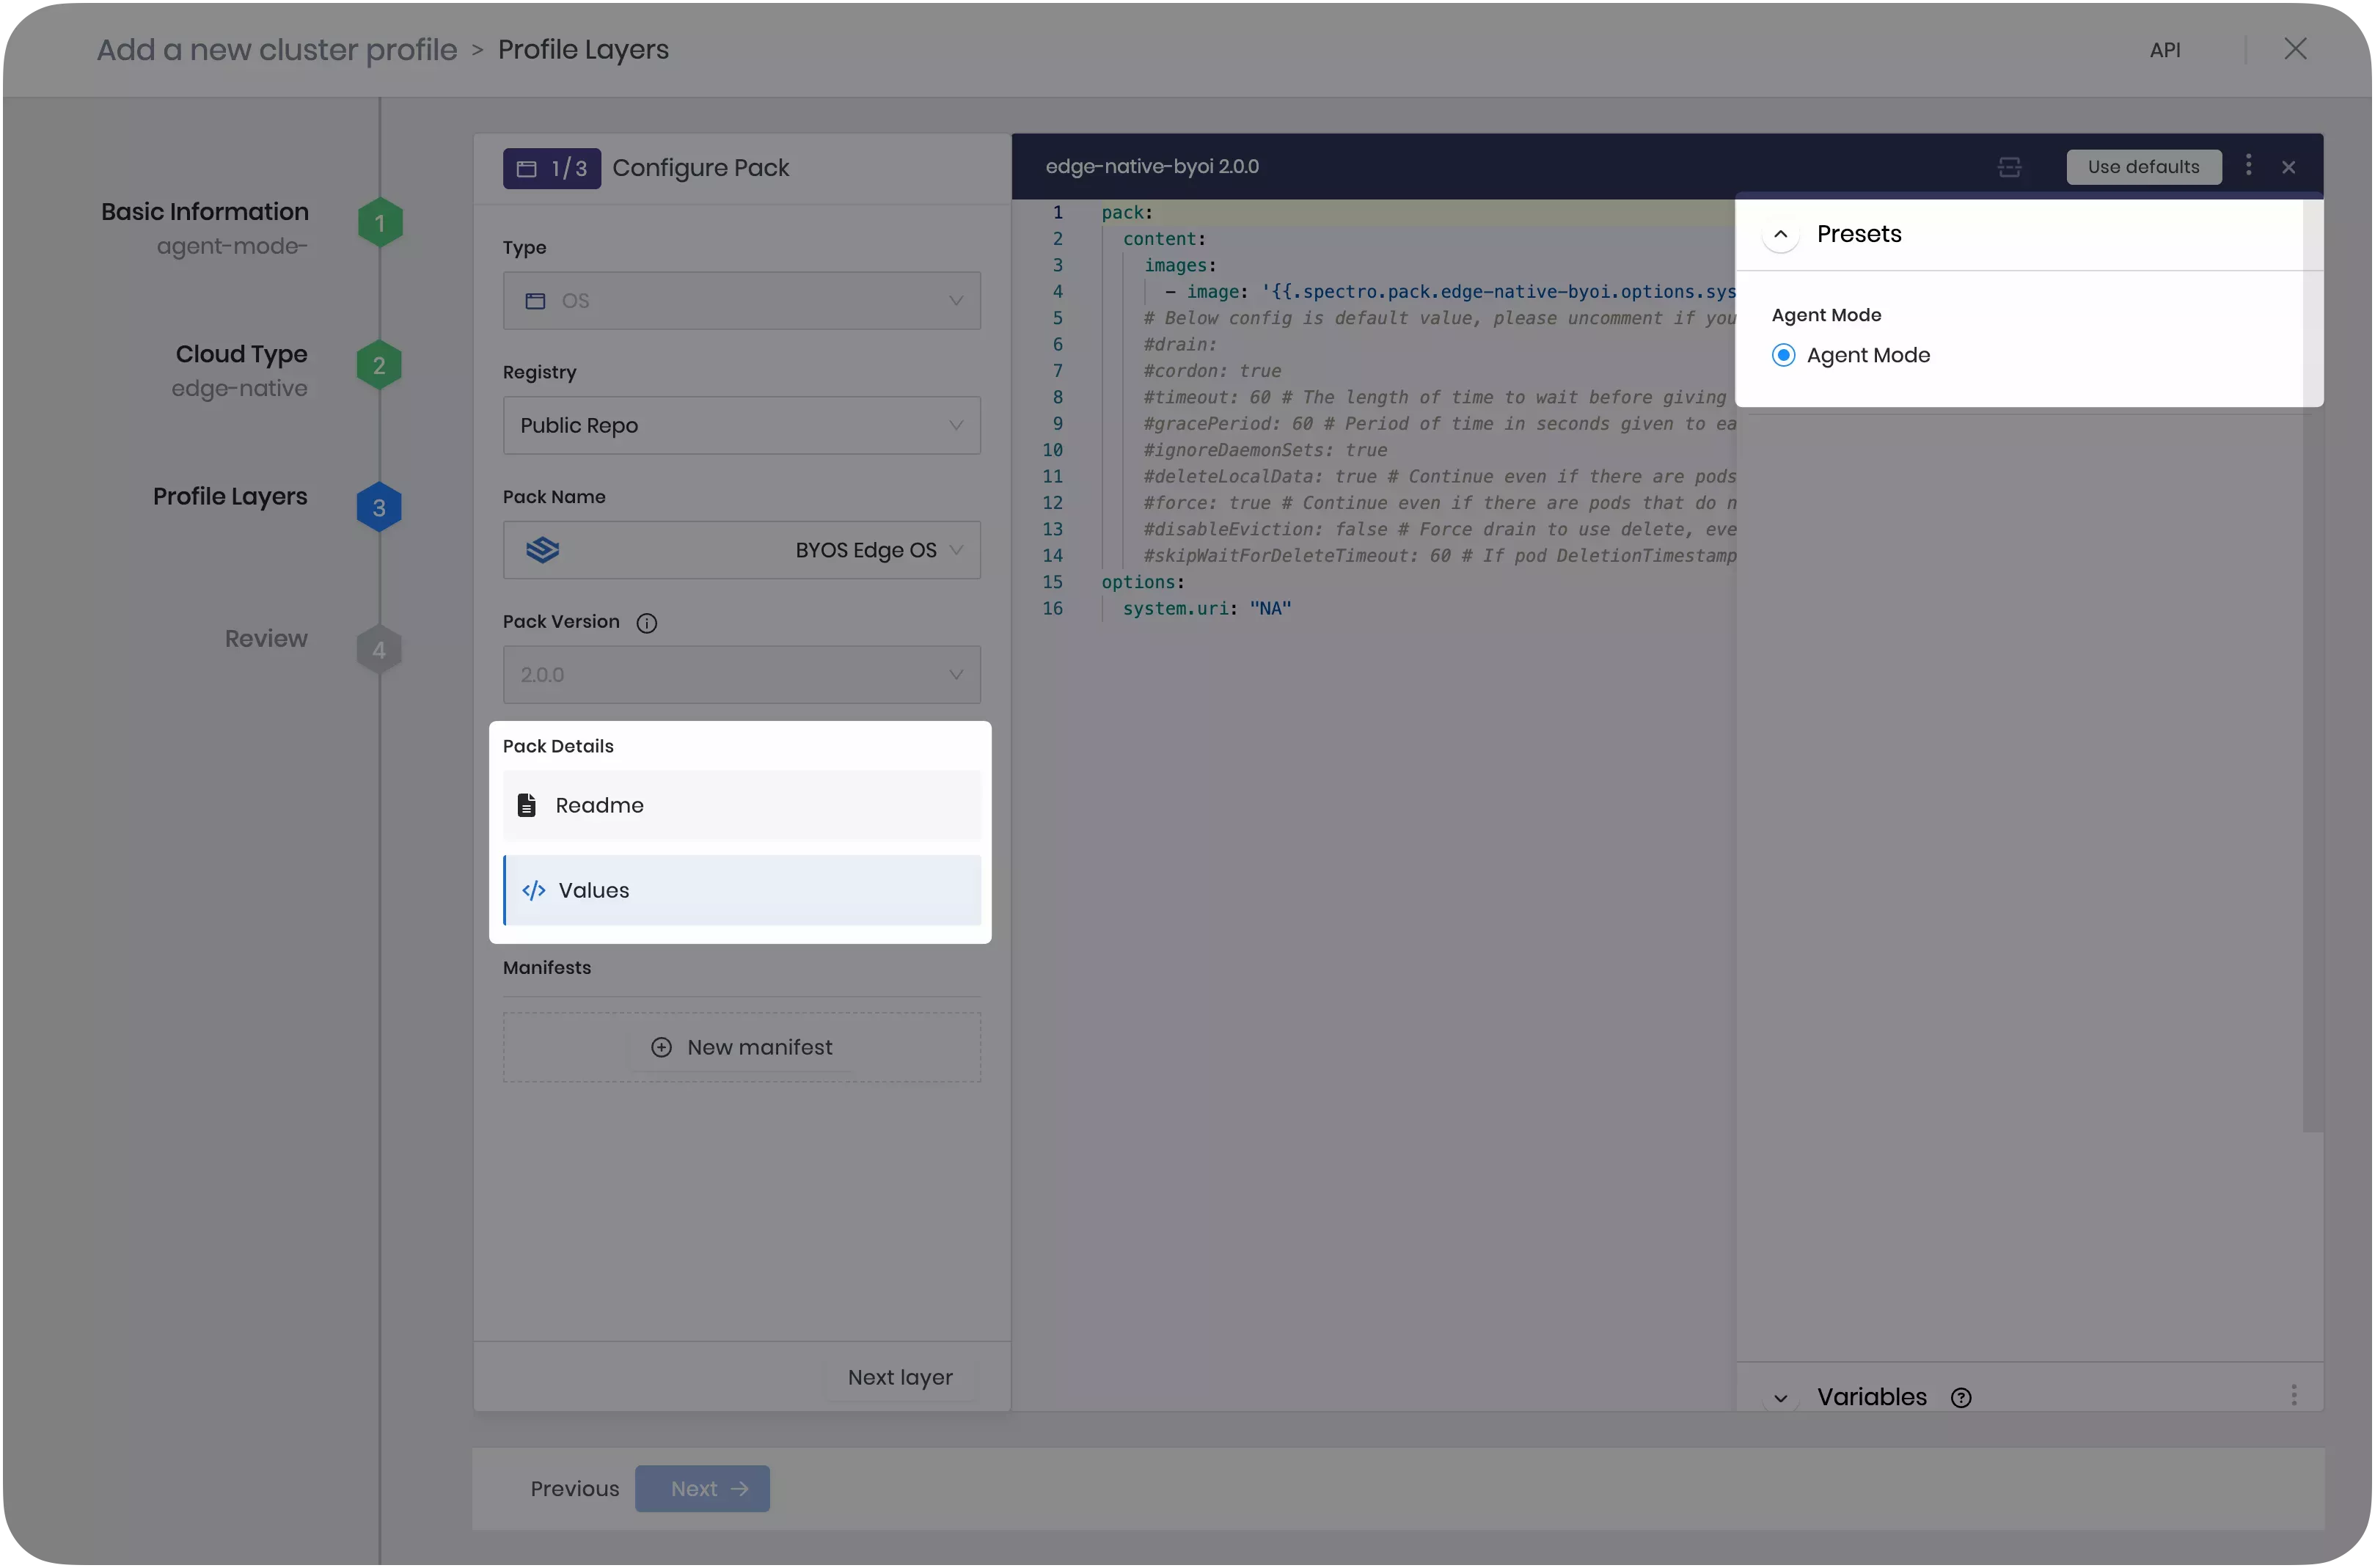
-
Click Next Layer to continue.
-
Complete the cluster profile creation process by filling out the remaining layers.
-
Follow the steps in the Create Cluster Definition guide to deploy a cluster using your registered host as a cluster node.
If using the FIPS version of Agent Mode on a Rocky Linux edge host, SELinux may incorrectly label the kubeadm-flags.env file during cluster deployment or when certain configurations are adjusted, preventing the Kubelet from accessing it and properly managing the cluster. Refer to the Edge Troubleshooting Guide for guidance.
In local management mode, your host does not have a connection to Palette and may also have limited access to the internet.
Ensure your Palette instance is version 4.6.32 or later to build Edge artifacts, as earlier versions do not support local management mode.
You can check the Palette agent version your Palette environment uses with the following command. Replace
<palette-endpoint> with your Palette endpoint and <api-key> with your
Palette API key.
curl --location --request GET 'https://<palette-endpoint>/v1/services/stylus/version' --header 'Content-Type: application/json' --header 'Apikey: <api-key>' | jq --raw-output '.spec.latestVersion.content | match("version: ([^\n]+)").captures[0].string'
The Palette agent version should be 4.6.21 or later, which corresponds to Palette instance version 4.6.32. If you are building a custom Edge ISO, ensure you use CanvOS version 4.6.21 or later as well.
-
In your terminal, use the following command to SSH into the host. Replace
</path/to/private/key>with the path to your private SSH key and<host-ip-or-domain>with the host's IP address or hostname.ssh -i </path/to/private/key> ubuntu@<host-ip-or-domain> -
(Optional) If you are not accessing the internet via a proxy, skip this step.
If you are downloading the agent on a host that accesses the internet via a proxy network, export the proxy configurations in your current terminal session so that the script downloading the agent binary can execute successfully. We recommend exporting the variables both in uppercase and lowercase to ensure compatibility. Replace
<httpProxyAddress>and<httpsProxyAddress>with the address and port to your HTTP and HTTPS proxy servers, respectively.export http_proxy=<httpProxyAddress>
export https_proxy=<httpsProxyAddress>
export HTTP_PROXY=<httpProxyAddress>
export HTTPS_PROXY=<httpsProxyAddress> -
Download the airgap agent installation package and save it as a TAR file. Replace
<architecture>with the architecture of your CPU. If you have ARM64, usearm64. If you have AMD64 or x86_64, useamd64. Replace<version>with the desired version number. In this example, we usev4.6.24. Refer to Agent Mode Releases for all the available releases.- Non-FIPS
- FIPS
curl -L https://github.com/spectrocloud/agent-mode/releases/download/<version>/agent-mode-linux-<architecture>.tar --output agent-mode-linux-<architecture>.tarcurl -L https://github.com/spectrocloud/agent-mode/releases/download/<version>/agent-mode-fips-linux-<architecture>.tar --output agent-mode-linux-<architecture>.tar -
Extract the package to the root folder.
sudo tar -xvf agent-mode-linux-<architecture>.tar -C / -
Issue the command below to create the
userdatafile and configure your host declaratively.The following configuration indicates the management mode to be local and sets up the
kairosuser. The host will not shut down and will reboot after the agent installation, with kube-vip enabled, as this is required for bare metal and VMware vSphere deployments. If your environment does not require kube-vip, setstylus.vip.skiptotrue. Refer to Edge Installer Configuration Reference to learn more about user data configuration.sudo tee /var/lib/spectro/userdata > /dev/null << EOF
#cloud-config
install:
reboot: true
poweroff: false
stylus:
vip:
skip: false
managementMode: local
stages:
initramfs:
- users:
kairos:
groups:
- sudo
passwd: kairos
name: "Configure user"
EOFwarningIf your setup meets the following conditions, include the following
initramfsstage in youruser-datafile, replacing<interface-name>with the name of the network interface on your Edge host:-
Your host is a virtual machine.
-
The virtual machine uses a VMXNET3 adapter.
-
You are planning to use one of the following in your Edge cluster:
-
An overlay network.
-
Flannel for your CNI.
-
stages:
  initramfs:
    - name: "Disable UDP segmentation"
      commands:
        - ethtool --offload <interface-name> tx-udp_tnl-segmentation off
        - ethtool --offload <interface-name> tx-udp_tnl-csum-segmentation off
This is due to a known issue with VMware's VMXNET3 adapter, which is widely used in different virtual machine management services, including VMware vSphere and Hyper-V.
-
-
Issue the following command confirm that your user data file was created successfully at the correct location.
sudo cat /var/lib/spectro/userdataThe response is the content of the user data file.
#cloud-config
install:
  reboot: true
  poweroff: false

stylus:
  vip:
    skip: false
  managementMode: local
stages:
  initramfs:
    - users:
       kairos:
         groups:
           - sudo
         passwd: kairos
name: "Configure user" -
Reboot the host. The host will automatically start the installation process once it reboots.
-
Log in to Palette and select Clusters from the left Main Menu.
-
Select Profiles from the left Main Menu.
-
Click on Add Cluster Profile.
-
In the Basic Information section, assign the a profile name, a description, and tags. Select the type as Full and click Next.
-
Select Edge Native as the Cloud Type and click Next.
-
The Profile Layers section specifies the packs that compose the profile. Add the BYOS Edge OS pack version 2.1.0 to the OS layer.
-
Click Values under Pack Details, then click on Presets on the right-hand side. Select Agent Mode.
-
Click Next Layer to continue.
-
In the Kubernetes layer, under
cluster.config.kube-apiserver-arg, removeAlwaysPullImagesfrom the list itemenable-admission-plugins:kube-apiserver-arg:
- anonymous-auth=true
- profiling=false
- disable-admission-plugins=AlwaysAdmit
- default-not-ready-toleration-seconds=60
- default-unreachable-toleration-seconds=60
- enable-admission-plugins=NamespaceLifecycle,ServiceAccount,NodeRestriction -
Complete the cluster profile creation process by filling out the remaining layers. In the application layer, make sure you include the Harbor Edge-Native Config pack. This pack is required for clusters in local management mode.
-
Follow the steps in Export Cluster Definition to export a cluster definition of your profile. You will use this cluster definition later when you create the cluster in Local UI.
-
(Optional) If your host has access to all the images referenced by your cluster profile, you may skip this step.
Follow the steps in Build Content Bundles to build a content bundle for your cluster profile. The content bundle will contain all the artifacts required to create your cluster and it will allow you to create a cluster even if your host has no access to an external image registry.
-
Log in to Local UI.
-
Follow the steps in Upload Content Bundles to upload the content bundle to your host.
-
Follow the steps in Create Local Cluster to use the cluster definition you exported previously to create a cluster.
If using the FIPS version of Agent Mode on a Rocky Linux edge host, SELinux may incorrectly label the kubeadm-flags.env file during cluster deployment or when certain configurations are adjusted, preventing the Kubelet from accessing it and properly managing the cluster. Refer to the Edge Troubleshooting Guide for guidance.
Validate
- Central Management Mode
- Local Management Mode
-
Log in to Palette.
-
Select Clusters from the left Main Menu.
-
Select the host cluster you created to view its details page.
-
Verify that the cluster is listed as Healthy and has a Running status.
Alongside Palette, Local UI allows you to fully manage the lifecycle of your edge hosts. Refer to the Reboot, Shutdown, and Reset Edge Host guide for further details on how to use these operations
-
Log in to Local UI.
-
Select Cluster from the left Main Menu.
-
Verify that your cluster is in a Heathy status.
Local UI allows you to fully manage the lifecycle of your edge hosts. Refer to the Reboot, Shutdown, and Reset Edge Host guide for further details on how to use these operations.