Create and Manage Azure AKS Cluster
Palette supports creating and managing Azure Kubernetes Service (AKS) clusters deployed to an Azure account. This guide explains how you can create an Azure AKS cluster managed by Palette.
Limitations
-
AKS clusters cannot be deployed in Azure Government Secret cloud.
-
When integrating with private Domain Name System (DNS) zones, AKS clusters created by Palette use a user-assigned managed identity instead of a system-assigned managed identity. This identity must have the
Microsoft.Network/privateDnsZones/readpermission in the required subscriptions. Check out What is managed identities for Azure resources? to learn more about user-assigned vs. system-assigned managed identities.
Prerequisites
-
An active Azure cloud account integrated with Palette. Review Register and Manage Azure Cloud Account for guidance.
-
A Secure Shell (SSH) key that you have pre-configured in your Azure environment. Only RSA and ED25519 SSH keys are supported when deploying Azure AKS clusters. Refer to the SSH Keys guide for more information about creating and managing SSH keys in Palette.
-
An infrastructure cluster profile for Azure. Review Create an Infrastructure Profile for guidance.
-
To use custom storage accounts or containers, you must create them before you create your cluster. For information about use cases for custom storage, review Azure Storage.
tipIf you need help creating a custom storage account or container, check out the Create a Storage Account and the Manage Blob Containers guides.
-
To enable OIDC with Microsoft Entra ID, you need to configure Entra ID with Palette. Review the Enable SSO with Microsoft Entra ID guide for more information.
-
Optionally, a Virtual Network (VNet). If you do not provide a VNet, Palette creates one for you with compute, network, and storage resources in Azure when it provisions Kubernetes clusters.
To use a VNet that Palette creates, ensure there is sufficient capacity in your preferred Azure region to create the following resources:
- Virtual CPU (vCPU)
- VNet
- Static Public IP addresses
- Virtual Network Interfaces
- Load Balancers
- Virtual Hard Disk (VHD)
- Managed Disks
- Virtual Network Address Translation (NAT) Gateway
-
If you configure a private DNS zone in a dedicated resource group for an AKS cluster, the private DNS zone must be linked to the cluster’s VNet to enable DNS resolution for private endpoints. If no private DNS zone is provided, AKS creates a private DNS zone in the node resource group. Refer to the Create a private Azure Kubernetes Service (AKS) cluster guide for further information.
Review the following guidelines to create a DNS zone and resource group before deploying your cluster.
-
For private AKS clusters, the private DNS zone used for the API server must be named
private.<cluster-region>.azmk8s.io. This naming convention is mandatory regardless of whether the private DNS zone resides in a different resource group, region, or subscription, provided it is correctly linked to the cluster VNet. -
If the private DNS zone is located in a different subscription than the AKS cluster, both subscriptions must have the
Microsoft.ContainerServiceresource provider registered.
-
For static network deployments, you must have port 6443 open between Palette and the workload cluster. Refer to the Network Ports documentation for detailed network architecture diagrams and to learn more about the ports used for communication.
Deploy an Azure AKS Cluster
-
Log in to Palette.
-
Ensure you are in the correct project scope.
-
From the left Main Menu select Clusters > Add New Cluster > Deploy New Cluster.
-
Under Public Clouds, select Azure AKS and click Start Azure AKS Configuration.
-
Fill out the following basic information and click Next.
Field Description Cluster Name A custom name for the cluster. Description Use the description to provide context about the cluster. Tags Assign any desired cluster tags. Tags on a cluster are propagated to the Virtual Machines (VMs) deployed to the target environments. Example: region:us-west.Cloud Account If you have already added your Azure account in Palette, select it from the drop-down Menu. Otherwise, click Add New Account and add your Azure account information. -
Choose between deploying your cluster using individual cluster profiles or a single cluster template.
- Cluster Profiles
- Cluster Templates
-
On the Cluster setup type window, choose Cluster Profiles > Add Cluster Profile.
-
Select the appropriate full or infrastructure cluster profile and Confirm your selection.
-
Review the layers of your cluster profile. Use the drop-down menus to select the appropriate cluster profile version, add necessary add-on profiles, and make changes to YAML configuration files as needed. When finished, select Next.
info- Cluster profile versions linked to cluster templates cannot be used in the cluster profile workflow.
- For ease of reuse and to persist changes across clusters using the same cluster profile, we recommend creating a new version of your cluster profile rather than making inline changes.
-
On the Cluster setup type window, choose Cluster Template > Select Cluster Template.
-
Select the appropriate cluster template and Confirm your selection.
-
Expand the Maintenance policy and Linked profiles panels to review the configuration of your cluster template.
If you need to make any changes, such as swapping your maintenance policy or updating your cluster profile version, you must exit the cluster deployment workflow and modify your cluster template before proceeding. If no changes are needed, select Next.
-
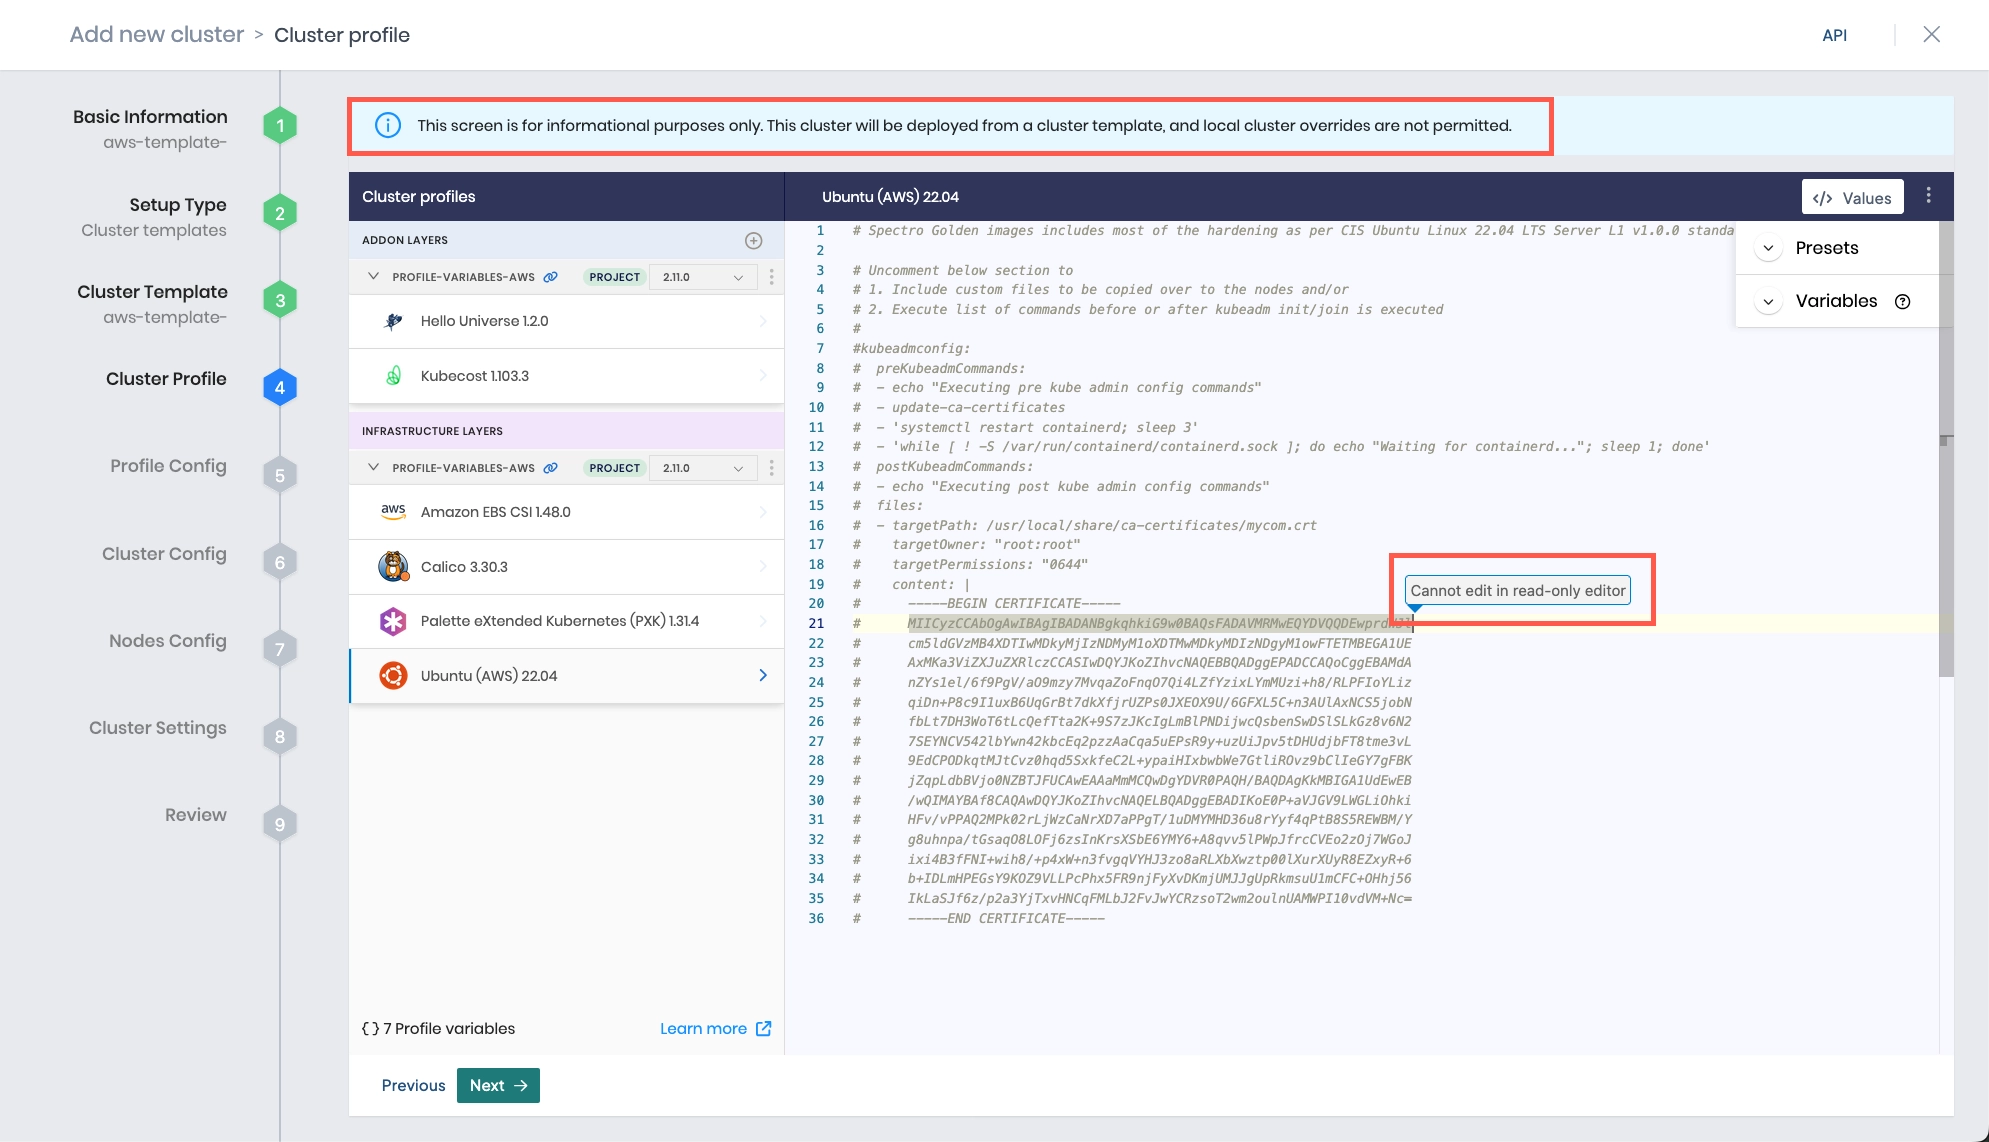
Review the layers of your cluster profile. If no changes are needed, select Next.
warningCluster profile changes, such as modifying your cluster profile version, adding additional add-on profiles, and editing YAML configuration files, are not allowed when deploying a cluster. Once a cluster profile is linked to a cluster template, that version of the cluster profile is locked to prevent configuration drift across clusters. If you need to make changes, you must create a new version of your cluster profile and modify your cluster template to use the new version.
-
Certain features, such as Pod and Service CIDRs, managed identity platforms, and more, require additional modifications to your cluster profile. Expand the appropriate panel for more information.
AKS Add-On Profile
If you want to add a custom AKS add-on profile, populate the following configuration template and add the configuration to your Kubernetes cluster profile layer.
managedControlPlane:
  addonProfiles:
    - name: add-on
      enabled: true
      config:
        mapString: string
Consider the following example configuration for
omsagentfor reference, wherelogAnalyticsWorkspaceResourceIDis the Log Analytics workspace resource ID, in the format/subscriptions/{subscriptionId}/resourceGroups/{resourceGroupName}/providers/Microsoft.OperationalInsights/workspaces/{workspaceName}.managedControlPlane:
addonProfiles:
- name: omsagent
enabled: true
config:
logAnalyticsWorkspaceResourceID: "<log-analytics-workspace-resource-id>"Azure Managed Identity
If you want to use a managed identity, populate the following configuration template and add the configuration to your Kubernetes cluster profile layer.
Replace
providerIDwith your user-assigned identity ID in the format ofazure:///subscriptions/{subscriptionId}/resourceGroups/{resourceGroupName}/providers/Microsoft.ManagedIdentity/userAssignedIdentities/{identityName}.managedControlPlane:
userAssignedIdentities:
- providerID: "<provider-id>"
- providerID: "<provider-id-2>"Microsoft Entra ID
If you want to integrate with Microsoft Entra ID (formerly Azure Active Directory), populate the following configuration template and add the configuration to your Kubernetes cluster profile layer.
managedControlPlane:
  aadProfile:
    managed: true
    adminGroupObjectIDs:
      - <admin-group-object-id>
      - <admin-group-object-id-2>
Additionally, if you want to disable local accounts, add the
disableLocalAccounts: trueentry to your Kubernetes cluster profile layer within themanagedControlPlane.aadProfilesection.managedControlPlane:
aadProfile:
managed: true
adminGroupObjectIDs:
- <admin-group-object-id>
- <admin-group-object-id-2>
disableLocalAccounts: trueOpenID Connect (OIDC)
You can configure custom OpenID Connect (OIDC) for Azure clusters at the Kubernetes layer. Check out the Palette eXtended Kubernetes (PXK) pack additional details for more information.
warningAll OIDC options require you to map a set of users or groups to a Kubernetes RBAC role. To learn how to map a Kubernetes role to users and groups, refer to Create Role Bindings.
Pod and Service CIDR
If you want to configure Pod and Service CIDR, populate the following configuration template and add the configuration to your Kubernetes cluster profile layer.
pack:
  podCIDR: "<pod-cidr>"
  serviceClusterIpRange: "<service-cidr>"
Private DNS Zone
To configure a private DNS zone, update the following configuration in the Kubernetes layer of your cluster profile. Replace the placeholders with your subscription ID, resource group ID, user assigned identity name, and cluster region.
managedControlPlane:
  userAssignedIdentities:
    - providerID: /subscriptions/<subscription-id>/resourceGroups/<identity-resource-group>/providers/Microsoft.ManagedIdentity/userAssignedIdentities/<user-assigned-identity-name>
  apiServerAccessProfile:
    privateDNSZone: /subscriptions/<subscription-id>/resourceGroups/<dns-resource-group>/providers/Microsoft.Network/privateDnsZones/private.<cluster-region>.azmk8s.io
-
The Profile variables configuration window opens if your cluster profile is configured to use cluster profile variables. Fill in the appropriate values, and select Next.
-
Configure your Azure AKS cluster using the following table for reference.
warningIf you enable the Disable Properties setting when registering an Azure cloud account, Palette cannot create network resources on your behalf. In this case, every time you deploy a cluster, you must manually specify its virtual network subnets and security groups.
Parameter Description Subscription Use the drop-down Menu to select the subscription that will be used to access Azure services. Region Use the drop-down Menu to choose the Azure region where you would like to provision the cluster. Resource Group Select the name of the resource group that contains the Azure resources you will be accessing. Storage Account Optionally, if you have a custom storage account available, you can use the drop-down Menu to select the storage account name. For information about use cases for custom storage, review Azure Storage. Storage Container Optionally, if you are using a custom storage container, use the drop-down Menu to select it. For information about use cases for custom storage, review Azure Storage. SSH Key The public SSH key for connecting to the nodes. SSH key pairs must be pre-configured in your Azure environment. Only RSA and ED25519 SSH keys are supported when deploying Azure AKS clusters. The key you select is inserted into the provisioned VMs. For more information, review Microsoft's Supported SSH key formats. Enable Private Cluster Whether the control plane or API server should have internal IP addresses. Refer to the Create a private AKS cluster guide for more information. Static Placement By default, Palette uses dynamic placement. This creates a new VNet for clusters with two subnets in different availability zones. Palette places resources in these clusters, manages the resources, and deletes them when the corresponding cluster is deleted.
If you want to place resources into a pre-existing VNet, enable the Static Placement option and fill out the input values listed in the Static Placement table below.
Select Static Placement for clusters where you want to use your network proxy configurations. To learn more about proxy configurations, check out Proxy Configuration.Static Placement Settings
Each subnet allows you to specify the CIDR range and a security group.
Parameter Description Network Resource Group The logical container for grouping related Azure resources. Virtual Network Select the VNet. CIDR Block Select the IP address CIDR range. Control Plane Subnet Select the control plane subnet. Worker Subnet Select the worker network. -
Click Next to continue.
-
Provide the following node pool and cloud configuration information. To learn more about node pools, review the Node Pool guide.
System Node Pool
To deploy an AKS cluster, you need to have at least one system node pool, which will manage the pods necessary to deploy a Kubernetes cluster, like the control plane and etcd. To add a system node pool, add a worker node pool and select the System Node Pool checkbox.
infoA system pool must have at least one node for development purposes. We recommend having between one and three nodes for high availability in production environments. You can configure a static node count with the Number of nodes in the pool parameter or a dynamic node count with the Enable Autoscaler parameter.
The following table describes how to configure a system node pool.
Parameter Description Node pool name A descriptive name for the node pool. Enable Autoscaler Scale the worker pool horizontally based on its per-node workload counts. The Minimum size specifies the lower bound of nodes in the pool, and the Maximum size specifies the upper bound. Setting both parameters to the same value results in a static node count. Refer to the Azure AKS autoscaler documentation for more information on autoscaling. System Node Pool Sets the pool to be a system node pool. Number of nodes in the pool A statically defined number of nodes in the system pool. This field is hidden if Enable Autoscaler is toggled on. Additional Labels Optional node labels in the key-value format. To learn more, review Node Labels. Example: environment:production.System Node Pool Cloud Configuration
The following table describes how to configure the Azure Cloud for a system node pool.
Parameter Description Instance Type Select the instance type to use for all nodes in the system node pool. Managed disk Choose a storage option. For more information, refer to Microsoft's Storage Account Overview reference. For information about Solid State Drive (SSD) disks, refer to Standard SSD Disks for Azure Virtual Machine Workloads reference. Disk size You can choose disk size based on your requirements. The default size is 60. Worker Node Pool
The following table describes how to configure a worker node pool.
Parameter Description Node pool name A descriptive name for the node pool. Enable Autoscaler Whether Palette should scale the pool horizontally based on its per-node workload counts. If enabled, instead of the Number of nodes in the pool parameter, you will have to configure the Minimum size and Maximum size parameters, which will allow AKS to adjust the node pool size based on the workload. You can set the node count to a minimum of zero and a maximum of 1000. Setting both parameters to the same value results in a static node count. System Node Pool Sets the pool to be a system node pool. Number of nodes in the pool A statically defined number of nodes in the system pool. Additional Labels Optional node labels in the key-value format. To learn more, review Node Labels. Example: environment:production.Additional Annotations (Optional) Additional Kubernetes annotations to assign to each worker node. Override Kubeadm Configuration Adjust kubelet arguments for kubeadm or pre-kubeadm commands to meet specific operational or environment requirements for your worker nodes. This option is disabled by default. When enabled, the Configure Kubeadm button appears. Configure Kubeadm Available only when Override Kubeadm Configuration is enabled. Select this option to override kubeadmconfig.kubeletExtraArgsandkubeadmconfig.preKubeadmConfigcommands configured in the Kubernetes layer of your cluster profile. Any changes made post-cluster deployment will trigger a cluster repave.Taints You can apply optional taint labels to a worker node pool. Review the Node Pool and Taints and Tolerations guides to learn more.
Toggle the Taint button to create a taint label. When tainting is enabled, you need to provide a custom key-value pair. Use the drop-down Menu to choose one of the following Effect options:
- NoSchedule—Pods are not scheduled onto nodes with this taint.
- PreferNoSchedule—Kubernetes attempts to avoid scheduling pods onto nodes with this taint, but scheduling is not prohibited.
- NoExecute — New pods that do not tolerate the taint will not be scheduled on the node, and existing pods on the node, if any, will be evicted if they do not tolerate the taint.Worker Node Pool Cloud Configuration
The following table describes how to configure the Azure Cloud for a worker node pool.
Parameter Description Instance Type Select the instance type to use for all nodes in the worker node pool. You must allocate at least 2 vCPUs and 4 GB RAM across all worker nodes. OS Type Select the Operating System (OS) for the worker nodes, either Linux or Windows. This option is not available for system node pools as they can only be deployed on Linux. Refer to System and user node pools in the Azure documentation for further details. Managed disk Choose a storage option. For more information, refer to Microsoft's Storage Account Overview reference. For information about Solid State Drive (SSD) disks, refer to Standard SSD Disks for Azure Virtual Machine Workloads reference. Disk size You can choose disk size based on your requirements. The default size is 60. -
Click Next to continue.
-
On the Cluster Settings page, configure additional options as needed. If you are deploying your cluster using cluster templates, a Cluster Timezone is required.
Left Menu Item Additional Information Cluster Timezone Specify the time zone where your cluster is being deployed. The time zone is used in maintenance policies to determine when updates are rolled out to clusters deployed with cluster templates. Manage machines Set an OS patching schedule and specify node behavior when creating your cluster, including upgrading your nodes to use the latest OS patch version and allowing reboots. Schedule scans Enable any scan options you want Palette to perform and select a scan schedule. Palette supports Kubernetes configuration security, penetration testing, and conformance testing. Refer to Compliance Scan for details on each scan type. Schedule backups Schedule backups for your entire cluster or etcd. Refer to Backup and Restore for more information. RBAC Map a set of users or groups to a Kubernetes RBAC role. This is required when custom OIDC is configured. Refer to the following guides for more information:
- Create Role Bindings
- Palette eXtended Kubernetes (PXK) -
Select Validate to review your cluster configurations and settings.
-
If no changes are needed, select Finish Configuration to deploy your cluster.
To monitor the status of your cluster deployment, from the left main menu, select Clusters and choose your cluster. The cluster Overview tab displays the status and health of your cluster, as well as deployment details. Use the Events tab to monitor the deployment in real time. Provisioning may take several minutes.
To learn how to remove a cluster and what to do if a force delete is necessary so you do not incur unexpected costs, refer to Cluster Removal.
Validate
-
Log in to Palette.
-
Ensure you are in the correct project scope.
-
From the left Main Menu, select Clusters. The Clusters page lists all available clusters that Palette manages.
-
Select the Azure AKS cluster you deployed to review its details. Ensure the Cluster Status field displays the value Running.