Deploy an IPv6 EKS Cluster
Palette supports deploying Amazon EKS clusters that use the IPv6 IP address family. In an IPv6 EKS cluster, pods and services receive IPv6 addresses only. Worker nodes run in subnets that have both IPv4 and IPv6 Classless Inter-Domain Routing (CIDR) blocks, which allows pods to reach IPv4 endpoints outside the cluster. Refer to Learn about IPv6 addresses to clusters, Pods, and services in the AWS documentation for details on how Amazon EKS implements the IPv6 IP address family.
Palette does not provide a dedicated IP address family setting when you create an EKS cluster. Instead, you enable IPv6 through pack values in your cluster profile and a Cluster API (CAPI) override during cluster creation. This guide describes the required configuration and the order in which to apply it.
Limitations
-
You select the IP address family when you create the cluster. Amazon EKS does not allow you to change the IP address family of an existing cluster, so you cannot convert an IPv4 EKS cluster to IPv6.
-
Amazon EKS does not support dual-stack pods or services. Pods and services in an IPv6 EKS cluster cannot have both an IPv4 and an IPv6 address.
-
Amazon EKS assigns the IPv6 service CIDR when it creates the cluster. You cannot choose the service CIDR in advance. For this reason, you deploy the cluster with a placeholder value and update the service CIDR after the cluster is created.
-
Do not enable Override Cluster API node pool configuration (Optional) on any node pool until you have updated the service CIDR. Node pools that use a CAPI override are bootstrapped with the service CIDR from the cluster profile. If the placeholder value is still in place, the nodes receive an incorrect service CIDR.
-
Do not set
instanceMetadataOptions.httpProtocolIpv6toenabledin a node pool CAPI override. This setting causes the node pool to be repaved repeatedly. -
Many services outside the cluster, such as some container image registries, are reachable over IPv4 only. Ensure that the subnets of your worker nodes have an IPv4 route to the services that your workloads and Palette depend on, for example, through a Network Address Translation (NAT) gateway.
Prerequisites
-
All prerequisites listed in the Create and Manage AWS EKS Cluster guide.
-
An existing Virtual Private Cloud (VPC) that has both an IPv4 and an IPv6 CIDR block, with subnets in at least two Availability Zones. The Enable auto-assign IPv6 address setting must be enabled on the private subnets that host the worker nodes. Refer to Learn about IPv6 addresses to clusters, Pods, and services in the AWS documentation for the complete list of AWS requirements and considerations, such as supported instance types.
-
An Identity and Access Management (IAM) policy for the Amazon VPC Container Network Interface (CNI) plugin that allows it to assign IPv6 addresses. AWS does not provide a managed policy for the IPv6 IP address family, so you must create the policy in the AWS account where you deploy the cluster. This guide uses the policy name
AmazonEKS_CNI_IPv6_Policy. Refer to Configure Amazon VPC CNI plugin to use IRSA in the AWS documentation for the policy contents and the command to create it.
-
A cluster profile for AWS EKS that contains the following packs. Refer to Create an Infrastructure Profile for guidance on creating a cluster profile.
-
The AWS CLI installed and configured with credentials for the AWS account that hosts the cluster. The credentials need the
eks:DescribeClusterpermission. -
kubectl installed to validate the cluster.
Configure the Cluster Profile
The Kubernetes, network, and storage layers of your cluster profile need additional values for IPv6. The network and storage layers use IAM Roles for Service Accounts (IRSA) to obtain their AWS permissions.
-
Log in to Palette.
-
Ensure you are in the correct project scope.
-
From the left main menu, select Profiles, and then select your AWS EKS cluster profile.
-
Select the Kubernetes layer of the cluster profile.
-
Use the YAML editor to set the service CIDR to a placeholder IPv6 CIDR. Amazon EKS assigns the actual service CIDR when it creates the cluster, and you replace the placeholder in the Update the Service CIDR section.
pack:
serviceClusterIpRange: "ff00:ff00:ff00::/108" -
In the same layer, add the following IRSA roles under
managedControlPlane. Palette creates one IAM role for the Amazon VPC CNI plugin and one for the Amazon Elastic Block Store (EBS) Container Storage Interface (CSI) driver when it deploys the cluster.managedControlPlane:
irsaRoles:
- name: "{{.spectro.system.cluster.name}}-irsa-vpc-cni"
policies:
- arn:aws:iam::<aws-account-id>:policy/AmazonEKS_CNI_IPv6_Policy
serviceAccount:
name: aws-node
namespace: kube-system
- name: "{{.spectro.system.cluster.name}}-irsa-ebs-csi"
policies:
- arn:aws:iam::aws:policy/AmazonEBSCSIDriverPolicyV2
serviceAccount:
name: ebs-csi-controller-sa
namespace: kube-systemReplace
<aws-account-id>with the ID of the AWS account where you created theAmazonEKS_CNI_IPv6_Policypolicy. -
Select Confirm Updates.
-
Select the Network layer of the cluster profile, which contains the AWS VPC CNI (Helm) pack.
-
Use the YAML editor to enable IPv6 and prefix delegation, disable IPv4, and annotate the service account of the plugin with the IRSA role.
charts:
  aws-vpc-cni:
    init:
      env:
        ENABLE_IPv6: "true"
    nodeAgent:
      enableIpv6: "true"
    env:
      ENABLE_PREFIX_DELEGATION: "true"
      ENABLE_IPv4: "false"
      ENABLE_IPv6: "true"
    serviceAccount:
      annotations:
        eks.amazonaws.com/role-arn: "arn:aws:iam::<aws-account-id>:role/{{.spectro.system.cluster.name}}-irsa-vpc-cni"
Replace
<aws-account-id>with the ID of the AWS account where you deploy the cluster. -
Select Confirm Updates.
-
Select the Storage layer of the cluster profile, which contains the Amazon EBS CSI pack.
-
Use the YAML editor to annotate the service account of the EBS CSI controller with the IRSA role.
charts:
  aws-ebs-csi-driver:
    controller:
      serviceAccount:
        annotations:
          eks.amazonaws.com/role-arn: "arn:aws:iam::<aws-account-id>:role/{{.spectro.system.cluster.name}}-irsa-ebs-csi"
Replace
<aws-account-id>with the ID of the AWS account where you deploy the cluster. -
Select Confirm Updates, and then select Save Changes on the cluster profile page.
Deploy the Cluster
-
Log in to Palette.
-
Ensure you are in the correct project scope.
-
From the left main menu, select Clusters, and then select Add New Cluster.
-
In Public Clouds, under Managed Kubernetes, select AWS EKS.
-
In the bottom-right corner, select Start AWS EKS Configuration.
-
Enter a Cluster Name, select your AWS Cloud Account, and select Next.
-
Choose between deploying your cluster using individual cluster profiles or a single cluster template.
- Cluster Profiles
- Cluster Templates
-
In the Cluster setup type window, choose Cluster Profiles > Add Cluster Profile.
-
Select the appropriate full or infrastructure cluster profile and Confirm your selection.
-
Review the layers of your cluster profile. Use the drop-down menus to select the appropriate cluster profile version, add necessary add-on profiles, and make changes to YAML configuration files as needed. When finished, select Next.
info- Cluster profile versions linked to cluster templates cannot be used in the cluster profile workflow.
- For ease of reuse and to persist changes across clusters using the same cluster profile, we recommend creating a new version of your cluster profile rather than making inline changes.
-
In the Cluster setup type window, choose Cluster Template > Select Cluster Template.
-
Select the appropriate cluster template and Confirm your selection.
-
Expand the Maintenance policy and Linked profiles panels to review the configuration of your cluster template.
If you need to make any changes, such as swapping your maintenance policy or updating your cluster profile version, you must exit the cluster deployment workflow and modify your cluster template before proceeding. If no changes are needed, select Next.
-
Review the layers of your cluster profile. If no changes are needed, select Next.
warningCluster profile changes, such as modifying your cluster profile version, adding additional add-on profiles, and editing YAML configuration files, are not allowed when deploying a cluster. Once a cluster profile is linked to a cluster template, that version of the cluster profile is locked to prevent configuration drift across clusters. If you need to make changes, you must create a new version of your cluster profile and modify your cluster template to use the new version.
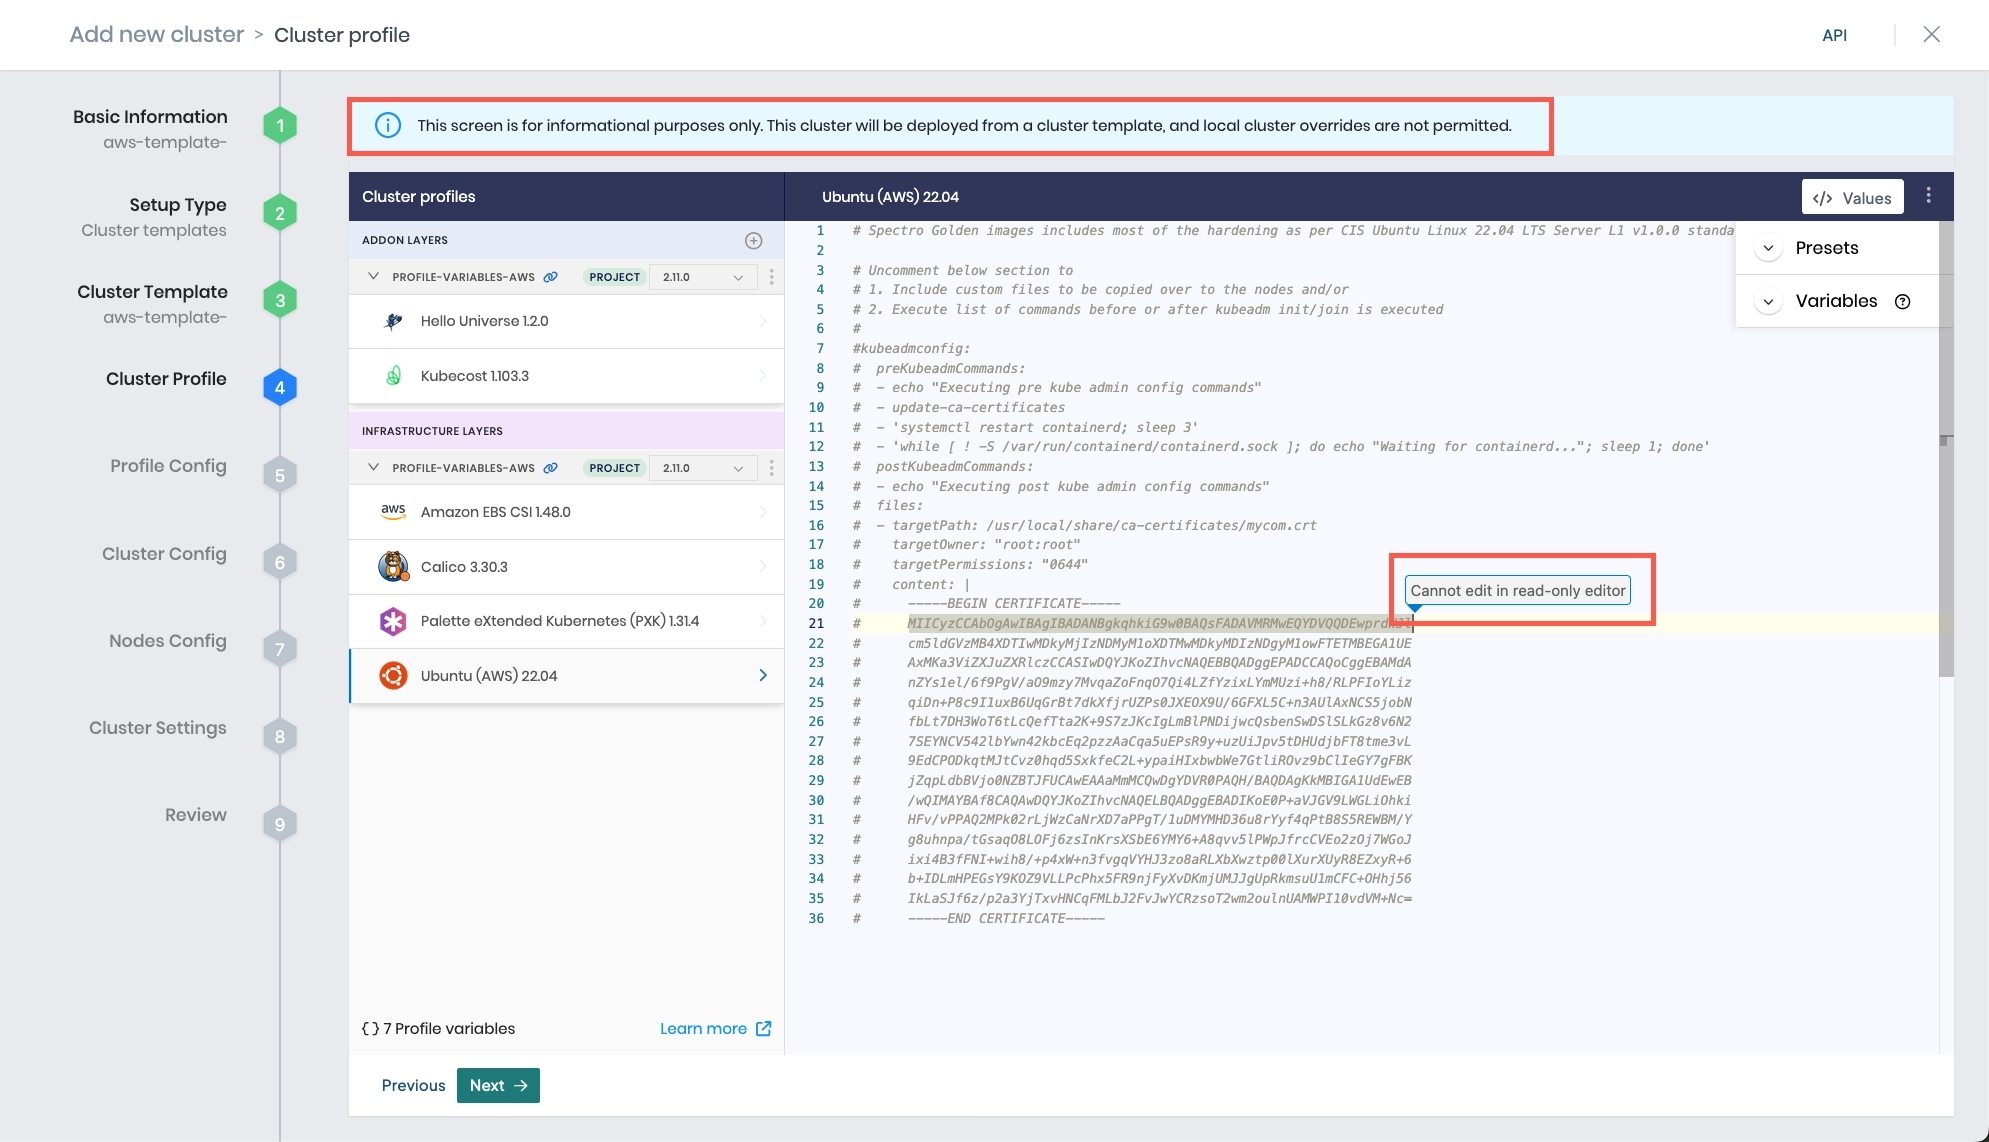
- Select the cluster profile that you configured in the Configure the Cluster Profile section.
-
The Profile variables configuration window opens if your cluster profile is configured to use cluster profile variables. Fill in the appropriate values, and select Next.
-
In the Cluster Config step, select the Region, select Enable static placement (Optional), and then choose the VPC and subnets that meet the IPv6 prerequisites.
-
Enable Override Cluster API cluster configuration, and then select Update Cluster API cluster configuration.
-
Enter the following override in the YAML editor to set the IP address family of the cluster to IPv6.
awsManagedControlPlane:
  spec:
    network:
      vpc:
ipv6: {} -
Complete the remaining fields in the Cluster Config step, and select Next. Refer to Deploy an AWS EKS Cluster for a description of each field.
-
In the Nodes Config step, configure one worker node pool, and leave Override Cluster API node pool configuration (Optional) disabled. Refer to Deploy an AWS EKS Cluster for a description of each field. Select Next.
-
On the Cluster Settings page, configure additional options as needed. If you are deploying your cluster using cluster templates, a Cluster Timezone is required.
Left Menu Item Additional Information Cluster Timezone Specify the time zone where your cluster is being deployed. The time zone is used in maintenance policies to determine when updates are rolled out to clusters deployed with cluster templates. Lock Profile Updates (Edge Native clusters only) Hold cluster profile updates on the Edge hosts until an operator at the device releases them in Local UI. Refer to Lock Profile Updates for more information. Manage machines Set an OS patching schedule and specify nodes behavior when creating your cluster, including upgrading your nodes to use the latest OS patch version and allowing reboots. Schedule scans Enable any scan options you want Palette to perform and select a scan schedule. Palette supports Kubernetes configuration security, penetration testing, and conformance testing. Refer to Compliance Scan for details on each scan type. Schedule backups Schedule backups for your entire cluster or etcd. Refer to Backup and Restore for more information. RBAC Map a set of users or groups to a Kubernetes Role-Based Access Control (RBAC) role. This is required when custom OpenID Connect (OIDC) is configured. Refer to the following guides for more information:
- Create Role Bindings
- Palette eXtended Kubernetes (PXK)Location Specify the location of your cluster by entering the address in the search bar and selecting one of the options in the drop-down. For example, London, Greater London, England, United Kingdom. This is used for display purposes and does not impact cluster functionality. -
Select Validate to review your cluster configurations and settings.
-
If no changes are needed, select Finish Configuration to deploy your cluster.
-
From the left main menu, select Clusters, and then select your cluster. Wait until the Cluster Status field displays Running.
Update the Service CIDR
After Amazon EKS creates the cluster, replace the placeholder service CIDR in the Kubernetes layer with the service CIDR that Amazon EKS assigned. The service CIDR is specific to each cluster.
-
Use the AWS CLI to retrieve the IPv6 service CIDR of the cluster.
aws eks describe-cluster --name <eks-cluster-name> --region <region> --query "cluster.kubernetesNetworkConfig.serviceIpv6Cidr" --output textReplace
<eks-cluster-name>with the name of the cluster in the Amazon EKS console and<region>with the AWS region of the cluster. -
Update the
pack.serviceClusterIpRangevalue in the Kubernetes layer with the CIDR that the command returned, and apply the change to the cluster. Refer to Update a Cluster for the available methods to apply a cluster profile change to an active cluster.pack:
serviceClusterIpRange: "<ipv6-service-cidr>"Replace
<ipv6-service-cidr>with the IPv6 service CIDR of the cluster. -
Wait a few minutes for Palette to apply the change to the cluster.
-
(Optional) If you need node pools that use a CAPI override, add them now, or edit the existing node pool. Before you override
awsLaunchTemplate, select Enable Nodepool Customization (Optional) on the node pool. Refer to Node Pool Launch Template for details.The following example raises the Instance Metadata Service version 2 (IMDSv2) hop limit to
2for the nodes of the pool.awsManagedMachinePool:
spec:
awsLaunchTemplate:
ami:
eksLookupType: AmazonLinux2023
instanceMetadataOptions:
httpTokens: required
httpPutResponseHopLimit: 2
Validate
Use the following steps to confirm that the cluster uses the IPv6 IP address family. The kubectl steps require access
to the cluster. Refer to Access EKS Cluster to obtain the kubeconfig file, and then set
the KUBECONFIG environment variable.
export KUBECONFIG=<path-to-kubeconfig>
Replace <path-to-kubeconfig> with the path to the kubeconfig file of the cluster.
-
Use the AWS CLI to check the IP address family of the cluster. The command returns
ipv6.aws eks describe-cluster --name <eks-cluster-name> --region <region> --query "cluster.kubernetesNetworkConfig.ipFamily" --output textReplace
<eks-cluster-name>with the name of the cluster in the Amazon EKS console and<region>with the AWS region of the cluster. -
List the pods in the cluster, and verify that the
IPcolumn contains IPv6 addresses.kubectl get pods --all-namespaces --output wide -
Check the IP address family of the
kubernetesservice. The command returns["IPv6"].kubectl get service kubernetes --namespace default --output jsonpath='{.spec.ipFamilies}'
Next Steps
Now that your IPv6 EKS cluster is deployed, refer to Create and Manage AWS EKS Cluster to learn how to access the cluster and update its endpoint access. To customize the cluster further, refer to Override Cluster API (CAPI) Properties. To manage the cluster after deployment, refer to the Cluster Management guides.