Configure OIDC for a Virtual Cluster
Enabling OpenID Connect (OIDC) Identity Provider (IDP) for Palette Virtual Clusters offers several benefits. First, it enables single sign-on, allowing you to log in once and access multiple virtual clusters without the need for separate authentication. Second, it facilitates centralized user management, making it easier to manage user accounts, permissions, and access control in a single location. Finally, OIDC integration allows for seamless integration with third-party identity providers, ensuring consistent authentication and authorization across the infrastructure. Overall, enabling OIDC enhances security, simplifies user management, and provides a seamless authentication experience for users accessing virtual clusters.
Prerequisites
-
A healthy host cluster that you will use to create a cluster group.
-
A cluster group. Review Create and Manage Cluster Groups for guidance.
We recommend configuring a cluster group with OIDC before you create virtual clusters. This will ensure that OIDC information from the cluster group configuration is properly inserted in the kubeconfig file that is generated for the virtual cluster.
-
The OIDC issuer URL, OIDC client ID, and OIDC secret. You can obtain this information from your identity provider.
-
At a minimum, the
cluster.adminKubeconfigDownloadpermission to access the generated kubeconfig. For more information, check out Kubeconfig files. If you are deploying virtual clusters, you need theclusterGroup.updatepermission. -
kubelogin installed. This is a kubectl plugin for Kubernetes OIDC authentication, also known as
kubectl oidc-login.
Configure OIDC
-
Log in to Palette as a tenant admin.
-
Navigate to the left Main Menu and click on Cluster Groups.
If a cluster group does not exist, you will need to create a host cluster and then create the cluster group. Refer to Create and Manage Cluster Groups for guidance.
-
Select the cluster group to which you will deploy a virtual cluster.
-
In the Host Clusters tab that displays on the next page, click on Settings.
-
In the slide panel that opens, select the Settings option. The cluster group YAML file displays.
-
Locate the
vcluster.extraArgsparameter section of the cluster group configuration file and uncomment the lines shown in the example.
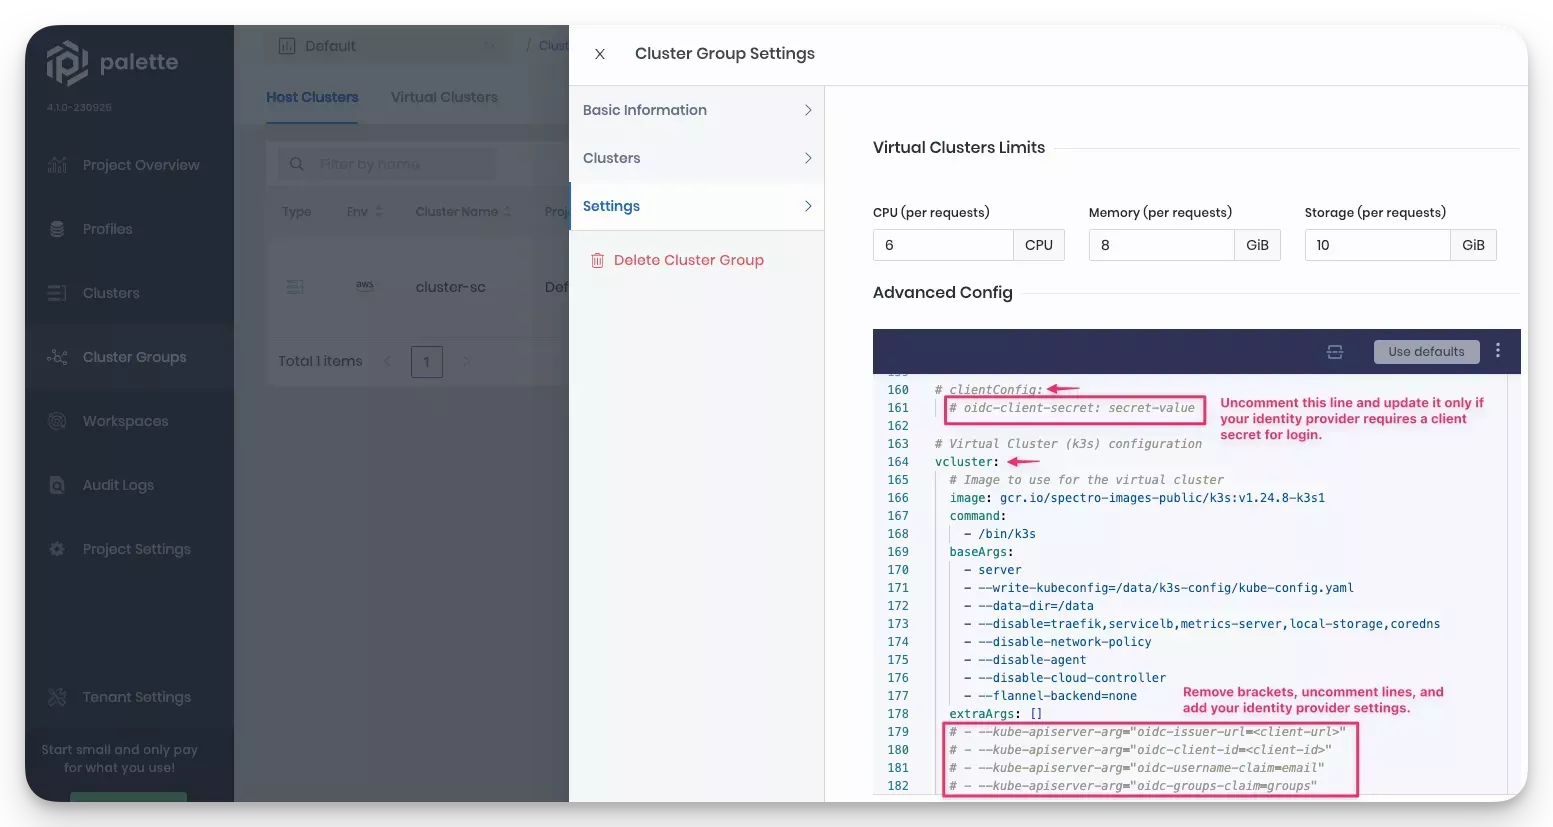
-
Update the
vcluster.extraArgssection with your identity provider information.vcluster:
extraArgs:
- --kube-apiserver-arg=”oidc-issuer-url=<client-url>"
- --kube-apiserver-arg="oidc-client-id=<client-id>"
- --kube-apiserver-arg="oidc-username-claim=email"
- --kube-apiserver-arg="oidc-groups-claim=groups" -
If your identity provider requires a client secret, uncomment the
oidc-client-secretparameter in theclientConfigsection of cluster group YAML file, and add the client secret.clientConfig:
oidc-client-secret: secret-value -
From the User Menu, switch to App Mode. From the left Main Menu, click on Virtual Clusters.
-
Deploy a virtual cluster to the cluster group that you configured with OIDC. For steps, review the Deploy a Virtual Cluster guide.
If the cluster group is part of a project, you can deploy a virtual cluster in Cluster Mode. From the Main Menu, click on Cluster Groups and select the Virtual Clusters tab.
When the virtual cluster is finished deploying and in Running state, a kubeconfig file is generated that contains OIDC information inserted into it from the cluster group configuration.
- Use the Kubeconfig link that displays on the virtual clusters overview page to download the kubeconfig file. This will give you access to the Kubernetes cluster.
From the User Menu, switch to App Mode, click on Virtual Clusters and select the virtual cluster. In Cluster Mode navigate to the Main Menu, click on Cluster Groups, select the Virtual Clusters tab, and select the virtual cluster.
- Create the proper Kubernetes roles and roleBindings required to map the OIDC users with a Kubernetes role. Refer to the Create Role Bindings for additional guidance.
Configuring OIDC requires you to map a set of users or groups to a Kubernetes RBAC role. To learn how to map a Kubernetes role to users and groups, refer to Create Role Bindings. Refer to the Palette eXtended Kubernetes (PXK) pack additional details for an example.
Validate
-
Log in to Palette as a tenant admin.
-
Navigate to your virtual clusters. In Cluster Mode, if the cluster group is part of a project, navigate to the left Main Menu, click on Cluster Groups and select the Virtual Clusters tab. Alternatively, you can switch to App Mode from the User Menu and select Virtual Clusters.
-
Select the virtual cluster you deployed to the cluster group that has OIDC configured.
-
Use the Kubeconfig link to download the kubeconfig file, and ensure you can connect to the cluster. Refer to the Kubectl guide for detailed steps.