Customize Local UI Theme
Palette offers the option to customize the Local UI web interface. You can change the color of the sidebar as well as using your own logo. You can do this before deployment during the EdgeForge process to standardize the look feel of the console for all Edge hosts of your organization.
Prerequisites
-
The theme customization process prior to deployment is based on the EdgeForge process. We recommend that you familiarize yourself with EdgeForge and the process to build Edge artifacts.
-
A physical or virtual Linux machine with AMD64 (also known as x86_64) processor architecture to build the Edge artifacts. You can issue the following command in the terminal to check your processor architecture.
uname -m -
Minimum hardware configuration of the Linux machine:
- 4 CPU
- 8 GB memory
- 50 GB storage
-
Git. You can ensure git installation by issuing the
git --versioncommand. -
Docker Engine version 18.09.x or later. You can use the
docker --versioncommand to view the existing Docker version. You should have root-level orsudoprivileges on your Linux machine to create privileged containers. -
A Spectro Cloud account. If you have not signed up, you can sign up for an account here.
-
Palette registration token for pairing Edge hosts with Palette. You will need tenant admin access to Palette to generate a new registration token. For detailed instructions, refer to the Create Registration Token guide.
Customize theme during EdgeForge
-
Clone the
CanvOSrepository.git clone https://github.com/spectrocloud/CanvOS.git -
Change into the
CanvOSdirectory.cd CanvOS -
Create a directory called
local-uiat the pathCanvOS/local-ui. Then under thelocal-uidirectory, create a directory namedui. You can issue the following command to create both directories.mkdir -p local-ui/ui -
In the
uidirectory, create a file namedcustomizations.json. This is the same file you can use to add custom links to your sidebar. If the file is already present, there is no need to create a new one. For more information, refer to Add Custom Links to Local UI. -
Upload a logo you'd like to use for Local UI to the
uidirectory. All file types are allowed. We recommend you limit the height of the logo image to between 64 pixels and 120 pixels. If you don't upload a logo, Local UI will use the Spectro Cloud logo. -
Populate the file with the following schema:
{
  "colors": {
    "brand": "#4A8FF1",
    "sidebar": "#2B323C"
  },
  "logo": "logo.webp"
}
The
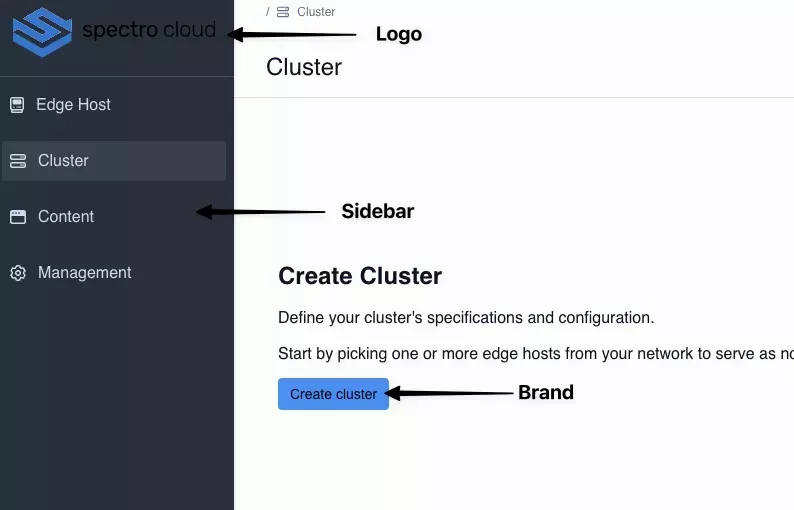
colors.sidebarproperty controls the color of the sidebar. This is also the color of the background in the Local UI login screen. We suggest you choose a color that contrasts well against your logo as the logo as the color will serve as the background for your logo. The brand color controls the color of buttons and checkboxes in the UI. The following image displays the default logo, brand, and sidebar color.
-
Compress the UI directory to a TAR file. The file must be named
local-ui.tar.tar cvf local-ui.tar local-ui -
Follow the Build Edge Artifacts guide from step 3 onward to finish the EdgeForge process.
Validate
-
Use the ISO you produced to install Palette Edge on an Edge device.
-
Power up the device and follow Access Local UI to access the Edge management console.
-
Verify that the customizations you made are reflected in the user interface.