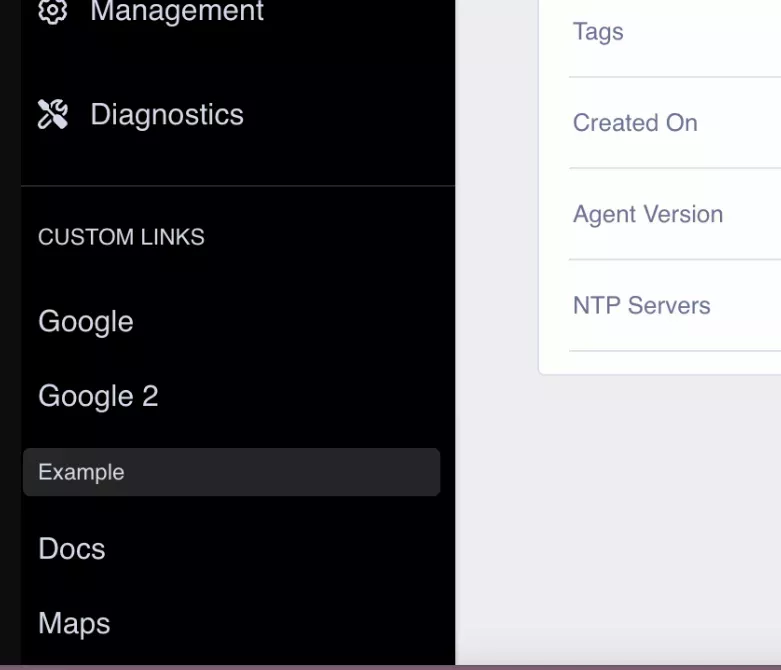
Add Custom Links to Sidebar
Palette allows you to add custom links to the sidebar of Local UI. These links allow you to integrate your own web applications with Local UI. When you click on a custom link, it can either open the page within the Local UI interface or open a new tab in your browser depending on how to configure the links.
Prerequisites
-
The process to add custom links prior to deployment is based on the EdgeForge process. We recommend that you familiarize yourself with EdgeForge and the process to build Edge artifacts.
-
A physical or virtual Linux machine with AMD64 (also known as x86_64) processor architecture to build the Edge artifacts. You can issue the following command in the terminal to check your processor architecture.
uname -m -
Minimum hardware configuration of the Linux machine:
- 4 CPU
- 8 GB memory
- 150 GB storage
-
Git. You can ensure git installation by issuing the
git --versioncommand. -
Docker Engine version 18.09.x or later. You can use the
docker --versioncommand to view the existing Docker version. You should have root-level orsudoprivileges on your Linux machine to create privileged containers. -
A Spectro Cloud account. If you have not signed up, you can sign up for an account here.
Customize theme during EdgeForge
-
Clone the
CanvOSrepository.git clone https://github.com/spectrocloud/CanvOS.git -
Change into the
CanvOSdirectory.cd CanvOS -
View the available tags and use the latest available tag. This guide uses
v4.4.0as an example.git tag
git checkout v4.4.0 -
Create a directory called
local-uiat the pathCanvOS/local-ui. Then, under thelocal-uidirectory, create a directory namedui. You can issue the following command to create both directories.mkdir -p local-ui/ui -
In the
CanvOS/local-ui/uidirectory, create a file namedcustomizations.json. This is the same file where you customize the Local UI theme. If the file is already present, there is no need to create a new one. For more information about customizing the Local UI theme, refer to Customize Local UI Theme. -
If you want Local UI to host static web pages that you want your users to be able to access from the sidebar, create another folder for your website under the
local-uifolder and put all assets for your web pages in that folder.Choose a name that describes the web pages. For example, if your website has content related to an application, you can name the folder
appand create the folder atlocal-ui/app.The HTML files may link to JavaScript and CSS files. Ensure that your HTML file can reference its assets. The hosted static sites are exposed through HTTPS with a self-signed certificate.
For example, you can put the following content inside the
local-uifolder.|-local-ui
|--ui
|--customizations.json
|--app
|--index.html
|--index.js
|--index.cssWhen using a URL to locate the local webpage, you can treat the
local-uifolder as the root folder and you must use absolute paths to locate your assets. For example, fromcustomizations.json, you can locate the HTML file in the example with/app/index.html. -
Populate the file with the following schema. Each link requires one object with the
labelandurlproperties.{
"links": [
{
"label": "Google",
"url": "https://www.google.com",
"type": "iframe"
},
{
"label": "Google 2",
"url": "https://www.google.com"
},
{
"label": "Docs",
"url": "https://docs.google.com",
"group": "Example"
},
{
"label": "Maps",
"url": "/app/index.html",
"group": "Example"
}
]
}Link objects with
"type": "iframe"means the link will open within the Local UI interface in an iframe. Link objects without"type": "iframe"will open a new tab instead.warningSome websites and domains cannot be embedded as iframes due to security. Confirm whether the sites can be loaded through iframes first. If they cannot be loaded as iframes, do not use the
type: iframeproperty. -
You can add a group attribute to each link. Links sharing the same group are grouped together in the side bar.

-
Ensure you include all the links you want to add to the sidebar before proceeding. You cannot add new links to the sidebar without rebuilding the installer ISO.
-
Archive the
local-uidirectory to a TAR file. The file must be namedlocal-ui.tarand must be placed at the root directory ofCanvOS.tar cvf local-ui.tar local-ui -
Follow the Build Edge Artifacts guide from step onward to finish the EdgeForge process. As long as the
local-ui.tarfile is at the root directory ofCanvOS, the custom links will be added to the sidebar when you log in to Local UI.
Validate
-
Use the ISO you produced to install Palette Edge on an Edge device.
-
Power up the device and follow Access Local UI to access the Edge management console.
-
Verify that the custom links you added are reflected in the sidebar.