Prepare User Data and Argument Files
The EdgeForge process requires two configuration files. The .arg file and the user-data file. Each is responsible
for a different aspect of the EdgeForge process. The .arg file configures the build process itself as well as its
output, while the user-data file configures the Edge installer ISO. The following table briefly summarizes the
differences between the two files.
| Aspect | .arg File | user-data File |
|---|---|---|
| Purpose | Configures the build process of the Edge Installer ISO and provider images. | Configures the installation and the immediate post-installation environment of the Edge host. |
| When It's Applied | During Edge artifact generation (before deployment). | During actual Edge host installation (after ISO boot). |
| Format | Key-value pairs. | YAML in cloud-init format |
| Main Contents | Image architecture, OS/K8s versions, image registry information, secure boot settings, etc. | Site information, proxy settings, network interfaces, cloud-init stages, tags, registration tokens. |
| Focus | Artifact generation and packaging. | System initialization and registration. |
| Controls | What gets built and how. For example, FIPS, SELinux, installer ISO name. | How the Edge host behaves post-install. For example, network config, certs, power off behavior. |
Since the .arg file controls the build process, you must ensure you provide the correct settings during build. If you
provide the wrong arguments or miss any arguments, you will need to restart the build process to make changes. With
user-data, you have an additional opportunity to provide site-specific configuration during site deployment. This can
replace, supplement, or override the installer configuration you provide to the installer ISO. For more information,
refer to Apply Site User Data.
After installation, you can also use Local UI to make edits to the user data file before you create a cluster. Refer to Edit User Data for more information.
This article guides you through several important parameters in the .arg file and configuration blocks in the
user-data file. However, you can use many additional parameters to further customize your installation. Review the
Edge Artifact Build Configurations and
Installer Reference resource to learn more about all the supported
configuration parameters you can use in the configuration user data.
The Appliance Studio is a Tech Preview feature and is
subject to change. For production workloads, create the .arg and user-data files manually.
Limitations
-
Appliance Studio validates the schema of your
.argfile anduser-data, but it does not validate the value in each individual fields. Ensure that you input a valid value for each field to avoid creating invalid.arganduser-datafiles. -
The
install.extra-dirs-rootfsparameter is not available in Appliance Studio. If you need to use this parameter, you need to either create the file manually, or add the parameter manually after downloading theuser-datafile from Appliance Studio.
Prerequisites
- Manual File Creation
- Appliance Studio
- Git. You can ensure git installation by issuing the
git --versioncommand.
- A deployed instance of Appliance Studio. Refer to Deploy Appliance Studio to learn how to deploy Appliance Studio.
Procedure
- Manual File Creation
- Appliance Studio
-
Clone the CanvOS repository.
git clone https://github.com/spectrocloud/CanvOS.gitFrom the CanvOS directory, copy the user-data.template file and name the copy user-data. This is a template that you can use as a starting point to build your own user data file.
-
View the available git tag.
git tag -
Check out the latest available tag. This guide uses the tag v4.6.21 as an example.
git checkout v4.6.21Prepare .arg File
-
Specify the system architecture and OS distribution and version. These configurations will apply to both the OS of your Edge host before and after cluster formation.
-
Specify the Kubernetes distribution and version. The Kubernetes distribution is used together with the OS distribution and version to create an immutable provider image that has your specified OS and Kubernetes.
If you want to build multiple versions of a provider image with different Kubernetes versions, use the
k8s_version.jsonfile in the repository. You must leave theK8s_VERSIONempty if you want to use the JSON file because it is only used whenK8s_VERSIONis not detected as an argument. -
Specify the image registry, image repository name, and image tag that will be used to tag your provider images. The custom tag, together with the Palette agent version (the same number as the Git tag you are using), the version and distribution of Kubernetes and the OS used by the image forms the tag of the image.
For example, if your
.argfile contains the following arguments, the full image reference would bettl.sh/ubuntu:k3s-1.32.1-v4.6.21-demo.IMAGE_REGISTRY=ttl.sh
IMAGE_REPO=ubuntu
CUSTOM_TAG=demo
K8S_DISTRIBUTION=k3s
K8s_VERSION=1.31.7
OS_DISTRIBUTION=ubuntu
OS_VERSION=22 -
(Optional) If your build machine isn't in a restricted network environment, or your build process does not require access to a proxy server, skip this step.
You can use
HTTP_PROXYandHTTPS_PROXYto specify the URLs of the proxy servers to be used for your build. -
Refer to Edge Artifact Build Configurations for a comprehensive list of arguments you can use to customize the build.
Prepare User Data
-
Decide whether you want to deploy an Edge host that is managed locally or centrally by Palette. The default configuration is a centrally management Edge host. If you want to deploy an Edge host that is not connected to a Palette instance, you need to change the management mode to
local. Add themanagementModeparameter to under thestylusparameter.#cloud-config
stylus:
managementMode: localEdge hosts installed in local management mode require you to provide assets needed to provision clusters. For more information about the deployment lifecycle of locally managed Edge hosts, refer to Edge Deployment Lifecycle.
-
If you want to deploy a locally managed Edge host, skip this step.
If you want to deploy the Edge host in central management mode, you need to provide the Palette endpoint, in addition to either a registration token or QR code registration configuration. For more information about Edge host registration, refer to Edge Host Registration. For example, the following configuration provides the default Palette endpoint, a registration token, an a project name.
#cloud-config
stylus:
  site:
    # The Palette API endpoint to use. The default value is api.spectrocloud.com.
    paletteEndpoint: api.spectrocloud.com

    # The edgeHostToken is an auto-registration token to register the Edge host with Palette upon bootup.
    # This token can be generated by navigating to the Tenant Settings -> Registration Token.
    # Specify a name and select the project id with which the Edge host should register itself.
    edgeHostToken: aUAxxxxxxxxx0ChYCrO

    # The Palette project ID the Edge host should pair with. This is an optional field if an edgeHostToken is used and the token was assigned to a project.
    projectUid: 12345677788
Configure Cloud Init Stages (Optional)
-
Cloud-init stages allow you to configure your Edge host declaratively. For more information about cloud-init stages, refer to Cloud-init Stages.
To configure clout-init stages for your Edge host, use the
stagesblock. For example, the following configuration installs Amazon Systems Manager agent on your Edge host during theafter-install-chrootstage.#cloud-config
stages:
after-install-chroot:
- name: "Install SSM"
commands:
- snap install amazon-ssm-agent --classictipYou can also use the Operating System (OS) pack to apply additional customization using cloud-init stages. Both the Edge Installer configuration file and the OS pack support the usage of cloud-init stages. Refer to the Cloud-Init Stages to learn more.
Configure GPU Specifications (Optional)
-
Palette automatically displays Graphics Processing Unit (GPU) specifications for Edge hosts with certain GPU vendor-model combinations in Edge Host Grid View and on the Edge host Overview tab. For other GPU models and vendors, Palette attempts to automatically source GPU information using the vendor-specific driver or command-line interface (CLI) installed on the Edge host. Multi-Instance GPU (MIG) data can only be retrieved for Nvidia devices with the
nvidia-smiCLI installed.If Palette cannot automatically retrieve the GPU specs, you can provide them manually via the
user-datafile (Appliance and Agent mode) or with acustom-hardware-specs-lookup.jsonfile (Appliance mode only). These files can also be used to override information that is sourced automatically, as long as thevendorIDanddeviceIDmatch the actual GPU specs. If thevendorIDordeviceIDdo not match, the user-provided information is ignored.The following table describes the required fields.
Parameter Description Example marketingNameDisplay name for the hardware. "NVIDIA Quadro RTX 6000"vRAMVideo RAM in GB (decimal). 24migCapableSupport for Multi-Instance GPUs (for NVIDIA GPUs). falsevendorVendor name. Must include AMD,Intel, orNVIDIA; otherwise, no GPU data is displayed. Case insensitive."NVIDIA"vendorIDPeripheral Component Interconnect (PCI) vendor ID in hexadecimal format. Case insensitive. Do not include 0xprefixes."10de"deviceIDArray of PCI device IDs in hexadecimal format. Allows multiple IDs for the same model. Case insensitive. Do not include 0xprefixes.["1e36", "1e78"]architectureGPU architecture name. "Turing"The following example is a
user-datafile for GPU specs. GPU information is passed in during theboot.afterstage. After the system boots, the file is available at/etc/spectrocloud/custom-hardware-specs-lookup.json.Example configuration#cloud-config
stages:
boot.after:
- files:
- path: "/etc/spectrocloud/custom-hardware-specs-lookup.json"
permissions: 0644
owner: 0
group: 0
content: |
[
{
"marketingName": "NVIDIA Quadro RTX 6000",
"vRAM": 24,
"migCapable": false,
"vendor": "NVIDIA",
"vendorID": "10de",
"deviceID": [
"1e36",
"1e78"
],
"architecture": "Turing"
}
]
name: "Configure custom hardware specs lookup"Use the
lspcicommand to retrieve a list of devices connected to the PCI bus and locate your GPU.lspci -nnThe GPU
vendorIDanddeviceIDare displayed in the format[vendorID:deviceID]. In the following example,10deis thevendorIDand2237is thedeviceID.Example output00:00.0 Host bridge [0600]: Intel Corporation 440FX - 82441FX PMC [Natoma] [8086:1237]
00:01.0 ISA bridge [0601]: Intel Corporation 82371SB PIIX3 ISA [Natoma/Triton II] [8086:7000]
00:01.3 Non-VGA unclassified device [0000]: Intel Corporation 82371AB/EB/MB PIIX4 ACPI [8086:7113] (rev 08)
00:03.0 VGA compatible controller [0300]: Amazon.com, Inc. Device [1d0f:1111]
00:04.0 Non-Volatile memory controller [0108]: Amazon.com, Inc. NVMe EBS Controller [1d0f:8061]
00:05.0 Ethernet controller [0200]: Amazon.com, Inc. Elastic Network Adapter (ENA) [1d0f:ec20]
00:1e.0 3D controller [0302]: NVIDIA Corporation GA102GL [A10G] [10de:2237] (rev a1)
00:1f.0 Non-Volatile memory controller [0108]: Amazon.com, Inc. NVMe SSD Controller [1d0f:cd01]tipIn Appliance mode, GPU information can be passed in as a separate JSON file instead of being included in
user-data. In theCanvOSdirectory, create the fileoverlay/files/etc/spectrocloud/custom-hardware-specs-lookup.jsonand provide the necessary information.Example JSON configuration[
{
"marketingName": "NVIDIA Quadro RTX 6000",
"vRAM": 24,
"migCapable": false,
"vendor": "NVIDIA",
"vendorID": "10de",
"deviceID": ["1e36", "1e78"],
"architecture": "Turing"
}
]Configure Users
-
If you would like to have SSH access to your Edge host, you must configure Operating System (OS) users on your Edge host. You can do this using the
stages.initramfs.usersblock. ReplaceUSERNAMEwith the name of your user and replace the value of the password with your password. You can also add the user to user groups, or add SSH keys to the list of authorized keys for that user.#cloud-config
stages:
initramfs:
- users:
USERNAME:
passwd: ******
groups:
- sudo
ssh_authorized_keys:
- ssh-rsa AAAAB3N…
name: Create user and assign SSH keyConfigure Proxy Settings (Optional)
-
Optionally, you can configure HTTP/HTTPS proxy settings for your Edge host. This instructs the Edge host OS as well as the Palette agent to use the proxy server for outbound communications. Use the parameters from the table below to configure proxy settings for your Edge host.
These settings are different from the proxy settings you provide to the
.argfile. The settings in the.argfile apply to the builder machine during the build process, while the settings inuser-dataapply to the Edge host after installation.Parameter Description siteNetwork.httpProxyThe URL of the HTTP proxy endpoint. siteNetwork.httpsProxyThe URL of the HTTPS proxy endpoint. siteNetwork.noProxyThe list of IP addresses or CIDR ranges to exclude routing through the network proxy. warningThe proxy settings in user data configure Palette services to use the proxy network. However, these settings do not automatically apply to application workloads. To configure applications to use the proxy configurations, refer to Configure Applications to Use Proxy Server.
Configure Post-Installation Behavior (Optional)
-
You can use some parameters of the
installblock to configure what you'd like the Edge host to do after installation is complete. The default behavior for the Edge host is to stay on the "Installation Complete" screen, but you can configure it to power off or restart automatically. For example, the following configuration instructs the Edge host to power off automatically post-installation.#cloud-config
install:
poweroff: truewarningIf your want your Edge host to restart automatically, ensure that you remove the installation disk after the installation is complete and before the restart happens. Otherwise, the Edge host might start the installation process again.
Create .arg File
-
Visit the Appliance Studio in your browser.
-
Click Design. Then under Argument files, click New .arg file. If you have previously created and saved a preset, you can choose Continue with presets. Otherwise, click Start from scratch.
- If you have previously created and saved a preset, you can choose Continue with presets. You can use multiple presets as a starting point to build a new configuration by dragging the presets to the middle column. If any of the parameters between the parameters conflict with each other, the presets higher in the list take precedence.
- If you do not have presets or want to create a new file from scratch, click Start from scratch.
-
Fill out each field in the form to customize your
.argfile. Fields marked with*are mandatory. As you fill out each field, you can preview the.argfile in the code pane on the right. You can also make edits in the code pane directly, which will automatically update the form.Refer to Edge Artifact Build Configurations for a description of each argument and their default values.
-
When you are done, click Confirm & Save. Give your new configuration a name and optional tags that will help you identify it.
-
After you save the file, it will appear under Argument files. Hover over the file to reveal the three-dot menu. Click on it and choose Download to download the file.
Create user-data File
-
Visit the Appliance Studio in your browser.
-
Click Design. Then under User data configuration, click New user-data configuration.
- If you have previously created and saved a preset, you can choose Continue with presets. You can use multiple presets as a starting point to build a new configuration by dragging the presets to the middle column. If any of the parameters between the parameters conflict with each other, the presets higher in the list take precedence.
- If you do not have presets or want to create a new file from scratch, click Start from scratch.
-
Fill out each field in the form to customize your
user-datafile. Fields marked with*are mandatory. As you fill out each field, you can preview theuser-datafile in the code pane on the right. You can also make edits in the code pane directly, which will automatically update the form.Refer to Installer Configuration Reference for a description of each parameter and their default values.
-
When you are done, click Confirm & Save. Give your new configuration a name and optional tags that will help you identify it.
Once you save a
user-datafile, you can make edits to it at any time. To make edits, click on the file entry and the form will appear for you to make edits. -
After you save the file, it will appear under User data files. Hover over the file to reveal the three-dot menu. Click on it and choose Download to download the file.
(Optional) Create Presets for .arg and user-data Files
You can create presets to use as reusable building blocks for future instances of your configuration files.
-
Visit the Appliance Studio in your browser.
-
Under either Argument files or User data configuration, click on the Presets tab.
-
Fill out the required fields in the form to customize your configuration. Since you are creating a preset, there are no mandatory fields.
-
When you are done, click Confirm & Save. Give your new preset a name and optional tags that will help you identify it.
The next time you create a new instance of either the
user-datafile or.argfile, you will be able to use your presets as building blocks to form a complete configuration.
Validate
You can use the +validate-user-data build target of EdgeForge to validate that your user data follows the expected
schema. You need to perform this action on an AMD64 (also known as x86_64) machine.
From the CanvOS directory, issue the following command to validate your user data.
sudo ./earthly.sh +validate-user-data
+validate-user-data | time=*2024-07-25T20:19:172* level=info msg="Validation successful"
Full .arg Samples
The following are full examples of .arg files for various use cases. Use these examples as a starting point to help
you create .arg files that fit your needs.
Trusted Boot
Trusted Boot is a security feature that ensures the authenticity of the boot processes that are allowed to operate on your Edge device. To enable the feature, you must provide related arguments during the EdgeForge build process.
IMAGE_REGISTRY=ttl.sh
OS_DISTRIBUTION=Ubuntu
OS_VERSION=22
IMAGE_REPO=ubuntu-secure
CUSTOM_TAG=trusted-boot
K8S_DISTRIBUTION=rke2
ARCH=amd64
UPDATE_KERNEL=false
IS_UKI=true
The .arg file specifies IS_UKI to be true which tells the EdgeForge to build a Unified Kernel Image (UKI) required
for Trusted Boot. In addition, it also specifies the OS version and distribution, as well as the Kubernetes version.
Two-Node Mode
Palette Edge allows you to provision highly available clusters with
two control plane nodes. Since the implementation replaces etcd with Postgres, this
alters the Kubernetes layer and requires a different provider image to be built than for regular etcd-backed clusters.
Therefore, you must specify TWO_NODE=true during the EdgeForge process in your .arg file.
IMAGE_REGISTRY=ttl.sh
OS_DISTRIBUTION=Ubuntu
OS_VERSION=22
IMAGE_REPO=ubuntu
CUSTOM_TAG=two-node
K8S_DISTRIBUTION=k3s
ARCH=amd64
HTTPS_PROXY=10.10.155.162
HTTP_PROXY=
PROXY_CERT_PATH=/etc/certs/proxy-cert
UPDATE_KERNEL=false
In addition, this .arg file specifies an HTTPS proxy server, which means that the build process will communicate with
the proxy server to gain access to the internet. This does not affect the finished artifacts that are built.
Full User Data Samples
The following are full examples of user data files for various use cases. Use these examples as a starting point to help you create user data configurations that fit your needs.
Centrally Managed Sites - Multiple User Data Configuration
In this example, two configuration user data files are used. The first one is used in the staging phase and is included with the Edge Installer image. Note how the first user data contains the registration information and creates a user group. A bootable USB stick applies the second user data at the physical site. The secondary user data includes network configurations specific to the edge location.
Staging - included with the Edge Installer.
#cloud-config
stylus:
  site:
    paletteEndpoint: api.spectrocloud.com
    edgeHostToken: <yourRegistrationToken>
    tags:
      city: chicago
      building: building-1

install:
  poweroff: true

stages:
  initramfs:
    - users:
        kairos:
          groups:
            - sudo
          passwd: kairos
      name: Create user and assign to sudo group
Site - supplied at the edge location through a bootable USB drive. If specified, the projectName value overrides
project information specified in the edgeHostToken parameter. You can add optional tags to identify the city,
building, and zip-code. If the edge site requires a proxy for an outbound connection, provide it in the network section
of the site user data.
#cloud-config
stylus:
  site:
    projectName: edge-sites
    tags:
      zip-code: 95135
Centrally Managed Sites - Single User Data
This example configuration is for a centrally managed site. In this scenario, only a single Edge Installer configuration user data is used for the entire deployment process.
#cloud-config
stylus:
  site:
    paletteEndpoint: api.spectrocloud.com
    edgeHostToken: <yourRegistrationToken>
    projectName: edge-sites
    tags:
      city: chicago
      building: building-1
      zip-code: 95135

install:
  poweroff: true

stages:
  initramfs:
    - users:
        kairos:
          groups:
            - sudo
          passwd: kairos
      name: Create user and assign to sudo group
Apply Proxy & Certificate Settings
This example showcases how you can include network settings in a user data configuration.
#cloud-config
stylus:
  site:
    paletteEndpoint: api.spectrocloud.com
    edgeHostToken: <yourRegistrationToken>
    projectName: edge-sites
    tags:
      city: chicago
      building: building-1
      zip-code: 95135
    network:
      httpProxy: http://proxy.example.com
      httpsProxy: https://proxy.example.com
      noProxy: 10.10.128.10,10.0.0.0/8
      nameserver: 1.1.1.1
      # configure interface specific info. If omitted all interfaces will default to dhcp
      interfaces:
        enp0s3:
          # type of network dhcp or static
          type: static
          # Ip address including the mask bits
          ipAddress: 10.0.10.25/24
          # Gateway for the static ip.
          gateway: 10.0.10.1
          # interface specific nameserver
          nameserver: 10.10.128.8
        enp0s4:
          type: dhcp
    caCerts:
      - |
        ------BEGIN CERTIFICATE------
        *****************************
        *****************************
        ------END CERTIFICATE------
      - |
        ------BEGIN CERTIFICATE------
        *****************************
        *****************************
        ------END CERTIFICATE------

install:
  poweroff: true

stages:
  initramfs:
    - users:
        kairos:
          groups:
            - sudo
          passwd: kairos
      name: Create user and assign to sudo group
Load Content From External Registry
In this example, content is downloaded from an external registry.
#cloud-config
stylus:
  registryCredentials:
    domain: 10.10.254.254:8000/spectro-images
    username: ubuntu
    password: <yourPassword>
    insecure: true
  site:
    debug: true
    insecureSkipVerify: false
    paletteEndpoint: api.console.spectrocloud.com
    name: edge-appliance-1
    caCerts:
      - |
        -----BEGIN CERTIFICATE-----

        -----END CERTIFICATE-----

install:
  poweroff: false

stages:
  initramfs:
    - users:
        kairos:
          groups:
            - sudo
          passwd: kairos
      name: Create user and assign to sudo group
Create Bind Mounts
Palette Edge allows you to create bind mounts from your Edge host to your cluster through the installer configuration file named user-data, which allows your cluster to use directories or files from your Edge host directly within your Kubernetes cluster. This setup is useful for scenarios where your applications are active in the cluster and need direct access to files or directories on the Edge host.
Several packs require you set up bind mounts in order to function. For example, the Portworx pack requires several folders to be mounted on Edge deployments. You can use the install.bind_mounts parameter to specify folders to be mounted. For
example, the following user data mounts three folders required by Portworx from the Edge host to the cluster.
#cloud-config
stylus:
  site:
    debug: true
    insecureSkipVerify: false
    paletteEndpoint: api.console.spectrocloud.com
    name: edge-appliance-1
    caCerts:
      - |
        -----BEGIN CERTIFICATE-----

        -----END CERTIFICATE-----

install:
  bind_mounts:
    - /etc/pwx
    - /var/lib/osd
    - /var/cores
Multiple User Data Use Case
If you don't need to apply any unique configurations on the device once it arrives at the physical site, then your site deployment flow would look like the following.
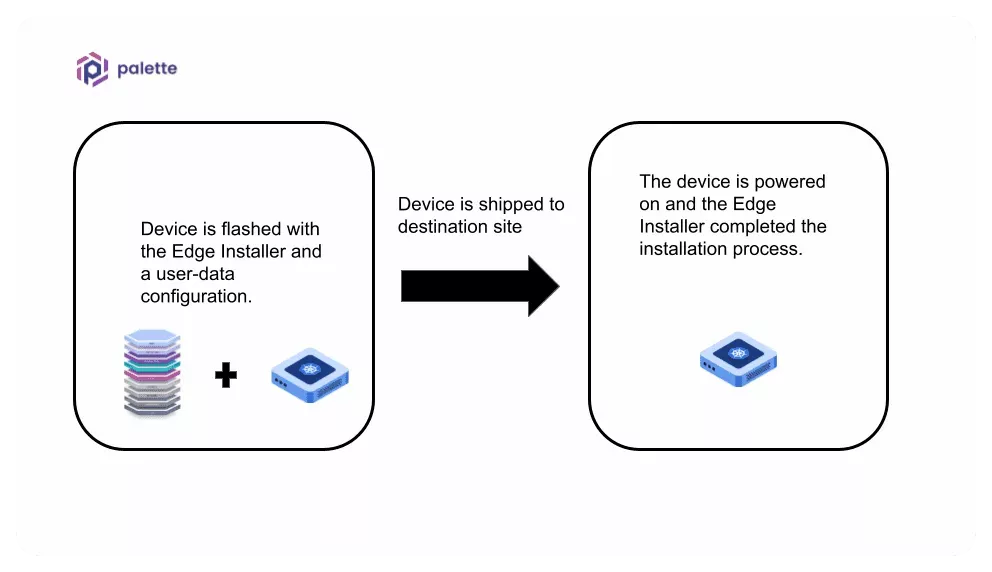
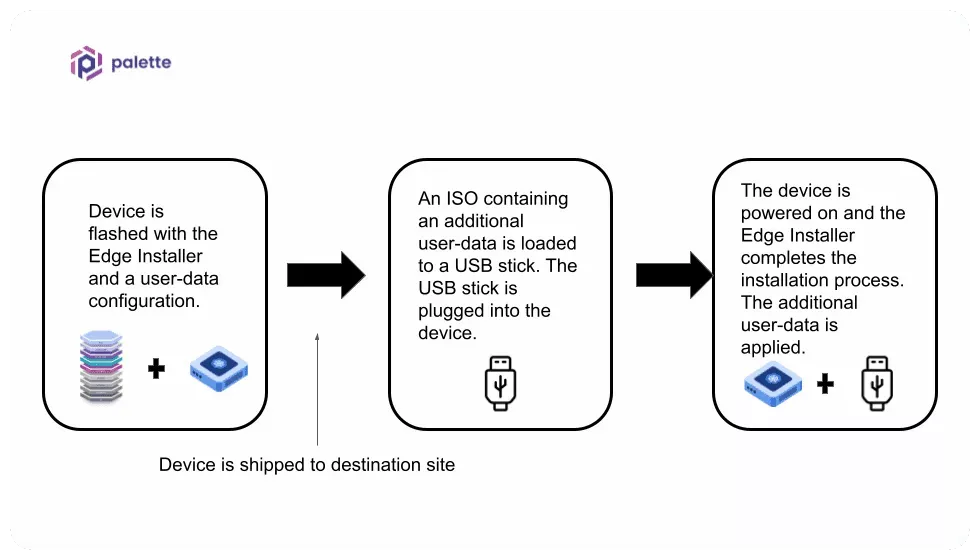
Should you need to apply different configurations once the device arrives at the physical site, you can use a secondary user data to support this use case.
Use the additional user data to override configurations from the previous user data that was flashed into the device or to inject new configuration settings. Using secondary user data at the physical site is a common pattern for organizations that need to change settings after powering on the Edge host at the physical location.
To use additional user data, create a bootable device, such as a USB stick, that contains the user data in the form of an ISO image. The Edge Installer will consume the additional user data during the installation process.
When creating your Edge Installer, you can embed the user data into the installer image to eliminate providing it via a USB drive.
In the staging phase, you may identify user data parameter values that apply uniformly to all your edge sites. But you may also have some edge locations that require different configurations such as site network proxy, site certs, users and groups, etc. Site-specific configurations are typically not included in the Edge installer image. For the latter scenario, you can use a secondary user data configuration. Refer to the Apply Site User Data guide to learn more about applying secondary site-specific user data.
For your initial testing, your user data may include global settings and site-specific properties in a single user data. As you gain more experience, you should evaluate whether secondary site-specific user data is a better design for your use case.
Next Steps
After you have finalized your Installer configuration, you can build the configuration into the Edge Installer ISO, or turn the user-data file into an ISO file to use before site deployment.
-
Check out the Build Edge Installer ISO guide to learn how to build the Edge Installer ISO image.
-
Check out the Apply Site User Data guide to learn how to provide site user data.