Creating clusters on Palette
Kubernetes clusters in Palette are instantiated from cluster profiles. A cluster definition in Palette consists of a reference to a cluster profile, cloud configuration, as well as the cluster size and placement configuration. The following high-level tasks are performed as part of the cluster creation:
-
Orchestration of computing, network, and storage resources on the cloud environments along with the required placement infrastructure.
-
Installation and configuration of various Kubernetes components like Kubelet, API servers, etcd, or scheduler.
-
Installation and configuration of the cloud-specific network (CNI) and storage (CSI) plugins.
-
Securing the cluster infrastructure and configuration according to the relevant OS, Kubernetes, and cloud security best practices.
-
Deployment of additional Add-ons such as Prometheus, Permissions Manager, or Vault, as specified in the Cluster Profile.
Images
Palette provides Virtual Machine (VM) images for cluster-computing infrastructure out of the box for the most recent versions of Operating Systems such as Ubuntu or CentOS. These images are security-hardened based on the respective CIS Benchmarks. In addition, Kubernetes components such as kubelet, kubeadm, etc. are preinstalled in these images. The specific image for a cluster is derived from the Operating System and Kubernetes packs configured in the cluster profile.
The out-of-the-box images are hosted in the public cloud (AWS - AMI, Azure - VHD) or Palette's storage repository (vSphere - OVA). During provisioning, the image is copied (if missing) to the desired cloud region or downloaded onto a private data center.
Customization
Palette provides various forms of customization options for VM images. All these customization options require a private pack registry to be set up with customized OS packs.
Customize Out-of-the Box Images
The Palette out-of-the-box images are security-hardened and have Kubernetes components preinstalled. Additional components can be installed on the images at runtime by defining one or more Ansible roles in the customized OS pack. Palette's orchestration engine creates a new image by instantiating a VM instance from the out-of-the-box image and executing the specified Ansible roles on the instance. This custom image is used for cluster provisioning. The customized image is tagged with a unique signature generated from the pack definition so that it can be reused for future cluster provisioning requests.
Security
Palette secures the Kubernetes clusters provisioned by following security best practices at the Operating System, Kubernetes, and Cloud Infrastructure levels.
Operating System
The Palette out-of-the-box VM images are hardened in accordance with the relevant OS CIS benchmark. Additionally, the images are scanned for vulnerabilities regularly, and fixes are applied to these images when available from the provider. The upgraded images are released in the form of updated OS packs in the Palette Pack Registry and are available to the users to apply to their existing clusters at a time convenient to them.
Kubernetes
Kubernetes components and configuration are hardened in accordance with the Kubernetes CIS Benchmark. Palette executes Kubebench, a CIS Benchmark scanner by Aqua Security, for every Kubernetes pack to ensure the control plane and worker nodes are configured securely.
Cloud Infrastructure
Palette follows security best practices recommended by the various cloud providers when provisioning and configuring the computing, network, and storage infrastructure for the Kubernetes clusters. These include practices such as isolating control plane and worker nodes in dedicated network domains and limiting access through the use constructs like security groups.
The security measures mentioned above are implemented for Palette's out-of-the-box OS and Kubernetes packs. For customized OS Kubernetes packs, users are responsible for taking the relevant measures to secure their clusters.
Day-2 Management
Palette provides several options to manage Kubernetes clusters on an ongoing basis. These include opportunities to scale up/down the cluster by adding/reducing the number of nodes in a node pool, add extra worker pools, resizing nodes in a node pool by modifying the instance type, and adding additional fault domains such as availability zones to a node pool.
Cluster management operations result updating cluster definitions in Palette's database. The updated definition is retrieved by the management agent running in the cluster. A rolling upgrade is then performed to bring associated clusters to their desired state.
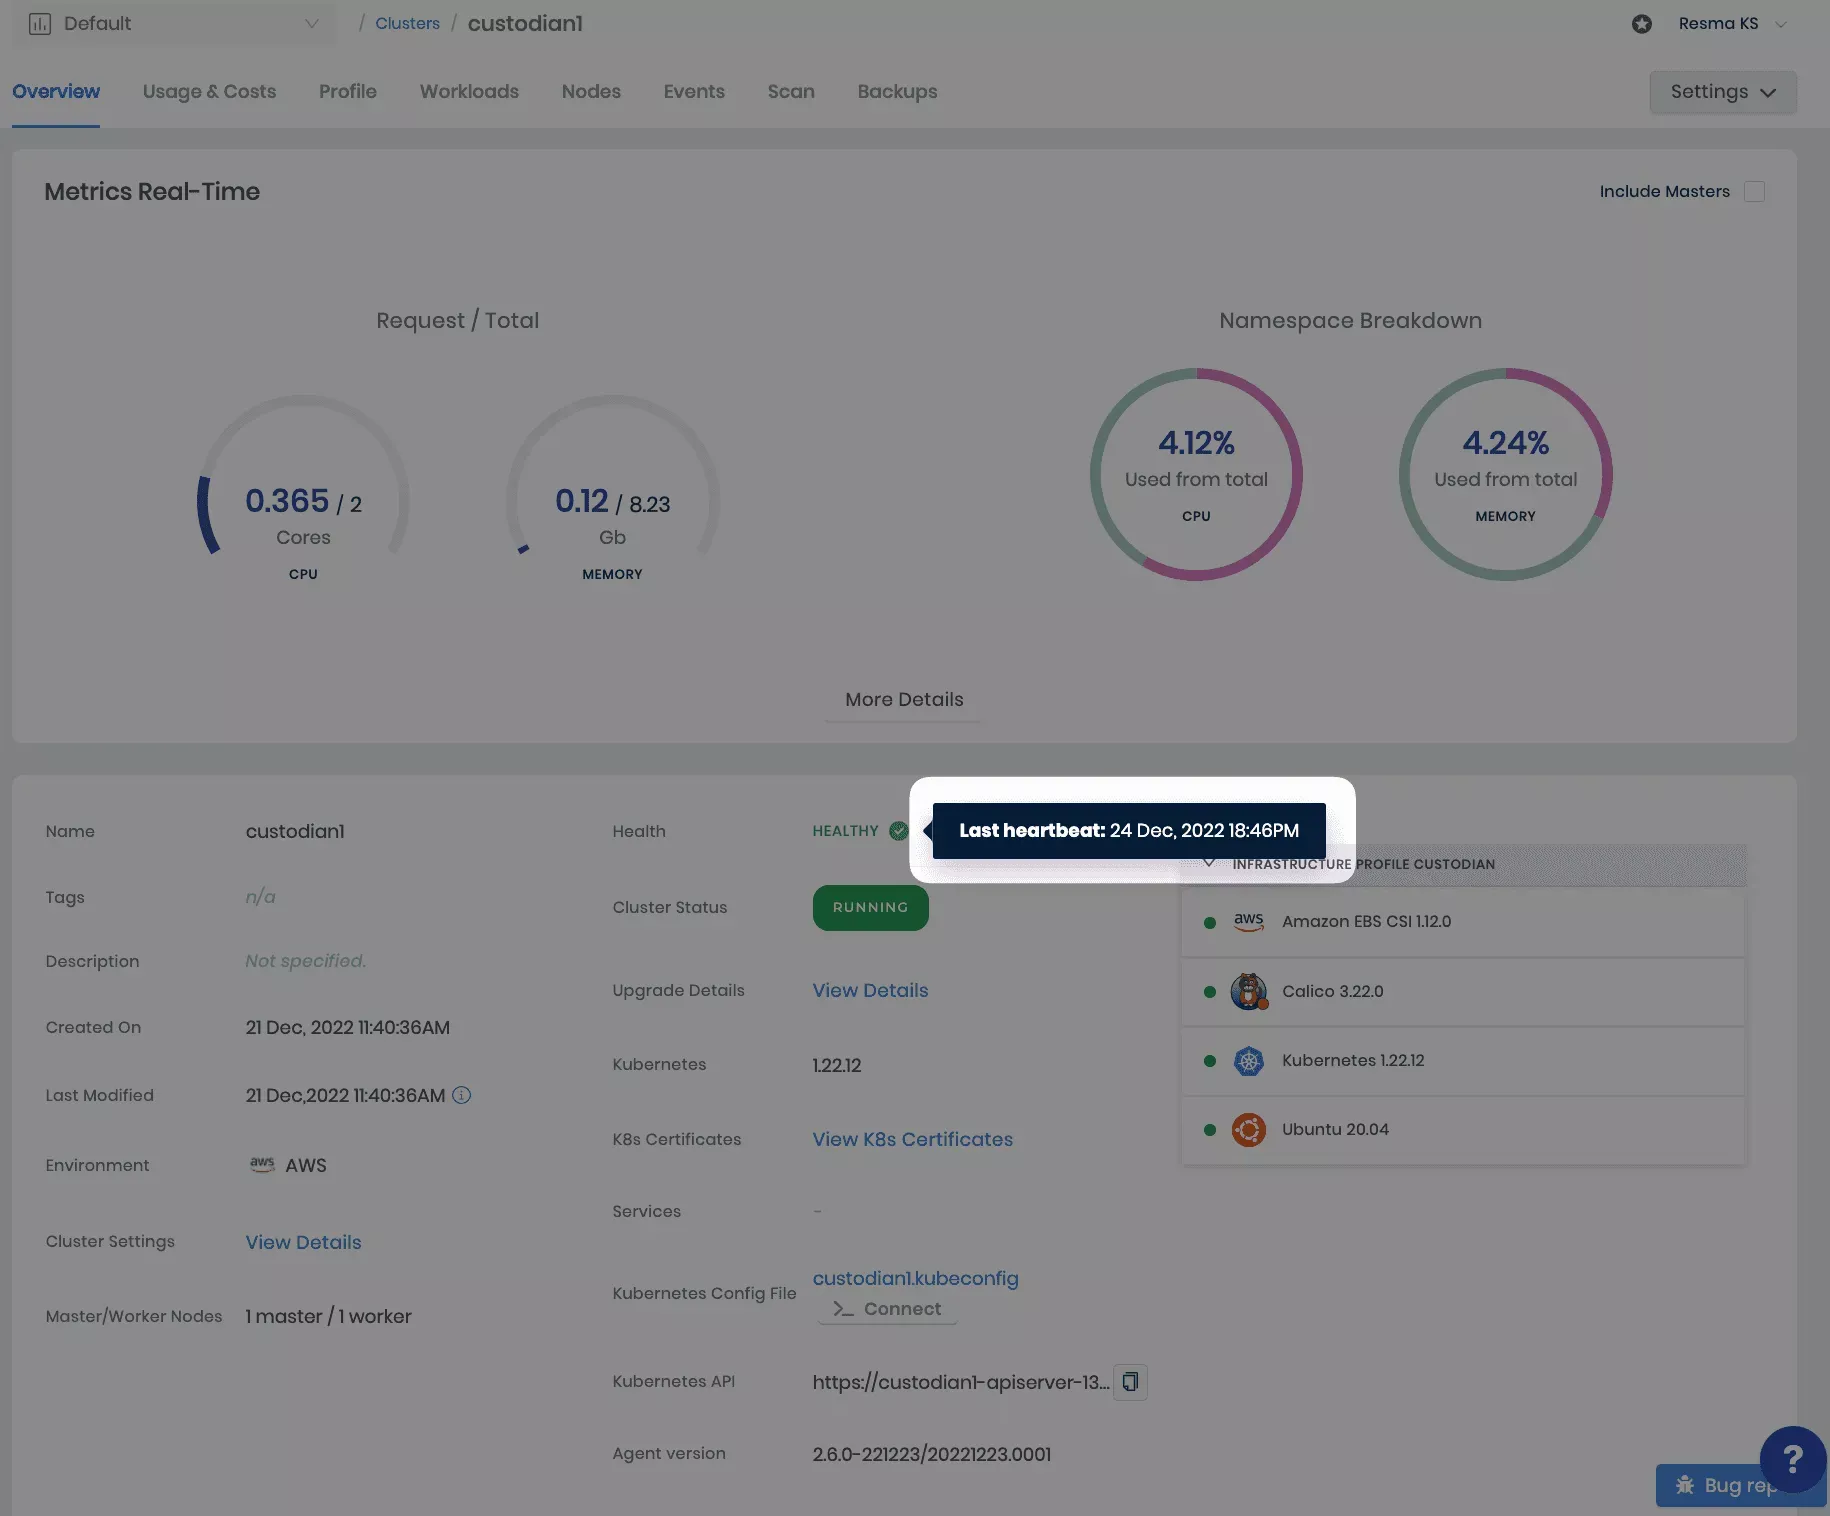
Cluster Health
Palette monitors the cluster infrastructure regularly and reports health on the management console.
Overall health is computed based on the following factors:
-
Heartbeat - The Palette management agent, which runs inside the cluster, periodically sends a heartbeat to the management console. Missing heartbeats typically indicate of a problem such as a cluster infrastructure going down or lack of network connectivity. Failure to detect heartbeats over a 10 minute period results in an unhealthy status for the cluster.
Palette provides health check information for your workload clusters. This information is a value add to the cluster monitoring activities. In case a cluster goes to an unhealthy state, the last received healthy heartbeat can help you in troubleshooting.
-
Node Conditions - Kubernetes maintains the status for each cluster node in the form of conditions such as DiskPressure, MemoryPressure, or NetworkUnavailable. Palette monitors these conditions and reports back to the management console. Any node condition indicating a problem with the node, results in an unhealthy status for the cluster.
-
Metrics - Palette collects usage metrics such as CPU, Disk, or Memory. The cluster is marked as unhealthy if the usage metrics cross specific thresholds over some time.
Usage Monitoring
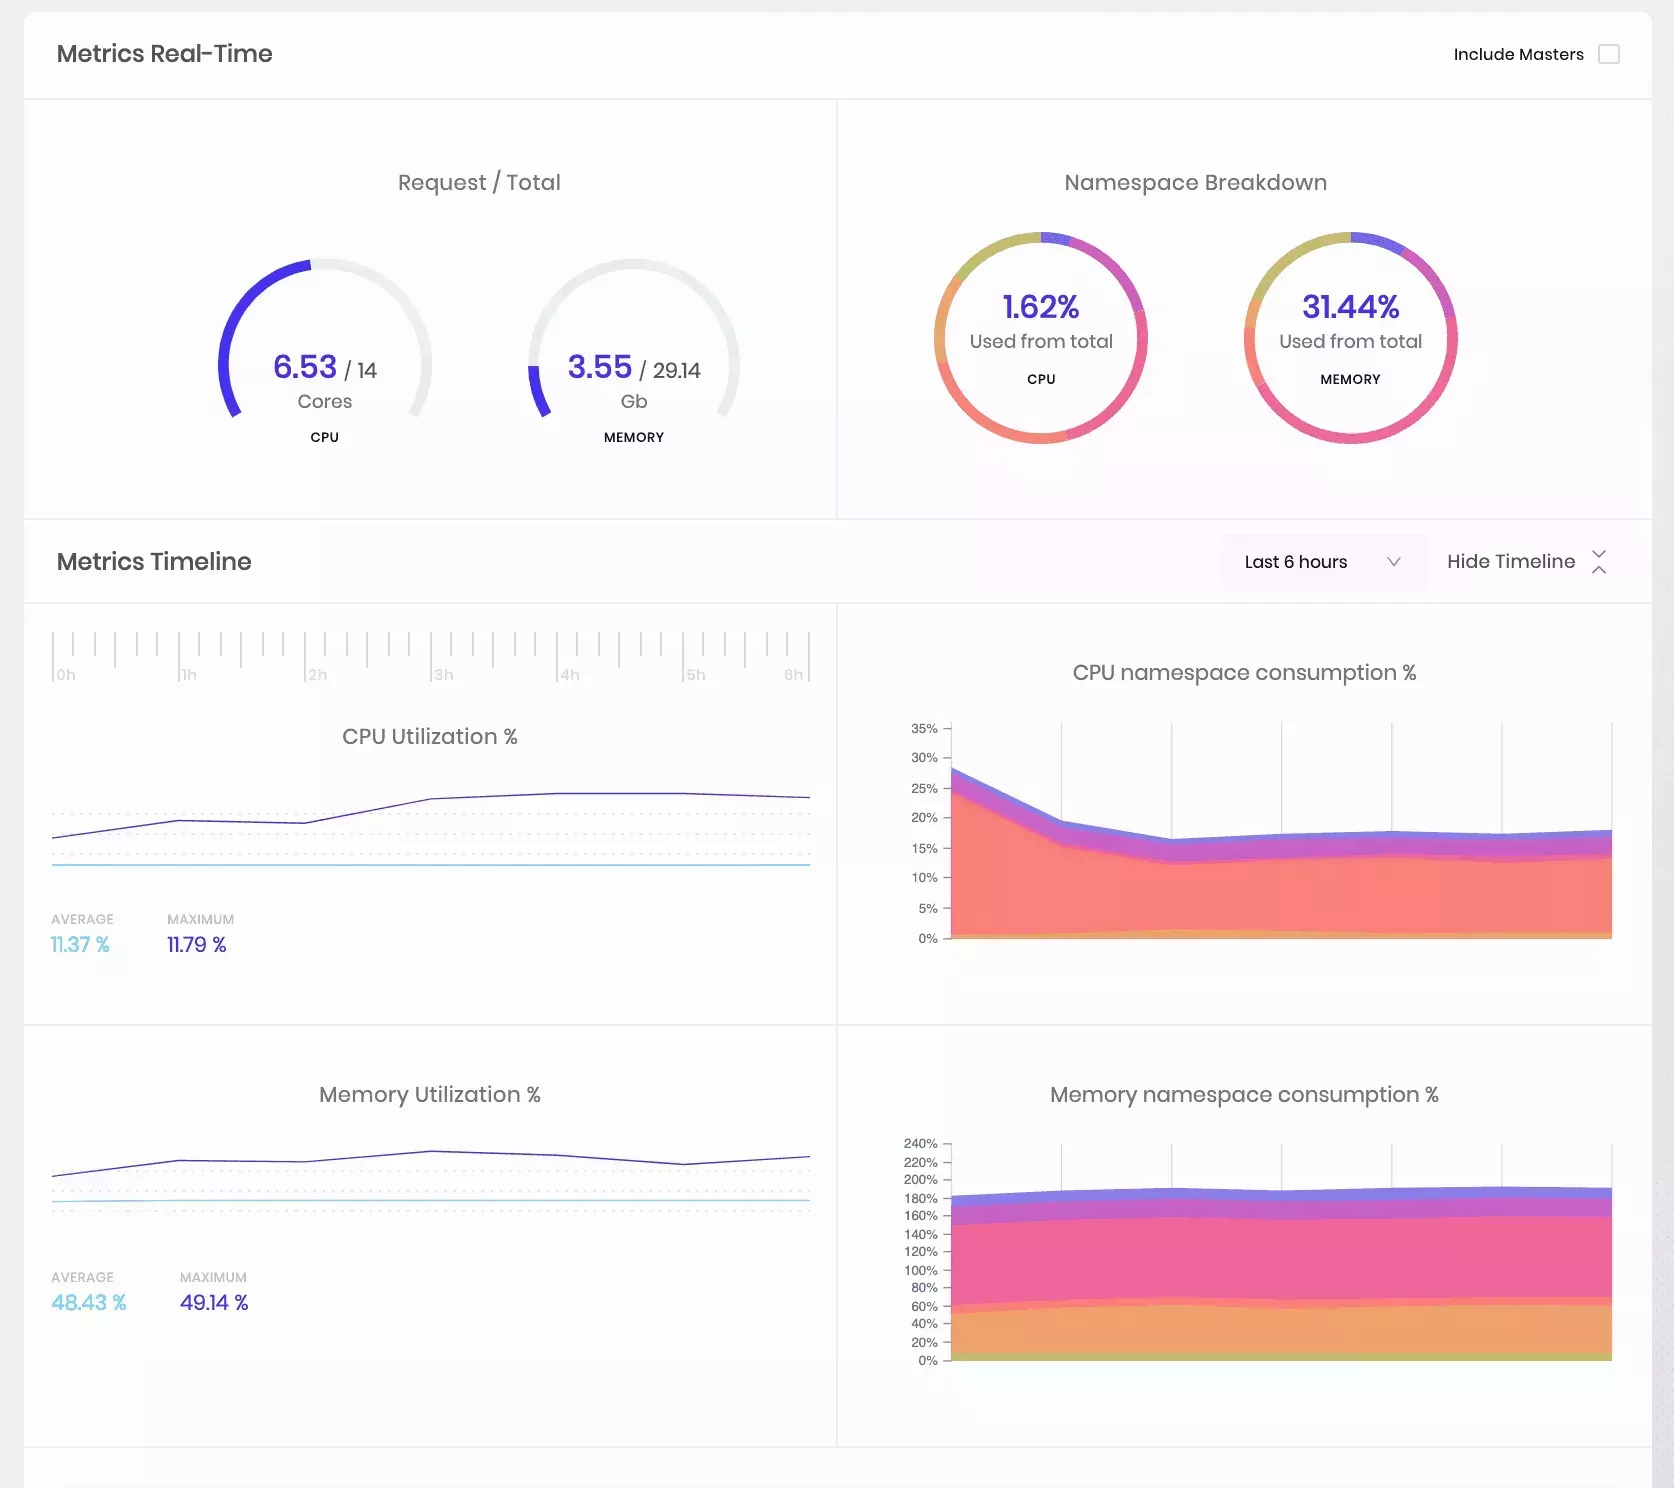
Palette continuously monitors cluster resources and reports the usage for the cluster as well as individual nodes. The following metrics are reported on the Cluster Overview page of the management console. By default, the metrics are only displayed for the worker nodes in the cluster:
-
Cores Used - A cluster-wide breakdown of the number of cores used.
-
CPU Usage - Current CPUs used across all cluster nodes. Additionally, usage over some time is presented as a chart.
-
Memory Usage - Current memory used across all cluster nodes. Additionally, usage over a while is presented as a chart.
-
CPU Requests - Total CPUs requested across all pods.
-
Memory Requests - Total memory requested across all pods.
Additionally, usage metrics for individual nodes and node conditions are accessible from the Node Details page.
Application Services
Palette enables quick access to the application services installed on the Kubernetes clusters by providing a link to those on the management console. These include the applications and services deployed through Palette and the ones deployed through any other means. Services are monitored on an ongoing basis, and all services of the type LoadBalancer or NodePort are displayed on the management console.

Troubleshooting
Typically, when a cluster lifecycle action such as provisioning, upgrade, or deletion runs into a failure, it does not result in an outright error on the cluster. Instead, the Palette orchestration engine follows the reconciliation pattern, wherein the system repeatedly tries to perform various orchestration tasks to bring the cluster to its desired state until it succeeds. Initial cluster provisioning or subsequent updates can run into various issues related to cloud infrastructure availability, lack of resources, or networking issues.
Cluster Conditions
Palette maintains specific milestones in a lifecycle and presents them as Conditions.
Examples include:
-
Creating Infrastructure
-
Adding Control Plane Node
-
Customizing Image
The active condition indicates what task Palette orchestration system is trying to perform. If a task fails, the condition is marked as failed, with relevant error messages. Reconciliation, however, continues behind the scenes, and continuous attempts are made to perform the task. Failed conditions are a great source of troubleshooting provisioning issues.

For example, failure to create a Virtual Machine in AWS due to the exceeded vCPU limit will cause this error to be shown to the end-users. Then, they can choose to bring down some workloads in the AWS cloud to free up space. The next time a VM creation task is attempted, it will succeed, and the condition will be marked as a success.
Rolling upgrade
Palette will perform a rolling upgrade on the nodes for any fundamental changes to the Cluster Configuration file. Below are some of the actions that will result in a rolling upgrade:
-
OS layer changes
-
Kubernetes layer changes
-
Kubernetes version upgrade
-
Kubernetes control plane upsize
-
Machine pool updates for disk size
-
Changes in availability zones
-
Changes in instance types
-
Certificate renewal and many more.
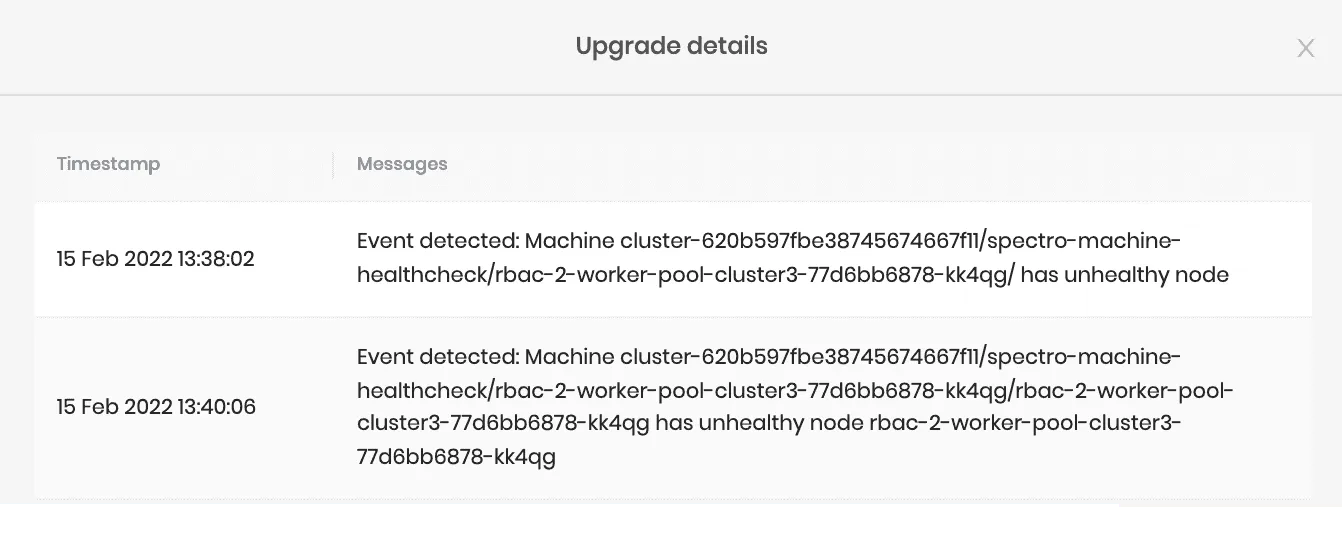
Palette keeps track of the reason that triggered the rolling upgrade on the nodes in the cluster and is made accessible under Cluster Overview > Upgrade details.
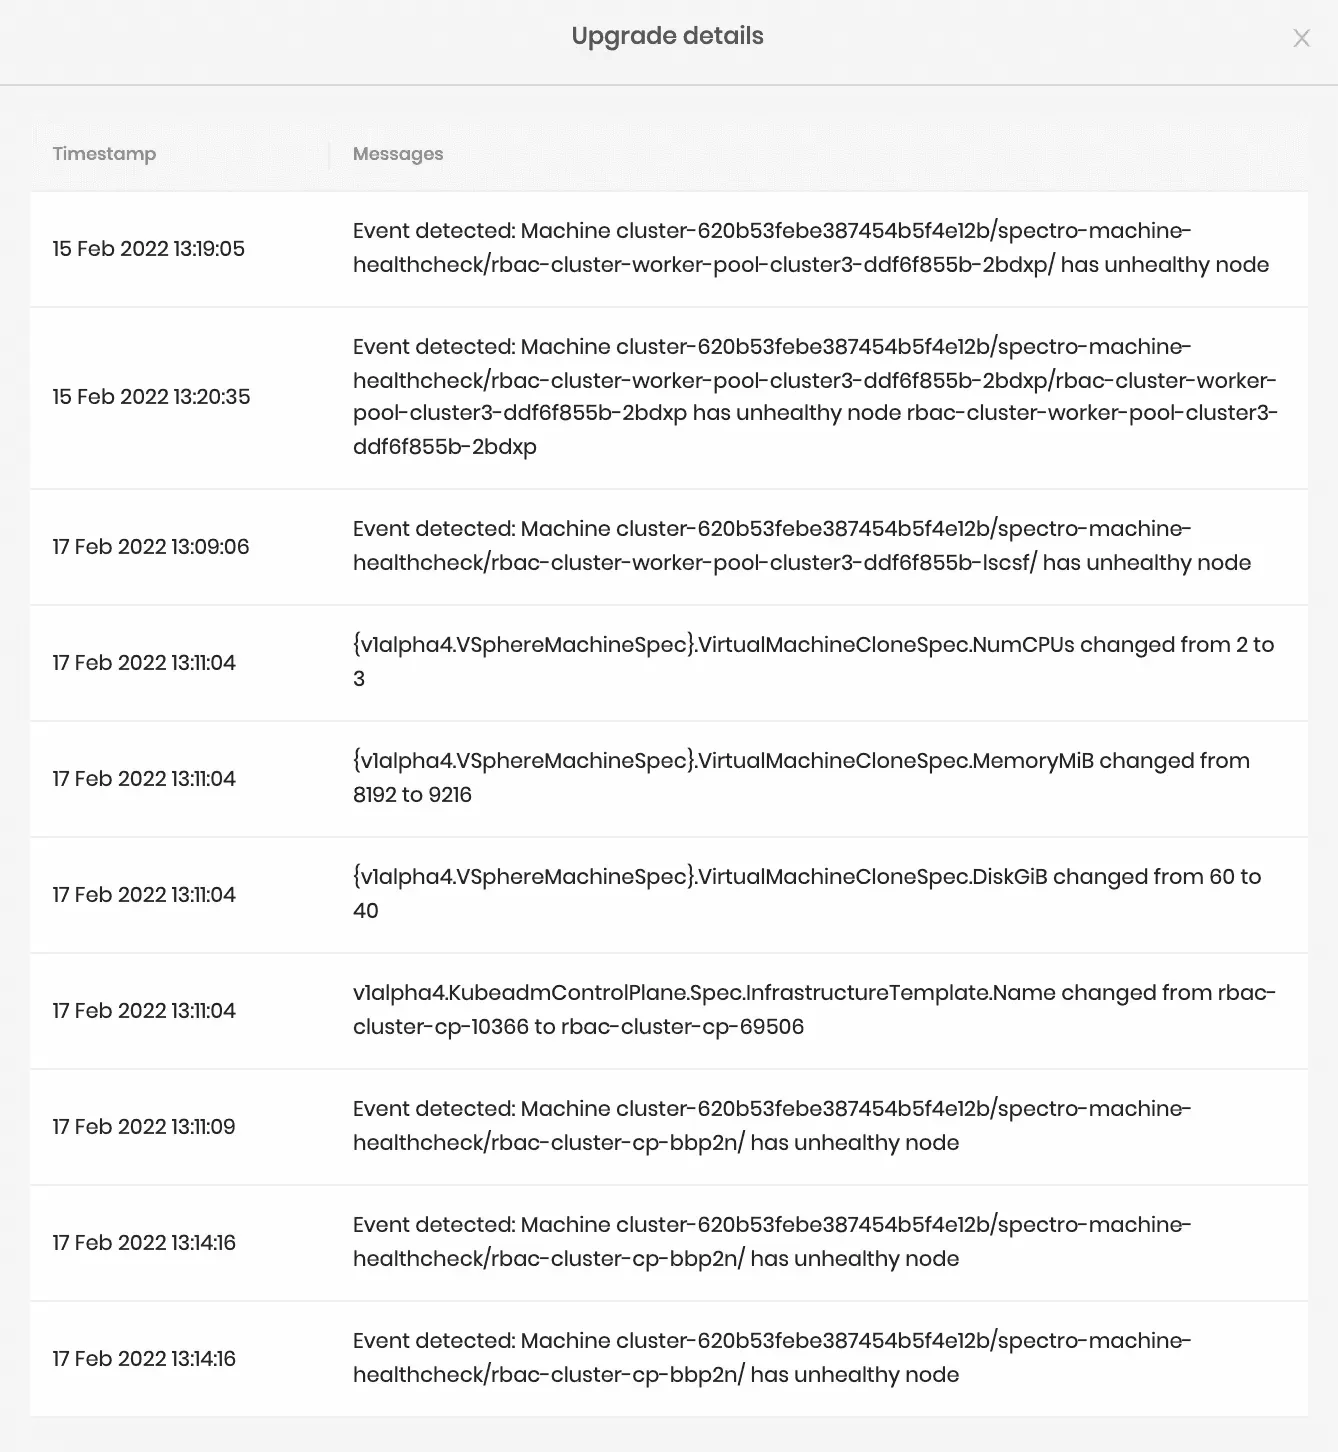
Besides actions taken by the user, Palette also performs a rolling upgrade if the cluster nodes' health degrades. Palette keeps track of the nodes machine's health and will relaunch the node when the machine health check fails.
The following are some sample scenarios where the node health is considered as degraded:
-
Kubelet not up for 10 mins.
-
Network unavailability for 10 mins.
-
New node doesn't get ready in 30 mins.
Event Stream
Palette maintains an event stream with low-level details of the various orchestration tasks being performed. This event stream is a good source for identifying issues in the event an operation does not complete for a long time.
-
Cluster events are retained for the last 1000 events.
-
Due to the Palette reconciliation logic, intermittent errors appear in the event stream.
As an example, errors might show up in the event stream regarding being unable to reach the node after launching a node. However, the errors clear up once the node comes up.
Error messages that persist over a long time or errors indicating issues with underlying infrastructure are an indication of a real problem.
Download Cluster Logs
At times, you may be required to work with the Palette Support Team to troubleshoot an issue. Palette provides the
ability to gather logs from the clusters it manages. Problems that occur during the orchestration lifecycle, may require
access to the various containers, nodes, and Kube system logs. Palette automates this log-collection process and
provides an easy download option from the Palette UI console. Hence, it reduces the burden on the operator to log in to
various cluster nodes individually and fetch these logs.
Collect the Logs
-
Select the running cluster.
-
Go to **Settings* and select **Download Logs**.
-
Choose the desired log from the below options:
- Kube-System Logs
- Logs of all the Kubernetes components.
- Logs
- Spectro namespace logs for the last one hour.
- Node Logs
- Contains the Spectro log, system log, and the cloud-init log information collected for the last ten thousand lines of code.
- Kube-System Logs
-
Click Download Logs.
This message will display on the UI: "The request was sent successfully. The download will be available soon." There is an average wait time of five (5) minutes.
At the end of this short log fetching interval, the message will be displayed on the UI: "The logs archive for {Cluster-name} was created successfully."
-
Click Download <cluster-name> logs to download the Logs folder to your local machine.
-
Unzip and rename the Logs folder as per the customer's choice.
-
In addition to the log contents briefed above, the folder will also contain a Manifest.yaml file describing the CRDs, Deployments, Pods, ConfigMap, Events, and Nodes details of the Cluster.
-
Palette recommends its users attach these logs, along with the support request, for accelerated troubleshooting.
-
Expect an average log fetching time of five (5) minutes for the ready-to-download message to appear on the UI, once the download log is clicked.
-
The downloaded Zip file will be by default named as spectro_logs.zip. The users can unzip and choose a name of convenience.
Proxy Whitelist
The following table lists the proxy requirements required by Palette. Depending on the network equipment and
configuration, you may have to specify all subdomains of the top-level domains listed in the table. For example, an
entry containing gcr.io and *.gcr.io may be required. Consult your network administrator for the exact requirements.
| Top-level Domain | Port | Description |
|---|---|---|
| docker.io | 443 | Third party container images. |
| docker.com | 443 | Third party container images. |
| gcr.io | 443 | Spectro Cloud and 3rd party container images. |
| ghcr.io | 443 | Third party container images. |
| github.com | 443 | Third party content. |
| googleapis.com | 443 | Spectro Cloud images. |
| grafana.com | 443 | Grafana container images and manifests. |
| k8s.gcr.io | 443 | Third party container images. |
| projectcalico.org | 443 | Calico container images. |
| registry.k8s.io | 443 | Third party container images. |
| raw.githubusercontent.com | 443 | Third party content. |
| spectrocloud.com | 443 | Spectro Cloud Palette SaaS. |
| s3.amazonaws.com | 443 | Spectro Cloud VMware OVA files. |
| quay.io | 443 | Third party container images. |
| ecr.us-east-1.amazonaws.com | 443 | OCI Pack images. |
| ecr.us-west-2.amazonaws.com | 443 | OCI Pack images. |
Scope
Clusters can be launched at the project scope or at the tenant scope. A project-level cluster belongs to a single project. A tenant-level cluster does not belong to any project and can only be accessed by users with tenant-level permissions.
Access to clusters in Palette is governed by Palette's role-based access control. To be able to take any action on a
cluster, you need the corresponding permission in the corresponding scope. For example, a user with the permission
cluster.create in the project foo and can create clusters in the project foo. Tenant-level permissions allow you
to take the corresponding action on clusters in all projects in the tenant, as well as tenant-level clusters.
Tenant-level permissions are required to take action on any tenant-level cluster. For more information about role-based
access control in Palette, refer to Palette RBAC.
You cannot create a tenant-level Edge cluster. This is because Edge hosts always belong to a project and cannot be added at the tenant scope.